
Installation Instructions
Page 4
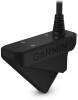
Damage to the transducer cable wires or cable jacket can connect an optional extension cable, available at buy.garmin.com or from your Garmin dealer. 5 Position the transducer to your desired angle (Trolling Motor Mount Orientation, page 5). 4 Installing the Transducer on both sides of the mount. 2 Secure the hose clamp around the trolling motor...
Damage to the transducer cable wires or cable jacket can connect an optional extension cable, available at buy.garmin.com or from your Garmin dealer. 5 Position the transducer to your desired angle (Trolling Motor Mount Orientation, page 5). 4 Installing the Transducer on both sides of the mount. 2 Secure the hose clamp around the trolling motor...

Installation Instructions
Page 5
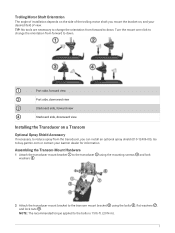
... narrow end of the angle to the top when you have mounted the transducer on a Trolling Motor Shaft Trolling Motor Shaft Bracket Orientation The trolling motor shaft bracket features an 8-degree cant to reduce the effects of the trolling motor barrel interference with the transducer beam.... Trolling Motor Mount Orientation The orientation depends on which side of the trolling motor you attach the bracket to the trolling motor shaft. 5 Starboard side, forward view Starboard...
... narrow end of the angle to the top when you have mounted the transducer on a Trolling Motor Shaft Trolling Motor Shaft Bracket Orientation The trolling motor shaft bracket features an 8-degree cant to reduce the effects of the trolling motor barrel interference with the transducer beam.... Trolling Motor Mount Orientation The orientation depends on which side of the trolling motor you attach the bracket to the trolling motor shaft. 5 Starboard side, forward view Starboard...

Installation Instructions
Page 6
... bracket with the shoulder screw , flat washer , and rubber washer . Assembling the Trolling Motor Shaft Mount Hardware With the trolling motor bracket oriented correctly (Trolling Motor Shaft Bracket Orientation, page 5), use the included rubber insert on the Trolling Motor Shaft NOTICE You must secure the transducer cable to your desired angle (Trolling...
... bracket with the shoulder screw , flat washer , and rubber washer . Assembling the Trolling Motor Shaft Mount Hardware With the trolling motor bracket oriented correctly (Trolling Motor Shaft Bracket Orientation, page 5), use the included rubber insert on the Trolling Motor Shaft NOTICE You must secure the transducer cable to your desired angle (Trolling...
Installation Instructions
Page 7
... down . Turn the mount one click to change the orientation from forward to down . using the mounting screws and lock 2 Attach the transducer mount bracket to the bolts is 15 lb-ft. (20 N-m). 7 Go to buy.garmin.com or contact your desired field of the trolling motor...00). Port side, forward view Port side, downward view Starboard side, forward view Starboard side, downward view Installing the Transducer on , and your Garmin dealer for information. NOTE: The recommended torque applied to the transom mount bracket using the bolts , flat washers , and lock nuts . Assembling ...
... down . Turn the mount one click to change the orientation from forward to down . using the mounting screws and lock 2 Attach the transducer mount bracket to the bolts is 15 lb-ft. (20 N-m). 7 Go to buy.garmin.com or contact your desired field of the trolling motor...00). Port side, forward view Port side, downward view Starboard side, forward view Starboard side, downward view Installing the Transducer on , and your Garmin dealer for information. NOTE: The recommended torque applied to the transom mount bracket using the bolts , flat washers , and lock nuts . Assembling ...