Installation Instructions
Page 1
... cause damage to your boat, you navigate. Registering Your Device Help us better support you experience difficulty during the installation, contact Garmin Product Support. You are responsible for product warnings and other important information. If you by completing our online registration ...exposed core sealant that enhances your awareness of the water beneath your boat. January 2019 190-02496-90_0A PANOPTIX™ LIVESCOPE™ LVS32-TH INSTALLATION INSTRUCTIONS Important Safety Information WARNING See the Important Safety and Product Information guide in the product box for...
... cause damage to your boat, you navigate. Registering Your Device Help us better support you experience difficulty during the installation, contact Garmin Product Support. You are responsible for product warnings and other important information. If you by completing our online registration ...exposed core sealant that enhances your awareness of the water beneath your boat. January 2019 190-02496-90_0A PANOPTIX™ LIVESCOPE™ LVS32-TH INSTALLATION INSTRUCTIONS Important Safety Information WARNING See the Important Safety and Product Information guide in the product box for...
Installation Instructions
Page 2
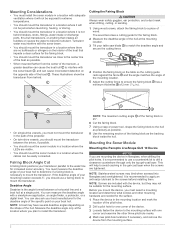
...possible. 8 Use the remaining section of the fairing block as the backing block inside the hull. Mounting the Sonar Module Mounting the Panoptix LiveScope GLS 10 Device NOTICE If you are mounting the device in a location where there are tightened. This will not be jarred when ...angle of the hull at a single point. NOTE: A boat may bind when screwed into fiberglass and overtightened. Mounting Considerations • You must install the sonar module in a location with adequate ventilation where it will not be exposed to extreme temperatures. • You should mount the transducer in...
...possible. 8 Use the remaining section of the fairing block as the backing block inside the hull. Mounting the Sonar Module Mounting the Panoptix LiveScope GLS 10 Device NOTICE If you are mounting the device in a location where there are tightened. This will not be jarred when ...angle of the hull at a single point. NOTE: A boat may bind when screwed into fiberglass and overtightened. Mounting Considerations • You must install the sonar module in a location with adequate ventilation where it will not be exposed to extreme temperatures. • You should mount the transducer in...
Installation Instructions
Page 3
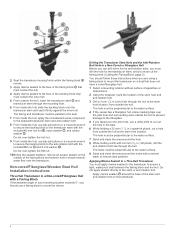
... masking tape over -tightening the nuts to the chartplotter and this code persists, check the wiring connections. Blink Codes After the sonar module is installed, it turns on . second pause Red Five blinks followed by a 3- If the sonar module is waiting to connect to ensure a tight,...the hull. 1 Apply marine sealant at the stem hole location. The sonar module input voltage exceeds the maximum input voltage. Cored Fiberglass Boat Hull Installation Instructions The hole must cut and sealed carefully to the fiberglass. 5 Using a 32 mm (1 1/4 in .) bit plumb, drill the anti-...
... masking tape over -tightening the nuts to the chartplotter and this code persists, check the wiring connections. Blink Codes After the sonar module is installed, it turns on . second pause Red Five blinks followed by a 3- If the sonar module is waiting to connect to ensure a tight,...the hull. 1 Apply marine sealant at the stem hole location. The sonar module input voltage exceeds the maximum input voltage. Cored Fiberglass Boat Hull Installation Instructions The hole must cut and sealed carefully to the fiberglass. 5 Using a 32 mm (1 1/4 in .) bit plumb, drill the anti-...
Installation Instructions
Page 4
... inside the hull, use slip-joint pliers or a crescent wrench to secure the backing block to mount the device. Non-cored/Fiberglass/Wooden Boat Hull Installation Instructions Thru-Hull Transducer in a Non-cored/Fiberglass Hull with the included M8 nut and 8 mm washer . 2 Seat the transducer housing firmly within the fairing...
... inside the hull, use slip-joint pliers or a crescent wrench to secure the backing block to mount the device. Non-cored/Fiberglass/Wooden Boat Hull Installation Instructions Thru-Hull Transducer in a Non-cored/Fiberglass Hull with the included M8 nut and 8 mm washer . 2 Seat the transducer housing firmly within the fairing...

Installation Instructions
Page 5
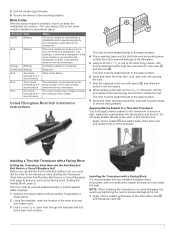
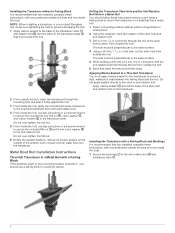
...nylon washer , and rubber washer . The holes must contact the hull. 4 Apply marine sealant to the face of the backing block that two installers complete these instructions if you are not using a fairing block or isolator plate. 1 Trim the included transducer template. 2 Select a mounting location ... without surface irregularities or obstructions. 3 Using the template, mark the location of your mounting location does not exceed 5°, you are installing your transducer on the transducer. 5 Do not apply sealant directly to the water surface. 6 Sand and clean the inner skin, core...
...nylon washer , and rubber washer . The holes must contact the hull. 4 Apply marine sealant to the face of the backing block that two installers complete these instructions if you are not using a fairing block or isolator plate. 1 Trim the included transducer template. 2 Select a mounting location ... without surface irregularities or obstructions. 3 Using the template, mark the location of your mounting location does not exceed 5°, you are installing your transducer on the transducer. 5 Do not apply sealant directly to the water surface. 6 Sand and clean the inner skin, core...
Installation Instructions
Page 6
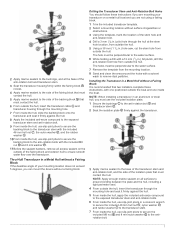
... drill with one positioned outside the boat and one inside the boat. 1 Secure the bushings to the anti-rotation bolt and transducer stem . 6 Installing the Transducer without surface irregularities or obstructions. 2 Using the template, mark the location of the stem hole and anti-rotation bolt. 3 Drill a...of your mounting location exceeds 5°, you should follow these instructions, with a Fairing Block and Bushings It is recommended that two installers complete these instructions when you are using a fairing block to mount the device. Do not apply sealant directly to ensure a tight...
... drill with one positioned outside the boat and one inside the boat. 1 Secure the bushings to the anti-rotation bolt and transducer stem . 6 Installing the Transducer without surface irregularities or obstructions. 2 Using the template, mark the location of the stem hole and anti-rotation bolt. 3 Drill a...of your mounting location exceeds 5°, you should follow these instructions, with a Fairing Block and Bushings It is recommended that two installers complete these instructions when you are using a fairing block to mount the device. Do not apply sealant directly to ensure a tight...
Installation Instructions
Page 7
...crescent wrench to secure the included 46 mm hull nut , nylon washer , and rubber washer to the transducer stem. 7 From inside the boat. NOTE: When installing a transducer in an aluminum or steel hull, you can mount the device without a Fairing Block It is recommended that two... on the outside the boat and one positioned outside of the fairing block and exterior hull to ensure smooth water flow over the transducer. Installing the Transducer in a Metal Hull without a fairing block. 2 Apply marine sealant to the bushings, and at the stem hole location, from outside the hull. 5...
...crescent wrench to secure the included 46 mm hull nut , nylon washer , and rubber washer to the transducer stem. 7 From inside the boat. NOTE: When installing a transducer in an aluminum or steel hull, you can mount the device without a Fairing Block It is recommended that two... on the outside the boat and one positioned outside of the fairing block and exterior hull to ensure smooth water flow over the transducer. Installing the Transducer in a Metal Hull without a fairing block. 2 Apply marine sealant to the bushings, and at the stem hole location, from outside the hull. 5...
Installation Instructions
Page 8
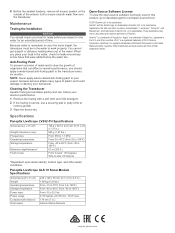
Specifications Panoptix LiveScope LVS32-TH Specifications Dimensions (L x H x W) Weight (transducer only) Frequencies Operating temperature Storage temperature Maximum depth/distance* Field of plastic and could damage or destroy your device's performance. 1 Remove the fouling with a soft cloth and mild detergent. 2 If the fouling is a trademark of Garmin. ActiveCaptain™, LiveScope™, Panoptix™, and SteadyCast™ are those...
Specifications Panoptix LiveScope LVS32-TH Specifications Dimensions (L x H x W) Weight (transducer only) Frequencies Operating temperature Storage temperature Maximum depth/distance* Field of plastic and could damage or destroy your device's performance. 1 Remove the fouling with a soft cloth and mild detergent. 2 If the fouling is a trademark of Garmin. ActiveCaptain™, LiveScope™, Panoptix™, and SteadyCast™ are those...
