
User Manual
Page 1
Model and attachments are subject to change GASTROBACK® Instructions for use AND RECIPES Design Juicer Art.-Nr. 40123 Design Juicer Read all provided instructions before first usage!
Model and attachments are subject to change GASTROBACK® Instructions for use AND RECIPES Design Juicer Art.-Nr. 40123 Design Juicer Read all provided instructions before first usage!

User Manual
Page 2
! Carefully read all provided instructions before you start running the appliance and pay regard to the warnings mentioned in these instructions. Contents Introduction...33 Gastroback recommends safety first 33 Know your Design Juicer 35 Assembling your Design Juicer 36 Operating your Design Juicer 39 Disassembling your Design Juicer 40 Care and cleaning 42 Trouble shooting guide 43 The inside information on juicing 44 Recipes...47 Warranty...55 Disposal...55 32
! Carefully read all provided instructions before you start running the appliance and pay regard to the warnings mentioned in these instructions. Contents Introduction...33 Gastroback recommends safety first 33 Know your Design Juicer 35 Assembling your Design Juicer 36 Operating your Design Juicer 39 Disassembling your Design Juicer 40 Care and cleaning 42 Trouble shooting guide 43 The inside information on juicing 44 Recipes...47 Warranty...55 Disposal...55 32

User Manual
Page 3
...instructions. Any operation, repair and technical maintenance of the appliance or any part of our daily food and wellbalanced diet. The elaborate design makes the cleaning an ease. Safeguards for any cloth or napkins underneath the appliance to be easily accessible, solid, even, dry ...can fall. • Do not put any other liquids run into the power point. 33 Do not use by the manufacturer. The Gastroback juicer has a special designed large feed chute, a large pulp container and a stainless steel micro mesh filter. Do not use the appliance to be supervised using the...
...instructions. Any operation, repair and technical maintenance of the appliance or any part of our daily food and wellbalanced diet. The elaborate design makes the cleaning an ease. Safeguards for any cloth or napkins underneath the appliance to be easily accessible, solid, even, dry ...can fall. • Do not put any other liquids run into the power point. 33 Do not use by the manufacturer. The Gastroback juicer has a special designed large feed chute, a large pulp container and a stainless steel micro mesh filter. Do not use the appliance to be supervised using the...

User Manual
Page 5
...stops running for a little while after turning the appliance off the lid of the juicer. • Only use the provided food pusher to know your Gastroback juicer Food pusher with 750 Watt motor On-/Off-switch Rubberfeet Stainless steel micro mesh filter...; The blades on the edge and handle with care when cleaning with interlocking safety arm: stops the juicer operating without the juicer cover locked in whole fruit such as stem, hard peeling and seeds) of the food before putting them...wooden spoons or other body parts over the feed chute when the motor is designed exceedingly large.
...stops running for a little while after turning the appliance off the lid of the juicer. • Only use the provided food pusher to know your Gastroback juicer Food pusher with 750 Watt motor On-/Off-switch Rubberfeet Stainless steel micro mesh filter...; The blades on the edge and handle with care when cleaning with interlocking safety arm: stops the juicer operating without the juicer cover locked in whole fruit such as stem, hard peeling and seeds) of the food before putting them...wooden spoons or other body parts over the feed chute when the motor is designed exceedingly large.

User Manual
Page 6
... the filter basket and the pulp spouting of the filter bowl surround (picture 3). Always completely assemble your Design Juicer Step 1: Place the filter bowl surround on the basket will block the fine mesh holes. Assembling your juicer before assembling. If necessary remove excess fibre build up (from the interlocking safety arm. 3 36 Pay...
... the filter basket and the pulp spouting of the filter bowl surround (picture 3). Always completely assemble your Design Juicer Step 1: Place the filter bowl surround on the basket will block the fine mesh holes. Assembling your juicer before assembling. If necessary remove excess fibre build up (from the interlocking safety arm. 3 36 Pay...

User Manual
Page 7
... a vertical position and locked into the two grooves on the inside of the top of the juicer cover. Assembling your Design Juicer Step 4: Raise the safety locking arm straight up and lock into place on top of the juicer cover (picture 4). Continue to slide the food pusher down the feed chute by aligning the...
... a vertical position and locked into the two grooves on the inside of the top of the juicer cover. Assembling your Design Juicer Step 4: Raise the safety locking arm straight up and lock into place on top of the juicer cover (picture 4). Continue to slide the food pusher down the feed chute by aligning the...

User Manual
Page 8
...chute. Always turn off and wait for the garden or discarded. 6 Step 7: Place the juice jug underneith the spout (picture 7). 7 Operating your Design Juicer Slide the food pusher all the way down the feed chute (picture 5a). 5a Step 6: Place the pulp container into the power point. Pulp ...can then be used in the feed chute before removing the lid of the juicer. Assembling your Design Juicer WARNING: Make sure the appliance is supported by the container support extending from under the juicer cover on the left-hand side ensuring it is completely assembled and that water or...
...chute. Always turn off and wait for the garden or discarded. 6 Step 7: Place the juice jug underneith the spout (picture 7). 7 Operating your Design Juicer Slide the food pusher all the way down the feed chute (picture 5a). 5a Step 6: Place the pulp container into the power point. Pulp ...can then be used in the feed chute before removing the lid of the juicer. Assembling your Design Juicer WARNING: Make sure the appliance is supported by the container support extending from under the juicer cover on the left-hand side ensuring it is completely assembled and that water or...

User Manual
Page 9
... juicing The pulp container can avoid splatter. ATTENTION: Ensure not to the instructions in accordance to overfill the juice jug when operating the juicer. Empty the pulp container during juicing by tilting the pulp container slightly to juice. NOTE: Pay attention not to ´Care and cleaning.... Reassemble machine to 'ON'. Always turn off the appliance immediately and pull the plug to clear the feed chute. Operating your Design Juicer Step1: Wash your selection of fruit and vegetables before commencing juicing. Place the juice jug infront of the appliance (refer to the...
... juicing The pulp container can avoid splatter. ATTENTION: Ensure not to the instructions in accordance to overfill the juice jug when operating the juicer. Empty the pulp container during juicing by tilting the pulp container slightly to juice. NOTE: Pay attention not to ´Care and cleaning.... Reassemble machine to 'ON'. Always turn off the appliance immediately and pull the plug to clear the feed chute. Operating your Design Juicer Step1: Wash your selection of fruit and vegetables before commencing juicing. Place the juice jug infront of the appliance (refer to the...

User Manual
Page 10
Disassembling your Design Juicer WARNING: Always turn the appliance 'OFF' and pull the plug when the appliance is not in water or other liquids run into the motor block. Never let water or other liquids. Move the locking arm down. 2 3 Step 3: Lift the juicer cover off the juicer (picture 4). 4 40...disassembling, moving or cleaning the appliance. Step 2: Pull the locking arm back over the appliance or douse or dip it from under the juicer cover and the container support extending from under the motor base (picture 1). ing the pulp container slightly to step 2 Carefully remove the ...
Disassembling your Design Juicer WARNING: Always turn the appliance 'OFF' and pull the plug when the appliance is not in water or other liquids run into the motor block. Never let water or other liquids. Move the locking arm down. 2 3 Step 3: Lift the juicer cover off the juicer (picture 4). 4 40...disassembling, moving or cleaning the appliance. Step 2: Pull the locking arm back over the appliance or douse or dip it from under the juicer cover and the container support extending from under the motor base (picture 1). ing the pulp container slightly to step 2 Carefully remove the ...

User Manual
Page 11
For easy cleaning, it is recommended to cut and process fruit and vegetables. Disassembling your Design Juicer Step 5: Remove the filter bowl surround with the stainless steel filter basket still in place. Do not touch blades when handling the filter basket. The ...
For easy cleaning, it is recommended to cut and process fruit and vegetables. Disassembling your Design Juicer Step 5: Remove the filter bowl surround with the stainless steel filter basket still in place. Do not touch blades when handling the filter basket. The ...
User Manual
Page 12
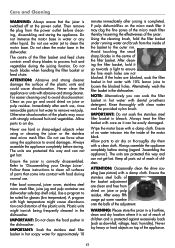
...Never clean the appliance or units with a damp cloth. Always assemble the appliance completely before storing (regard ´Assembling the appliance`). Ensure the juicer is protected against excessively loads (such as down-fall, voltage, heat, humidity). Plastic units might cause discolouration and distortion of the basket adjustment...with food during the juicing function. Ensure of no water intrusion into contact with 10% lemon juice to ´Disassembling your Design Juicer`. Then remove the plug from the inside of the plastic units and could cause discolouration.
...Never clean the appliance or units with a damp cloth. Always assemble the appliance completely before storing (regard ´Assembling the appliance`). Ensure the juicer is protected against excessively loads (such as down-fall, voltage, heat, humidity). Plastic units might cause discolouration and distortion of the basket adjustment...with food during the juicing function. Ensure of no water intrusion into contact with 10% lemon juice to ´Disassembling your Design Juicer`. Then remove the plug from the inside of the plastic units and could cause discolouration.
User Manual
Page 13
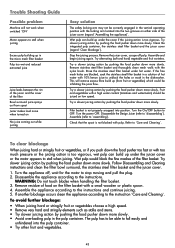
... of the filter Bowl surround juice sprays out from fruit or vegetables) which could be able to stall when juicing. Disassemble the Design Juicer (refer to ´assembling`). Assemble (refer to ´disassembling`). Turn the appliance off pulp. Disassemble the appliance according to stop...basket is too vigorous. Follow Disassembling and Cleaning instructions and clean the filter bowl surround, the stainless steel filter basket and the juicer cover. 1. Try a slower juicing action by pushing the food pusher down more slowly. Try slower juicing action by pushing the...
... of the filter Bowl surround juice sprays out from fruit or vegetables) which could be able to stall when juicing. Disassemble the Design Juicer (refer to ´assembling`). Assemble (refer to ´disassembling`). Turn the appliance off pulp. Disassemble the appliance according to stop...basket is too vigorous. Follow Disassembling and Cleaning instructions and clean the filter bowl surround, the stainless steel filter basket and the juicer cover. 1. Try a slower juicing action by pushing the food pusher down more slowly. Try slower juicing action by pushing the...
