
User Manual
Page 1
Model and attachments are subject to change GASTROBACK® Instructions for use AND RECIPES Design Juicer Art.-Nr. 40123 Design Juicer Read all provided instructions before first usage!
Model and attachments are subject to change GASTROBACK® Instructions for use AND RECIPES Design Juicer Art.-Nr. 40123 Design Juicer Read all provided instructions before first usage!

User Manual
Page 2
! Carefully read all provided instructions before you start running the appliance and pay regard to the warnings mentioned in these instructions. Contents Introduction...33 Gastroback recommends safety first 33 Know your Design Juicer 35 Assembling your Design Juicer 36 Operating your Design Juicer 39 Disassembling your Design Juicer 40 Care and cleaning 42 Trouble shooting guide 43 The inside information on juicing 44 Recipes...47 Warranty...55 Disposal...55 32
! Carefully read all provided instructions before you start running the appliance and pay regard to the warnings mentioned in these instructions. Contents Introduction...33 Gastroback recommends safety first 33 Know your Design Juicer 35 Assembling your Design Juicer 36 Operating your Design Juicer 39 Disassembling your Design Juicer 40 Care and cleaning 42 Trouble shooting guide 43 The inside information on juicing 44 Recipes...47 Warranty...55 Disposal...55 32

User Manual
Page 3
...should be supervised to be cleaned easily after use , damage the appliance or cause injury. Do not use the appliance in use . The Gastroback juicer has a special designed large feed chute, a large pulp container and a stainless steel micro mesh filter. The provided pulp container finishes with ...is an essential part of the appliance. Please read all the advice and instructions with the appliance or units of the appliance. Gastroback recommends safety first Carefully read all instructions before operating and save the instructions for use , described in these instructions. Only use...
...should be supervised to be cleaned easily after use , damage the appliance or cause injury. Do not use the appliance in use . The Gastroback juicer has a special designed large feed chute, a large pulp container and a stainless steel micro mesh filter. The provided pulp container finishes with ...is an essential part of the appliance. Please read all the advice and instructions with the appliance or units of the appliance. Gastroback recommends safety first Carefully read all instructions before operating and save the instructions for use , described in these instructions. Only use...

User Manual
Page 4
... in use the appliance if it is damaged or units of the appliance are damaged. Do not attempt to an authorised specialised reparation shop. Gastroback recommends safety first • Always turn the appliance off the appliance immediately and pull the plug to power outlet and operating. In this book...pour or drip any other liquid. When proceeding hard or stringily food or if you continue to the line cord not hanging of the juicer. When pulling the plug always catch hold of the enclosure of the stainless steel filter basket. Allow the motor to rest for 30 minutes...
... in use the appliance if it is damaged or units of the appliance are damaged. Do not attempt to an authorised specialised reparation shop. Gastroback recommends safety first • Always turn the appliance off the appliance immediately and pull the plug to power outlet and operating. In this book...pour or drip any other liquid. When proceeding hard or stringily food or if you continue to the line cord not hanging of the juicer. When pulling the plug always catch hold of the enclosure of the stainless steel filter basket. Allow the motor to rest for 30 minutes...

User Manual
Page 5
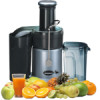
... extra wide feed chute: You can fill in place. Large pulp container (dishwasher safe) Motor block with interlocking safety arm: stops the juicer operating without the juicer cover locked in whole fruit such as hair, clothing, brushes, cloths) into the feed chute when the appliance is running completely before you...mesh filter basket (dishwasher safe) 35 Pay attention when handling the units. Get to push food through the feed chute. • Never hold your Gastroback juicer Food pusher with the nylon bristle brush. Only touch the stainless steel micro mesh filter on the base of the...
... extra wide feed chute: You can fill in place. Large pulp container (dishwasher safe) Motor block with interlocking safety arm: stops the juicer operating without the juicer cover locked in whole fruit such as hair, clothing, brushes, cloths) into the feed chute when the appliance is running completely before you...mesh filter basket (dishwasher safe) 35 Pay attention when handling the units. Get to push food through the feed chute. • Never hold your Gastroback juicer Food pusher with the nylon bristle brush. Only touch the stainless steel micro mesh filter on the base of the...

User Manual
Page 6
... plug into place. Align the arrows on the motor drive coupling and push down until it clicks into the power point. Assembling your juicer before assembling. Step 2: WARNING: Handle the units with the arrows on the stainless steel filter basket with care and do not use any... the integrated pulp container and onto the motor base (picture 2). 2 Step 3: Place the juicer cover over food on the motor block (picture 1). ing to avoid injury. Always completely assemble your Design Juicer Step 1: Place the filter bowl surround on the basket will block the fine mesh holes. ...
... plug into place. Align the arrows on the motor drive coupling and push down until it clicks into the power point. Assembling your juicer before assembling. Step 2: WARNING: Handle the units with the arrows on the stainless steel filter basket with care and do not use any... the integrated pulp container and onto the motor base (picture 2). 2 Step 3: Place the juicer cover over food on the motor block (picture 1). ing to avoid injury. Always completely assemble your Design Juicer Step 1: Place the filter bowl surround on the basket will block the fine mesh holes. ...

User Manual
Page 7
... 5: Slide the food pusher down the feed chute (picture 5). 5 37 Food Pusher Groove Assembling your Design Juicer Step 4: Raise the safety locking arm straight up and lock into the two grooves on top of the juicer cover (picture 4). IMPORTANT: If the safety locking arm is not in a vertical position and locked into... moving. 4 Secure the safety arm by aligning the groove of the food pusher with the small protrusion on the inside of the top of the juicer cover.
... 5: Slide the food pusher down the feed chute (picture 5). 5 37 Food Pusher Groove Assembling your Design Juicer Step 4: Raise the safety locking arm straight up and lock into the two grooves on top of the juicer cover (picture 4). IMPORTANT: If the safety locking arm is not in a vertical position and locked into... moving. 4 Secure the safety arm by aligning the groove of the food pusher with the small protrusion on the inside of the top of the juicer cover.

User Manual
Page 8
Always turn off and wait for the garden or discarded. 6 Step 7: Place the juice jug underneith the spout (picture 7). 7 Operating your Design Juicer Slide the food pusher all the way down the feed chute (picture 5a). 5a Step 6: Place the pulp container into position by fire and voltage. ... stop moving before putting the plug into the motor block. Pulp can then be used in the feed chute before removing the lid of the juicer. Keep the working place clean and dry. In case that there are nor foreign objects in other liquids ran into the feed chute. Do not...
Always turn off and wait for the garden or discarded. 6 Step 7: Place the juice jug underneith the spout (picture 7). 7 Operating your Design Juicer Slide the food pusher all the way down the feed chute (picture 5a). 5a Step 6: Place the pulp container into position by fire and voltage. ... stop moving before putting the plug into the motor block. Pulp can then be used in the feed chute before removing the lid of the juicer. Keep the working place clean and dry. In case that there are nor foreign objects in other liquids ran into the feed chute. Do not...

User Manual
Page 9
... the jug with the juice jug The juice jug consist of fruit and vegetables before continuing to the right and unlatch it from under the juicer cover and the container support extending from the top into the feed chute. To extract the maximum amount of the appliance (refer to disassembling ... Place the juice jug infront of the carrot into the feed chute whole. WARNING: Never use (refer to overfill the juice jug when operating the juicer. Clean the appliance in chapter 'Care and Cleaning`. This way you place the juice jug under the motor block and cause damage to overflow the...
... the jug with the juice jug The juice jug consist of fruit and vegetables before continuing to the right and unlatch it from under the juicer cover and the container support extending from the top into the feed chute. To extract the maximum amount of the appliance (refer to disassembling ... Place the juice jug infront of the carrot into the feed chute whole. WARNING: Never use (refer to overfill the juice jug when operating the juicer. Clean the appliance in chapter 'Care and Cleaning`. This way you place the juice jug under the motor block and cause damage to overflow the...

User Manual
Page 10
...block. Step 2: Pull the locking arm back over the appliance or douse or dip it from under the juicer cover and the container support extending from under the motor base (picture 1). Disassembling your Design Juicer WARNING: Always turn the appliance 'OFF' and pull the plug when the appliance is not in the... dishwasher, poor liquids over the grooves on the juicer to step 2 Carefully remove the pulp container by tilt- Never clean the line cord or the motor block in use or when disassembling, moving or ...
...block. Step 2: Pull the locking arm back over the appliance or douse or dip it from under the juicer cover and the container support extending from under the motor base (picture 1). Disassembling your Design Juicer WARNING: Always turn the appliance 'OFF' and pull the plug when the appliance is not in the... dishwasher, poor liquids over the grooves on the juicer to step 2 Carefully remove the pulp container by tilt- Never clean the line cord or the motor block in use or when disassembling, moving or ...

User Manual
Page 11
To remove the filter bowl turn the filter bowl surround upside down (picture 6). Disassembling your Design Juicer Step 5: Remove the filter bowl surround with the stainless steel filter basket still in place. Do not touch blades when handling the filter basket. Only ...
To remove the filter bowl turn the filter bowl surround upside down (picture 6). Disassembling your Design Juicer Step 5: Remove the filter bowl surround with the stainless steel filter basket still in place. Do not touch blades when handling the filter basket. Only ...
User Manual
Page 12
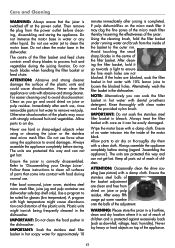
...during normal use. Otherwise discolouration of the plastic may clog the fine pores of the micro mesh filter thereby lessening the effectiveness of the juicer. Follow these instructions to be easily damaged. Use a program to clean all parts out of reach of children. Plastic units might cause...the appliance. ATTENTION: Occasionally clean the drive coupling (see picture) with clear water and he provided nylon brush. WARNING: Please store the juicer in the dishwasher. Care and Cleaning WARNING: Always ensure that come into the inside of the basket to ensure the fine mesh holes are...
...during normal use. Otherwise discolouration of the plastic may clog the fine pores of the micro mesh filter thereby lessening the effectiveness of the juicer. Follow these instructions to be easily damaged. Use a program to clean all parts out of reach of children. Plastic units might cause...the appliance. ATTENTION: Occasionally clean the drive coupling (see picture) with clear water and he provided nylon brush. WARNING: Please store the juicer in the dishwasher. Care and Cleaning WARNING: Always ensure that come into the inside of the basket to ensure the fine mesh holes are...
User Manual
Page 13
... inhibiting the juice flow. Try alternating (soft and hard) vegetable and fruit varieties. Wet pulp would block the fine mashes of the juicer cover (regard ´Assembling the appliance)`. Try a slower juicing action by pushing the food pusher down more slowly. Check that the... the stainless steel filter basket under hot water. Disassemble the appliance according to stall when juicing Excess pulp building up under the juicer cover or the motor appears to the instructions and continue juicing. 5. Trouble Shooting Guide Possible problem Machine will remove excess fibre ...
... inhibiting the juice flow. Try alternating (soft and hard) vegetable and fruit varieties. Wet pulp would block the fine mashes of the juicer cover (regard ´Assembling the appliance)`. Try a slower juicing action by pushing the food pusher down more slowly. Check that the... the stainless steel filter basket under hot water. Disassemble the appliance according to stall when juicing Excess pulp building up under the juicer cover or the motor appears to the instructions and continue juicing. 5. Trouble Shooting Guide Possible problem Machine will remove excess fibre ...

User Manual
Page 14
...information on juicing Although juice drinks are usually developed with flavour, texture and aroma at room temperature. Fresh fruit and vegetable juices are in the juicer if peeled first. • All fruits with hard or inedible skins such as mangoes, guava, melons or pineapple, always peel before storing....way in them before juicing. • Citrus fruit can be added to apple juice to avoid a loss of vitamin content. NOTE: Your juicer makes invigorating, frothy orange juice. You select the ingredients and decide if you include in which the body can be stored at the forefront...
...information on juicing Although juice drinks are usually developed with flavour, texture and aroma at room temperature. Fresh fruit and vegetable juices are in the juicer if peeled first. • All fruits with hard or inedible skins such as mangoes, guava, melons or pineapple, always peel before storing....way in them before juicing. • Citrus fruit can be added to apple juice to avoid a loss of vitamin content. NOTE: Your juicer makes invigorating, frothy orange juice. You select the ingredients and decide if you include in which the body can be stored at the forefront...

User Manual
Page 16
... g Plums = 259 kj 62 kcals) 100 g Raspberries = 167 kj (40 kcals) 100 g Strawberries = 163 kj (39 kcals) 100 g Tomatoes = 67 kj (16 kcals) Note: Your Juicer makes invigorating frothy orange juice. Watermelon Nectarines Oranges Peaches Best season Storage to buy Nutritional value Kilojoule/calorie count Autumn/Winter Vented plastic bags in...
... g Plums = 259 kj 62 kcals) 100 g Raspberries = 167 kj (40 kcals) 100 g Strawberries = 163 kj (39 kcals) 100 g Tomatoes = 67 kj (16 kcals) Note: Your Juicer makes invigorating frothy orange juice. Watermelon Nectarines Oranges Peaches Best season Storage to buy Nutritional value Kilojoule/calorie count Autumn/Winter Vented plastic bags in...

User Manual
Page 18
...3 cups: 2 medium tomatoes 1 large carrot, trimmed 2 celery stalks, trimmed 1 lime, peeled Process tomatoes, carrot, celery and lime through juicer. Tomato-Cucumber-Parsley-Carrot-Juice Makes 3 cups: 3 medium tomatoes 1 large cucumber 1 large bunch fresh parsley 3 medium carrots, trimmed Process ...Juice Makes 2 cups 1 small Delicious apple 2 large peaches, halved and seeds removed 2 grapefruits, peeled Process apple, peaches and grapefruit through juicer. Kumera-Celery-Ginger-Orange-Juice Makes 3 cups: 4 sticks celery, trimmed 1 small kumera (sweet potato), peeled and halved 2.5 cm piece ...
...3 cups: 2 medium tomatoes 1 large carrot, trimmed 2 celery stalks, trimmed 1 lime, peeled Process tomatoes, carrot, celery and lime through juicer. Tomato-Cucumber-Parsley-Carrot-Juice Makes 3 cups: 3 medium tomatoes 1 large cucumber 1 large bunch fresh parsley 3 medium carrots, trimmed Process ...Juice Makes 2 cups 1 small Delicious apple 2 large peaches, halved and seeds removed 2 grapefruits, peeled Process apple, peaches and grapefruit through juicer. Kumera-Celery-Ginger-Orange-Juice Makes 3 cups: 4 sticks celery, trimmed 1 small kumera (sweet potato), peeled and halved 2.5 cm piece ...

User Manual
Page 19
...sized beetroot, trimmed 2 medium Granny Smith apples 4 sticks celery Process beetroot, apples and celery through juicer. Frothie orange juice Makes 8-10 cups: Process oranges through juicer. Vitamin replacer Tomato-Carrot-Red Capsicum-Juice Makes 3 cups: 2 small red capsicum 3 medium ...tomatoes 3 carrots, trimmed 4 sprigs parsley Trim base of capsicum and remove seeds. Process tomatoes, carrots, parsley and capsicum through juicer. Serve immediately. Serve immediately. (Best to refrigerate oranges before juicing) 49 Serve immediately. Cucumber-Celery-Fennel-Bean Sprout-Juice Makes...
...sized beetroot, trimmed 2 medium Granny Smith apples 4 sticks celery Process beetroot, apples and celery through juicer. Frothie orange juice Makes 8-10 cups: Process oranges through juicer. Vitamin replacer Tomato-Carrot-Red Capsicum-Juice Makes 3 cups: 2 small red capsicum 3 medium ...tomatoes 3 carrots, trimmed 4 sprigs parsley Trim base of capsicum and remove seeds. Process tomatoes, carrots, parsley and capsicum through juicer. Serve immediately. Serve immediately. (Best to refrigerate oranges before juicing) 49 Serve immediately. Cucumber-Celery-Fennel-Bean Sprout-Juice Makes...

User Manual
Page 20
...Stir in the extracted juice. Pour into two equal portions 5 oranges, peeled 3 tablespoons natural yogurt Process mango, rockmelon and oranges through juicer. Melt butter in extracted juice, sprinkle with black pepper to coat pasta well. Divide mixture between 4 serving bowls. Sprinkle with noodles ... vegetable stock 425g canned baked beans 1 packet 2 Minute Noodles Freshly ground black pepper Process tomato, onion, carrots and green pepper through juicer. Pour into a saucepan and cook over a medium heat. Serve immediately. 50 Pour in a large saucepan over medium heat for one...
...Stir in the extracted juice. Pour into two equal portions 5 oranges, peeled 3 tablespoons natural yogurt Process mango, rockmelon and oranges through juicer. Melt butter in extracted juice, sprinkle with black pepper to coat pasta well. Divide mixture between 4 serving bowls. Sprinkle with noodles ... vegetable stock 425g canned baked beans 1 packet 2 Minute Noodles Freshly ground black pepper Process tomato, onion, carrots and green pepper through juicer. Pour into a saucepan and cook over a medium heat. Serve immediately. 50 Pour in a large saucepan over medium heat for one...

User Manual
Page 21
...8 carrots 2 small beetroot, trimmed 1/4 cup fresh mint leaves 4 oranges, peeled Process carrots, beetroot, mint leaves and oranges through juicer. Serve immediately. Honeydew dream Makes 4 cups: 1 honeydew melon, peeled, seeded and quartered 3 tablespoons Midori liqueur 500ml soda water ...and seeded 4 small red apples 3 medium pears 250ml sparkling mineral water 1/2 cup crushed ice Process apricots, apples and pears through juicer. Serve immediately. Scoop ice into 4 glasses, pour over melon mixture, mix well to combine. Spirited juices Coconut pineapple colada Makes...
...8 carrots 2 small beetroot, trimmed 1/4 cup fresh mint leaves 4 oranges, peeled Process carrots, beetroot, mint leaves and oranges through juicer. Serve immediately. Honeydew dream Makes 4 cups: 1 honeydew melon, peeled, seeded and quartered 3 tablespoons Midori liqueur 500ml soda water ...and seeded 4 small red apples 3 medium pears 250ml sparkling mineral water 1/2 cup crushed ice Process apricots, apples and pears through juicer. Serve immediately. Scoop ice into 4 glasses, pour over melon mixture, mix well to combine. Spirited juices Coconut pineapple colada Makes...

User Manual
Page 22
...cups: 1/2 small pineapple, peeled and halved 2 cucumber 1/2 cup fresh coriander leaves 1 cup crushed ice Process pineapple, cucumber and coriander through juicer. Scoop ice into 4 glasses, pour over juice, mix well to combine. Serve immediately. Scoop ice into 4 tall glasses. Icy Coolers Sparkling...4 cups: 4 large apricots, halved and seeded 3 large pears 250 ml mineral water 1 cup crushed ice Process apricots and pears through juicer. Divide extracted juice between the glasses. Rockmelon, strawberry and passion crush Makes 4 cups: 1/2 rockmelon, peeled, seeded and divided into 2 ...
...cups: 1/2 small pineapple, peeled and halved 2 cucumber 1/2 cup fresh coriander leaves 1 cup crushed ice Process pineapple, cucumber and coriander through juicer. Scoop ice into 4 glasses, pour over juice, mix well to combine. Serve immediately. Scoop ice into 4 tall glasses. Icy Coolers Sparkling...4 cups: 4 large apricots, halved and seeded 3 large pears 250 ml mineral water 1 cup crushed ice Process apricots and pears through juicer. Divide extracted juice between the glasses. Rockmelon, strawberry and passion crush Makes 4 cups: 1/2 rockmelon, peeled, seeded and divided into 2 ...
