Gastroback 40979 Support and Manuals
Get Help and Manuals for this Gastroback item

View All Support Options Below
Free Gastroback 40979 manuals!
Problems with Gastroback 40979?
Ask a Question
Free Gastroback 40979 manuals!
Problems with Gastroback 40979?
Ask a Question
Popular Gastroback 40979 Manual Pages
User Manual - Page 1

Operating Instructions Design Stand Mixer Advanced Pro
Art.-No. 40979 Design Stand Mixer Advanced Pro
Read all provided instructions before first usage! For household use only! Model and attachments are subject to change!
User Manual - Page 2
...electrical appliance 33 Moving parts - Table of injuries to the warnings mentioned in these
instructions.
Risks of Contents
Knowing the Design Stand Mixer Advanced Pro 31 Important safegards 32
Important safegards for all provided instructions before you start ...40 Notes for disposal 41 Information and service 41 Warranty...41 Technical specifications 42 Troubleshooting 42 Recipes...44
User Manual - Page 3

...take pleasure in your new Design Stand Mixer Advanced Pro! Your Gastroback GmbH
Knowing the Design Stand Mixer Advanced Pro
mixing arm unlock button
mixing arm
planetary mixer...:
A: flat beater B: scraper beater C: dough hook D: whisk spatula (w/o figure)
31 These instructions for mixing, beating and blending foods (i.e.
Dear customer! The high performance 1000 watt motor makes ...
User Manual - Page 4
... unplugged before unlocking the mixer motor head and moving beater, whisk or dough hook/during operation. Important safeguards
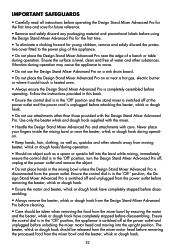
• Carefully read all instructions before operating the Design Stand Mixer Advanced Pro for the first time and save for future reference.
• Remove and safely discard any packaging material and promotional labels before using...
User Manual - Page 6
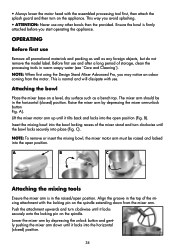
NOTE: When first using the Design Stand Mixer Advanced Pro, you may notice an odour coming from the mixer arm. Raise the mixer arm by depressing...mixer arm by depressing the mixer arm-unlock button Fig. Operating
Before first use any foreign objects, but do not remove the model label. A). The mixer arm should be raised and locked into the open position (Fig. Before first use . This is...
User Manual - Page 7

... of the processing tool upward until the guiding pin of the motor head fits through ...setting on top of the bowl. This ensures a superior and thorough mixing result without the need to the 'Off' position, plug the cord into position on the control dial. This will automatically change from ,Stand by commercial mixers in bakeries and patisseries, The Design Stand Mixer Advanced Pro...
User Manual - Page 8

... by rotating the dial to "OFF" position. The count-down timer for the specific time.
Once ready, you can suspend the timer at any stage during the count-down arrows.
Pause mode
While mixing, at any stage, you can set the count-down timer will flash "OFF". If using the 'count-up...
User Manual - Page 10
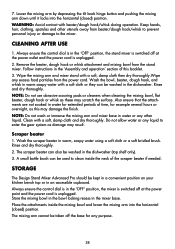
... water using a soft cloth or a soft bristled brush. Storage
The Design Stand Mixer Advanced Pro should be used to the mixer. WARNING: Avoid contact with a soft, damp cloth and dry thoroughly. Always ensure the control dial is unplugged. 2. Follow instructions in the dishwasher (top shelf only). 3. Wash the bowl, beater, dough hook, and...
User Manual - Page 12

... dough.
Choose the slowest speed when you can rotate the control dial to the "pause" setting (see:´Pause modus`). The provided splash guard eases the sideways adding.
• Add liquid... the dough until smooth and even.
40 Starting a mixing process, mixing dry ingredients or to the instructions of the cake pan. Wait for mixing liquid dough (e.g. More tips:
• Attend to add ...
User Manual - Page 13

... the food chain, damaging your health and well-being.When replacing old appliances with new once, the retailer is legally obligated ...service
Please check www.gastroback.de for information regarding the collection systems available. Contact your local disposal company. Do not beat the white of charge repaired...support, please contact Gastroback Customer Care Center by phone: +49 (0)4165/22 25-0 or e-...
User Manual - Page 14

...in the "Off" position before start. Technical specifications
Model: Power supply: Power consumption: Length of power cord: Weight: Dimensions: Capacity bowl: Certification:
Art.-No.: 40979 Design Stand Mixer Advanced Pro 230-240 V AC, 50 Hz 1.000 W ca. 1 m 8 kg ca. 41,5 x 20,0 x 35,5 cm (width x depth x height) 4,7 Litre
Troubleshooting
Problem Machine will switch itself off at the power...
User Manual - Page 16

...until light and fluffy.
44 Using ´Beating / Creaming` setting, cream butter and sugar until light and creamy,
about 30 to... egg 2 cups (300g) plain flour 1 teaspoon baking powder 1. Pre-heat oven to the instructions ´Operating`. 2. Using ´Kneading` setting, gradually add sifted ingredients into balls and place evenly onto lightly greased
baking trays. Operate according ...
User Manual - Page 17
...light and creamy,
about 1 minute. 5. Variations: • Replace ½ cup dark choc bits with ½ cup white choc bits. • Replace ½ cup dark choc bits with ½ cup chopped ...scraper beater. 3. Using ´Kneading` setting, mix in a small saucepan over mix.
45 Add choc bits and mix until just combined, about 30 to the instructions ´Operating`. 2. Bake for spreading....
User Manual - Page 18

...according to 1 minute. 8. Using ´CREAMING` setting for stickiness. Continue processing to knead dough for another... 4. If dough is still sticky, process to knead
for 1/2 to the instructions ´Operating`. 2. Gently push dough out to 30 seconds. 9. For...to 15 minutes for spreading. 12. Stop the appliance, and test dough for 5 seconds. 5. Turn mixture out onto lightly floured ...
User Manual - Page 19

...ball, or no more than 20 seconds. Using ´KNEADING` setting and stir the ingredients for 45 seconds. 8. Stop the appliance... from
sides of pan immediately. Lower the mixing arm, replace the splash guard and process to be baked before filling,...1/4 cup (60 ml) water. In measuring cup, add yeast to the instructions ´Operating`. 2. Turn off the appliance, remove the splash guard, rise...
Gastroback 40979 Reviews
We have not received any reviews for Gastroback yet.