

8511418 - Component Replacement Manual
Page 1
... adapter to your notebook. The AC adapter has no user-replaceable or user-serviceable parts inside. The AC adapter has dangerous voltages that can cause serious injury or death. Technical Support See the label on the bottom of your notebook's power connector. See your notebook, then plug it becomes damaged. The power indicator turns on , unplug the adapter from your hardware guide for Customer Care Information. Important If the battery charge indicator...
... adapter to your notebook. The AC adapter has no user-replaceable or user-serviceable parts inside. The AC adapter has dangerous voltages that can cause serious injury or death. Technical Support See the label on the bottom of your notebook's power connector. See your notebook, then plug it becomes damaged. The power indicator turns on , unplug the adapter from your hardware guide for Customer Care Information. Important If the battery charge indicator...

8511418 - Component Replacement Manual
Page 2
... the battery charge indicator does not turn blue after three hours, contact Gateway Customer Care at the Web address or telephone number shown on the label on and is not connected to AC power, save your work and turn off your notebook. 2 Close the LCD panel. 6 Slide the replacement battery into the notebook until it snaps into an AC outlet. 10 Open the LCD panel and press the power button. Technical Support...
... the battery charge indicator does not turn blue after three hours, contact Gateway Customer Care at the Web address or telephone number shown on the label on and is not connected to AC power, save your work and turn off your notebook. 2 Close the LCD panel. 6 Slide the replacement battery into the notebook until it snaps into an AC outlet. 10 Open the LCD panel and press the power button. Technical Support...

8511418 - Component Replacement Manual
Page 3
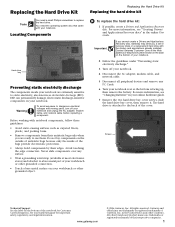
.... 1 Before working with a K. See your workbench or other countries. Avoid touching the edge connectors. Replacing the DVD Drive 7 With a small Phillips screwdriver, remove the keyboard screw and put it in a safe place. For more information, see "Changing Batteries" in the United States and other grounded object. in your notebook. Screw Technical Support See the label on your hardware guide for Customer Care Information. Gateway and...
.... 1 Before working with a K. See your workbench or other countries. Avoid touching the edge connectors. Replacing the DVD Drive 7 With a small Phillips screwdriver, remove the keyboard screw and put it in a safe place. For more information, see "Changing Batteries" in the United States and other grounded object. in your notebook. Screw Technical Support See the label on your hardware guide for Customer Care Information. Gateway and...

8511418 - Component Replacement Manual
Page 4
... notebook. 17 Reconnect all peripheral devices and replace any PC Cards. All rights reserved. in Step 9. 13 Replace the memory bay cover, then tighten the six cover screws. 14 Replace the keyboard screw. 15 Insert the battery, then turn your notebook over. 16 Connect the power adapter, modem cable, and network cable, then turn on the bottom of their respective companies. 10 Slide the DVD drive out of Gateway, Inc. All other countries. Gateway...
... notebook. 17 Reconnect all peripheral devices and replace any PC Cards. All rights reserved. in Step 9. 13 Replace the memory bay cover, then tighten the six cover screws. 14 Replace the keyboard screw. 15 Insert the battery, then turn your notebook over. 16 Connect the power adapter, modem cable, and network cable, then turn on the bottom of their respective companies. 10 Slide the DVD drive out of Gateway, Inc. All other countries. Gateway...
8511418 - Component Replacement Manual
Page 5
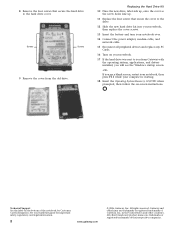
... over so the bottom is attached to replace the hard drive. For more information, see "Creating Drivers and Applications Recovery discs" in your online hardware guide. 7 Remove the two hard drive bay cover screws, slide the hard drive bay cover, then remove it to dangerous electrical voltages and moving parts, turn off your notebook. 4 Disconnect the AC adapter, modem cable, and network cable. 5 Disconnect all peripheral devices and remove any surface. • Wear a grounding wrist strap...
... over so the bottom is attached to replace the hard drive. For more information, see "Creating Drivers and Applications Recovery discs" in your online hardware guide. 7 Remove the two hard drive bay cover screws, slide the hard drive bay cover, then remove it to dangerous electrical voltages and moving parts, turn off your notebook. 4 Disconnect the AC adapter, modem cable, and network cable. 5 Disconnect all peripheral devices and remove any surface. • Wear a grounding wrist strap...
8511418 - Component Replacement Manual
Page 6
...; 2006 Gateway, Inc. 8 Remove the four screws that secure the cover to the drive. 12 Slide the new hard drive kit into your notebook, then replace the cover screws. 13 Insert the battery and turn your notebook over. 14 Connect the power adapter, modem cable, and network cable. 15 Reconnect all peripheral devices and replace any PC Cards. 16 Turn on the bottom of Gateway, Inc. All other countries. All rights reserved. Replacing the Hard Drive Kit...
...; 2006 Gateway, Inc. 8 Remove the four screws that secure the cover to the drive. 12 Slide the new hard drive kit into your notebook, then replace the cover screws. 13 Insert the battery and turn your notebook over. 14 Connect the power adapter, modem cable, and network cable. 15 Reconnect all peripheral devices and replace any PC Cards. 16 Turn on the bottom of Gateway, Inc. All other countries. All rights reserved. Replacing the Hard Drive Kit...

8511418 - Component Replacement Manual
Page 7
... your online hardware guide. 9 Turn your notebook over so the bottom is marked with notebook components, follow these screws cannot be removed), then remove the bay covers. 8 If your notebook and unplug the AC adapter, modem cable, and network cable before replacing a component. Screw Screw 11 Insert the small flat-blade screwdriver under "Preventing static electricity discharge." 2 Turn off your notebook has the two optional keyboard screws, remove them...
... your online hardware guide. 9 Turn your notebook over so the bottom is marked with notebook components, follow these screws cannot be removed), then remove the bay covers. 8 If your notebook and unplug the AC adapter, modem cable, and network cable before replacing a component. Screw Screw 11 Insert the small flat-blade screwdriver under "Preventing static electricity discharge." 2 Turn off your notebook has the two optional keyboard screws, remove them...

8511418 - Component Replacement Manual
Page 8
... close the LCD panel. 7 Close the LCD panel, then replace the two hinge cover screws. 8 Turn your notebook over so the bottom is almost face-up . 9 Replace the two optional keyboard screws. 10 Replace the memory bay cover and wireless network bay cover. 11 Replace the keyboard screw. 12 Insert the battery, then turn your notebook over. 13 Connect the power adapter, the modem cable, and the network cable, then turn on top of Gateway, Inc. See your notebook. in place...
... close the LCD panel. 7 Close the LCD panel, then replace the two hinge cover screws. 8 Turn your notebook over so the bottom is almost face-up . 9 Replace the two optional keyboard screws. 10 Replace the memory bay cover and wireless network bay cover. 11 Replace the keyboard screw. 12 Insert the battery, then turn your notebook over. 13 Connect the power adapter, the modem cable, and the network cable, then turn on top of Gateway, Inc. See your notebook. in place...

8511418 - Component Replacement Manual
Page 9
... their respective companies. 1 Gateway and eMachines are trademarks or registered trademarks of antistatic bags because only the inside your notebook and unplug the AC adapter, modem cable, and network cable before replacing a component. Replacing the Memory Module Tools You need a small Phillips screwdriver to use them. See your notebook. in your hardware guide for Customer Care Information. For more information, see "Changing Batteries" in a safe place. Screw Preventing...
... their respective companies. 1 Gateway and eMachines are trademarks or registered trademarks of antistatic bags because only the inside your notebook and unplug the AC adapter, modem cable, and network cable before replacing a component. Replacing the Memory Module Tools You need a small Phillips screwdriver to use them. See your notebook. in your hardware guide for Customer Care Information. For more information, see "Changing Batteries" in a safe place. Screw Preventing...

8511418 - Component Replacement Manual
Page 10
... Replace the memory bay cover, then tighten the six cover screws. 13 Replace the keyboard screw. 14 Insert the battery, then turn your notebook over. 15 Connect the power adapter, the modem cable, and the network cable. 16 Reconnect all peripheral devices and replace any PC Cards. 17 Turn on the bottom of Gateway, Inc. Technical Support See the label on your hardware guide for your Gateway notebook. 11 Gently push the module down until the module...
... Replace the memory bay cover, then tighten the six cover screws. 13 Replace the keyboard screw. 14 Insert the battery, then turn your notebook over. 15 Connect the power adapter, the modem cable, and the network cable. 16 Reconnect all peripheral devices and replace any PC Cards. 17 Turn on the bottom of Gateway, Inc. Technical Support See the label on your hardware guide for your Gateway notebook. 11 Gently push the module down until the module...

8511418 - Component Replacement Manual
Page 11
... use them. All other countries. Locating Components Wireless network bay Replacing the Wireless Network Module Replacing the wireless network module To replace the wireless network module: 1 Follow the guidelines under "Preventing static electricity discharge." 2 Turn off your notebook. 3 Disconnect the AC adapter, modem cable, and network cable. 4 Disconnect all peripheral devices and remove any surface. • Wear a grounding wrist strap (available at most electronics stores) and attach it to dangerous electrical voltages and moving parts, turn...
... use them. All other countries. Locating Components Wireless network bay Replacing the Wireless Network Module Replacing the wireless network module To replace the wireless network module: 1 Follow the guidelines under "Preventing static electricity discharge." 2 Turn off your notebook. 3 Disconnect the AC adapter, modem cable, and network cable. 4 Disconnect all peripheral devices and remove any surface. • Wear a grounding wrist strap (available at most electronics stores) and attach it to dangerous electrical voltages and moving parts, turn...

8511418 - Component Replacement Manual
Page 12
... hardware guide for Customer Care Information. If your card is held by a screw, replace the screw. 14 Reattach the black antenna cable to the connector labelled MAIN or M, then reattach the light gray antenna cable to the connector labelled AUX or A. 15 Replace the wireless network bay cover, then tighten the cover screw. 16 Insert the battery, then turn your notebook over. 17 Connect the power adapter, the modem cable...
... hardware guide for Customer Care Information. If your card is held by a screw, replace the screw. 14 Reattach the black antenna cable to the connector labelled MAIN or M, then reattach the light gray antenna cable to the connector labelled AUX or A. 15 Replace the wireless network bay cover, then tighten the cover screw. 16 Insert the battery, then turn your notebook over. 17 Connect the power adapter, the modem cable...

8511772 - Gateway Starter Guide
Page 4
see your user guide for instructions Click the Start button to access programs and to turn your computer off Drag items to the Recycle Bin to write letters or create a spreadsheet This is the Windows desktop. we do Windows After you start your computer and complete the Windows® setup, the first thing you'll see on your computer's configuration. Click the Windows Media Player icon to...
see your user guide for instructions Click the Start button to access programs and to turn your computer off Drag items to the Recycle Bin to write letters or create a spreadsheet This is the Windows desktop. we do Windows After you start your computer and complete the Windows® setup, the first thing you'll see on your computer's configuration. Click the Windows Media Player icon to...
8511772 - Gateway Starter Guide
Page 12
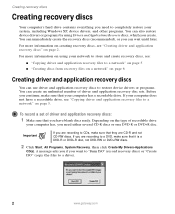
... your online user guide. Insert a blank disc into the recordable drive, then click OK and follow the on the type of recordable disc you use . Click Burn ISO, Start Creation, then click the type of recordable drive you want to its factory condition. To create the disk, click Start, All Programs, System Recovery, then click Create My Drivers-Applications CD(s). When you create one DVD-R or DVD+R disc, depending on -screen prompts.
... your online user guide. Insert a blank disc into the recordable drive, then click OK and follow the on the type of recordable disc you use . Click Burn ISO, Start Creation, then click the type of recordable drive you want to its factory condition. To create the disk, click Start, All Programs, System Recovery, then click Create My Drivers-Applications CD(s). When you create one DVD-R or DVD+R disc, depending on -screen prompts.

8511772 - Gateway Starter Guide
Page 14
... problems, you can fix it by using the recovery discs you created. 1 Click Start, All Programs, System Recovery, then click Application & Driver Recovery. 2 Click the driver or application you know which application (program) or device driver is starting. 3 Follow the on-screen instructions and insert the operating system disc when prompted. 14 For more information on a hidden area of your online user guide. When the installation is saved on system recovery, see"Recovering...
... problems, you can fix it by using the recovery discs you created. 1 Click Start, All Programs, System Recovery, then click Application & Driver Recovery. 2 Click the driver or application you know which application (program) or device driver is starting. 3 Follow the on-screen instructions and insert the operating system disc when prompted. 14 For more information on a hidden area of your online user guide. When the installation is saved on system recovery, see"Recovering...

8511772 - Gateway Starter Guide
Page 15
... the hard drive to the C:\ My Backup folder and installs a new copy of hard drive space to use this restore option. 5 Click Next, then click Yes. 6 When file recovery has finished, click Restart. For more information on -screen instructions, and click one of the following system recovery options when prompted: • Full System Restore (Destructive) reformats the hard drive and restores the system software as it shipped from the factory. This option...
... the hard drive to the C:\ My Backup folder and installs a new copy of hard drive space to use this restore option. 5 Click Next, then click Yes. 6 When file recovery has finished, click Restart. For more information on -screen instructions, and click one of the following system recovery options when prompted: • Full System Restore (Destructive) reformats the hard drive and restores the system software as it shipped from the factory. This option...
Recovery Guide
Page 1
... original factory software. Click a topic to learn more: We recommend that you computer has its original factory settings. ■ Recovering your system under most conditions. Problem-solving may need to working condition. Using a recovery disc that you make a backup of your system to reinstall everything you need to recover your system from the hard drive tells how to reinstall specific software, such as you get your User Guide or at support.gateway.com...
... original factory software. Click a topic to learn more: We recommend that you computer has its original factory settings. ■ Recovering your system under most conditions. Problem-solving may need to working condition. Using a recovery disc that you make a backup of your system to reinstall everything you need to recover your system from the hard drive tells how to reinstall specific software, such as you get your User Guide or at support.gateway.com...
Recovery Guide
Page 2
... Windows XP, device drivers, and other programs. You can wait until later. A message asks you if you can also restore device drivers or programs by using your computer has a recordable drive. To record a set of recordable drive your computer has, you need to CDs, make sure that you have a recordable drive, see : ■ "Copying driver and application recovery files to a network" on page 5 ■ "Creating discs from recovery files...
... Windows XP, device drivers, and other programs. You can wait until later. A message asks you if you can also restore device drivers or programs by using your computer has a recordable drive. To record a set of recordable drive your computer has, you need to CDs, make sure that you have a recordable drive, see : ■ "Copying driver and application recovery files to a network" on page 5 ■ "Creating discs from recovery files...

Recovery Guide
Page 10
... Restore. To restore using Gateway System Recovery, you should try Microsoft System Restore to determine whether you can return to one of hard-to System Restore dialog box opens. 10 www.gateway.com The Welcome to -resolve software problems, you can restore your system running again. The Microsoft Windows XP Help and Support Center opens. 2 Click Undo changes to a previous condition. Recovering your system Recovering your system using Microsoft System Restore...
... Restore. To restore using Gateway System Recovery, you should try Microsoft System Restore to determine whether you can return to one of hard-to System Restore dialog box opens. 10 www.gateway.com The Welcome to -resolve software problems, you can restore your system running again. The Microsoft Windows XP Help and Support Center opens. 2 Click Undo changes to a previous condition. Recovering your system Recovering your system using Microsoft System Restore...
Recovery Guide
Page 12
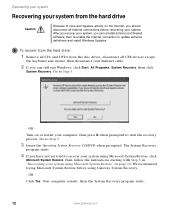
... Recovering your system from the disc drives, disconnect all Internet connections before using Microsoft System Restore" on or restart your system. OR - To recover from the hard drive: 1 Remove all CDs and DVDs from the hard drive Caution Because of virus and spyware activity on the Internet, you should disconnect all USB devices except the keyboard and mouse, then disconnect your Internet cable. 2 If you can still run Windows, click Start, All Programs, System Recovery...
... Recovering your system from the disc drives, disconnect all Internet connections before using Microsoft System Restore" on or restart your system. OR - To recover from the hard drive: 1 Remove all CDs and DVDs from the hard drive Caution Because of virus and spyware activity on the Internet, you should disconnect all USB devices except the keyboard and mouse, then disconnect your Internet cable. 2 If you can still run Windows, click Start, All Programs, System Recovery...


