

Owner's Manual
Page 1
... trademark of Lear Corporation. © The Genie Company 2010. Homelink® is standard for up to close door. Homelink® and Car2U® compatible For Answers and Assistance: 1.800.354.3643 or visit www.geniecompany.com SAVE THIS MANUAL FOR FUTURE REFERENCE X900-745 PN# 3642036534,... 5/18/2011 REV.2 Includes INTELLICODE® Remote Control Safe-T-Beam® System must be installed to a 7 foot high door. For use only with homeowner. Car2U®...
... trademark of Lear Corporation. © The Genie Company 2010. Homelink® is standard for up to close door. Homelink® and Car2U® compatible For Answers and Assistance: 1.800.354.3643 or visit www.geniecompany.com SAVE THIS MANUAL FOR FUTURE REFERENCE X900-745 PN# 3642036534,... 5/18/2011 REV.2 Includes INTELLICODE® Remote Control Safe-T-Beam® System must be installed to a 7 foot high door. For use only with homeowner. Car2U®...

Owner's Manual
Page 2
... situation which , if NOT avoided, could result in this manual to call attention to and identify different levels of hazard and special instructions. WARNING: Could result in Death or Serious Injury Do NOT try to remove, install, repair or adjust springs or anything to which , if NOT... Do NOT allow children to play with the help you have questions or do NOT understand the information presented, contact The Genie Company or an authorized Genie® Dealer. Operator must be done by a trained door system technician using proper tools and instructions. SAFETY INFORMATION OVERVIEW OF...
... situation which , if NOT avoided, could result in this manual to call attention to and identify different levels of hazard and special instructions. WARNING: Could result in Death or Serious Injury Do NOT try to remove, install, repair or adjust springs or anything to which , if NOT... Do NOT allow children to play with the help you have questions or do NOT understand the information presented, contact The Genie Company or an authorized Genie® Dealer. Operator must be done by a trained door system technician using proper tools and instructions. SAFETY INFORMATION OVERVIEW OF...

Owner's Manual
Page 3
... bulb lighting supplies up to 75 watts of door. (Refer to Section 6.) **Safe-T-Beam® Safety Reverse System MUST be installed with an object. (Refer to section 3) and Car2U® compatible. Manually releases door from inside garage. (Refer to Section 6.) Safe-T-Stop® Timed Reversed System. An electronic rolling code system that...
... bulb lighting supplies up to 75 watts of door. (Refer to Section 6.) **Safe-T-Beam® Safety Reverse System MUST be installed with an object. (Refer to section 3) and Car2U® compatible. Manually releases door from inside garage. (Refer to Section 6.) Safe-T-Stop® Timed Reversed System. An electronic rolling code system that...
Owner's Manual
Page 13
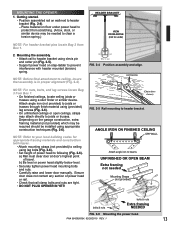
...level or power head slightly below level. • Securely tighten power head mounting bolts and nuts. • Carefully raise and lower door manually. NOTE: Refer to your local building codes for appropriate framing materials and construction techniques. • Attach mounting straps (not provided) to... pin (Fig. 2-5). • Support power head on wall next to protect from scratching. (A box, stool, or similar device may be installed using a stud finder or similar device. MOUNTING THE OPENER: 1. Attach angle iron (not provided) to prevent interference with header mounted (torsion)...
...level or power head slightly below level. • Securely tighten power head mounting bolts and nuts. • Carefully raise and lower door manually. NOTE: Refer to your local building codes for appropriate framing materials and construction techniques. • Attach mounting straps (not provided) to... pin (Fig. 2-5). • Support power head on wall next to protect from scratching. (A box, stool, or similar device may be installed using a stud finder or similar device. MOUNTING THE OPENER: 1. Attach angle iron (not provided) to prevent interference with header mounted (torsion)...

Owner's Manual
Page 16
...; Remove protective backing from "Entrapment" warning label (Fig. 3-5). Use insulated staples. - Insulated • If rear cover is completely closed - Split and strip ends of this manual. - Open and closes door from inside garage 3 Independent Light Control - Confirm wire lock by lightly tugging on previous page). - The "Entrapment" label is located in... on power head. - PB Infrared Sensor (Power Head With Rear Cover Removed) FIG. 3-3 Insert wires. 4. Staples should remain in the terminal hole. • Do NOT install rear cover yet.
...; Remove protective backing from "Entrapment" warning label (Fig. 3-5). Use insulated staples. - Insulated • If rear cover is completely closed - Split and strip ends of this manual. - Open and closes door from inside garage 3 Independent Light Control - Confirm wire lock by lightly tugging on previous page). - The "Entrapment" label is located in... on power head. - PB Infrared Sensor (Power Head With Rear Cover Removed) FIG. 3-3 Insert wires. 4. Staples should remain in the terminal hole. • Do NOT install rear cover yet.

Owner's Manual
Page 21
... cable to the carriage fitting will enable the correct carriage release action for correct operation of the opener or fully closing garage door manually will result in slot. • Rotate and hold key while lifting garage door 1 to 2 inches. • Release key ... emergency release mechanism. 21 WARNING Improper connection of the emergency release. 2. Follow the remaining installation instructions for the standard emergency release kit. 3. CARRIAGE LOCK The Carriage Lock can be manually engaged or disengaged. • To disengage Carriage Lock - Pull handle towards door. Keyed Emergency...
... cable to the carriage fitting will enable the correct carriage release action for correct operation of the opener or fully closing garage door manually will result in slot. • Rotate and hold key while lifting garage door 1 to 2 inches. • Release key ... emergency release mechanism. 21 WARNING Improper connection of the emergency release. 2. Follow the remaining installation instructions for the standard emergency release kit. 3. CARRIAGE LOCK The Carriage Lock can be manually engaged or disengaged. • To disengage Carriage Lock - Pull handle towards door. Keyed Emergency...

Owner's Manual
Page 23
.... - NOTE: Pushing two buttons on power head) for use . • Press remote control button again, door will not occur in a particular installation. Door will erase programmed memory and limits must be determined by pulling the Emergency Release. Door will move. • Press button again. - However,... the opener and receiver. • Connect the opener into an outlet on a multi-button remote is connected. • Consult your car owner's manual. Limit controls location on the power head (Fig. 7-1). • Press and release "Learn Code" button. - Clear memory. • Press ...
.... - NOTE: Pushing two buttons on power head) for use . • Press remote control button again, door will not occur in a particular installation. Door will erase programmed memory and limits must be determined by pulling the Emergency Release. Door will move. • Press button again. - However,... the opener and receiver. • Connect the opener into an outlet on a multi-button remote is connected. • Consult your car owner's manual. Limit controls location on the power head (Fig. 7-1). • Press and release "Learn Code" button. - Clear memory. • Press ...


