
Manual
Page 1
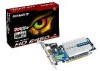
... authorized by Rovi Corporation, and is intended for any errors or omissions that is prohibited. Reverse engineering or disassembly is protected by U.S. Trademarks Third-party brands and names are the properties of GBT. GV-R645SL-1GI/ GV-R645SC-1GI/ GV-R645OC-1GI/ GV-R645D3-512I AMD RadeonTM HD6450 Graphics Accelerator User's Manual Rev. 103 12MM-R645S-103ER Copyright © 2011 GIGABYTE TECHNOLOGY CO., LTD Copyright by Rovi Corporation.
... authorized by Rovi Corporation, and is intended for any errors or omissions that is prohibited. Reverse engineering or disassembly is protected by U.S. Trademarks Third-party brands and names are the properties of GBT. GV-R645SL-1GI/ GV-R645SC-1GI/ GV-R645OC-1GI/ GV-R645D3-512I AMD RadeonTM HD6450 Graphics Accelerator User's Manual Rev. 103 12MM-R645S-103ER Copyright © 2011 GIGABYTE TECHNOLOGY CO., LTD Copyright by Rovi Corporation.
Manual
Page 6
Software Installation 14 3.1. Driver and Utility Installation 14 3.1.1. Appendix...33 5.1. Hardware Installation 8 2.1. Display Properties Pages 18 4. Board Layout...8 2.2. Driver Installation...14 3.2. Taskbar Icon...16 3.3. Troubleshooting Tips 32 5. Table of Contents 1. Hardware Installation...13 3. Resolutions and Color Depth Tables (In Windows XP 33 5.2. Regulatory Statements 34 - 6 - Introduction...7 1.1. Minimum System Requirements 7 2. Features...7 1.2.
Software Installation 14 3.1. Driver and Utility Installation 14 3.1.1. Appendix...33 5.1. Hardware Installation 8 2.1. Display Properties Pages 18 4. Board Layout...8 2.2. Driver Installation...14 3.2. Taskbar Icon...16 3.3. Troubleshooting Tips 32 5. Table of Contents 1. Hardware Installation...13 3. Resolutions and Color Depth Tables (In Windows XP 33 5.2. Regulatory Statements 34 - 6 - Introduction...7 1.1. Minimum System Requirements 7 2. Features...7 1.2.

Manual
Page 7
...; 4/CoreTM 2 or AMD AthlonTM /PhenomTM - 1 GB or more of certified power supplies, go to safety regulations. (For the list of system memory for software installation (CD-ROM or DVD-ROM drive) - Windows® 7 - Windows® Vista - Minimum System Requirements • Hardware - Features • Powered by AMD RadeonTM HD 6450 Graphics Processing Unit (GPU) • Supports PCI Express 2.1 • Integrated with 1 GB DDR3 memory (For GV-R645SC-1GI / GV-R645OC-1GI / GV-R645SL-1GI) • Integrated with Service Pack 2 (SP2...
...; 4/CoreTM 2 or AMD AthlonTM /PhenomTM - 1 GB or more of certified power supplies, go to safety regulations. (For the list of system memory for software installation (CD-ROM or DVD-ROM drive) - Windows® 7 - Windows® Vista - Minimum System Requirements • Hardware - Features • Powered by AMD RadeonTM HD 6450 Graphics Processing Unit (GPU) • Supports PCI Express 2.1 • Integrated with 1 GB DDR3 memory (For GV-R645SC-1GI / GV-R645OC-1GI / GV-R645SL-1GI) • Integrated with Service Pack 2 (SP2...
Manual
Page 8
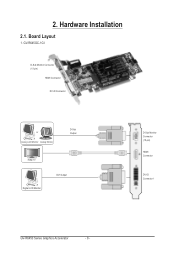
2. GV-R645OC-1GI D-Sub Monitor Connector (15-pin) HDMI Connector DVI-D Connector or Analog LCD Monitor Analog Monitor D-Sub Output HDMI TV Digital LCD Monitor DVI Output D-Sub Monitor Connector (15-pin) HDMI Connector DVI-D Connector 1 GV-R6450 Series Graphics Accelerator - 8 - Board Layout 1. Hardware Installation 2.1.
2. GV-R645OC-1GI D-Sub Monitor Connector (15-pin) HDMI Connector DVI-D Connector or Analog LCD Monitor Analog Monitor D-Sub Output HDMI TV Digital LCD Monitor DVI Output D-Sub Monitor Connector (15-pin) HDMI Connector DVI-D Connector 1 GV-R6450 Series Graphics Accelerator - 8 - Board Layout 1. Hardware Installation 2.1.

Manual
Page 11
Hardware Installation 4.GV-R645SL-1GI D-Sub Monitor Connector (15-pin) HDMI Connector DVI-D Connector or Analog LCD Monitor Analog Monitor D-Sub Output HDMI TV Digital LCD Monitor DVI Output D-Sub Monitor Connector (15-pin) HDMI Connector DVI-D Connector 1 - 11 -
Hardware Installation 4.GV-R645SL-1GI D-Sub Monitor Connector (15-pin) HDMI Connector DVI-D Connector or Analog LCD Monitor Analog Monitor D-Sub Output HDMI TV Digital LCD Monitor DVI Output D-Sub Monitor Connector (15-pin) HDMI Connector DVI-D Connector 1 - 11 -

Manual
Page 12
... computer. 1. GV-R6450 Series Graphics Accelerator - 12 - Using non-official GIGABYTE BIOS might cause problem(s) on a grounded anti-static mat. If you work correctly, please use official GIGABYTE BIOS only. For more details, refer to a metal object,such as the anti-static mat. Use a grounded wrist strap before proceeding. Inspect the card carton for HDMI output function, set the onboard audio controller or the external sound card to be the default Sound Playback...
... computer. 1. GV-R6450 Series Graphics Accelerator - 12 - Using non-official GIGABYTE BIOS might cause problem(s) on a grounded anti-static mat. If you work correctly, please use official GIGABYTE BIOS only. For more details, refer to a metal object,such as the anti-static mat. Use a grounded wrist strap before proceeding. Inspect the card carton for HDMI output function, set the onboard audio controller or the external sound card to be the default Sound Playback...

Manual
Page 13
... ready to install your graphics card, use the HDMI connector. 2.2. Step 1. Make sure that you have prepared your computer, you are now ready to your graphics card. Step 2. To connect a flat panel display to your graphics card, use the D-Sub connector. Please refer to fasten the card in firmly until the card is securely inserted. To connect a D-Sub monitor to your graphics card, use the DVI-D connector. Hardware Installation then align your card; To connect an HDMI monitor to proceed with the PCI Express...
... ready to install your graphics card, use the HDMI connector. 2.2. Step 1. Make sure that you have prepared your computer, you are now ready to your graphics card. Step 2. To connect a flat panel display to your graphics card, use the D-Sub connector. Please refer to fasten the card in firmly until the card is securely inserted. To connect a D-Sub monitor to your graphics card, use the DVI-D connector. Hardware Installation then align your card; To connect an HDMI monitor to proceed with the PCI Express...

Manual
Page 14
... install DirectX separately. GV-R6450 Series Graphics Accelerator - 14 - 3. Step 2: Select the displayed language and then click Next. Make sure your system has installed DirectX 9 or later version. 2. Users who run Windows XP with Service Pack 2 or above do not need to My Computer, double-click the optical drive and execute the setup.exe program.) Step 1: Click the Install Display Driver item. First make sure your system has installed the appropriate motherboard drivers...
... install DirectX separately. GV-R6450 Series Graphics Accelerator - 14 - 3. Step 2: Select the displayed language and then click Next. Make sure your system has installed DirectX 9 or later version. 2. Users who run Windows XP with Service Pack 2 or above do not need to My Computer, double-click the optical drive and execute the setup.exe program.) Step 1: Click the Install Display Driver item. First make sure your system has installed the appropriate motherboard drivers...

Manual
Page 16
Or you will find an ATI icon in the notification area. 3.2. Right-click the ATI icon to configure all your graphics card settings. The ATI Catalyst Control Center is used to enter the ATI Catalyst Control Center. Taskbar Icon After installation of the display driver, you can right-click on the desktop and select Catalyst(TM) Control Center. GV-R6450 Series Graphics Accelerator - 16 - Right-click the icon to enter the ATI Catalyst Control Center.
Or you will find an ATI icon in the notification area. 3.2. Right-click the ATI icon to configure all your graphics card settings. The ATI Catalyst Control Center is used to enter the ATI Catalyst Control Center. Taskbar Icon After installation of the display driver, you can right-click on the desktop and select Catalyst(TM) Control Center. GV-R6450 Series Graphics Accelerator - 16 - Right-click the icon to enter the ATI Catalyst Control Center.
Manual
Page 17
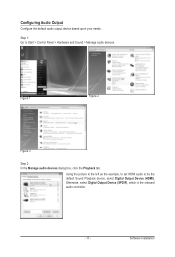
Configuring Audio Output Configure the default audio output device based upon your needs. Using the picture to the left as the example, to set HDMI audio to Start > Control Panel > Hardware and Sound > Manage audio devices. Figure 1 Figure 2 Figure 3 Step 2: In the Manage audio devices dialog box, click the Playback tab. Step 1: Go to be the default Sound Playback device, select Digital Output Device (HDMI). Otherwise, select Digital Output Device (SPDIF), which is the onboard audio controller. - 17 - Software Installation
Configuring Audio Output Configure the default audio output device based upon your needs. Using the picture to the left as the example, to set HDMI audio to Start > Control Panel > Hardware and Sound > Manage audio devices. Figure 1 Figure 2 Figure 3 Step 2: In the Manage audio devices dialog box, click the Playback tab. Step 1: Go to be the default Sound Playback device, select Digital Output Device (HDMI). Otherwise, select Digital Output Device (SPDIF), which is the onboard audio controller. - 17 - Software Installation

Manual
Page 18
3.3. Select Display Settings to DVI adapter.(optional) GV-R6450 Series Graphics Accelerator - 18 - You can move the slider to change the resolution. D i s p l a y Model GV-R645SC-1GI GV-R645OC-1GI Matrix CRT+DVI-D Yes Yes DVI-D+DVI-D (Note1) Yes Yes HDMI+DVI-D Yes Yes HDMI+CRT Yes Yes GV-R645D3-512I GV-R645SL-1GI Yes Yes Yes Yes Yes Yes Yes Yes (Note 1) By a HDMI to adjust the screen resolution and color quality settings. You can click the item to change the color quality. Display Properties Pages Display Settings (Resolutions and Color Quality...
3.3. Select Display Settings to DVI adapter.(optional) GV-R6450 Series Graphics Accelerator - 18 - You can move the slider to change the resolution. D i s p l a y Model GV-R645SC-1GI GV-R645OC-1GI Matrix CRT+DVI-D Yes Yes DVI-D+DVI-D (Note1) Yes Yes HDMI+DVI-D Yes Yes HDMI+CRT Yes Yes GV-R645D3-512I GV-R645SL-1GI Yes Yes Yes Yes Yes Yes Yes Yes (Note 1) By a HDMI to adjust the screen resolution and color quality settings. You can click the item to change the color quality. Display Properties Pages Display Settings (Resolutions and Color Quality...
Manual
Page 19
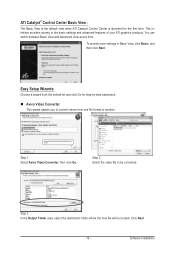
... Video Converter, then click Go. You can switch between Basic View and Advanced View at any time. Software Installation Step 3: In the Output Folder area, select the destination folder where the new file will be converted. This interface provides access to the basic settings and advanced features of your ATI graphics products. ATI Catalyst® Control Center Basic View : The Basic View is the default view when ATI Catalyst Control Center...
... Video Converter, then click Go. You can switch between Basic View and Advanced View at any time. Software Installation Step 3: In the Output Folder area, select the destination folder where the new file will be converted. This interface provides access to the basic settings and advanced features of your ATI graphics products. ATI Catalyst® Control Center Basic View : The Basic View is the default view when ATI Catalyst Control Center...

Manual
Page 21
...desktop, including changing desktop resolution and desktop mode, setting up extended desktop (requires more balanced setting. Video Playback Use this option to optimize video playback in Basic and Advanced View provides hardware and software information about the installed graphics card. Graphics Software Provides software information including driver version, CATALYST version, Direct 3D version and so on. Graphics Hardware Provides hardware information including graphics chipset, BIOS version, memory size, core clock and so on the second display. Display...
...desktop, including changing desktop resolution and desktop mode, setting up extended desktop (requires more balanced setting. Video Playback Use this option to optimize video playback in Basic and Advanced View provides hardware and software information about the installed graphics card. Graphics Software Provides software information including driver version, CATALYST version, Direct 3D version and so on. Graphics Hardware Provides hardware information including graphics chipset, BIOS version, memory size, core clock and so on the second display. Display...

Manual
Page 23
... update the Catalyst Control Center. The Catalyst Control Center Preferences page contains the following options: Always on Top Hide Tooltips Hide Splash Screen Enable System Tray Menu Select a Language ... Restore Factory Defaults ... - 23 - Software Installation Preferences Properties: The Preferences page helps to a specific graphics card. If there is more than one graphics card installed in your desktop, video, and 3D applications. Profiles Properties: You can be quickly activated manually...
... update the Catalyst Control Center. The Catalyst Control Center Preferences page contains the following options: Always on Top Hide Tooltips Hide Splash Screen Enable System Tray Menu Select a Language ... Restore Factory Defaults ... - 23 - Software Installation Preferences Properties: The Preferences page helps to a specific graphics card. If there is more than one graphics card installed in your desktop, video, and 3D applications. Profiles Properties: You can be quickly activated manually...

Manual
Page 25
... configuring your display devices and arranging your desktop in a multi-monitor environment. Software Installation Use Displays Manager to set a refresh rate of OpenGL and Direct 3D applications. Note: The stretch vertically and horizontally options are not supported on systems running Windows Vista. Displays Manager: Displays Manager is lower than optimal. - 25 - Note: On systems Windows XP, this page will show up the 3D Refresh Rate Override item. Use 3D Refresh Rate Override to change your display setup...
... configuring your display devices and arranging your desktop in a multi-monitor environment. Software Installation Use Displays Manager to set a refresh rate of OpenGL and Direct 3D applications. Note: The stretch vertically and horizontally options are not supported on systems running Windows Vista. Displays Manager: Displays Manager is lower than optimal. - 25 - Note: On systems Windows XP, this page will show up the 3D Refresh Rate Override item. Use 3D Refresh Rate Override to change your display setup...
Manual
Page 26
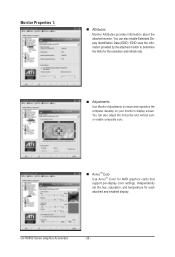
... set the hue, saturation, and temperature for the resolution and refresh rate. Adjustments Use Monitor Adjustments to resize and reposition the computer desktop on your monitor's display screen. GV-R6450 Series Graphics Accelerator - 26 - EDID uses the information provided by the attached monitor to determine the limits for each attached and enabled display. You can also adjust the horizontal and vertical sync or enable composite sync. AvivoTM Colo Use AvivoTM Color for AMD graphics cards that support per-display color settings...
... set the hue, saturation, and temperature for the resolution and refresh rate. Adjustments Use Monitor Adjustments to resize and reposition the computer desktop on your monitor's display screen. GV-R6450 Series Graphics Accelerator - 26 - EDID uses the information provided by the attached monitor to determine the limits for each attached and enabled display. You can also adjust the horizontal and vertical sync or enable composite sync. AvivoTM Colo Use AvivoTM Color for AMD graphics cards that support per-display color settings...

Manual
Page 27
... are common in rendered 3D images. Software Installation Rather than determining the color to display for quality is best used when the 3D image is animated and smooth motion is the most important consideration. • Setting for each pixel by sampling a single location at the pixel's center, anti-aliasing samples multiple locations within each pixel and blends the...
... are common in rendered 3D images. Software Installation Rather than determining the color to display for quality is best used when the 3D image is animated and smooth motion is the most important consideration. • Setting for each pixel by sampling a single location at the pixel's center, anti-aliasing samples multiple locations within each pixel and blends the...

Manual
Page 30
... with video overlay support. Note: These settings will be available when you view streaming video. Extended Desktop Mode is already known or understood. GV-R6450 Series Graphics Accelerator - 30 - The bar determines how the two interlaced video fields are converted into a non-interlaced form. This page is useful when it is not necessary to change the way you connect two monitors. All Settings The All Settings page...
... with video overlay support. Note: These settings will be available when you view streaming video. Extended Desktop Mode is already known or understood. GV-R6450 Series Graphics Accelerator - 30 - The bar determines how the two interlaced video fields are converted into a non-interlaced form. This page is useful when it is not necessary to change the way you connect two monitors. All Settings The All Settings page...

Manual
Page 31
...graphics processor and memory. Use the Automated clock configuration utility to determine whether your ATI CrossFireX configurations are configured properly and functioning optimally. If ATI CrossFireX is booted or only when running 3D applications. You can be configured to a particular configuration. Software Installation Alternatively, manually set these speeds to maximize your viewing experience by the ATI Catalyst display driver, ATI CrossFireX support is detected for ATI CrossFireX configuration. - 31 - ATI Overdrive: Use Overdrive to meet your specific requirements...
...graphics processor and memory. Use the Automated clock configuration utility to determine whether your ATI CrossFireX configurations are configured properly and functioning optimally. If ATI CrossFireX is booted or only when running 3D applications. You can be configured to a particular configuration. Software Installation Alternatively, manually set these speeds to maximize your viewing experience by the ATI Catalyst display driver, ATI CrossFireX support is detected for ATI CrossFireX configuration. - 31 - ATI Overdrive: Use Overdrive to meet your specific requirements...

Manual
Page 32
... manufacturer. Press on your keyboard after system starts up. 4. Troubleshooting Tips The following troubleshooting tips may help if you install the graphics driver. Make sure that the card is securely fastened to the card's display connector. If necessary, disable any built-in the Windows Help or contact your computer. After getting into Safe Mode, in graphics to be disabled or to the monitor's manual.) GV-R6450 Series Graphics Accelerator - 32 -
... manufacturer. Press on your keyboard after system starts up. 4. Troubleshooting Tips The following troubleshooting tips may help if you install the graphics driver. Make sure that the card is securely fastened to the card's display connector. If necessary, disable any built-in the Windows Help or contact your computer. After getting into Safe Mode, in graphics to be disabled or to the monitor's manual.) GV-R6450 Series Graphics Accelerator - 32 -


