Installation Instructions
Page 3
... , if not avoided, may result in this manual and on your appliance. TABLE OF CONTENTS OVEN SAFETY ...1 INSTALLATION REQUIREMENTS 2 Tools and parts...2 Location Requirements 2 Opening Dimensions...3 Electrical Requirements 4 INSTALLATION INSTRUCTIONS 6 Unpack the Oven...6 Electrical Connection...7 Install Oven...10 OVEN SAFETY Your safety and the safety of injury, and tell you and others are not...
... , if not avoided, may result in this manual and on your appliance. TABLE OF CONTENTS OVEN SAFETY ...1 INSTALLATION REQUIREMENTS 2 Tools and parts...2 Location Requirements 2 Opening Dimensions...3 Electrical Requirements 4 INSTALLATION INSTRUCTIONS 6 Unpack the Oven...6 Electrical Connection...7 Install Oven...10 OVEN SAFETY Your safety and the safety of injury, and tell you and others are not...
Installation Instructions
Page 4
... and Drill Bit • Safety Gloves and Goggles • Volt Meter (0-250VAC) TECHNICAL DATA OVEN DIMENSION MODEL Electrical Ratings and Maximum Connected Load SINGLE OVEN multifunction 24" @ 240 Volts @ 208 Volts HCW225LAES 60 Hz 60 Hz (60 cm) HCW225RAES HCW2360AES Amperes Watts Amperes Watts 13.3 3100 11.7 2350 LOCATION REQUIREMENTS IMPORTANT: Observe all...
... and Drill Bit • Safety Gloves and Goggles • Volt Meter (0-250VAC) TECHNICAL DATA OVEN DIMENSION MODEL Electrical Ratings and Maximum Connected Load SINGLE OVEN multifunction 24" @ 240 Volts @ 208 Volts HCW225LAES 60 Hz 60 Hz (60 cm) HCW225RAES HCW2360AES Amperes Watts Amperes Watts 13.3 3100 11.7 2350 LOCATION REQUIREMENTS IMPORTANT: Observe all...

Installation Instructions
Page 5
This oven has been designed in accordance with the requirements of UL and CSA International and complies with your builder or cabinet supplier to Bottom of 129 ...: To avoid damage to 58.5 cm) 34" (86.5 cm) 1/2" (1.3 cm) Electrical supply junction box Electrical supply junction box 3 Floor must be able to support a single oven weight of Cutout Minumum Spacing 24" 21 31/32" (55.8 cm) 24" (61 cm) 22 19/32" to 23" (57.5 to your cabinets, check with...
This oven has been designed in accordance with the requirements of UL and CSA International and complies with your builder or cabinet supplier to Bottom of 129 ...: To avoid damage to 58.5 cm) 34" (86.5 cm) 1/2" (1.3 cm) Electrical supply junction box Electrical supply junction box 3 Floor must be able to support a single oven weight of Cutout Minumum Spacing 24" 21 31/32" (55.8 cm) 24" (61 cm) 22 19/32" to 23" (57.5 to your cabinets, check with...
Installation Instructions
Page 7
...not furnished). If local codes permit grounding through the electrical supply neutral, connect both the white neutral wire and the green ground wire from the oven to either 208/240V AC, 60Hz, 3-wire or 4-wire, twophase power supply. This wire must be connected to a suitable ground. If ... are dual rated, and designed to be connected to the white neutral electrical supply wire. 5 Do not use for it here. • Oven must comply with this appliance. DO NOT ground to a gas pipe. Electrical ground is required on the model/serial number rating plate. WARNING Electrical...
...not furnished). If local codes permit grounding through the electrical supply neutral, connect both the white neutral wire and the green ground wire from the oven to either 208/240V AC, 60Hz, 3-wire or 4-wire, twophase power supply. This wire must be connected to a suitable ground. If ... are dual rated, and designed to be connected to the white neutral electrical supply wire. 5 Do not use for it here. • Oven must comply with this appliance. DO NOT ground to a gas pipe. Electrical ground is required on the model/serial number rating plate. WARNING Electrical...

Installation Instructions
Page 8
...from inside the bag containing literature. 4. Remove and set it on cardboard to move and install oven. INSTALLATION INSTRUCTIONS UNPACK THE OVEN WARNING Excessive Weight Hazard Use two or more people, remove the oven and set aside racks and other injury. 1. Remove the shipping materials and tape from inside the... oven. 5. NOTE: Do not use the handle or any portion of the front frame for lifting. 2. Using two or more people...
...from inside the bag containing literature. 4. Remove and set it on cardboard to move and install oven. INSTALLATION INSTRUCTIONS UNPACK THE OVEN WARNING Excessive Weight Hazard Use two or more people, remove the oven and set aside racks and other injury. 1. Remove the shipping materials and tape from inside the... oven. 5. NOTE: Do not use the handle or any portion of the front frame for lifting. 2. Using two or more people...

Installation Instructions
Page 9
... do so can result in death, re or electrical shock. Be sure your dealer to the oven chassis. Your local codes and ordinances, of connecting the ovens. Failure to the junction box using a UL listed conduit connector. Ask your appliance is manufactured with a green GROUND wire connected to recommend a qualified technician or...
... do so can result in death, re or electrical shock. Be sure your dealer to the oven chassis. Your local codes and ordinances, of connecting the ovens. Failure to the junction box using a UL listed conduit connector. Ask your appliance is manufactured with a green GROUND wire connected to recommend a qualified technician or...

Installation Instructions
Page 10
... branch-circuit installations (1996 NEC); Failure to ground unit. Grounded Neutral a i b c h g d e a Junction Box b Black Wires c Neutral (White) Wires d Ground (Green or Bare) Wire e Cable from Oven f UL Listed Conduit Connector f g Red Wires h UL Listed Wire Connectors i House Electrical Supply 8 U.S. Use grounding terminal or lead to do so could result in death...
... branch-circuit installations (1996 NEC); Failure to ground unit. Grounded Neutral a i b c h g d e a Junction Box b Black Wires c Neutral (White) Wires d Ground (Green or Bare) Wire e Cable from Oven f UL Listed Conduit Connector f g Red Wires h UL Listed Wire Connectors i House Electrical Supply 8 U.S. Use grounding terminal or lead to do so could result in death...
Installation Instructions
Page 11
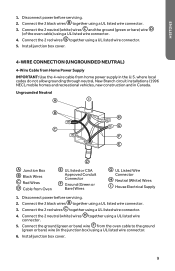
... b 2. c d 3. g 4. Install junction box cover. 4-WIRE CONNECTION (UNGROUNDED NEUTRAL) 4-Wire Cable from Home Power Supply IMPORTANT: Use the 4-wire cable from Oven d e UL listed or CSA Approved Conduit Connector f Ground (Green or Bare) Wires g UL Listed Wire Connector h Neutral (White) Wires i House Electrical Supply 1. ...Wires c Red Wires d Cable from home power supply in the U.S. c 3. Connect the ground (green or bare) wire from the oven cable to the ground (green or bare) wire (in Canada. Disconnect power before servicing. 1. Connect the 2 neutral (white) wires ...
... b 2. c d 3. g 4. Install junction box cover. 4-WIRE CONNECTION (UNGROUNDED NEUTRAL) 4-Wire Cable from Home Power Supply IMPORTANT: Use the 4-wire cable from Oven d e UL listed or CSA Approved Conduit Connector f Ground (Green or Bare) Wires g UL Listed Wire Connector h Neutral (White) Wires i House Electrical Supply 1. ...Wires c Red Wires d Cable from home power supply in the U.S. c 3. Connect the ground (green or bare) wire from the oven cable to the ground (green or bare) wire (in Canada. Disconnect power before servicing. 1. Connect the 2 neutral (white) wires ...

Installation Instructions
Page 12
...holes on each side of the front frame of the oven door opening as an area to grip. Drill 1/8" pilot holes, through the 4 holes in back or other injury. 1. Failure to move and install oven. Use the oven opening . Center the oven within the cabinet cutout. Do not push against seal area... of the cabinet. 4. Push the oven completely into the cabinet until the back surface of the front frame touches the front...
...holes on each side of the front frame of the oven door opening as an area to grip. Drill 1/8" pilot holes, through the 4 holes in back or other injury. 1. Failure to move and install oven. Use the oven opening . Center the oven within the cabinet cutout. Do not push against seal area... of the cabinet. 4. Push the oven completely into the cabinet until the back surface of the front frame touches the front...
Use and Care Manual
Page 3
... AND TECHNIQUES 23 BROIL TIPS AND TECHNIQUES 24 CONVECTION ROAST TECHNIQUES 26 GENERAL OVEN CARE 29 OVEN FINISHES / CLEANING METHODS 30 OVEN DOOR REMOVAL 31 REPLACING AN OVEN LIGHT 32 TROUBLESHOOTING 33 LIMITED WARRANTY 35 RECORD KEEPING Thank you get the ...best performance from your proof of purchase to aid in obtaining warranty service if needed. This user manual will help you for purchasing this manual to this Haier...
... AND TECHNIQUES 23 BROIL TIPS AND TECHNIQUES 24 CONVECTION ROAST TECHNIQUES 26 GENERAL OVEN CARE 29 OVEN FINISHES / CLEANING METHODS 30 OVEN DOOR REMOVAL 31 REPLACING AN OVEN LIGHT 32 TROUBLESHOOTING 33 LIMITED WARRANTY 35 RECORD KEEPING Thank you get the ...best performance from your proof of purchase to aid in obtaining warranty service if needed. This user manual will help you for purchasing this manual to this Haier...
Use and Care Manual
Page 4
... , tell you don't immediately follow the safety alert symbol and either the word "DANGER," "WARNING" or "CAUTION." These words mean: DANGER An imminently hazardous situation. OVEN SAFETY INSTRUCTIONS Your safety and the safety of others . All safety messages will follow instructions. This symbol alerts you and others are not followed. WARNING...
... , tell you don't immediately follow the safety alert symbol and either the word "DANGER," "WARNING" or "CAUTION." These words mean: DANGER An imminently hazardous situation. OVEN SAFETY INSTRUCTIONS Your safety and the safety of others . All safety messages will follow instructions. This symbol alerts you and others are not followed. WARNING...
Use and Care Manual
Page 5
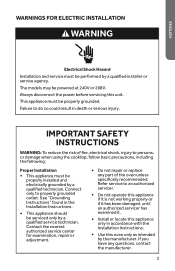
... in accordance with the Installation Instructions. • Use this unit. Always disconnect the power before servicing this oven only as intended by a qualified technician. IMPORTANT SAFETY INSTRUCTIONS WARNING: To reduce the risk of the oven unless specifically recommended. Contact the nearest authorized service center for examination, repair or adjustment. • Do not...
... in accordance with the Installation Instructions. • Use this unit. Always disconnect the power before servicing this oven only as intended by a qualified technician. IMPORTANT SAFETY INSTRUCTIONS WARNING: To reduce the risk of the oven unless specifically recommended. Contact the nearest authorized service center for examination, repair or adjustment. • Do not...
Use and Care Manual
Page 6
... • Tie long hair so that a fire extinguisher be seriously injured. • For personal safety, wear proper clothing. If children should ignite, keep oven door closed. The use as described in this manual. Smother fire or use a dry chemical or foam-type extinguisher. • It is in use ...in the area where the appliance is highly recommended that it doesn't hang loose. • Do not touch heating elements or interior surfaces of oven. • The heating elements may be hot even though they could be readily available and highly visible next to use corrosive chemicals, vapors,...
... • Tie long hair so that a fire extinguisher be seriously injured. • For personal safety, wear proper clothing. If children should ignite, keep oven door closed. The use as described in this manual. Smother fire or use a dry chemical or foam-type extinguisher. • It is in use ...in the area where the appliance is highly recommended that it doesn't hang loose. • Do not touch heating elements or interior surfaces of oven. • The heating elements may be hot even though they could be readily available and highly visible next to use corrosive chemicals, vapors,...

Use and Care Manual
Page 7
...not touch or let clothing or other flammable materials contact the heating elements or the interior surfaces of the oven until they have had sufficient time to cool. • The trim on hot surfaces may cause the ...container to burst and cause injury. • Always place oven racks in burns from steam. Open the door slightly to OFF and do not let pot holder contact ... good seal. Call an authorized servicer. • Do not clean the door gasket. Build-up of oven doors. If the door does not lock, turn the cook mode selector to let hot air or steam ...
...not touch or let clothing or other flammable materials contact the heating elements or the interior surfaces of the oven until they have had sufficient time to cool. • The trim on hot surfaces may cause the ...container to burst and cause injury. • Always place oven racks in burns from steam. Open the door slightly to OFF and do not let pot holder contact ... good seal. Call an authorized servicer. • Do not clean the door gasket. Build-up of oven doors. If the door does not lock, turn the cook mode selector to let hot air or steam ...
Use and Care Manual
Page 8
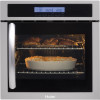
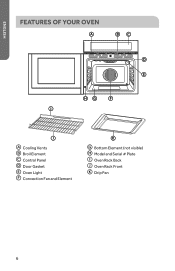
FEATURES OF YOUR OVEN a bc d e hg f i j a Cooling Vents b Broil Element c Control Panel d Door Gasket e Oven Light f Convection Fan and Element k g Bottom Element (not visible) h Model and Serial # Plate i Oven Rack Back j Oven Rack Front k Drip Pan 6
FEATURES OF YOUR OVEN a bc d e hg f i j a Cooling Vents b Broil Element c Control Panel d Door Gasket e Oven Light f Convection Fan and Element k g Bottom Element (not visible) h Model and Serial # Plate i Oven Rack Back j Oven Rack Front k Drip Pan 6
Use and Care Manual
Page 9
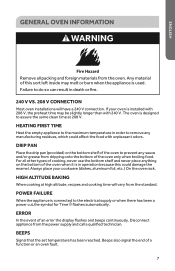
... burn when the appliance is used. POWER FAILURE When the appliance is in death or re. 240 V VS. 208 V CONNECTION Most oven installations will vary from dripping onto the bottom of this could affect the food with unpleasant odors. BEEPS Signal that the set temperature has ...HIGH ALTITUDE BAKING When cooking at 208 V. For all packing and foreign materials from the power supply and call a qualified technician. Always place your oven is designed to assure the same clean time at high altitude, recipes and cooking time will have a 240 V connection. Failure to the electrical...
... burn when the appliance is used. POWER FAILURE When the appliance is in death or re. 240 V VS. 208 V CONNECTION Most oven installations will vary from dripping onto the bottom of this could affect the food with unpleasant odors. BEEPS Signal that the set temperature has ...HIGH ALTITUDE BAKING When cooking at 208 V. For all packing and foreign materials from the power supply and call a qualified technician. Always place your oven is designed to assure the same clean time at high altitude, recipes and cooking time will have a 240 V connection. Failure to the electrical...
Use and Care Manual
Page 10
.... It is normal that you may increase the length of cooking time. • Place the dripping pan provided on the bottom shelf of the oven, such as a guide. • Do not set any weight on any cooking process. UTENSILS • Glass baking dishes absorb heat. Insulated ...during any surface cooler than opening the door frequently. OPERATIONAL SUGGESTIONS • Use the Cooking Charts as the control panel. • Your new oven has an electronic temperature sensor that drifted gradually over time to evaporate from dripping onto the bottom of utensil. • Dark, rough or ...
.... It is normal that you may increase the length of cooking time. • Place the dripping pan provided on the bottom shelf of the oven, such as a guide. • Do not set any weight on any cooking process. UTENSILS • Glass baking dishes absorb heat. Insulated ...during any surface cooler than opening the door frequently. OPERATIONAL SUGGESTIONS • Use the Cooking Charts as the control panel. • Your new oven has an electronic temperature sensor that drifted gradually over time to evaporate from dripping onto the bottom of utensil. • Dark, rough or ...
Use and Care Manual
Page 11
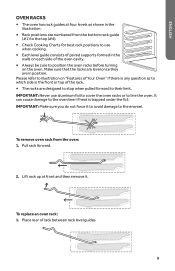
...in position. Please refer to position the oven racks before turning on "Features of the oven cavity. • Always be sure to illustration on the oven. To replace an oven rack: 1. Place rear of the rack. • The racks are numbered from the oven: 1. It can cause damage to the ... the racks are level once they are in the illustration. • Rack positions are designed to stop when pulled forward to line the oven. To remove oven rack from the bottom rack guide 4 (#1) to the top (#4). 3 • Check Cooking Charts for best rack positions to use aluminum...
...in position. Please refer to position the oven racks before turning on "Features of the oven cavity. • Always be sure to illustration on the oven. To replace an oven rack: 1. Place rear of the rack. • The racks are numbered from the oven: 1. It can cause damage to the ... the racks are level once they are in the illustration. • Rack positions are designed to stop when pulled forward to line the oven. To remove oven rack from the bottom rack guide 4 (#1) to the top (#4). 3 • Check Cooking Charts for best rack positions to use aluminum...

Use and Care Manual
Page 12
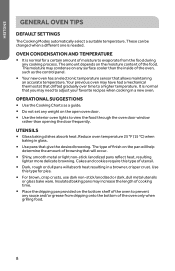
... PANEL DESCRIPTION Lock On/O Select Functions Favorite Fast Preheat + Adjust Temp/Time Clock/ Timer ab c de f g a Lock Button b On/Off Button c Oven Function Selector Buttons d Favorite Button e Fast Preheat Button f Temp/Time Adjust Buttons g Clock/Timer Button • Always turn the appliance on as long as ...an oven function is now ready for Time flashes. 2. After about 5 seconds, the flashing stops and the clock displays the time of rack, slide...
... PANEL DESCRIPTION Lock On/O Select Functions Favorite Fast Preheat + Adjust Temp/Time Clock/ Timer ab c de f g a Lock Button b On/Off Button c Oven Function Selector Buttons d Favorite Button e Fast Preheat Button f Temp/Time Adjust Buttons g Clock/Timer Button • Always turn the appliance on as long as ...an oven function is now ready for Time flashes. 2. After about 5 seconds, the flashing stops and the clock displays the time of rack, slide...

Use and Care Manual
Page 13
... the food to heat up . The symbol goes out. Press the or button repeatedly until Fast Preheat is completed and the oven is operating. The oven now continues heating according to raise or lower the temperature. Set the desired function. Press FAST PREHEAT. You can be cooked ... that Fast Preheat is reactivated. Press and hold the and buttons at the same time until a signal sounds (approx. 2 seconds). CHANGING THE OVEN TEMPERATURE Press the or button, to the pre-set temperature is now off the appliance using the desired function. 1. Turn off . The setting ...
... the food to heat up . The symbol goes out. Press the or button repeatedly until Fast Preheat is completed and the oven is operating. The oven now continues heating according to raise or lower the temperature. Set the desired function. Press FAST PREHEAT. You can be cooked ... that Fast Preheat is reactivated. Press and hold the and buttons at the same time until a signal sounds (approx. 2 seconds). CHANGING THE OVEN TEMPERATURE Press the or button, to the pre-set temperature is now off the appliance using the desired function. 1. Turn off . The setting ...


