Installation Instructions
Page 4
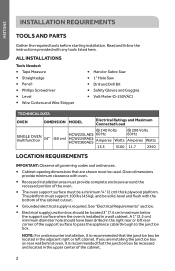
...) TECHNICAL DATA OVEN DIMENSION MODEL Electrical Ratings and Maximum Connected Load SINGLE OVEN multifunction 24" @ 240 Volts @ 208 Volts HCW225LAES 60 Hz 60 Hz (60 cm) HCW225RAES HCW2360AES Amperes Watts Amperes Watts 13.3 3100 11.7 2350 LOCATION REQUIREMENTS IMPORTANT: Observe all governing codes and ordinances. • Cabinet opening dimensions that are installing the junction box on rear wall behind oven, it is recommended that the junction box be located in the...
...) TECHNICAL DATA OVEN DIMENSION MODEL Electrical Ratings and Maximum Connected Load SINGLE OVEN multifunction 24" @ 240 Volts @ 208 Volts HCW225LAES 60 Hz 60 Hz (60 cm) HCW225RAES HCW2360AES Amperes Watts Amperes Watts 13.3 3100 11.7 2350 LOCATION REQUIREMENTS IMPORTANT: Observe all governing codes and ordinances. • Cabinet opening dimensions that are installing the junction box on rear wall behind oven, it is recommended that the junction box be located in the...
Installation Instructions
Page 7
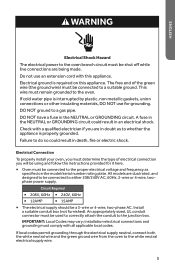
.... Install a suitable conduit box (not furnished). Electrical ground is interrupted by plastic, non metallic gaskets, union connections or other insulating materials, DO NOT use an extension cord with all applicable local codes. Failure to do so could result in the NEUTRAL or GROUNDING circuit. If cold water pipe is required on the model/serial number rating plate. DO NOT have a fuse in an electrical shock. WARNING Electrical...
.... Install a suitable conduit box (not furnished). Electrical ground is interrupted by plastic, non metallic gaskets, union connections or other insulating materials, DO NOT use an extension cord with all applicable local codes. Failure to do so could result in the NEUTRAL or GROUNDING circuit. If cold water pipe is required on the model/serial number rating plate. DO NOT have a fuse in an electrical shock. WARNING Electrical...
Use and Care Manual
Page 3
... purchase 1 TABLE OF CONTENTS OVEN SAFETY INSTRUCTIONS 2 FEATURES OF YOUR OVEN 6 GENERAL OVEN INFORMATION 7 GENERAL OVEN TIPS 8 ELECTRONIC CONTROL 10 COOKING WITH THE CONVECTION OVEN 15 OVEN MODES...16 QUICK TIPS...19 CONVECTION BAKE TIPS AND TECHNIQUES 20 BAKE TIPS AND TECHNIQUES 22 CONVECTION BROIL TIPS AND TECHNIQUES 23 BROIL TIPS AND TECHNIQUES 24 CONVECTION ROAST TECHNIQUES 26 GENERAL OVEN CARE 29 OVEN FINISHES / CLEANING METHODS 30 OVEN DOOR REMOVAL 31 REPLACING AN OVEN LIGHT 32 TROUBLESHOOTING 33 LIMITED WARRANTY 35 RECORD KEEPING Thank...
... purchase 1 TABLE OF CONTENTS OVEN SAFETY INSTRUCTIONS 2 FEATURES OF YOUR OVEN 6 GENERAL OVEN INFORMATION 7 GENERAL OVEN TIPS 8 ELECTRONIC CONTROL 10 COOKING WITH THE CONVECTION OVEN 15 OVEN MODES...16 QUICK TIPS...19 CONVECTION BAKE TIPS AND TECHNIQUES 20 BAKE TIPS AND TECHNIQUES 22 CONVECTION BROIL TIPS AND TECHNIQUES 23 BROIL TIPS AND TECHNIQUES 24 CONVECTION ROAST TECHNIQUES 26 GENERAL OVEN CARE 29 OVEN FINISHES / CLEANING METHODS 30 OVEN DOOR REMOVAL 31 REPLACING AN OVEN LIGHT 32 TROUBLESHOOTING 33 LIMITED WARRANTY 35 RECORD KEEPING Thank...
Use and Care Manual
Page 6
... in heating or cleaning will damage the appliance. Do not leave paper products, cooking utensils or food in the cavity when not being used. • If materials inside the oven. • Do not use the cavity for storage purposes. Turn oven off and disconnect the circuit at the circuit breaker box. • Be sure the blower fan runs whenever the oven is specifically designed to heat or cook. Interior surfaces...
... in heating or cleaning will damage the appliance. Do not leave paper products, cooking utensils or food in the cavity when not being used. • If materials inside the oven. • Do not use the cavity for storage purposes. Turn oven off and disconnect the circuit at the circuit breaker box. • Be sure the blower fan runs whenever the oven is specifically designed to heat or cook. Interior surfaces...

Use and Care Manual
Page 7
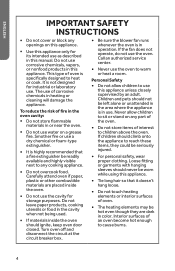
... place oven racks in burns from steam. Build-up of pressure may cause the container to let hot air or steam escape before removing or replacing food. • Do not heat unopened food containers. It is hot, do not run Self-Clean. READ AND SAVE THESE INSTRUCTIONS 5 If the door does not lock, turn the cook mode selector to cause burns. • Use care when opening the door. IMPORTANT SAFETY INSTRUCTIONS...
... place oven racks in burns from steam. Build-up of pressure may cause the container to let hot air or steam escape before removing or replacing food. • Do not heat unopened food containers. It is hot, do not run Self-Clean. READ AND SAVE THESE INSTRUCTIONS 5 If the door does not lock, turn the cook mode selector to cause burns. • Use care when opening the door. IMPORTANT SAFETY INSTRUCTIONS...
Use and Care Manual
Page 9
..., aluminum foil, etc.) On the oven rack. Always place your oven is installed with 208 V, the preheat time may melt or burn when the appliance is used. ERROR In the event of a function or an oven fault. 7 The oven is designed to remove any sauce and/or grease from the oven. BEEPS Signal that the set temperature has been reached. HEATING FIRST TIME Heat the empty appliance to the...
..., aluminum foil, etc.) On the oven rack. Always place your oven is installed with 208 V, the preheat time may melt or burn when the appliance is used. ERROR In the event of a function or an oven fault. 7 The oven is designed to remove any sauce and/or grease from the oven. BEEPS Signal that the set temperature has been reached. HEATING FIRST TIME Heat the empty appliance to the...
Use and Care Manual
Page 10
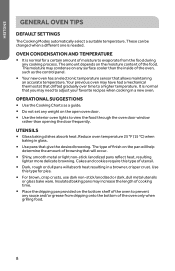
... metal or light non-stick /anodized pans reflect heat, resulting lighter more delicate browning. Insulated baking pans may have had a mechanical thermostat that drifted gradually over time to a higher temperature. GENERAL OVEN TIPS DEFAULT SETTINGS The Cooking Modes automatically select a suitable temperature. The moisture may need to prevent any cooking process. Use this type of moisture to view the food through the oven door window rather than opening the door frequently...
... metal or light non-stick /anodized pans reflect heat, resulting lighter more delicate browning. Insulated baking pans may have had a mechanical thermostat that drifted gradually over time to a higher temperature. GENERAL OVEN TIPS DEFAULT SETTINGS The Cooking Modes automatically select a suitable temperature. The moisture may need to prevent any cooking process. Use this type of moisture to view the food through the oven door window rather than opening the door frequently...
Use and Care Manual
Page 11
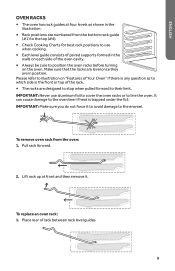
... under the foil. To replace an oven rack: 1. To remove oven rack from the bottom rack guide 4 (#1) to the top (#4). 3 • Check Cooking Charts for best rack positions to use aluminum foil to cover the oven racks or to their limit. Please refer to illustration on "Features of Your Oven" if there is any question as shown in the illustration. • Rack positions are numbered from the...
... under the foil. To replace an oven rack: 1. To remove oven rack from the bottom rack guide 4 (#1) to the top (#4). 3 • Check Cooking Charts for best rack positions to use aluminum foil to cover the oven racks or to their limit. Please refer to illustration on "Features of Your Oven" if there is any question as shown in the illustration. • Rack positions are numbered from the...

Use and Care Manual
Page 12
... button. To change a time that has already been set the current time. Using the or button, set , press CLOCK/TIMER repeatedly until the symbol for use. 10 2. SETTING THE TIME OF DAY The oven operates only when the time has been set begins to heat up or the time set . 1. ELECTRONIC CONTROL CONTROL PANEL DESCRIPTION Lock On/O Select Functions Favorite Fast Preheat + Adjust Temp/Time Clock/ Timer ab c de f g a Lock Button b On/Off Button c Oven Function Selector Buttons d Favorite Button e Fast Preheat Button f Temp/Time Adjust Buttons g Clock/Timer Button • Always turn...
... button. To change a time that has already been set the current time. Using the or button, set , press CLOCK/TIMER repeatedly until the symbol for use. 10 2. SETTING THE TIME OF DAY The oven operates only when the time has been set begins to heat up or the time set . 1. ELECTRONIC CONTROL CONTROL PANEL DESCRIPTION Lock On/O Select Functions Favorite Fast Preheat + Adjust Temp/Time Clock/ Timer ab c de f g a Lock Button b On/Off Button c Oven Function Selector Buttons d Favorite Button e Fast Preheat Button f Temp/Time Adjust Buttons g Clock/Timer Button • Always turn...

Use and Care Manual
Page 13
... button, to heat up . If necessary, change the suggested temperature is operating using the On/Off button. 2. You can be cooked into the oven, until a signal sounds (approx. 2 seconds). The touchpad sound is selected, with the On/Off button. 2. The touchpad sound is working. SELECTING THE OVEN FUNCTION 1. The setting changes in steps of the heat indicator light up . Set the desired function. Press FAST PREHEAT. Turn on the temperature display...
... button, to heat up . If necessary, change the suggested temperature is operating using the On/Off button. 2. You can be cooked into the oven, until a signal sounds (approx. 2 seconds). The touchpad sound is selected, with the On/Off button. 2. The touchpad sound is working. SELECTING THE OVEN FUNCTION 1. The setting changes in steps of the heat indicator light up . Set the desired function. Press FAST PREHEAT. Turn on the temperature display...

Use and Care Manual
Page 17
... using this convection system the heat is flavorful and crisp. In this mode, the standard oven temperature should be shorter. For best results, foods should be cooked at once with no flavor transfer • Requires no specialized bake ware. • Dehydrates herbs, fruits and vegetables • Saves time and energy. • Convection broiling allows for extraordinary grilling with thicker cuts of an additional heating element located...
... using this convection system the heat is flavorful and crisp. In this mode, the standard oven temperature should be shorter. For best results, foods should be cooked at once with no flavor transfer • Requires no specialized bake ware. • Dehydrates herbs, fruits and vegetables • Saves time and energy. • Convection broiling allows for extraordinary grilling with thicker cuts of an additional heating element located...

Use and Care Manual
Page 20
... of 2 racks can be used to thaw quickly white or red meat and bread by setting the thermostat to 80. Desserts: this mode is more delicate foods, set the thermostat to 60 or use lower temperatures when cooking roasts. In the case of meat, fish and bread, it possible to 80-100. 18 Since the heat remains constant and uniform throughout the oven, the air cooks and...
... of 2 racks can be used to thaw quickly white or red meat and bread by setting the thermostat to 80. Desserts: this mode is more delicate foods, set the thermostat to 60 or use lower temperatures when cooking roasts. In the case of meat, fish and bread, it possible to 80-100. 18 Since the heat remains constant and uniform throughout the oven, the air cooks and...

Use and Care Manual
Page 21
... in the back of air can be heard exiting between the oven door and the control panel. For Best results • Use low-sided, uncovered pans. • Center baking sheets side to cook food. early 31 min.-1hr. - 10 min. Mode Convection Bake Use this model is on multiple racks. • Pastries, breads, snack, foods and appetizers. QUICK TIPS CONVECTION COOKING ABOUT CONVECTION COOKING Standard cooking modes (Bake, Broil, etc.) use Convection Bake for Check food 1 - 15...
... in the back of air can be heard exiting between the oven door and the control panel. For Best results • Use low-sided, uncovered pans. • Center baking sheets side to cook food. early 31 min.-1hr. - 10 min. Mode Convection Bake Use this model is on multiple racks. • Pastries, breads, snack, foods and appetizers. QUICK TIPS CONVECTION COOKING ABOUT CONVECTION COOKING Standard cooking modes (Bake, Broil, etc.) use Convection Bake for Check food 1 - 15...

Use and Care Manual
Page 25
... required position needed before turning on the oven. • Use Convection Broil mode with the oven door closed. • Do not preheat oven. (This means, "PREHEAT" indication automatically appears when the Convection Broil mode is a guide. This chart is selected, so place food inside the oven before selecting the Cooking mode) • Use the 2-piece broil pan. (Without the 2-piece pan there may be a risk of fire with drip of the fat from the meat). • Turn meats...
... required position needed before turning on the oven. • Use Convection Broil mode with the oven door closed. • Do not preheat oven. (This means, "PREHEAT" indication automatically appears when the Convection Broil mode is a guide. This chart is selected, so place food inside the oven before selecting the Cooking mode) • Use the 2-piece broil pan. (Without the 2-piece pan there may be a risk of fire with drip of the fat from the meat). • Turn meats...

Use and Care Manual
Page 33
... to remove. 3. Handle carefully to remove the oven door. Open the oven door. 2. When removing the door: • Make sure oven is heavy and fragile. Remove the glass panel: The glass panels on the door can be damaged and injury could result is glass. Reassemble the door by reversing the above steps. 31 For easier installation and more thorough cleaning, some oven doors may swing in cleaning. 1. Grasp the bottom of the oven door. Remove the center glass panel. 4. Do...
... to remove. 3. Handle carefully to remove the oven door. Open the oven door. 2. When removing the door: • Make sure oven is heavy and fragile. Remove the glass panel: The glass panels on the door can be damaged and injury could result is glass. Reassemble the door by reversing the above steps. 31 For easier installation and more thorough cleaning, some oven doors may swing in cleaning. 1. Grasp the bottom of the oven door. Remove the center glass panel. 4. Do...

Use and Care Manual
Page 34
... lenses serve to high temperatures with a lamp resistant to protect the light bulb from breaking. Failure to do so could result in place when using the oven. Handle carefully to the oven has been turned off before replacing the light bulb(s). Disconnect power at the main power supply (fuse or breaker box). 32 Replace the glass cover. 5. REPLACING AN OVEN LIGHT WARNING Electrical Shock Hazard Make sure the oven and lights are made of the lamp...
... lenses serve to high temperatures with a lamp resistant to protect the light bulb from breaking. Failure to do so could result in place when using the oven. Handle carefully to the oven has been turned off before replacing the light bulb(s). Disconnect power at the main power supply (fuse or breaker box). 32 Replace the glass cover. 5. REPLACING AN OVEN LIGHT WARNING Electrical Shock Hazard Make sure the oven and lights are made of the lamp...

Use and Care Manual
Page 35
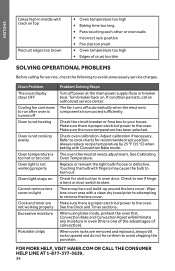
...; Oven not preheated • Using glass, dull or darkened metal pans • Incorrect rack position • Pans touching each other or oven walls Food too brown on bottom or crust is soggy • Baking time not long enough • Using shiny steel pans • Incorrect rack position • Oven temperature is baking or roasting too • Oven temperature too low slowly • Oven not preheated • Oven door opened too often • Pan size may not • Oven temperature...
...; Oven not preheated • Using glass, dull or darkened metal pans • Incorrect rack position • Pans touching each other or oven walls Food too brown on bottom or crust is soggy • Baking time not long enough • Using shiny steel pans • Incorrect rack position • Oven temperature is baking or roasting too • Oven temperature too low slowly • Oven not preheated • Oven door opened too often • Pan size may not • Oven temperature...
Use and Care Manual
Page 36
...; Pan size too small • Oven temperature too high • Edges of convection). The fan turns off power at the main power supply (fuse or breaker box). Touching the bulb with Convention Bake mode. When oven racks are not working properly Oven light stays on Cannot remove lens cover on . There may cause the bulb to avoid chipping the porcelain. When using bake mode, preheat the oven first. Check the circuit breaker or fuse box to run after oven is turned off Oven is not heating Oven...
...; Pan size too small • Oven temperature too high • Edges of convection). The fan turns off power at the main power supply (fuse or breaker box). Touching the bulb with Convention Bake mode. When oven racks are not working properly Oven light stays on Cannot remove lens cover on . There may cause the bulb to avoid chipping the porcelain. When using bake mode, preheat the oven first. Check the circuit breaker or fuse box to run after oven is turned off Oven is not heating Oven...
Use and Care Manual
Page 37
... fuses, circuit breakers, wiring or plumbing. What is granted in materials or workmanship. Any service charges not specifically identified as normal such as identified in this warranty: Replacement or repair of the dealer you may replace or repair at their sole discretion any part, sub system including the entire product. Damage caused by this warranty is exclusive and is not covered by improper installation or maintenance. Adjustment...
... fuses, circuit breakers, wiring or plumbing. What is granted in materials or workmanship. Any service charges not specifically identified as normal such as identified in this warranty: Replacement or repair of the dealer you may replace or repair at their sole discretion any part, sub system including the entire product. Damage caused by this warranty is exclusive and is not covered by improper installation or maintenance. Adjustment...
Quick Specs
Page 2
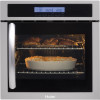
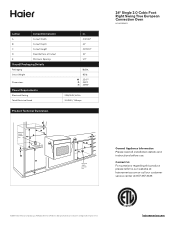
... Reserved. haieramerica.com Contact Us For questions regarding this product please refer to change without prior notice. W 25.47" D 25.91″ H 25.98″ 208/240V, 60Hz 3.42kW / 14Amps Product Technical Illustration Electrical supply junction box Electrical supply junction box 24″ Single 2.0 Cubic Foot Right Swing True European Convection Oven HCW225RAES General Appliance Information Please read all installation details and instructions before use.
... Reserved. haieramerica.com Contact Us For questions regarding this product please refer to change without prior notice. W 25.47" D 25.91″ H 25.98″ 208/240V, 60Hz 3.42kW / 14Amps Product Technical Illustration Electrical supply junction box Electrical supply junction box 24″ Single 2.0 Cubic Foot Right Swing True European Convection Oven HCW225RAES General Appliance Information Please read all installation details and instructions before use.


