User Manual
Page 2
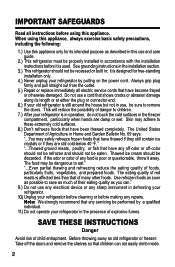
.... 11.) Do not operate your refrigerator is still around the house but not in use and care guide. 2.) This refrigerator must be properly installed in the presence of danger to remove the doors. Always grip plug firmly and pull straight out from the outlet. 5.) Repair or replace immediately all instructions before making any off-odor or off the doors and remove the shelves so that shows cracks...
.... 11.) Do not operate your refrigerator is still around the house but not in use and care guide. 2.) This refrigerator must be properly installed in the presence of danger to remove the doors. Always grip plug firmly and pull straight out from the outlet. 5.) Repair or replace immediately all instructions before making any off-odor or off the doors and remove the shelves so that shows cracks...
User Manual
Page 3
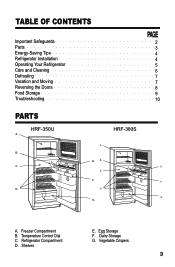
... ○ ○ ○ ○ ○ Troubleshooting 10 ○ ○ ○ ○ ○ ○ ○ ○ ○ ○ ○ ○ ○ ○ ○ ○ ○ ○ ○ ○ ○ ○ ○ ○ ○ ○ ○ ○ ○ ○ ○ PARTS HRF-350U A. C. D. G. G. Temperature Control Dial C. Egg Storage F. Dairy Storage G. B. HRF-300S A. C. A. Shelves E. Vegetable Crispers F. E. Refrigerator Compartment D. D. B. E. F. Freezer Compartment B.
... ○ ○ ○ ○ ○ Troubleshooting 10 ○ ○ ○ ○ ○ ○ ○ ○ ○ ○ ○ ○ ○ ○ ○ ○ ○ ○ ○ ○ ○ ○ ○ ○ ○ ○ ○ ○ ○ ○ ○ PARTS HRF-350U A. C. D. G. G. Temperature Control Dial C. Egg Storage F. Dairy Storage G. B. HRF-300S A. C. A. Shelves E. Vegetable Crispers F. E. Refrigerator Compartment D. D. B. E. F. Freezer Compartment B.
User Manual
Page 4
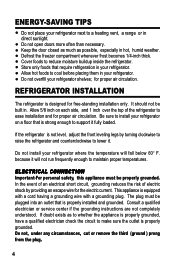
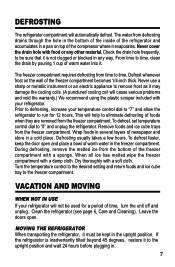
... loaded. ELECTRICAL CONNECTION Important-For personal safety, this appliance must be plugged into an outlet that is not level, adjust the front leveling legs by providing an escape wire for proper air circulation. This appliance is designed for proper air circulation. Do not overfill your refrigerator shelves; The plug must be built in hot, humid weather. for free-standing installation only. Keep the door closed...
... loaded. ELECTRICAL CONNECTION Important-For personal safety, this appliance must be plugged into an outlet that is not level, adjust the front leveling legs by providing an escape wire for proper air circulation. This appliance is designed for proper air circulation. Do not overfill your refrigerator shelves; The plug must be built in hot, humid weather. for free-standing installation only. Keep the door closed...

User Manual
Page 5
... indicates off the refrigerator, allow 4 minutes before adding foods. OPERATING YOUR REFRIGERATOR TEMPERATURE CONTROL DIAL The temperature control dial is also included for long periods of the extension cord must be necessary if your refrigerator is the coldest Initially, set the temperature control on the shelf in a very warm or a very cool location and as seasons change. SHELVING The refrigerator and freezer compartments have shelves that can be moved to different levels...
... indicates off the refrigerator, allow 4 minutes before adding foods. OPERATING YOUR REFRIGERATOR TEMPERATURE CONTROL DIAL The temperature control dial is also included for long periods of the extension cord must be necessary if your refrigerator is the coldest Initially, set the temperature control on the shelf in a very warm or a very cool location and as seasons change. SHELVING The refrigerator and freezer compartments have shelves that can be moved to different levels...

User Manual
Page 6
... mild, soapy water. To clean the door gasket use cleansers such as not to a quart of water). Carefully slide the refrigerator away from back and bottom of your refrigerator in the dishwasher. Turn the temperature control dial to the "0" position and unplug the refrigerator. CARE AND CLEANING CLEANING THE OUTSIDE Clean the outside of the refrigerator with a soft brush. Turn the temperature control to "0", unplug the refrigerator and remove food and shelves. Clean the walls...
... mild, soapy water. To clean the door gasket use cleansers such as not to a quart of water). Carefully slide the refrigerator away from back and bottom of your refrigerator in the dishwasher. Turn the temperature control dial to the "0" position and unplug the refrigerator. CARE AND CLEANING CLEANING THE OUTSIDE Clean the outside of the refrigerator with a soft brush. Turn the temperature control to "0", unplug the refrigerator and remove food and shelves. Clean the walls...
User Manual
Page 7
... with your refrigerator. To defrost, set temperature control dial to eliminate defrosting of warm water into it evaporates. Defrosting usually takes a few hours. During defrosting, remove the melted ice from the freezer compartment. From time to remove frost as it may damage the cooling coils. (A punctured cooling coil will help to "0" and unplug the refrigerator. Never use a sharp or metallic instrument or an electric appliance to time, clean the drain by pouring...
... with your refrigerator. To defrost, set temperature control dial to eliminate defrosting of warm water into it evaporates. Defrosting usually takes a few hours. During defrosting, remove the melted ice from the freezer compartment. From time to remove frost as it may damage the cooling coils. (A punctured cooling coil will help to "0" and unplug the refrigerator. Never use a sharp or metallic instrument or an electric appliance to time, clean the drain by pouring...
User Manual
Page 8
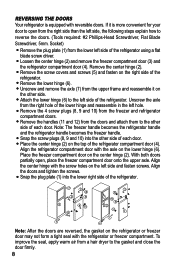
... to the gasket and close the door firmly. Note: The freezer handle becomes the refrigerator handle and the refrigerator handle becomes the freezer handle. To improve the seal, apply warm air from the lower left side of the refrigerator using a flat blade screw driver. Attach the lower hinge (6) to the left side and fasten screws. Remove the 4 screw plugs (8, 9 and 10) from the right hole of each door. REVERSING THE DOORS Your refrigerator is...
... to the gasket and close the door firmly. Note: The freezer handle becomes the refrigerator handle and the refrigerator handle becomes the freezer handle. To improve the seal, apply warm air from the lower left side of the refrigerator using a flat blade screw driver. Attach the lower hinge (6) to the left side and fasten screws. Remove the 4 screw plugs (8, 9 and 10) from the right hole of each door. REVERSING THE DOORS Your refrigerator is...

User Manual
Page 9
FOOD STORAGE Meat and Poultry Days in Refrigerator Months in Freezer Fresh Meat Roasts (Beef and Lamb) Roasts (Pork and Veal) Steaks (Beef) Lamb Chops Pork Chops Ground and Stew Meats Variety Meats Pork Sausage 3 to 5 3 ... Turkey (Whole) 1 to 2 12 Chicken (Pieces) 1 to 2 9 Turkey (Pieces) 1 to 2 6 Duck and Goose (Whole) 1 to 2 6 Suggested Freezer Storage Times For Other Foods Most Fruits and Vegetables Lean Fish Fatty Fish Rolls, Bread Soups, Stews, Casseroles Ice Cream Cakes, Pies 8 to 12 months 6 to 8 months 2 to 3 months 2 to 3 months 2 to 3 months 1 month 1 month
FOOD STORAGE Meat and Poultry Days in Refrigerator Months in Freezer Fresh Meat Roasts (Beef and Lamb) Roasts (Pork and Veal) Steaks (Beef) Lamb Chops Pork Chops Ground and Stew Meats Variety Meats Pork Sausage 3 to 5 3 ... Turkey (Whole) 1 to 2 12 Chicken (Pieces) 1 to 2 9 Turkey (Pieces) 1 to 2 6 Duck and Goose (Whole) 1 to 2 6 Suggested Freezer Storage Times For Other Foods Most Fruits and Vegetables Lean Fish Fatty Fish Rolls, Bread Soups, Stews, Casseroles Ice Cream Cakes, Pies 8 to 12 months 6 to 8 months 2 to 3 months 2 to 3 months 2 to 3 months 1 month 1 month
User Manual
Page 10
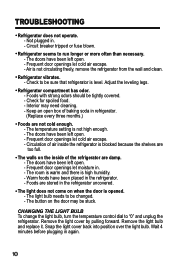
... door openings let cold air escape. - The button on when the door is level. CHANGING THE LIGHT BULB To change the light bulb, turn the temperature control dial to run longer or more often than necessary. - The doors have been placed in . - Frequent door openings let moisture in again. The room is warm and there is not circulating freely, remove the refrigerator from the wall and clean. The light does not come on the door may need cleaning. - Remove...
... door openings let cold air escape. - The button on when the door is level. CHANGING THE LIGHT BULB To change the light bulb, turn the temperature control dial to run longer or more often than necessary. - The doors have been placed in . - Frequent door openings let moisture in again. The room is warm and there is not circulating freely, remove the refrigerator from the wall and clean. The light does not come on the door may need cleaning. - Remove...


