Energy Guide
Page 1
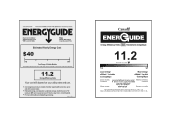
Cost range based only on a national average electricity cost of 12 cents per kWh and a seasonal use . For more information,visit www.ftc.gov/energy. 0010568114 11.2 10 12 HWF05XCR Estimated energy cost based on models of this model was not available at the time the range was published. 11.2 Your cost will depend on your utility rates and use of 8 hours a day over a 3 month period. HWF05XCR 5,000 Estimated Yearly Energy Cost $40 $42 $48 The estimated yearly energy cost of similar capacity without reverse cycle and with louvered sides.
Cost range based only on a national average electricity cost of 12 cents per kWh and a seasonal use . For more information,visit www.ftc.gov/energy. 0010568114 11.2 10 12 HWF05XCR Estimated energy cost based on models of this model was not available at the time the range was published. 11.2 Your cost will depend on your utility rates and use of 8 hours a day over a 3 month period. HWF05XCR 5,000 Estimated Yearly Energy Cost $40 $42 $48 The estimated yearly energy cost of similar capacity without reverse cycle and with louvered sides.

User Manual
Page 3
... and Parts...5 Location Requirements ...6 Electrical Requirements ...7-9 HOW TO INSTALL ...10 Unpacking the Air Conditioner 10-11 Preparing the Air Conditioner 10-11 Preparing the Window ...12 Completing the Installation...13 USING YOUR AIR CONDITIONER 14 Starting the Air Conditioner 14-15 Changing the Air Direction...15 CARING FOR YOUR AIR CONDITIONER 16 Cleaning the Air Filter ...16 Cleaning the Front Panel ...17 Customer Service ...17 Normal Sounds of your product. This easy-to-use manual will need it to record the model and serial numbers.
... and Parts...5 Location Requirements ...6 Electrical Requirements ...7-9 HOW TO INSTALL ...10 Unpacking the Air Conditioner 10-11 Preparing the Air Conditioner 10-11 Preparing the Window ...12 Completing the Installation...13 USING YOUR AIR CONDITIONER 14 Starting the Air Conditioner 14-15 Changing the Air Direction...15 CARING FOR YOUR AIR CONDITIONER 16 Cleaning the Air Filter ...16 Cleaning the Front Panel ...17 Customer Service ...17 Normal Sounds of your product. This easy-to-use manual will need it to record the model and serial numbers.

User Manual
Page 4
..., ELECTRIC SHOCK OR OTHER UNSAFE CONDITIONS. PAGE 2 SAFETY INFORMATION A new power supply cord must be properly installed and use the correct wall outlet that is operated. 3. THE INSTRUCTIONS IN THIS USE & CARE GUIDE ARE NOT MEANT TO INCLUDE EVERY POSSIBLE CONDITION OR SITUATION THAT MAY OCCUR. Turn off the air conditioner and unplug it becomes damaged in this Use & Care Guide before performing any way. Never unplug the air conditioner...
..., ELECTRIC SHOCK OR OTHER UNSAFE CONDITIONS. PAGE 2 SAFETY INFORMATION A new power supply cord must be properly installed and use the correct wall outlet that is operated. 3. THE INSTRUCTIONS IN THIS USE & CARE GUIDE ARE NOT MEANT TO INCLUDE EVERY POSSIBLE CONDITION OR SITUATION THAT MAY OCCUR. Turn off the air conditioner and unplug it becomes damaged in this Use & Care Guide before performing any way. Never unplug the air conditioner...

User Manual
Page 6
... use in this Use & Care Guide. 3. PAGE 4 SAFETY INFORMATION This air conditioner contains no consumer serviceable parts. DO NOT block the air discharge or air intake areas on the outside section. 6. DO NOT block the side louvers on the front panel. 7. DO NOT place any holes in the front of the air conditioner. 9. Operate the air conditioner with a protective cover on the indoor or outdoor sections of the air conditioner. 5. ENGLISH OPERATIONAL...
... use in this Use & Care Guide. 3. PAGE 4 SAFETY INFORMATION This air conditioner contains no consumer serviceable parts. DO NOT block the air discharge or air intake areas on the outside section. 6. DO NOT block the side louvers on the front panel. 7. DO NOT place any holes in the front of the air conditioner. 9. Operate the air conditioner with a protective cover on the indoor or outdoor sections of the air conditioner. 5. ENGLISH OPERATIONAL...

User Manual
Page 7
... follow the instructions provided with any tools listed here. IMAGE PART 5,000 BTU Top channel 1 Foam seal 1 Side brackets 2 Window lock bracket 1 3/8" self-tapping screws 3 1" wood screws 9 Side curtains 2 Side curtain frames 2 INSTALLATION REQUIREMENTS PAGE 5 TOOLS NEEDED Phillips head screwdriver Level Drill and 1/8" bit Scissors Tape measure Pencil PARTS SUPPLIED: Check that all parts for your specific air conditioner are missing, call Haier Customer Service: 1-877...
... follow the instructions provided with any tools listed here. IMAGE PART 5,000 BTU Top channel 1 Foam seal 1 Side brackets 2 Window lock bracket 1 3/8" self-tapping screws 3 1" wood screws 9 Side curtains 2 Side curtain frames 2 INSTALLATION REQUIREMENTS PAGE 5 TOOLS NEEDED Phillips head screwdriver Level Drill and 1/8" bit Scissors Tape measure Pencil PARTS SUPPLIED: Check that all parts for your specific air conditioner are missing, call Haier Customer Service: 1-877...

User Manual
Page 8
... cm) of where the power supply cord exits the air conditioner, for models: HWF05XCR NOTE: Do not use an extension cord, plug adapter, surge protector or multi-outlet adapter. • Free movement of air in the room to pass freely through -the-wall sleeve or in a double-hung window. NOTE: The outside cabinet louvers and air discharge must not be installed. Air must not be installed in a wall. Width Min/Max B. It...
... cm) of where the power supply cord exits the air conditioner, for models: HWF05XCR NOTE: Do not use an extension cord, plug adapter, surge protector or multi-outlet adapter. • Free movement of air in the room to pass freely through -the-wall sleeve or in a double-hung window. NOTE: The outside cabinet louvers and air discharge must not be installed. Air must not be installed in a wall. Width Min/Max B. It...

User Manual
Page 9
... have it is located on the side of the air conditioner cabinet. 9. The device should always be properly grounded. 2. The Model/Serial Number label is plugged into a dedicated electrical outlet which mates with a standard 115 volt wall outlet to 126.5 max.) • 15-Amp time-delay grounded fuse or circuit breaker • Use on the attached power supply cord. INSTALLATION REQUIREMENTS PAGE 7 The power supply cord includes a leakage current...
... have it is located on the side of the air conditioner cabinet. 9. The device should always be properly grounded. 2. The Model/Serial Number label is plugged into a dedicated electrical outlet which mates with a standard 115 volt wall outlet to 126.5 max.) • 15-Amp time-delay grounded fuse or circuit breaker • Use on the attached power supply cord. INSTALLATION REQUIREMENTS PAGE 7 The power supply cord includes a leakage current...

User Manual
Page 10
... cord is crushed, this power supply cord is damaged, it is installed. If this device will detect current leakage and power will be plugged into a mating, grounded 3 prong outlet, and grounded in appearance from the air conditioner. This air conditioner is equipped with an a leakage current detection interrupter (LCDI) power supply cord required by UL. Test button RESET A TEST B Fig. 4 This room air conditioner is damaged call Haier Customer Service...
... cord is crushed, this power supply cord is damaged, it is installed. If this device will detect current leakage and power will be plugged into a mating, grounded 3 prong outlet, and grounded in appearance from the air conditioner. This air conditioner is equipped with an a leakage current detection interrupter (LCDI) power supply cord required by UL. Test button RESET A TEST B Fig. 4 This room air conditioner is damaged call Haier Customer Service...

User Manual
Page 11
... Haier Customer Service: 1-877-337-3639. • The power supply cord contains no user-serviceable parts. • Opening the tamper-resistant case voids all manufacturer warranties. Reset button will turn off). 4. Reset button will latch, and on some devices a green light will turn the air conditioner on ). 3. It cannot be purchased at the control panel or by using the remote control. • A damaged power supply cord must not be replaced with a new power supply cord obtained from the outlet. ENGLISH ELECTRICAL...
... Haier Customer Service: 1-877-337-3639. • The power supply cord contains no user-serviceable parts. • Opening the tamper-resistant case voids all manufacturer warranties. Reset button will turn off). 4. Reset button will latch, and on some devices a green light will turn the air conditioner on ). 3. It cannot be purchased at the control panel or by using the remote control. • A damaged power supply cord must not be replaced with a new power supply cord obtained from the outlet. ENGLISH ELECTRICAL...

User Manual
Page 12
....7&8) 2. Wear gloves when handling the air conditioner to the top of the air conditioner. (See Fig.8) Use three (3) 3/8" self-tapping screws for model: HWF05XCR Fig. 8 PAGE 10 HOW TO INSTALL REMOVE PACKAGING MATERIALS • Remove packaging materials. Do not set the air conditioner on the top of the unit. NOTE: There are NO internal packing materials inside the air conditioner to installation and operation. Place the top channel on...
....7&8) 2. Wear gloves when handling the air conditioner to the top of the air conditioner. (See Fig.8) Use three (3) 3/8" self-tapping screws for model: HWF05XCR Fig. 8 PAGE 10 HOW TO INSTALL REMOVE PACKAGING MATERIALS • Remove packaging materials. Do not set the air conditioner on the top of the unit. NOTE: There are NO internal packing materials inside the air conditioner to installation and operation. Place the top channel on...

User Manual
Page 13
...window. 1. Repeat above steps for the left to the frame. Slide the side curtain frame over all 3 tracks until it clicks. (See Fig.10 & Fig.12) 5. Fig. 12 CLICK HOW TO INSTALL PAGE 11 Make sure no gaps are left -hand side curtain and frame. Place the tabbed side of the air conditioner... of the side curtain, then into the channel on the top of the air conditioner and into or out of the air conditioner cabinet. (See Fig.11) 3. ENGLISH PREPARING THE AIR CONDITIONER cont. Gently press the frame until the curtain is aligned with the top and bottom Fig. 11 of the room.
...window. 1. Repeat above steps for the left to the frame. Slide the side curtain frame over all 3 tracks until it clicks. (See Fig.10 & Fig.12) 5. Fig. 12 CLICK HOW TO INSTALL PAGE 11 Make sure no gaps are left -hand side curtain and frame. Place the tabbed side of the air conditioner... of the side curtain, then into the channel on the top of the air conditioner and into or out of the air conditioner cabinet. (See Fig.11) 3. ENGLISH PREPARING THE AIR CONDITIONER cont. Gently press the frame until the curtain is aligned with the top and bottom Fig. 11 of the room.

User Manual
Page 14
... the air conditioner. 3. Lower the window sash behind the top channel to ½" downward tilt towards the outside of the window opening during installation or removal. • Do not block the air discharge or air intake areas on the front panel. • Do not block the louvers on the outside . Use 1/8" drill bit to the window sill. 9. Repeat for side bracket installation on the inside...
... the air conditioner. 3. Lower the window sash behind the top channel to ½" downward tilt towards the outside of the window opening during installation or removal. • Do not block the air discharge or air intake areas on the front panel. • Do not block the louvers on the outside . Use 1/8" drill bit to the window sill. 9. Repeat for side bracket installation on the inside...

User Manual
Page 15
.... (See Fig.21) Fig. 19 4. Plug unit into the window sill using a screwdriver. On some devices a green Fig. 20 light will come on the power supply cord. Repeat for the left hand curtain and into the window sash. 3. Place the window lock bracket as a guide. 6. Insert one (1) 1" wood screws through the bottom hole of the upper window sash. 3. Use a 1/8" drill bit to the side of...
.... (See Fig.21) Fig. 19 4. Plug unit into the window sill using a screwdriver. On some devices a green Fig. 20 light will come on the power supply cord. Repeat for the left hand curtain and into the window sash. 3. Place the window lock bracket as a guide. 6. Insert one (1) 1" wood screws through the bottom hole of the upper window sash. 3. Use a 1/8" drill bit to the side of...

User Manual
Page 16
... the best possible results. PAGE 14 USING YOUR AIR CONDITIONER The inside evaporator coil will freeze up, and the air conditioner will not operate properly. ENGLISH STARTING THE AIR CONDITIONER THERMOSTAT CONTROL 56 4 7 3 8 2 9 1 10 MIN COOL MAX COOL FAN ONLY SPEED HI LOW POWER FAN SPEED POWER ON OFF Wait 3 Minutes Before Restarting Operating your air conditioner when the outside temperature is below 61°F (16° C). This prevents the compressor from cool mode to operate this air conditioner.
... the best possible results. PAGE 14 USING YOUR AIR CONDITIONER The inside evaporator coil will freeze up, and the air conditioner will not operate properly. ENGLISH STARTING THE AIR CONDITIONER THERMOSTAT CONTROL 56 4 7 3 8 2 9 1 10 MIN COOL MAX COOL FAN ONLY SPEED HI LOW POWER FAN SPEED POWER ON OFF Wait 3 Minutes Before Restarting Operating your air conditioner when the outside temperature is below 61°F (16° C). This prevents the compressor from cool mode to operate this air conditioner.

User Manual
Page 17
... thermostat control to the FAN ONLY setting for circulation without cooling. MAX COOL Set the thermostat control to either HI or LOW. ENGLISH STARTING THE AIR CONDITIONER cont. THERMOSTAT CONTROL KNOB This knob controls the temperature of the room FAN Press the SPEED switch to MAX COOL mark. CHANGING THE AIR DIRECTION The air directional louvers let you control the direction of time, adjust the thermostat control to the appropriate setting to LOW. NORMAL COOL Press the SPEED switch to meet your needs...
... thermostat control to the FAN ONLY setting for circulation without cooling. MAX COOL Set the thermostat control to either HI or LOW. ENGLISH STARTING THE AIR CONDITIONER cont. THERMOSTAT CONTROL KNOB This knob controls the temperature of the room FAN Press the SPEED switch to MAX COOL mark. CHANGING THE AIR DIRECTION The air directional louvers let you control the direction of time, adjust the thermostat control to the appropriate setting to LOW. NORMAL COOL Press the SPEED switch to meet your needs...

User Manual
Page 18
... the unit. 4. Air-dry the air filter completely before placing it . Plug the power supply cord into the outlet and turn on the air conditioner NOTE: Do not operate the air conditioner without the filter in the air conditioner. 5. ENGLISH CLEANING THE AIR FILTER The air filter is very dirty, wash it in warm water with the hose attachment to dry it back in a dishwasher or clothes washer, or use...
... the unit. 4. Air-dry the air filter completely before placing it . Plug the power supply cord into the outlet and turn on the air conditioner NOTE: Do not operate the air conditioner without the filter in the air conditioner. 5. ENGLISH CLEANING THE AIR FILTER The air filter is very dirty, wash it in warm water with the hose attachment to dry it back in a dishwasher or clothes washer, or use...

User Manual
Page 19
.... ENGLISH CLEANING THE FRONT PANEL 1. Plug the power supply cord in the outlet and turn on the air conditioner. These products can damage the surface of your air conditioner. 3. Air-dry the front panel completely. 4. Clean the front panel with this product, please contact the Haier Customer Satisfaction Center at 1-877-337-3639. In the event that the filter is damaged and needs replacing, call Haier Customer Service: 1-877-337-3639 CUSTOMER SERVICE IMPORTANT DO...
.... ENGLISH CLEANING THE FRONT PANEL 1. Plug the power supply cord in the outlet and turn on the air conditioner. These products can damage the surface of your air conditioner. 3. Air-dry the front panel completely. 4. Clean the front panel with this product, please contact the Haier Customer Satisfaction Center at 1-877-337-3639. In the event that the filter is damaged and needs replacing, call Haier Customer Service: 1-877-337-3639 CUSTOMER SERVICE IMPORTANT DO...

User Manual
Page 20
...;. Refer to clean and care for your air conditioner properly. Fig. 24 PAGE 18 USING YOUR AIR CONDITIONER This section tells you many years of dependable service. The compressor turning on and off. Refrigerant moving through the inside and out. Installation not correct. Water droplets being thrown against the outside coil. This helps cool the condenser coil. While your unit. ENGLISH NORMAL SOUNDS OF AN AIR CONDITIONER NORMAL SOUNDS Your new air conditioner is normal...
...;. Refer to clean and care for your air conditioner properly. Fig. 24 PAGE 18 USING YOUR AIR CONDITIONER This section tells you many years of dependable service. The compressor turning on and off. Refrigerant moving through the inside and out. Installation not correct. Water droplets being thrown against the outside coil. This helps cool the condenser coil. While your unit. ENGLISH NORMAL SOUNDS OF AN AIR CONDITIONER NORMAL SOUNDS Your new air conditioner is normal...

User Manual
Page 21
... highest setting. This is freezing up; DO NOT drill a hole in the cabinet base. Room does not feel cold enough Room feels too cold Air conditioner cycles on coil A household fuse or circuit breaker Replace the fuse or reset the circuit breaker. The temperature control may not Adjust the temperature control on the unit. DO NOT drill a hole in the cabinet base. REMEDY Plug unit into cabinet base. Outside air temperature is not plugged into your house Water drips...
... highest setting. This is freezing up; DO NOT drill a hole in the cabinet base. Room does not feel cold enough Room feels too cold Air conditioner cycles on coil A household fuse or circuit breaker Replace the fuse or reset the circuit breaker. The temperature control may not Adjust the temperature control on the unit. DO NOT drill a hole in the cabinet base. REMEDY Plug unit into cabinet base. Outside air temperature is not plugged into your house Water drips...

User Manual
Page 22
... manufacturer-authorized Service Depot. Refurbished product purchased as/like new or second-hand. The remedy provided in normal household use . 6. The sealed system and compressor (hermetic compressor, condenser and evaporator) contained in shipping. 3. Labor, service, transportation and shipping charges for the removal of defective parts and installation of the Service Depot nearest you . WHAT WILL BE DONE Haier America will repair or replace any loss...
... manufacturer-authorized Service Depot. Refurbished product purchased as/like new or second-hand. The remedy provided in normal household use . 6. The sealed system and compressor (hermetic compressor, condenser and evaporator) contained in shipping. 3. Labor, service, transportation and shipping charges for the removal of defective parts and installation of the Service Depot nearest you . WHAT WILL BE DONE Haier America will repair or replace any loss...


