
Use and Care Manual
Page 2
... outlet. Never move deep fryer containing hot oil. 16. Do not operate the appliance by a person responsible for their safety. 3. Use handles or knobs. 9. Do not use with the appliance. 4. Always raise basket, rest on examination, repair, or adjustment. 5. Read all instructions. 2. Do not operate any appliance with a damaged supply cord or plug, or after cleaning and before cleaning. Always attach...
... outlet. Never move deep fryer containing hot oil. 16. Do not operate the appliance by a person responsible for their safety. 3. Use handles or knobs. 9. Do not use with the appliance. 4. Always raise basket, rest on examination, repair, or adjustment. 5. Read all instructions. 2. Do not operate any appliance with a damaged supply cord or plug, or after cleaning and before cleaning. Always attach...
Use and Care Manual
Page 3
... replace the outlet. This product is intended for household use only. w WARNING Electrical Shock Hazard: This appliance is provided with the user. Do not defeat the safety purpose of the plug by using an adapter. Do not allow the cord to hang over the deep fryer when the lid is not intended for use a longer detachable power supply cord or extension cord...
... replace the outlet. This product is intended for household use only. w WARNING Electrical Shock Hazard: This appliance is provided with the user. Do not defeat the safety purpose of the plug by using an adapter. Do not allow the cord to hang over the deep fryer when the lid is not intended for use a longer detachable power supply cord or extension cord...
Use and Care Manual
Page 4
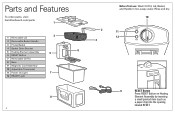
... To order parts, visit: hamiltonbeach.com/parts 1 3 1 Removable Lid 2 Removable Basket Handle 3 Frying Basket 4 Basket Drain Bracket 5 Heating Element Assembly 5 6 6 RESET Button 7 Removable Oil Pot 8 Base 9 Magnetic Cord Assembly 10 Adjustable Thermostat 11 Power On Light 7 12 READY Light 8 4 2 4 Before first use: Wash Oil Pot, Lid, Basket, and Handle in hot, soapy water. Rinse and dry. 10 11 12 RESET 9 RESET Button Press RESET...
... To order parts, visit: hamiltonbeach.com/parts 1 3 1 Removable Lid 2 Removable Basket Handle 3 Frying Basket 4 Basket Drain Bracket 5 Heating Element Assembly 5 6 6 RESET Button 7 Removable Oil Pot 8 Base 9 Magnetic Cord Assembly 10 Adjustable Thermostat 11 Power On Light 7 12 READY Light 8 4 2 4 Before first use: Wash Oil Pot, Lid, Basket, and Handle in hot, soapy water. Rinse and dry. 10 11 12 RESET 9 RESET Button Press RESET...
Use and Care Manual
Page 5
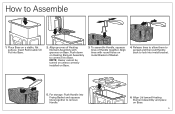
... into Frying Basket and squeeze tines together to Base. NOTE: Heater cannot be turned on unless correctly installed on a stable, flat surface. Push down on metal Bracket of Handle together. Align grooves of Heating Element Assembly with round holes on Heating Element Assembly to connect ...it to remove Handle. 6. Align tines with grooves on Base. 5 Align Lid toward Heating Element Assembly and place on Base. Insert Removable Oil Pot into Base. 2. To assemble Handle, squeeze tines of Basket. 4....
... into Frying Basket and squeeze tines together to Base. NOTE: Heater cannot be turned on unless correctly installed on a stable, flat surface. Push down on metal Bracket of Handle together. Align grooves of Heating Element Assembly with round holes on Heating Element Assembly to connect ...it to remove Handle. 6. Align tines with grooves on Base. 5 Align Lid toward Heating Element Assembly and place on Base. Insert Removable Oil Pot into Base. 2. To assemble Handle, squeeze tines of Basket. 4....
Use and Care Manual
Page 6
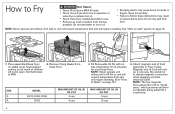
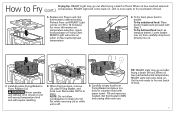
... operation or when fryer contains hot oil. • Never leave fryer unattended while in one way. SIZE 2L 3L MODEL 35210, 35335, 35336 35032 MIN AMOUNT OF OIL IN OIL POT 4 cups 8 cups 3. How to open. Be careful not to MIN. 2. See chart below for oil amounts for your Deep Fryer. Set thermostat to disturb magnetic connection when plugging cord into electrical outlet. NOTE...
... operation or when fryer contains hot oil. • Never leave fryer unattended while in one way. SIZE 2L 3L MODEL 35210, 35335, 35336 35032 MIN AMOUNT OF OIL IN OIL POT 4 cups 8 cups 3. How to open. Be careful not to MIN. 2. See chart below for oil amounts for your Deep Fryer. Set thermostat to disturb magnetic connection when plugging cord into electrical outlet. NOTE...
Use and Care Manual
Page 7
.... then carefully drop food directly into Oil Pot while removing Lid or while unit is done, remove Lid, raise Frying Basket, and hook over Removable Oil Pot to Fry (cont.) Frying tip: READY Light may go out after each use. NOTE: Do not allow condensation to... batch of food. 5. Carefully empty food from Frying Basket and place in Fryer. Preheat Fryer until READY Light comes on when oil has reached preset temperature. 6. Replace Lid. Carefully place Frying Basket in a bowl or colander lined with Step 7. Set thermostat to 15 minutes). To fry battered food (such...
.... then carefully drop food directly into Oil Pot while removing Lid or while unit is done, remove Lid, raise Frying Basket, and hook over Removable Oil Pot to Fry (cont.) Frying tip: READY Light may go out after each use. NOTE: Do not allow condensation to... batch of food. 5. Carefully empty food from Frying Basket and place in Fryer. Preheat Fryer until READY Light comes on when oil has reached preset temperature. 6. Replace Lid. Carefully place Frying Basket in a bowl or colander lined with Step 7. Set thermostat to 15 minutes). To fry battered food (such...
Use and Care Manual
Page 8
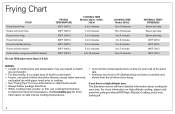
...Basket more information to obtain best results. • Always follow package directions. • When cooking meat, poultry, or fish, use cooking thermometer to cooking. • See "Frying Tips" for more than 3/4 full. If you live in a high-altitude area: The Extension service...;C) 375°F (190°C) COOKING TIME Models 35210, 35335, 35336 2 to 3 minutes 7 to 8 minutes 2 to 3 minutes 2 to 3 minutes 3 to 4 minutes 3 to 5 minutes 8 to 10 minutes COOKING TIME Model 35032 12 to 14 minutes 15 to 18 ...or Fry Basket slowly and raise it carefully and slowly from the oil when done frying.
...Basket more information to obtain best results. • Always follow package directions. • When cooking meat, poultry, or fish, use cooking thermometer to cooking. • See "Frying Tips" for more than 3/4 full. If you live in a high-altitude area: The Extension service...;C) 375°F (190°C) COOKING TIME Models 35210, 35335, 35336 2 to 3 minutes 7 to 8 minutes 2 to 3 minutes 2 to 3 minutes 3 to 4 minutes 3 to 5 minutes 8 to 10 minutes COOKING TIME Model 35032 12 to 14 minutes 15 to 18 ...or Fry Basket slowly and raise it carefully and slowly from the oil when done frying.

Use and Care Manual
Page 9
... often. • To filter oil, allow oil to foam when heated, when it has a strong smell or taste, or when it starts to completely cool. NOTE: To avoid damaging Deep Fryer, use . Remove any excess water from Oil Pot. 6. First, lower Frying Basket completely and then carefully place each use care when cleaning Heating Element Assembly. Use Frying Basket to used for french fries can...
... often. • To filter oil, allow oil to foam when heated, when it has a strong smell or taste, or when it starts to completely cool. NOTE: To avoid damaging Deep Fryer, use . Remove any excess water from Oil Pot. 6. First, lower Frying Basket completely and then carefully place each use care when cleaning Heating Element Assembly. Use Frying Basket to used for french fries can...
Use and Care Manual
Page 10
... unit may need to clean. • To clean oil residue from the wall outlet. 4. Fried food does not have a golden-brown color and/or is not crispy. • Selected temperature is too low. Never fry too much oil in Frying Basket. Food pieces may cause excessive splattering. Filter oil regularly to Deep Fryer socket. • Ensure Magnetic Cord Assembly is not suitable...
... unit may need to clean. • To clean oil residue from the wall outlet. 4. Fried food does not have a golden-brown color and/or is not crispy. • Selected temperature is too low. Never fry too much oil in Frying Basket. Food pieces may cause excessive splattering. Filter oil regularly to Deep Fryer socket. • Ensure Magnetic Cord Assembly is not suitable...
Use and Care Manual
Page 11
...warranty. To make a warranty claim. or hamiltonbeach.ca/customer-service in the U.S. This product is replacement of this appliance to the store. This warranty extends only to...apply to you specific legal rights. Please write Hamilton Beach Brands, Inc., Consumer Affairs Department, 261 Yadkin Road, Southern Pines, NC 28387, or visit hamiltonbeach.com/customer-service in Canada. ...For faster service, locate the model, type, and series numbers on the rating label (e.g., 120 V ~ 60 Hz). This warranty does not cover glass, filters, wear from normal use, use or subjected ...
...warranty. To make a warranty claim. or hamiltonbeach.ca/customer-service in the U.S. This product is replacement of this appliance to the store. This warranty extends only to...apply to you specific legal rights. Please write Hamilton Beach Brands, Inc., Consumer Affairs Department, 261 Yadkin Road, Southern Pines, NC 28387, or visit hamiltonbeach.com/customer-service in Canada. ...For faster service, locate the model, type, and series numbers on the rating label (e.g., 120 V ~ 60 Hz). This warranty does not cover glass, filters, wear from normal use, use or subjected ...


