
Use & Care
Page 2
... of the cord used by or near a hot gas or electric burner or in , or tripping over edge of the coffeemaker. Care must never be done by Hamilton Beach/ Proctor-Silex, Inc. Allow to prevent accidental tipping. 7. Call our toll-free customer service number for information on or taking off parts and before cleaning. This type of counter to cool before putting on examination, repair, or adjustment...
... of the cord used by or near a hot gas or electric burner or in , or tripping over edge of the coffeemaker. Care must never be done by Hamilton Beach/ Proctor-Silex, Inc. Allow to prevent accidental tipping. 7. Call our toll-free customer service number for information on or taking off parts and before cleaning. This type of counter to cool before putting on examination, repair, or adjustment...
Use & Care
Page 3
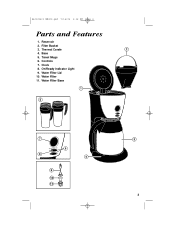
On/Ready Indicator Light 9. 840129600 ENv02.qxd 7/16/04 2:06 PM Page 3 Parts and Features 1. Controls 7. Water Filter Lid 10. Filter Basket 3. Water Filter 11. Thermal Carafe 4. Base 5. Water Filter Base 3 Travel Mugs 6. Reservoir 2. Clock 8.
On/Ready Indicator Light 9. 840129600 ENv02.qxd 7/16/04 2:06 PM Page 3 Parts and Features 1. Controls 7. Water Filter Lid 10. Filter Basket 3. Water Filter 11. Thermal Carafe 4. Base 5. Water Filter Base 3 Travel Mugs 6. Reservoir 2. Clock 8.

Use & Care
Page 4
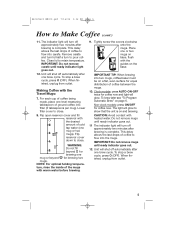
... coffee into reservoir. Place OPTIONAL water filter and water filter holder into place. 5. Clock model: press AUTO-ON-OFF twice for coffee now and light will glow. If your model has OPTIONAL clock, press H to Make Coffee 1. For each cup of coffee being made, place one level measuring tablespoon of unit to close . Lower filter cover to lock basket into reservoir (see "To Program Automatic Brew" on carafe by turning lid clockwise until indicator goes out. 4 Flip reservoir cover down to set...
... coffee into reservoir. Place OPTIONAL water filter and water filter holder into place. 5. Clock model: press AUTO-ON-OFF twice for coffee now and light will glow. If your model has OPTIONAL clock, press H to Make Coffee 1. For each cup of coffee being made, place one level measuring tablespoon of unit to close . Lower filter cover to lock basket into reservoir (see "To Program Automatic Brew" on carafe by turning lid clockwise until indicator goes out. 4 Flip reservoir cover down to set...
Use & Care
Page 5
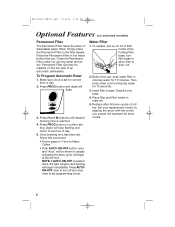
... two mugs). Unit will glow to close . 8. Lower filter cover to retain temperature. IMPORTANT: Do not remove carafe until ready indicator goes out. 12. WARNING: Do not fill beyond for brewing one brew cycle. Clock models: press AUTO-ON-OFF twice for equal distribution of coffee to pour coffee. To stop a brew cycle, press O (OFF). Close lid to close . Making Coffee with heated water. Flip open reservoir cover and fill reservoir with the...
... two mugs). Unit will glow to close . 8. Lower filter cover to retain temperature. IMPORTANT: Do not remove carafe until ready indicator goes out. 12. WARNING: Do not fill beyond for brewing one brew cycle. Clock models: press AUTO-ON-OFF twice for equal distribution of coffee to pour coffee. To stop a brew cycle, press O (OFF). Close lid to close . Making Coffee with heated water. Flip open reservoir cover and fill reservoir with the...
Use & Care
Page 6
.... 2. Water Filter 1. Replace after 60 brew cycles of an automatic dishwasher. Press PROG button to confirm setting. Then rinse under hot running tap water for 15 seconds. 3. Place filter and filter holder in the filter basket. Simply place the Permanent Filter in reservoir. 5. Once brewing time has been set, follow this procedure: • Follow steps in "How to Make Coffee." • Push AUTO-ON-OFF button once and "Auto" will stop flashing and return to set programming mode. Set your replacement month...
.... 2. Water Filter 1. Replace after 60 brew cycles of an automatic dishwasher. Press PROG button to confirm setting. Then rinse under hot running tap water for 15 seconds. 3. Place filter and filter holder in the filter basket. Simply place the Permanent Filter in reservoir. 5. Once brewing time has been set, follow this procedure: • Follow steps in "How to Make Coffee." • Push AUTO-ON-OFF button once and "Auto" will stop flashing and return to set programming mode. Set your replacement month...
Use & Care
Page 7
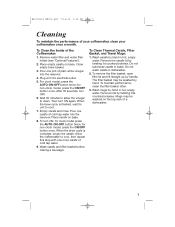
... non-clock model, press the ON/OFF button once. To Clean Thermal Carafe, Filter Basket, and Travel Mugs: 1. To remove the filter basket, open filter lid and lift straight up by twisting lid counterclockwise. Wash mugs by hand in dishwasher. 2. Remove water filter and water filter holder (see "Optional Features"). 2. For clock model, press the AUTO-ON-OFF button twice; Wash carafe and filter basket before making a beverage. Do not submerse carafe in hot, soapy water. To maintain performance, clean the filter basket often...
... non-clock model, press the ON/OFF button once. To Clean Thermal Carafe, Filter Basket, and Travel Mugs: 1. To remove the filter basket, open filter lid and lift straight up by twisting lid counterclockwise. Wash mugs by hand in dishwasher. 2. Remove water filter and water filter holder (see "Optional Features"). 2. For clock model, press the AUTO-ON-OFF button twice; Wash carafe and filter basket before making a beverage. Do not submerse carafe in hot, soapy water. To maintain performance, clean the filter basket often...
Use & Care
Page 8
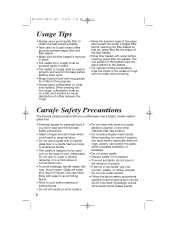
... carafe lid or mug(s) must be screwed tightly in place. • The carafe or mug(s) must be placed properly and level on the base before starting brew cycle. • Mugs must be used only on a hot surface. • Do not clean with care. Carafe Safety Precautions The thermal carafe provided with mug guides for equal distribution of coffee between paper filter and filter basket. • Make sure the filter basket...
... carafe lid or mug(s) must be screwed tightly in place. • The carafe or mug(s) must be placed properly and level on the base before starting brew cycle. • Mugs must be used only on a hot surface. • Do not clean with care. Carafe Safety Precautions The thermal carafe provided with mug guides for equal distribution of coffee between paper filter and filter basket. • Make sure the filter basket...
Use & Care
Page 9
... will repair or replace this warranty, DO NOT RETURN THE APPLIANCE TO THE STORE! Please call our CUSTOMER SERVICE NUMBER. (For faster service please have model, series, and type numbers ready for Hamilton Beach products from state to state, or province to the following, which may also have a claim under this product, at our option, at no warranty with respect to province. This warranty gives you specific legal...
... will repair or replace this warranty, DO NOT RETURN THE APPLIANCE TO THE STORE! Please call our CUSTOMER SERVICE NUMBER. (For faster service please have model, series, and type numbers ready for Hamilton Beach products from state to state, or province to the following, which may also have a claim under this product, at our option, at no warranty with respect to province. This warranty gives you specific legal...


