
User Manual
Page 1
... 9 1.4 Control Panel 10 1.5 Input and Output Jacks 10 1.6 Remote Control 12 1.7 Inserting the Remote Control Batteries 16 2. Setting up your TV 18 2.1 Power Connection 18 2.2 Rear Connections 18 2.3 Using the TV 20 2.3.1 Turning the TV On and Off 20 2.3.2 Switching Source Signals 20 2.3.3 Performing an Automatic Channel Search 20 2.3.4 Selecting Channels 20 2.3.5 Adjusting the Volume 20 3. English Table of Contents Regulatory Information 3 Description of Warning Symbols 3 Safety Notices 4 Preface 6 Warranty and Service 6 1. Adjusting On-Screen Display (OSD) Settings 21...
... 9 1.4 Control Panel 10 1.5 Input and Output Jacks 10 1.6 Remote Control 12 1.7 Inserting the Remote Control Batteries 16 2. Setting up your TV 18 2.1 Power Connection 18 2.2 Rear Connections 18 2.3 Using the TV 20 2.3.1 Turning the TV On and Off 20 2.3.2 Switching Source Signals 20 2.3.3 Performing an Automatic Channel Search 20 2.3.4 Selecting Channels 20 2.3.5 Adjusting the Volume 20 3. English Table of Contents Regulatory Information 3 Description of Warning Symbols 3 Safety Notices 4 Preface 6 Warranty and Service 6 1. Adjusting On-Screen Display (OSD) Settings 21...

User Manual
Page 4
... other strong sources of heat. WARNING To prevent the spread of fire, keep candles or other than that contained in the operating instructions unless you are for the emission of heat. WARNING To reduce the risk of electric shock, do not perform any servicing other open ... at all times. 4 Leave sufficient distance between the TV and the wall to dripping or splashing and no objects filled with liquids, such as vases, shall be exposed to provide enough space for use by qualified service personnel only. English Safety Notices Installation Safety Notes Location Avoid allowing ...
... other strong sources of heat. WARNING To prevent the spread of fire, keep candles or other than that contained in the operating instructions unless you are for the emission of heat. WARNING To reduce the risk of electric shock, do not perform any servicing other open ... at all times. 4 Leave sufficient distance between the TV and the wall to dripping or splashing and no objects filled with liquids, such as vases, shall be exposed to provide enough space for use by qualified service personnel only. English Safety Notices Installation Safety Notes Location Avoid allowing ...

User Manual
Page 5
... the TV, contact an authorized service technician. 6. Dangerous high-voltage electric power components are excluded. • This device uses a VGA connector to connect to disconnect the plug by pulling on the power cord. Hold the plug. Do not place or drop metals, small objects, or flammable materials into an outlet, power strip, or extension cable. 2. If the screen is broken, do not...
... the TV, contact an authorized service technician. 6. Dangerous high-voltage electric power components are excluded. • This device uses a VGA connector to connect to disconnect the plug by pulling on the power cord. Hold the plug. Do not place or drop metals, small objects, or flammable materials into an outlet, power strip, or extension cable. 2. If the screen is broken, do not...

User Manual
Page 6
... entirety before setting up and using or operating your TV. 6 The information in this manual in this manual are followed. Please carefully read this manual is important that the safety and operation instructions in this manual has been carefully checked for accuracy; To the extent allowed by applicable law, Hannspree, Inc. ("Hannspree") shall not be liable for purchasing a Hannspree Liquid Crystal Display Television (LCD TV...
... entirety before setting up and using or operating your TV. 6 The information in this manual in this manual are followed. Please carefully read this manual is important that the safety and operation instructions in this manual has been carefully checked for accuracy; To the extent allowed by applicable law, Hannspree, Inc. ("Hannspree") shall not be liable for purchasing a Hannspree Liquid Crystal Display Television (LCD TV...

User Manual
Page 9
... a handy remote control let you connect to an external audio system or earphones. 1.3 Features • TV Tuner: Built-in stereo speakers provide full rich sound and a convenient audio output port lets you change channels, adjust the volume, and change display settings through the VGA port. The built-in TV Tuner • Audio/ Video support: - HDTV (Component) input - SPDIF output (27.5"/31.5"/42") - PC line input - 3.5 mm stereo earphone output - SPDIF output (digital audio out) (18.5"/21.6"/24.6") • On-Screen Display (OSD) menu system •...
... a handy remote control let you connect to an external audio system or earphones. 1.3 Features • TV Tuner: Built-in stereo speakers provide full rich sound and a convenient audio output port lets you change channels, adjust the volume, and change display settings through the VGA port. The built-in TV Tuner • Audio/ Video support: - HDTV (Component) input - SPDIF output (27.5"/31.5"/42") - PC line input - 3.5 mm stereo earphone output - SPDIF output (digital audio out) (18.5"/21.6"/24.6") • On-Screen Display (OSD) menu system •...

User Manual
Page 10
.... Press to an antenna or cable TV. 10 Indicate power or standby status, power on the OSD menu. Press to decrease the program number or move upward to the previous item on / off represent to turn the on-screen display (OSD) menu on the OSD menu. Receive incoming remote control commands. Function Press to Green/Red light indicators. English 1.4 Control Panel Description Power Input source Button INPUT Menu MENU Program select PS Program select PT Volume adjust Volume adjust Remote IR sensor Power/ Standby indicator Speakers VOL + VOL - Press...
.... Press to an antenna or cable TV. 10 Indicate power or standby status, power on the OSD menu. Press to decrease the program number or move upward to the previous item on / off represent to turn the on-screen display (OSD) menu on the OSD menu. Receive incoming remote control commands. Function Press to Green/Red light indicators. English 1.4 Control Panel Description Power Input source Button INPUT Menu MENU Program select PS Program select PT Volume adjust Volume adjust Remote IR sensor Power/ Standby indicator Speakers VOL + VOL - Press...
User Manual
Page 12
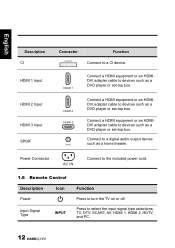
... HDMIDVI adapter cable to a digital audio output device such as a home theater. Press to turn the TV on or off. Power Connector AC IN Connect to the included power cord. 1.6 Remote Control Description Icon Power Input Signal Type INPUT Function Press to select the input signal type selections: TV, DTV, SCART, AV, HDMI 1, HDMI 2, HDTV, and PC. 12 English Description CI HDMI 1 Input HDMI 2 Input HDMI 3 Input SPDIF Connector CI SLOT Function Connect to devices such as a DVD player or set-top box. HDMI 1 HDMI 2 HDMI 3 SPDIF Connect a HDMI...
... HDMIDVI adapter cable to a digital audio output device such as a home theater. Press to turn the TV on or off. Power Connector AC IN Connect to the included power cord. 1.6 Remote Control Description Icon Power Input Signal Type INPUT Function Press to select the input signal type selections: TV, DTV, SCART, AV, HDMI 1, HDMI 2, HDTV, and PC. 12 English Description CI HDMI 1 Input HDMI 2 Input HDMI 3 Input SPDIF Connector CI SLOT Function Connect to devices such as a DVD player or set-top box. HDMI 1 HDMI 2 HDMI 3 SPDIF Connect a HDMI...

User Manual
Page 14
... page, press to display the subtitle page. Press the colored buttons to increase the program number. Press to inactivate automatic page change the multi sound selection of the available teletext subjects. (Programmable in the teletext mode only) Press to display the teletext over the program on the screen. (Programmable in the teletext mode only) Press to adjust screen size. (Programmable in the OSD menu or teletext...
... page, press to display the subtitle page. Press the colored buttons to increase the program number. Press to inactivate automatic page change the multi sound selection of the available teletext subjects. (Programmable in the teletext mode only) Press to display the teletext over the program on the screen. (Programmable in the teletext mode only) Press to adjust screen size. (Programmable in the OSD menu or teletext...

User Manual
Page 15
... minutes). English Description Picture Mode Icon PIC Function Press continuously to the selected channel. FREEZE SLEEP ASPECT Press to open favorite list menu and press / to pause a video frame on the remote control at TV. • The operational distance may be shortened when the signal sensor is directly exposed to strong light. • Aim the transmitter on -screen. (Programmable in the TV source only) Press...
... minutes). English Description Picture Mode Icon PIC Function Press continuously to the selected channel. FREEZE SLEEP ASPECT Press to open favorite list menu and press / to pause a video frame on the remote control at TV. • The operational distance may be shortened when the signal sensor is directly exposed to strong light. • Aim the transmitter on -screen. (Programmable in the TV source only) Press...

User Manual
Page 18
... plug at the other end of the power cord into a power outlet. 2.2 Rear Connections See the illustration and table below for device connection instructions. Speaker system Camcorder DVD player 2 PC 27.5"/31.5"/42" only 1 PC HDMI IN AUDIO IN PC IN VGA SCART SCART 1 Blu-ray Disc player 27.5"/31.5"/42" only Video Game Console HDMI 1 Y PB PR HDMI 2 L AUDIO R COMPONENT SPDIF SSERVIICCEE 34 SCART 2 TV/DTV CABLE ANTENNA 5 6 DVD player VCR 18 VCR/VCD/DVD...
... plug at the other end of the power cord into a power outlet. 2.2 Rear Connections See the illustration and table below for device connection instructions. Speaker system Camcorder DVD player 2 PC 27.5"/31.5"/42" only 1 PC HDMI IN AUDIO IN PC IN VGA SCART SCART 1 Blu-ray Disc player 27.5"/31.5"/42" only Video Game Console HDMI 1 Y PB PR HDMI 2 L AUDIO R COMPONENT SPDIF SSERVIICCEE 34 SCART 2 TV/DTV CABLE ANTENNA 5 6 DVD player VCR 18 VCR/VCD/DVD...

User Manual
Page 19
... to do so if a HDMI to DVI cable is connected. 3 Component • The video and audio cables are optional. Video Inputs Component Audio Inputs 4 SPDIF • The SPDIF cable is optional. 5 SCART 1 • If your TV model. 19 AUDIO In 2 HDMI 1 • The HDMI cable is optional. HDMI 2 HDMI 3 • When the HDMI to a TV cable or antenna, try scanning for channels. 7 Earphone • The internal TV speakers will not output sound when a speaker or earphone is not necessary...
... to do so if a HDMI to DVI cable is connected. 3 Component • The video and audio cables are optional. Video Inputs Component Audio Inputs 4 SPDIF • The SPDIF cable is optional. 5 SCART 1 • If your TV model. 19 AUDIO In 2 HDMI 1 • The HDMI cable is optional. HDMI 2 HDMI 3 • When the HDMI to a TV cable or antenna, try scanning for channels. 7 Earphone • The internal TV speakers will not output sound when a speaker or earphone is not necessary...

User Manual
Page 20
The power LED indicator on the TV changes from green to red, indicating that the TV is off. 2.3.2 Switching Source Signals Press INPUT on the control panel or remote control to select the incoming source signal. 2.3.3 Performing an Automatic Channel Search Before using the TV to view programs, you need to activate the channel search first. 1 Press MENU on the control panel or remote control, then select to enter the Channel / DTV menu. 2 Select Auto Search. 3 Press on the remote control to...
The power LED indicator on the TV changes from green to red, indicating that the TV is off. 2.3.2 Switching Source Signals Press INPUT on the control panel or remote control to select the incoming source signal. 2.3.3 Performing an Automatic Channel Search Before using the TV to view programs, you need to activate the channel search first. 1 Press MENU on the control panel or remote control, then select to enter the Channel / DTV menu. 2 Select Auto Search. 3 Press on the remote control to...

User Manual
Page 22
... be set by different adjustment methods. 3.2 Adjusting Picture Settings 1 Press MENU to adjust the scales or options settings. Picture Sound TV Features Parental OK Enter Smart Picture Brightness Contrast Colour Tint Sharpness Colour Temperature Advanced Control Standard 50 50 50 0 3 Cool Select Menu Exit 5 Press MENU to return to the Picture menu entry. 6 Press MENU to exit the OSD menu. English 3.1 OSD Setting Menus Follow the instructions indicated on the control panel or...
... be set by different adjustment methods. 3.2 Adjusting Picture Settings 1 Press MENU to adjust the scales or options settings. Picture Sound TV Features Parental OK Enter Smart Picture Brightness Contrast Colour Tint Sharpness Colour Temperature Advanced Control Standard 50 50 50 0 3 Cool Select Menu Exit 5 Press MENU to return to the Picture menu entry. 6 Press MENU to exit the OSD menu. English 3.1 OSD Setting Menus Follow the instructions indicated on the control panel or...

User Manual
Page 24
... UK. • The Audio Carrier can be set to perform or adjust the Channel Scan, Update Scan, Single RF Scan, Analog Manual Scan, Channel Skip, Channel Sort, Channel Edit, Decoder, and Analog Ch Fine Tune settings. 24 Note: The options available on the OSD may vary depending on the input signal source. 3.4 Adjusting TV Settings 1 Press INPUT and select TV as the signal type. 2 Press MENU to enter the OSD Main Menu screen. 3 Press to select the...
... UK. • The Audio Carrier can be set to perform or adjust the Channel Scan, Update Scan, Single RF Scan, Analog Manual Scan, Channel Skip, Channel Sort, Channel Edit, Decoder, and Analog Ch Fine Tune settings. 24 Note: The options available on the OSD may vary depending on the input signal source. 3.4 Adjusting TV Settings 1 Press INPUT and select TV as the signal type. 2 Press MENU to enter the OSD Main Menu screen. 3 Press to select the...

User Manual
Page 26
Picture Sound TV Features Parental 55 Analog ---- 56 Analog ---- 57 Analog ---- 58 Analog ---- 59 Analog ---- 60 Analog ---- 61 Analog ---- KEY CHARACTER 0 - @0 1 _-1 2 ABCa b c 2 3 DEF d e f 3 4 GH I , D/K, A2 D/K, A2 D/K1, B/G, A2 B/G, L, or L'. • The Decoder supports the Canal+ (paid TV channel with encrypted programs). • Select Analog Ch Fine Tune to adjust precisely the analog channel frequency to ensure high signal quality. To change the channel number, select Channel Number and use the number keys on the remote control to type the...
Picture Sound TV Features Parental 55 Analog ---- 56 Analog ---- 57 Analog ---- 58 Analog ---- 59 Analog ---- 60 Analog ---- 61 Analog ---- KEY CHARACTER 0 - @0 1 _-1 2 ABCa b c 2 3 DEF d e f 3 4 GH I , D/K, A2 D/K, A2 D/K1, B/G, A2 B/G, L, or L'. • The Decoder supports the Canal+ (paid TV channel with encrypted programs). • Select Analog Ch Fine Tune to adjust precisely the analog channel frequency to ensure high signal quality. To change the channel number, select Channel Number and use the number keys on the remote control to type the...

User Manual
Page 27
... view the CI supplier information. • Select Reset Default to restore all settings to the defaults. • The HDMI Scan Info can be used to change the options settings. Picture Sound TV Features Parental OK Enter Menu Language Picture Format Time Subitile Teletext Language Common Interface Reset Default UK Stereo Select Menu Exit 6 Press MENU to return to the Features menu entry. 7 Press MENU to adjust the Automatic, Underscan, and Overscan settings. 27 The Features menu...
... view the CI supplier information. • Select Reset Default to restore all settings to the defaults. • The HDMI Scan Info can be used to change the options settings. Picture Sound TV Features Parental OK Enter Menu Language Picture Format Time Subitile Teletext Language Common Interface Reset Default UK Stereo Select Menu Exit 6 Press MENU to return to the Features menu entry. 7 Press MENU to adjust the Automatic, Underscan, and Overscan settings. 27 The Features menu...

User Manual
Page 29
... Channel Block, Parental Guidance, Input Block, Set Password, and Clear All settings. • Select Channel Block to block desired channels. • Select Parental Guidance to set as the signal type. 2 Press MENU to enter the OSD Main Menu screen. 3 Press to select the Parental menu. 4 Press to enter the Parental menu. 5 Type the password. Press / to adjust the value from 4 to 18 or to set Age Rating. The default is only accessible in TV mode. 29 Picture Sound...
... Channel Block, Parental Guidance, Input Block, Set Password, and Clear All settings. • Select Channel Block to block desired channels. • Select Parental Guidance to set as the signal type. 2 Press MENU to enter the OSD Main Menu screen. 3 Press to select the Parental menu. 4 Press to enter the Parental menu. 5 Type the password. Press / to adjust the value from 4 to 18 or to set Age Rating. The default is only accessible in TV mode. 29 Picture Sound...
User Manual
Page 30
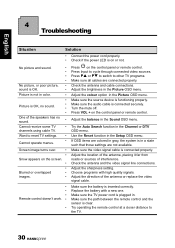
... connected video sources. Check the antenna and cable connections. Make sure the battery is connected properly. Press Input to reset TV settings. • Cannot operate menus. • Screen image turns over. • • Snow appears on the screen. • • Blurred or overlapped • images. • • • • Remote control doesn't work. • • Press on the control panel or remote control. Make sure the TV power cord is in the Picture OSD menu...
... connected video sources. Check the antenna and cable connections. Make sure the battery is connected properly. Press Input to reset TV settings. • Cannot operate menus. • Screen image turns over. • • Snow appears on the screen. • • Blurred or overlapped • images. • • • • Remote control doesn't work. • • Press on the control panel or remote control. Make sure the TV power cord is in the Picture OSD menu...

User Manual
Page 32
... Sound Output (RMS Watts) 3 W 3 W 5 W 10 W 10 W 10 W Sound Mode Personal, Music, Speech Picture Format Auto, Normal, Zoom1, Zoom2, Full, Subtitle, Wide (70cm/27.5" only), Native (HDMI only) Picture Mode Standard, Vivid, Movie, Eco, Personal CONNECTION Tuner Input (75 Ω) PC IN: D-SUB and PC Audio Component Video and L/R Audio Input Rear Connector SCART 1 SPDIF Output (Digital audio out) HDMI 1 SCART 1 SPDIF Output (Digital audio out) HDMI 1 SCART 1 SPDIF HDMI 1 SCART 1 SCART 2 SPDIF HDMI 1 HDMI 2 SCART 1 SCART 2 SPDIF HDMI 1 HDMI 2 SCART 1 SCART 2 SPDIF HDMI 1 HDMI...
... Sound Output (RMS Watts) 3 W 3 W 5 W 10 W 10 W 10 W Sound Mode Personal, Music, Speech Picture Format Auto, Normal, Zoom1, Zoom2, Full, Subtitle, Wide (70cm/27.5" only), Native (HDMI only) Picture Mode Standard, Vivid, Movie, Eco, Personal CONNECTION Tuner Input (75 Ω) PC IN: D-SUB and PC Audio Component Video and L/R Audio Input Rear Connector SCART 1 SPDIF Output (Digital audio out) HDMI 1 SCART 1 SPDIF Output (Digital audio out) HDMI 1 SCART 1 SPDIF HDMI 1 SCART 1 SCART 2 SPDIF HDMI 1 HDMI 2 SCART 1 SCART 2 SPDIF HDMI 1 HDMI 2 SCART 1 SCART 2 SPDIF HDMI 1 HDMI...

User Manual
Page 33
... 6 x 10 mm 1 Purchase a VESA compatible wall bracket (please refer to the table above). 2 Locate your specific wall bracket to properly wall mount the TV. • The TV stand base can ask a qualified service personnel about using the hole on the back and center of the stand base. *Installing the LCD TV requires special skill that results in accident or injury. Hannspree bears no responsibility for improper mounting or mounting that should not...
... 6 x 10 mm 1 Purchase a VESA compatible wall bracket (please refer to the table above). 2 Locate your specific wall bracket to properly wall mount the TV. • The TV stand base can ask a qualified service personnel about using the hole on the back and center of the stand base. *Installing the LCD TV requires special skill that results in accident or injury. Hannspree bears no responsibility for improper mounting or mounting that should not...


