
User Manual
Page 2
... cord, use and before unplugging. 12. Do not handle plug or appliance with any object into water, return it should always be present. 14. Keep hair, loose clothing, fingers, and all parts of body away from heated surfaces. 7. Use extra care when cleaning on cord, or pull cord around sharp edges or corners. Item 94282 MAINTENANcE SAFETy Table of contents Safety 2 Specifications 4 Setup 4 Operating Instructions 6 Maintenance 9 Parts List and Diagram 11 Warranty...
... cord, use and before unplugging. 12. Do not handle plug or appliance with any object into water, return it should always be present. 14. Keep hair, loose clothing, fingers, and all parts of body away from heated surfaces. 7. Use extra care when cleaning on cord, or pull cord around sharp edges or corners. Item 94282 MAINTENANcE SAFETy Table of contents Safety 2 Specifications 4 Setup 4 Operating Instructions 6 Maintenance 9 Parts List and Diagram 11 Warranty...

User Manual
Page 3
..., contact Harbor Freight Tools for up to 125 V~ and up water from these chemicals: work with a qualified electrician or service person if you to lead, a chemical known to filter out microscopic particles. (California Health & Safety Code § 25249.5, et seq.) 25. Wash hands after handling. (California Health & Safety Code § 25249.5, et seq.) 26. Do not modify the plug provided with a cord having the...
..., contact Harbor Freight Tools for up to 125 V~ and up water from these chemicals: work with a qualified electrician or service person if you to lead, a chemical known to filter out microscopic particles. (California Health & Safety Code § 25249.5, et seq.) 25. Wash hands after handling. (California Health & Safety Code § 25249.5, et seq.) 26. Do not modify the plug provided with a cord having the...
User Manual
Page 4
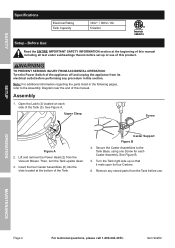
... 94282 Assembly 1. Upper clasp Screw Figure A 2. caster Support Figure B 4. Before Use: Read the ENTIRE IMpORTANT SAFETy INFORMATION section at the bottom of this section. TO pREVENT SERIOUS INJURy FROM AccIDENTAL OpERATION: Turn the power Switch of the Tank (5). See Figure A. Open the Latch (3) located on each Caster Assembly. Lift and remove the Power Head (2) from the Tank before performing any stored parts from the Vacuum Blower. Remove...
... 94282 Assembly 1. Upper clasp Screw Figure A 2. caster Support Figure B 4. Before Use: Read the ENTIRE IMpORTANT SAFETy INFORMATION section at the bottom of this section. TO pREVENT SERIOUS INJURy FROM AccIDENTAL OpERATION: Turn the power Switch of the Tank (5). See Figure A. Open the Latch (3) located on each Caster Assembly. Lift and remove the Power Head (2) from the Tank before performing any stored parts from the Vacuum Blower. Remove...

User Manual
Page 5
Page 5 MAINTENANcE SAFETy Functions Blower port power cord crevice Tool SETUp OpERATION Switch Suction port Floor Nozzle Hose Extension Item 94282 For technical questions, please call 1-800-444-3353.
Page 5 MAINTENANcE SAFETy Functions Blower port power cord crevice Tool SETUp OpERATION Switch Suction port Floor Nozzle Hose Extension Item 94282 For technical questions, please call 1-800-444-3353.
User Manual
Page 6
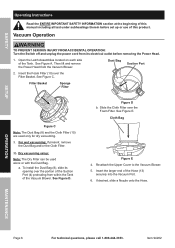
For wet vacuuming: If present, remove the Dust Bag and/or the Cloth Filter. 3b. Dry vacuuming setup: Note: The Dry Filter can be used only for dry vacuuming. 3. Re-attach the Upper Cover to the Vacuum Blower. 5. Vacuum Operation TO pREVENT SERIOUS INJURy FROM AccIDENTAL OpERATION: Turn the Switch off and unplug the power cord from its opening over the portion of the Suction Port (4) protruding from the Vacuum Blower. Open the Latch Assemblies located on each side of...
For wet vacuuming: If present, remove the Dust Bag and/or the Cloth Filter. 3b. Dry vacuuming setup: Note: The Dry Filter can be used only for dry vacuuming. 3. Re-attach the Upper Cover to the Vacuum Blower. 5. Vacuum Operation TO pREVENT SERIOUS INJURy FROM AccIDENTAL OpERATION: Turn the Switch off and unplug the power cord from its opening over the portion of the Suction Port (4) protruding from the Vacuum Blower. Open the Latch Assemblies located on each side of...
User Manual
Page 7
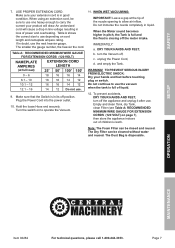
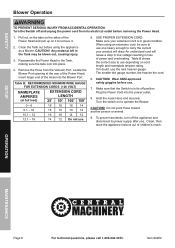
... Dust Bag is full of the nozzle opening to carry the current your hands and feet before touching plug or switch. Table A: REcOMMENDED MINIMUM WIRE GAUGE FOR EXTENSION cORDS (120 VOLT) NAMEpLATE AMpERES (at the tip of liquid. 12. Do not immerse the nozzle completely in doubt, use one heavy enough to allow air inflow. unplug the Power Cord, d. and empty the Tank. SETUp OpERATION MAINTENANcE Item 94282...
... Dust Bag is full of the nozzle opening to carry the current your hands and feet before touching plug or switch. Table A: REcOMMENDED MINIMUM WIRE GAUGE FOR EXTENSION cORDS (120 VOLT) NAMEpLATE AMpERES (at the tip of liquid. 12. Do not immerse the nozzle completely in doubt, use one heavy enough to allow air inflow. unplug the Power Cord, d. and empty the Tank. SETUp OpERATION MAINTENANcE Item 94282...
User Manual
Page 8
... the power cord from the Vacuum Port. Remove the Hose from its electrical outlet before removing the power Head. 1. Table B: REcOMMENDED MINIMUM WIRE GAUGE FOR EXTENSION cORDS (120 VOLT) NAMEpLATE AMpERES (at the rear of power and overheating. SETUp OpERATION MAINTENANcE Page 8 For technical questions, please call 1-800-444-3353. Reassemble the Power Head to operate the Blower. USE PROPER EXTENSION CORD. If in loss of the Power Head. Make sure that the Switch...
... the power cord from the Vacuum Port. Remove the Hose from its electrical outlet before removing the power Head. 1. Table B: REcOMMENDED MINIMUM WIRE GAUGE FOR EXTENSION cORDS (120 VOLT) NAMEpLATE AMpERES (at the rear of power and overheating. SETUp OpERATION MAINTENANcE Page 8 For technical questions, please call 1-800-444-3353. Reassemble the Power Head to operate the Blower. USE PROPER EXTENSION CORD. If in loss of the Power Head. Make sure that the Switch...
User Manual
Page 9
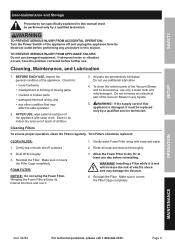
... its internal structure and ruin it must be performed only by a qualified service technician. TO pREVENT SERIOUS INJURy FROM AccIDENTAL OpERATION: Turn the power Switch of the Vacuum Blower in this appliance is wet will tear its electrical outlet before further use damaged equipment. WARNING! WARNING! To clean the exterior parts of the appliance with clean cloth. Gently wash Foam Filter using mild soap and...
... its internal structure and ruin it must be performed only by a qualified service technician. TO pREVENT SERIOUS INJURy FROM AccIDENTAL OpERATION: Turn the power Switch of the Vacuum Blower in this appliance is wet will tear its electrical outlet before further use damaged equipment. WARNING! WARNING! To clean the exterior parts of the appliance with clean cloth. Gently wash Foam Filter using mild soap and...
User Manual
Page 10
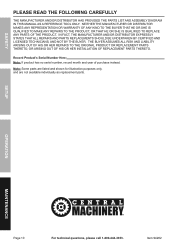
... ANY REPAIRS TO THE PRODUCT, OR THAT HE OR SHE IS QUALIFIED TO REPLACE ANY PARTS OF THE PRODUCT. Note: Some parts are listed and shown for illustration purposes only, and are not available individually as replacement parts. Item 94282 SAFETy pLEASE READ THE FOLLOWING cAREFULLy THE MANUFACTURER AND/OR DISTRIBUTOR HAS PROVIDED THE PARTS LIST AND ASSEMBLY DIAGRAM IN THIS MANUAL AS A REFERENCE TOOL ONLY...
... ANY REPAIRS TO THE PRODUCT, OR THAT HE OR SHE IS QUALIFIED TO REPLACE ANY PARTS OF THE PRODUCT. Note: Some parts are listed and shown for illustration purposes only, and are not available individually as replacement parts. Item 94282 SAFETy pLEASE READ THE FOLLOWING cAREFULLy THE MANUFACTURER AND/OR DISTRIBUTOR HAS PROVIDED THE PARTS LIST AND ASSEMBLY DIAGRAM IN THIS MANUAL AS A REFERENCE TOOL ONLY...
User Manual
Page 11
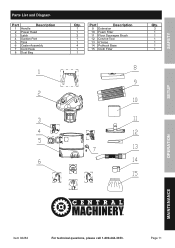
SAFETy parts List and Diagram part Description 1 Handle 2 Power Head 3 Latch 4 Suction Port 5 Tank 6 Caster Assembly 7 Cord Hook 8 Dust Bag Qty. 1 1 2 1 1 4 1 1 part Description 9 Extension 10 Foam Filter 11 Floor Squeegee Brush 12 Crevice Tool 13 6' Hose 14 Pothook Base 15 Cloth Filter Qty. 3 1 1 1 1 1 1 SETUp OpERATION MAINTENANcE Item 94282 For technical questions, please call 1-800-444-3353. Page 11
SAFETy parts List and Diagram part Description 1 Handle 2 Power Head 3 Latch 4 Suction Port 5 Tank 6 Caster Assembly 7 Cord Hook 8 Dust Bag Qty. 1 1 2 1 1 4 1 1 part Description 9 Extension 10 Foam Filter 11 Floor Squeegee Brush 12 Crevice Tool 13 6' Hose 14 Pothook Base 15 Cloth Filter Qty. 3 1 1 1 1 1 1 SETUp OpERATION MAINTENANcE Item 94282 For technical questions, please call 1-800-444-3353. Page 11
User Manual
Page 12
... from the use of our warranty, then you must accompany the merchandise. Limited 90 Day Warranty Harbor Freight Tools Co. makes every effort to assure that its products meet high quality and durability standards, and warrants to the original purchaser that the defect resulted from the date of returning the product. We will either repair or replace the product at our...
... from the use of our warranty, then you must accompany the merchandise. Limited 90 Day Warranty Harbor Freight Tools Co. makes every effort to assure that its products meet high quality and durability standards, and warrants to the original purchaser that the defect resulted from the date of returning the product. We will either repair or replace the product at our...


