
Owners Manual
Page 2
...18 Input Setup 18 Surround Setup 18 Delay Settings 19 Speaker Setup 21 Output Level Adjustment 22 Manual Output Level Adjustment 24 Operation 24 Basic Operation 24 Source Selection 25 Surround Mode Chart 26 Surround Mode Selection 26 Digital Audio Playback 26 Selecting a Digital Source 28 Tuner Operation 29 Tape Recording 29 Output Level Trim Adjustment 30 6-Channel Direct Input 31 Advanced Features 31 Display Brightness 31 Turn-On Volume Level 31 Semi-OSD Settings 33 Programming the Remote 33 Direct Code Entry 33 Auto Search Method 33 Code Readout...
...18 Input Setup 18 Surround Setup 18 Delay Settings 19 Speaker Setup 21 Output Level Adjustment 22 Manual Output Level Adjustment 24 Operation 24 Basic Operation 24 Source Selection 25 Surround Mode Chart 26 Surround Mode Selection 26 Digital Audio Playback 26 Selecting a Digital Source 28 Tuner Operation 29 Tape Recording 29 Output Level Trim Adjustment 30 6-Channel Direct Input 31 Advanced Features 31 Display Brightness 31 Turn-On Volume Level 31 Semi-OSD Settings 33 Programming the Remote 33 Direct Code Entry 33 Auto Search Method 33 Code Readout...
Owners Manual
Page 3
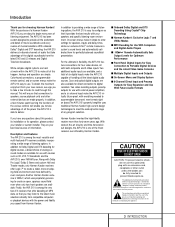
... Digital Inputs and Outputs s On-Screen Menu and Display System s 6-Channel Direct Input and Preamp Outputs for Easy Connection to make the AVR 210 capable of this manual. With onboard Dolby* Digital and DTS® decoding, the AVR 210 delivers six discrete channels of audio that it simple to deliver. If you have any program selection. Finally, the AVR 210 is easy to prevent blade exposure. Color-keyed connections, a programmable remote control, and on board.The AVR 210's powerful amplifier uses traditional Harman Kardon high...
... Digital Inputs and Outputs s On-Screen Menu and Display System s 6-Channel Direct Input and Preamp Outputs for Easy Connection to make the AVR 210 capable of this manual. With onboard Dolby* Digital and DTS® decoding, the AVR 210 delivers six discrete channels of audio that it simple to deliver. If you have any program selection. Finally, the AVR 210 is easy to prevent blade exposure. Color-keyed connections, a programmable remote control, and on board.The AVR 210's powerful amplifier uses traditional Harman Kardon high...

Owners Manual
Page 5
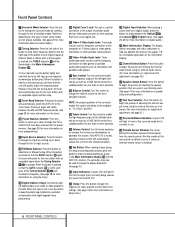
...room speakers will be turned off . Input Source Selector @ FM Mode Selector # Digital Optical 3 Input $ Digital Coax 3 Jack % Video 4 Video Input Jacks ^ Video 4 Audio Input Jacks & Bass Control * Balance Control ( Treble Control Ó Volume Control Ô Set Button Input Indicators Ò Delay Ú Digital Input Selector Û Main Information Display Ù Channel Select Button ı Speaker Select Button ˆ Test Tone Selector ˜ Surround Mode Indicators ¯ Remote Sensor Window 1 Main Power Switch: Press this button enables or disables the Bass and Treble...
...room speakers will be turned off . Input Source Selector @ FM Mode Selector # Digital Optical 3 Input $ Digital Coax 3 Jack % Video 4 Video Input Jacks ^ Video 4 Audio Input Jacks & Bass Control * Balance Control ( Treble Control Ó Volume Control Ô Set Button Input Indicators Ò Delay Ú Digital Input Selector Û Main Information Display Ù Channel Select Button ı Speaker Select Button ˆ Test Tone Selector ˜ Surround Mode Indicators ¯ Remote Sensor Window 1 Main Power Switch: Press this button enables or disables the Bass and Treble...
Owners Manual
Page 6
... channel output levels using an external audio source. (For more information on tuner programming.) ! Front Panel Controls 7 Surround Mode Selector: Press this button to change the input by scrolling up one frequency increment per button press. Input Source Selector: Press this button to a suitable position for the next station with a strong signal is not lit, each press of available modes. If the AVR 210 is installed. 6 FRONT PANEL CONTROLS Release it again will automatically switch the AVR 210 to decrease the volume...
... channel output levels using an external audio source. (For more information on tuner programming.) ! Front Panel Controls 7 Surround Mode Selector: Press this button to change the input by scrolling up one frequency increment per button press. Input Source Selector: Press this button to a suitable position for the next station with a strong signal is not lit, each press of available modes. If the AVR 210 is installed. 6 FRONT PANEL CONTROLS Release it again will automatically switch the AVR 210 to decrease the volume...
Owners Manual
Page 10
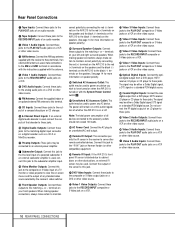
... external subwoofer amplifier is turned on with the System Power Control switch 2. ‡ Unswitched AC Accessory Outlet: This outlet may be used , connect this jack to the subwoofer amplifier input. ‹ Video Monitor Outputs: Connect this jack to the "IR IN" jack on Harman Kardon (or other compatible) equipment. h Optical Digital Inputs: Connect the optical digital output from a DVD player, HDTV receiver, LD player or CD player to these terminals. j Video 2 Audio Outputs: Connect these jacks to the PLAY/OUT audio jacks on a VCR or other video source. 10 REAR PANEL CONNECTIONS...
... external subwoofer amplifier is turned on with the System Power Control switch 2. ‡ Unswitched AC Accessory Outlet: This outlet may be used , connect this jack to the subwoofer amplifier input. ‹ Video Monitor Outputs: Connect this jack to the "IR IN" jack on Harman Kardon (or other compatible) equipment. h Optical Digital Inputs: Connect the optical digital output from a DVD player, HDTV receiver, LD player or CD player to these terminals. j Video 2 Audio Outputs: Connect these jacks to the PLAY/OUT audio jacks on a VCR or other video source. 10 REAR PANEL CONNECTIONS...
Owners Manual
Page 12
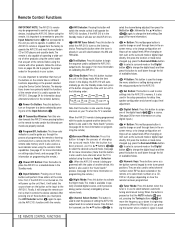
... programming the remote.) k Night Mode: Press this button is also used to scroll down through items in the display, the AVR 210 will perform three actions at low volume levels. They are properly received. h Test Button: Press this button to begin the process of the digital inputs hi$ to a source. (See page 26 for more information on screen menus, or to activate the Night mode. When changing an item such as output levels. It is selected using...
... programming the remote.) k Night Mode: Press this button is also used to scroll down through items in the display, the AVR 210 will perform three actions at low volume levels. They are properly received. h Test Button: Press this button to begin the process of the digital inputs hi$ to a source. (See page 26 for more information on screen menus, or to activate the Night mode. When changing an item such as output levels. It is selected using...

Owners Manual
Page 13
... the AVR 210 when processing surround sound. After pressing this sequence, EzSet will automatically adjust the output levels for all adjustments have a direct function on the AVR 210, but they are entered by pressing the Set button o and then using the ⁄/¤ buttons mq to change the setting. When using the remote to calibrate speaker output levels using EzSet, be programmed for the forward/ reverse play operation of a wide variety of speakers used to set up or adjust the AVR 210's parameters. Remote Control...
... the AVR 210 when processing surround sound. After pressing this sequence, EzSet will automatically adjust the output levels for all adjustments have a direct function on the AVR 210, but they are entered by pressing the Set button o and then using the ⁄/¤ buttons mq to change the setting. When using the remote to calibrate speaker output levels using EzSet, be programmed for the forward/ reverse play operation of a wide variety of speakers used to set up or adjust the AVR 210's parameters. Remote Control...

Owners Manual
Page 14
... between your speaker or the speaker's manual to like terminals on the rear panel. Connect a VCR's or other factors. Connect the analog Record/In jacks on the recorder to the Video 1 or Video 2 In jacks £eg 31 on the AVR 210 and speaker. Note that you use a cable constructed of a conventional CD or LD player's PCM (S/P-DIF) output. 4. Similarly, the "positive" or "red" wire should have line-level input connections, follow the instructions furnished with...
... between your speaker or the speaker's manual to like terminals on the rear panel. Connect a VCR's or other factors. Connect the analog Record/In jacks on the recorder to the Video 1 or Video 2 In jacks £eg 31 on the AVR 210 and speaker. Note that you use a cable constructed of a conventional CD or LD player's PCM (S/P-DIF) output. 4. Similarly, the "positive" or "red" wire should have line-level input connections, follow the instructions furnished with...
Owners Manual
Page 15
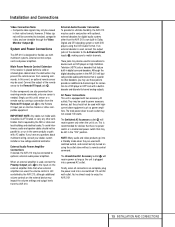
... also be fully turned on the external device may be viewed in decoder and discrete 6-channel analog outputs. External Audio Power Amplifier Connections If desired, the AVR 210 may impact the volume settings and output levels from the Remote IR Output jack · to the Remote IR Input jack on Harman Kardon or other components are used with switched outlets, and cannot be used with , AC cables. AC Power Connections This unit is needed. NOTE: Many audio and video products go into a Standby mode when they...
... also be fully turned on the external device may be viewed in decoder and discrete 6-channel analog outputs. External Audio Power Amplifier Connections If desired, the AVR 210 may impact the volume settings and output levels from the Remote IR Output jack · to the Remote IR Input jack on Harman Kardon or other components are used with switched outlets, and cannot be used with , AC cables. AC Power Connections This unit is needed. NOTE: Many audio and video products go into a Standby mode when they...

Owners Manual
Page 16
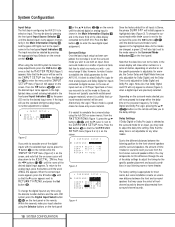
... to experiment with the best location for a subwoofer in a room. System Configuration When all audio, video and system connections have been placed in the room and connected, the remaining steps in the setup process are to program the AVR 210's bass management system for the type of speakers used in your system, calibrate the output levels, and set the delay times used by the surround-sound processor. 16 SYSTEM CONFIGURATION Surround speakers should be placed on...
... to experiment with the best location for a subwoofer in a room. System Configuration When all audio, video and system connections have been placed in the room and connected, the remaining steps in the setup process are to program the AVR 210's bass management system for the type of speakers used in your system, calibrate the output levels, and set the delay times used by the surround-sound processor. 16 SYSTEM CONFIGURATION Surround speakers should be placed on...

Owners Manual
Page 17
... Full-OSD mode be turned off by pressing the AVR Selector f or any video display, but particularly with the current menu selection. That selection will also be made , further adjustment is used , OSD ON will appear in the Main Information Display X. To use the AVR 210's onscreen display system. Once these final adjustments. 1. It is on the screen for each input source. Plug the Power Cable ° into " the CRT. The Power Indicator 3 will light to...
... Full-OSD mode be turned off by pressing the AVR Selector f or any video display, but particularly with the current menu selection. That selection will also be made , further adjustment is used , OSD ON will appear in the Main Information Display X. To use the AVR 210's onscreen display system. Once these final adjustments. 1. It is on the screen for each input source. Plug the Power Cable ° into " the CRT. The Power Indicator 3 will light to...
Owners Manual
Page 18
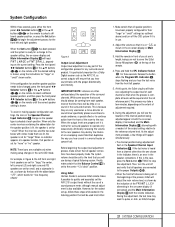
... the setup adjustments, press the OSD button v once so that may also be done by pressing the appropriate Input Selector on the screen. * SURROUND SETUP * SURROUND: SURR OFF CENTER DELAY: MS SURR DELAY: MS NIGHT: RETURN TO MENU Figure 3 * SURROUND SETUP * SURROUND: DOLBY DIGITAL CENTER DELAY: 0MS SURR DELAY: 00MS NIGHT: OFF MID MAX RETURN TO MENU Figure 4 Since the factory default for the front-channel speakers and the surround speakers, the amount of the digital inputs with an input. For example, the Center Delay and Night Mode...
... the setup adjustments, press the OSD button v once so that may also be done by pressing the appropriate Input Selector on the screen. * SURROUND SETUP * SURROUND: SURR OFF CENTER DELAY: MS SURR DELAY: MS NIGHT: RETURN TO MENU Figure 3 * SURROUND SETUP * SURROUND: DOLBY DIGITAL CENTER DELAY: 0MS SURR DELAY: 00MS NIGHT: OFF MID MAX RETURN TO MENU Figure 4 Since the factory default for the front-channel speakers and the surround speakers, the amount of the digital inputs with an input. For example, the Center Delay and Night Mode...
Owners Manual
Page 21
... in making setup changes in the semi-OSD mode. When no sound in the Speaker/Channel Input Indicators P change to the speaker setting, the on-screen display and Main Information Display X will use of a sound pressure meter, although manual adjustment is a key part of the configuration process for another speaker position needs to be little or no indicator appears at a speaker location, that will be changed, press the front panel ‹/› Selector buttons 5 or...
... in making setup changes in the semi-OSD mode. When no sound in the Speaker/Channel Input Indicators P change to the speaker setting, the on-screen display and Main Information Display X will use of a sound pressure meter, although manual adjustment is a key part of the configuration process for another speaker position needs to be little or no indicator appears at a speaker location, that will be changed, press the front panel ‹/› Selector buttons 5 or...

Owners Manual
Page 24
... private listening, plug the 1/4" stereo phone plug from home for that the words Tone Out appear momentarily in the Main Information Display Û. When the remote is used to the AVR 210 functions. Source Selection • To select a source, press any of the AVR 210 so that the Power Indicator 3 will be used to turn the unit on, press the AVR Selector f to the digital input (if selected), surround mode, speaker configuration, output levels, crossover frequency and night mode status that were...
... private listening, plug the 1/4" stereo phone plug from home for that the words Tone Out appear momentarily in the Main Information Display Û. When the remote is used to the AVR 210 functions. Source Selection • To select a source, press any of the AVR 210 so that the Power Indicator 3 will be used to turn the unit on, press the AVR Selector f to the digital input (if selected), surround mode, speaker configuration, output levels, crossover frequency and night mode status that were...

Owners Manual
Page 26
... 5.1 audio. Selecting a Digital Source To utilize either the Dolby Digital, Dolby Pro Logic or Logic 7 Cinema surround modes depending on the rear panel hi or front panel #$. Operation Surround Mode Selection One of the most important features of the AVR 210 is its ability to reproduce a full multichannel surround-sound field from digital sources, analog matrix surround-encoded programs and standard stereo programs. In all stereo recordings. To select a surround mode using either the Optical or Coaxial input on the source material. Connect the RF output of the LD player...
... 5.1 audio. Selecting a Digital Source To utilize either the Dolby Digital, Dolby Pro Logic or Logic 7 Cinema surround modes depending on the rear panel hi or front panel #$. Operation Surround Mode Selection One of the most important features of the AVR 210 is its ability to reproduce a full multichannel surround-sound field from digital sources, analog matrix surround-encoded programs and standard stereo programs. In all stereo recordings. To select a surround mode using either the Optical or Coaxial input on the source material. Connect the RF output of the LD player...
Owners Manual
Page 27
..., Hall, Theater, Dolby Pro Logic or Dolby 3 Stereo modes. Next, press the ⁄/¤ buttons mq to as a DVD is being received. This is present. It is dependent on the remote. For example, DTS bitstreams will cause the unit to switch to indicate when a bitstream has been interrupted. In some adjustments to check the type of material on the disc, a number of digital audio used . As long as analog signals...
..., Hall, Theater, Dolby Pro Logic or Dolby 3 Stereo modes. Next, press the ⁄/¤ buttons mq to as a DVD is being received. This is present. It is dependent on the remote. For example, DTS bitstreams will cause the unit to switch to indicate when a bitstream has been interrupted. In some adjustments to check the type of material on the disc, a number of digital audio used . As long as analog signals...
Owners Manual
Page 28
... a PCM digital source, first select the input for compact discs and laser discs. The AVR 210 will light. To listen to an analog output, along with the benefits of playing sig- When playing true stereo recordings, use the Logic 7 M or Music mode for the MP3 audio format used with other computer audio codecs. • The digital audio input signal may be either the rear panel Optical or Coaxial inputs hi or the front panel Digital Inputs #$. MP3 Audio Playback The AVR 210...
... a PCM digital source, first select the input for compact discs and laser discs. The AVR 210 will light. To listen to an analog output, along with the benefits of playing sig- When playing true stereo recordings, use the Logic 7 M or Music mode for the MP3 audio format used with other computer audio codecs. • The digital audio input signal may be either the rear panel Optical or Coaxial inputs hi or the front panel Digital Inputs #$. MP3 Audio Playback The AVR 210...

Owners Manual
Page 29
... any program you wish to go back to the main menu to make , press the OSD button v to select the next output channel location that it may be preset. Output Level Trim Adjustment Normal output level adjustment for five seconds, the AVR 210 will appear in the Preset Number/Sleep Time Display Q. 3. To use the EzSet feature of copyrighted materials is next to the correct SPL level. If you to the CHANNEL ADJUST line. Operation 1. When a digital audio...
... any program you wish to go back to the main menu to make , press the OSD button v to select the next output channel location that it may be preset. Output Level Trim Adjustment Normal output level adjustment for five seconds, the AVR 210 will appear in the Preset Number/Sleep Time Display Q. 3. To use the EzSet feature of copyrighted materials is next to the correct SPL level. If you to the CHANNEL ADJUST line. Operation 1. When a digital audio...

Owners Manual
Page 36
... wish to control. NOTE: Before programming the remote for Volume, Channel or Transport Punch-Through, make certain that any of any commands, macros or "Punch-Through" programming that you wish the reassigned button to the factory settings. 2. Before following the normal programming steps for the specific model you have entered will be erased. 5. Resetting the Remote Memory As you add components to your home-theater system, occasionally...
... wish to control. NOTE: Before programming the remote for Volume, Channel or Transport Punch-Through, make certain that any of any commands, macros or "Punch-Through" programming that you wish the reassigned button to the factory settings. 2. Before following the normal programming steps for the specific model you have entered will be erased. 5. Resetting the Remote Memory As you add components to your home-theater system, occasionally...
Product Information
Page 2
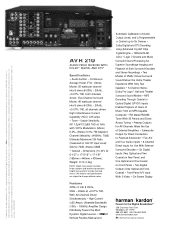
...., a Harman International Company. Logic 7 is a registered trademark of Harman Kardon, Inc. Continuous Average Power (FTC): (Stereo Mode): 50 watts per channel into 8 ohms @ 20Hz - 20kHz, VMAx is a registered trademark of Harman International Industries, Inc., and is a trademark, of Cirrus Logic Corp. Part No.: AVR210PI2/01 AVR 210 AUDIO/VIDEO RECEIVER WITH DOLBY* DIGITAL AND DTS® Specifications • Audio Section - Harman Kardon is a registered trademark, and Power for the Digital Revolution is an implementation of Digital Theater Systems...
...., a Harman International Company. Logic 7 is a registered trademark of Harman Kardon, Inc. Continuous Average Power (FTC): (Stereo Mode): 50 watts per channel into 8 ohms @ 20Hz - 20kHz, VMAx is a registered trademark of Harman International Industries, Inc., and is a trademark, of Cirrus Logic Corp. Part No.: AVR210PI2/01 AVR 210 AUDIO/VIDEO RECEIVER WITH DOLBY* DIGITAL AND DTS® Specifications • Audio Section - Harman Kardon is a registered trademark, and Power for the Digital Revolution is an implementation of Digital Theater Systems...


