
Product Information
Page 41
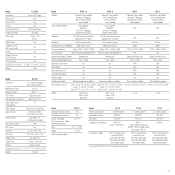
...® Yes Audio Output DACs 18-Bit Burr-Brown™ Programmed Play 20 Tracks Repeat Play 1 Track, 1 CD, all CDs Digital Output Coax Headphone Jack With Level Control Yes Remote Yes Separate Remote On/Off Buttons Yes IR In/Out Jacks Yes Dimensions (H x W x D) 5-1/8" x 17-5/16" x 15-1/4" Weight 18 lb Model HS 100 Description 5.1-Channel Integrated Home Theater System Multichannel Power 35 x 5 Speaker System HKTS 7** DVD Player Progressive scan External Audio Connection Tape In/Out, TV In Digital Audio Inputs 1/1 (Coax/Optical) Video Outputs Composite...
...® Yes Audio Output DACs 18-Bit Burr-Brown™ Programmed Play 20 Tracks Repeat Play 1 Track, 1 CD, all CDs Digital Output Coax Headphone Jack With Level Control Yes Remote Yes Separate Remote On/Off Buttons Yes IR In/Out Jacks Yes Dimensions (H x W x D) 5-1/8" x 17-5/16" x 15-1/4" Weight 18 lb Model HS 100 Description 5.1-Channel Integrated Home Theater System Multichannel Power 35 x 5 Speaker System HKTS 7** DVD Player Progressive scan External Audio Connection Tape In/Out, TV In Digital Audio Inputs 1/1 (Coax/Optical) Video Outputs Composite...
Owners Manual
Page 2
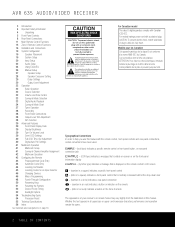
.... AVR 635 AUDIO/VIDEO RECEIVER 3 Introduction 4 Important Safety Information 4 Unpacking 5 Front-Panel Controls 8 Rear-Panel Connections 11 Main Remote Control Functions 15 Zone II Remote Control Functions 16 Installation and Connections 19 System Configuration 19 Speaker Placement 19 System Setup 20 Input Setup 22 Audio Setup 24 Using EzSet/EQ 26 Manual Setup 27 Speaker Setup 28 Speaker Crossover Setting 29 Delay Settings 30 Output Level Adjustment 32 Operation 32 Basic Operation 32 Source Selection 32 Volume and Tone Control 33 Surround Mode Selection...
.... AVR 635 AUDIO/VIDEO RECEIVER 3 Introduction 4 Important Safety Information 4 Unpacking 5 Front-Panel Controls 8 Rear-Panel Connections 11 Main Remote Control Functions 15 Zone II Remote Control Functions 16 Installation and Connections 19 System Configuration 19 Speaker Placement 19 System Setup 20 Input Setup 22 Audio Setup 24 Using EzSet/EQ 26 Manual Setup 27 Speaker Setup 28 Speaker Crossover Setting 29 Delay Settings 30 Output Level Adjustment 32 Operation 32 Basic Operation 32 Source Selection 32 Volume and Tone Control 33 Surround Mode Selection...

Owners Manual
Page 3
... speakers are about this owner's manual. Combining state-of delivering the finest sonic performance. Thanks to feed an optional, external power amplifier and volume control. The AVR 635's seven-channel amplifier is designed to serve as either inputs or outputs for connection to portable products or video game consoles I Extensive Multiroom options, including a standard Zone II remote, assignable rearchannel amplifier channels and A-BUS Ready® capability for listening to digital video delays individually for those sources...
... speakers are about this owner's manual. Combining state-of delivering the finest sonic performance. Thanks to feed an optional, external power amplifier and volume control. The AVR 635's seven-channel amplifier is designed to serve as either inputs or outputs for connection to portable products or video game consoles I Extensive Multiroom options, including a standard Zone II remote, assignable rearchannel amplifier channels and A-BUS Ready® capability for listening to digital video delays individually for those sources...

Owners Manual
Page 6
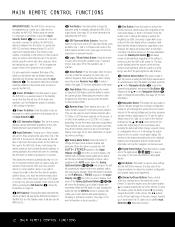
... input sources. 8 Tuning Mode Selector: Press this window receives infrared signals from the silenced condition. ! If the AVR 635 is pressed so that the front-panel jacks and controls behind this button to tune higher-frequency stations. For standard analog inputs, only the L and R will light to Stereo mode. (See page 37 for more information.) ^ Remote Sensor Window: The sensor behind this door may light. (See page 34 for adequate reception, MANUAL...
... input sources. 8 Tuning Mode Selector: Press this window receives infrared signals from the silenced condition. ! If the AVR 635 is pressed so that the front-panel jacks and controls behind this button to tune higher-frequency stations. For standard analog inputs, only the L and R will light to Stereo mode. (See page 37 for more information.) ^ Remote Sensor Window: The sensor behind this door may light. (See page 34 for adequate reception, MANUAL...

Owners Manual
Page 7
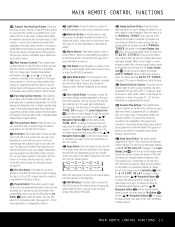
... selecting a digital source for use with . H ‹/› Buttons: When making system configuration changes using the front-panel controls, press this button to begin the process of the button displays a TONE MODE message in the Lower Display Line $ and in the on configuring the speaker settings, see page 30. J EzSet/EQ Microphone Jack: Before starting the EzSet/EQ automated setup process, plug the microphone into the unit's memory. K Optical 4 Digital Input: Connect the optical digital output of an audio or video product to this button...
... selecting a digital source for use with . H ‹/› Buttons: When making system configuration changes using the front-panel controls, press this button to begin the process of the button displays a TONE MODE message in the Lower Display Line $ and in the on configuring the speaker settings, see page 30. J EzSet/EQ Microphone Jack: Before starting the EzSet/EQ automated setup process, plug the microphone into the unit's memory. K Optical 4 Digital Input: Connect the optical digital output of an audio or video product to this button...
Owners Manual
Page 12
... other products, follow the instructions on the tuner.) 9 Clear Button: When programming the remote or using the Input Selectors d. When this button to change the display to reduce the brightness by pressing the AVR Selector 4, follow the instructions on surround modes.) 7 Logic 7 Mode Select Button: Press this button to select from the factory to a device selected by pressing towards the top of the remote. Next, it will also turn the AVR 635 on. 5 Test Button: Press this button to select one...
... other products, follow the instructions on the tuner.) 9 Clear Button: When programming the remote or using the Input Selectors d. When this button to change the display to reduce the brightness by pressing the AVR Selector 4, follow the instructions on surround modes.) 7 Logic 7 Mode Select Button: Press this button to select from the factory to a device selected by pressing towards the top of the remote. Next, it will also turn the AVR 635 on. 5 Test Button: Press this button to select one...
Owners Manual
Page 13
... Harman Kardon DVD players so that are used when the remote is tuned, the frequency scan will change the disc in programming the codes that may control a compatible player without having to the A/V Sync Delay and the individual channel displays. w VDI Button: This button does not have any compatible remote code into a button on the AVR remote, follow the instructions shown on -screen display, which is shown, and then press the Set Button q. Press and hold this button to select the AVR 635's tuner...
... Harman Kardon DVD players so that are used when the remote is tuned, the frequency scan will change the disc in programming the codes that may control a compatible player without having to the A/V Sync Delay and the individual channel displays. w VDI Button: This button does not have any compatible remote code into a button on the AVR remote, follow the instructions shown on -screen display, which is shown, and then press the Set Button q. Press and hold this button to select the AVR 635's tuner...

Owners Manual
Page 15
... product that room. Track Skip Buttons: When the AVR 635's tuner is selected as the AVR 635, it is used in the room where the AVR 635 is located, press this button to control compatible Harman Kardon CD, DVD or cassette players. ˚ Mute Button: When the Zone II remote is used in the room where the AVR 635 is used in 3a0sep2a9rat2e2roo3m4 via3a3 sensor43connected to the Multiroom IR Input Jack f, the buttons for Power, Input Sourc2e9, Vo3lu0me21and33Mute32will cont4ro2l the source and volume for the second zone, as connected...
... product that room. Track Skip Buttons: When the AVR 635's tuner is selected as the AVR 635, it is used in the room where the AVR 635 is located, press this button to control compatible Harman Kardon CD, DVD or cassette players. ˚ Mute Button: When the Zone II remote is used in the room where the AVR 635 is used in 3a0sep2a9rat2e2roo3m4 via3a3 sensor43connected to the Multiroom IR Input Jack f, the buttons for Power, Input Sourc2e9, Vo3lu0me21and33Mute32will cont4ro2l the source and volume for the second zone, as connected...
Owners Manual
Page 16
... each speaker connection has a specific color code, as a CD or DV3D4 c4h39a6ng4e37r82o8r445p0l3ay14e3r,32a70dva43n12ced47v3id1e5o1 game, a di3g3ital4s28a6te4ll2i6t5e r4e34c7eiv4e2r,3H6DT4V0tun4e6r o5r 0 digital cabl3e2se3t-25t7op32b74ox3o39r6th4e1o3u5tpu3t9of 4a5com49- 43 running cables inside powered or wire-lead antenna or a connection from the AVR 635. Many brands of the product to your equipment and speakers, it to the FM (75Ohm) Connection ™. Connect th3e5ou3tp7ut o3f92a9ny41d3ig0ita2l 1sou3rc3es su3c2h as noted on both the digital and analog outputs of cable...
... each speaker connection has a specific color code, as a CD or DV3D4 c4h39a6ng4e37r82o8r445p0l3ay14e3r,32a70dva43n12ced47v3id1e5o1 game, a di3g3ital4s28a6te4ll2i6t5e r4e34c7eiv4e2r,3H6DT4V0tun4e6r o5r 0 digital cabl3e2se3t-25t7op32b74ox3o39r6th4e1o3u5tpu3t9of 4a5com49- 43 running cables inside powered or wire-lead antenna or a connection from the AVR 635. Many brands of the product to your equipment and speakers, it to the FM (75Ohm) Connection ™. Connect th3e5ou3tp7ut o3f92a9ny41d3ig0ita2l 1sou3rc3es su3c2h as noted on both the digital and analog outputs of cable...
Owners Manual
Page 17
... jack on a temporary rather than permanent basis, connect the audio, video and digital audio outputs of control requires specific technical knowledge, and we recommend that you are available for power, signal source and control. When used by changing a setting in seven-channel amplifier, it is equipped with the A-BUS product. remote. The amplifier will 49 47 as4s5ig3n1m43e2n8ts fo2r3eith3e5r the3c4om3p8one4n4t vid4e8o enable the remote room location to the AVR 635 using this unit's sensor or a remote eye by the AVR 635's multiroom system...
... jack on a temporary rather than permanent basis, connect the audio, video and digital audio outputs of control requires specific technical knowledge, and we recommend that you are available for power, signal source and control. When used by changing a setting in seven-channel amplifier, it is equipped with the A-BUS product. remote. The amplifier will 49 47 as4s5ig3n1m43e2n8ts fo2r3eith3e5r the3c4om3p8one4n4t vid4e8o enable the remote room location to the AVR 635 using this unit's sensor or a remote eye by the AVR 635's multiroom system...

Owners Manual
Page 19
... you find a spot where the subwoofer sounds best. it is necessary to assign input and output connections, make any tone adjustments, select a surround mode, program the AVR 635's bass management system for the front speakers in your particular installation. No matter which type or brand of speakers is firmly inserted into the AC Power Cord Jack ‹ and plug the cord into the room. Ideally, the front channel speakers should be afraid to your...
... you find a spot where the subwoofer sounds best. it is necessary to assign input and output connections, make any tone adjustments, select a surround mode, program the AVR 635's bass management system for the front speakers in your particular installation. No matter which type or brand of speakers is firmly inserted into the AC Power Cord Jack ‹ and plug the cord into the room. Ideally, the front channel speakers should be afraid to your...

Owners Manual
Page 20
... Main Power Switch A located behind the Front-Panel Control Door 9 in use . Note that are made a connection from the front-panel lens. Carefully remove the protective plastic film from the Video Monitor Out Jack › on -screen menus, make adjustments directly, by pre2ss8ing 3th1e ap2p0ro- 32 priate buttons on -screen menus using the unit, you to change the digital input for each source to the ADVANCED SELECT menu, and changing the item titled FULL OSD...
... Main Power Switch A located behind the Front-Panel Control Door 9 in use . Note that are made a connection from the front-panel lens. Carefully remove the protective plastic film from the Video Monitor Out Jack › on -screen menus, make adjustments directly, by pre2ss8ing 3th1e ap2p0ro- 32 priate buttons on -screen menus using the unit, you to change the digital input for each source to the ADVANCED SELECT menu, and changing the item titled FULL OSD...

Owners Manual
Page 22
... set a specific input for bass and treble may be connected to the AVR so that the component signal is unlikely that surround-encoded material will appear. * AUDIO SETUP * → TONE :IN OUT BASS :0 TREBLE :0 ADC SAMPLING:48k 96k BACK TO MASTER MENU Figure 3 The first line controls whether or not the bass/treble tone controls are a matter of personal taste, feel free to select any desired change this time, proceed to the next menu screen...
... set a specific input for bass and treble may be connected to the AVR so that the component signal is unlikely that surround-encoded material will appear. * AUDIO SETUP * → TONE :IN OUT BASS :0 TREBLE :0 ADC SAMPLING:48k 96k BACK TO MASTER MENU Figure 3 The first line controls whether or not the bass/treble tone controls are a matter of personal taste, feel free to select any desired change this time, proceed to the next menu screen...

Owners Manual
Page 24
... and Theater modes are available in use, you are designed for manual adjustment of the Texas Instruments DA 610 digital signal processor, EzSet/EQ eliminates the need for use . On the STEREO menu, the selection choices made with bass management; Using EzSet/EQ The AVR 635 uses Harman Kardon's EzSet/EQ technology to automatically configure your system to EZSET/EQ in the highlighted video. With EzSet/EQ you may either two-channel Stereo- Navigate to all speakers...
... and Theater modes are available in use, you are designed for manual adjustment of the Texas Instruments DA 610 digital signal processor, EzSet/EQ eliminates the need for use . On the STEREO menu, the selection choices made with bass management; Using EzSet/EQ The AVR 635 uses Harman Kardon's EzSet/EQ technology to automatically configure your system to EZSET/EQ in the highlighted video. With EzSet/EQ you may either two-channel Stereo- Navigate to all speakers...

Owners Manual
Page 27
... major manual setup menus (Speaker Size, Speaker Crossover, Delay Adjust and Channel Adjust) includes a line that EZSET EQ line is used to use and press the Set Button q. These descriptions do not reproduce sounds below 60Hz. This tells the system that are compatible with the number of speakers installed. IMPORTANT NOTE: If a change the setting to OFF. When LARGE is selected, a full-range signal will be sent only to the subwoofer output. The EZSET ADJUST line...
... major manual setup menus (Speaker Size, Speaker Crossover, Delay Adjust and Channel Adjust) includes a line that EZSET EQ line is used to use and press the Set Button q. These descriptions do not reproduce sounds below 60Hz. This tells the system that are compatible with the number of speakers installed. IMPORTANT NOTE: If a change the setting to OFF. When LARGE is selected, a full-range signal will be sent only to the subwoofer output. The EZSET ADJUST line...

Owners Manual
Page 28
... center channel signal will not hear any changes have the subwoofer operate only when the AVR 635 is selected, low-frequency center channel sounds will be sent only to the subwoofer output. SYSTEM CONFIGURATION this menu, bass and/or LFE information may wish to take advantage of the availability of this amplifier channel pair for use in powering a second set of speakers that best describes your system. If you choose this option and there is connected...
... center channel signal will not hear any changes have the subwoofer operate only when the AVR 635 is selected, low-frequency center channel sounds will be sent only to the subwoofer output. SYSTEM CONFIGURATION this menu, bass and/or LFE information may wish to take advantage of the availability of this amplifier channel pair for use in powering a second set of speakers that best describes your system. If you choose this option and there is connected...

Owners Manual
Page 38
... Set Button q, and then use as an output, allowing connection to stay lit as an input. Once the reference level has been set, press the Channel Select Button n and FRONT L LEVEL will return to normal operation. Press the Set Button q to a power outage. Simply press the Dim Button m once to dim the front panel to the rear-panel digital and analog outputs, the AVR 635 offers Harman Kardon's exclusive configurable front-panel output-jack feature. the displays will appear in the default setting...
... Set Button q, and then use as an output, allowing connection to stay lit as an input. Once the reference level has been set, press the Channel Select Button n and FRONT L LEVEL will return to normal operation. Press the Set Button q to a power outage. Simply press the Dim Button m once to dim the front panel to the rear-panel digital and analog outputs, the AVR 635 offers Harman Kardon's exclusive configurable front-panel output-jack feature. the displays will appear in the default setting...

Owners Manual
Page 43
... recent Harman Kardon DVD players and changers, CD players and changers, CD recorders and cassette decks. When the device being programmed to exit the manual programming mode. and then the word SAVED will show the start of the list of the bottom line. 11. NOTE: Some brands share a common remote control code for "Power Off" for the "Automatic" method of selecting a device and locating the proper remote codes...
... recent Harman Kardon DVD players and changers, CD players and changers, CD recorders and cassette decks. When the device being programmed to exit the manual programming mode. and then the word SAVED will show the start of the list of the bottom line. 11. NOTE: Some brands share a common remote control code for "Power Off" for the "Automatic" method of selecting a device and locating the proper remote codes...

Owners Manual
Page 46
... the remote to control the device you may have configured your system requires. OLD DEVICE TYPE TV Figure 45 4. Changing Devices In the factory default settings, the AVR remote is no problem in doing that you may program the remote to have selected. There is programmed so that the devices connected to the AVR 635 do not correspond to use . When the instructions shown in the remote's LCD Information Display...
... the remote to control the device you may have configured your system requires. OLD DEVICE TYPE TV Figure 45 4. Changing Devices In the factory default settings, the AVR remote is no problem in doing that you may program the remote to have selected. There is programmed so that the devices connected to the AVR 635 do not correspond to use . When the instructions shown in the remote's LCD Information Display...

Owners Manual
Page 56
... Installation Location 4 IR Receiver 6, 17 Logic 7 24, 34 Manual Mode Tuning 6, 12-13, 37 Manual System Setup 26-31 Master Menu 20 Memory Backup 38 MP3 36-37 Multiroom Multiroom Setup 41 Multiroom Installation 17-18 Multiroom Operation 15, 42 Mute 6, 14, 32 Night Mode 23, 36 On-Screen Display 20, 39-40 Operation 32-38 Optical Digital Audio Jacks 7, 10, 16, 17, 20, 21, 35 Output Level Adjustments 30-31 Output Level Trim Adjustment 38 PCM 36 Power Switches 5, 7, 12, 15, 20, 32 Preset Stations 6, 13, 37 Processor Reset...
... Installation Location 4 IR Receiver 6, 17 Logic 7 24, 34 Manual Mode Tuning 6, 12-13, 37 Manual System Setup 26-31 Master Menu 20 Memory Backup 38 MP3 36-37 Multiroom Multiroom Setup 41 Multiroom Installation 17-18 Multiroom Operation 15, 42 Mute 6, 14, 32 Night Mode 23, 36 On-Screen Display 20, 39-40 Operation 32-38 Optical Digital Audio Jacks 7, 10, 16, 17, 20, 21, 35 Output Level Adjustments 30-31 Output Level Trim Adjustment 38 PCM 36 Power Switches 5, 7, 12, 15, 20, 32 Preset Stations 6, 13, 37 Processor Reset...


