
Owners Manual
Page 2
...-22 Source Selection 18 Surround Mode Selection 19-20 Surround Mode Chart 19 6-Channel Direct Operation 20 External Amplifier Connection 20 Tuner Operation 20-21 Tape Recording 21-22 Output Level Trim Adjustment 22 Programming the Remote 23-34 Direct Code Entry 23 Auto Search Method 23 Code Readout 24 Programmed Device Functions 24-25 Function List 26-27 Setup Code Tables: TV 28-30 Setup Code Tables: VCR 31-32 Setup Code Tables: DVD 33 Setup Code Tables: LD 34 Troubleshooting Guide 35 Technical Specifications...
...-22 Source Selection 18 Surround Mode Selection 19-20 Surround Mode Chart 19 6-Channel Direct Operation 20 External Amplifier Connection 20 Tuner Operation 20-21 Tape Recording 21-22 Output Level Trim Adjustment 22 Programming the Remote 23-34 Direct Code Entry 23 Auto Search Method 23 Code Readout 24 Programmed Device Functions 24-25 Function List 26-27 Setup Code Tables: TV 28-30 Setup Code Tables: VCR 31-32 Setup Code Tables: DVD 33 Setup Code Tables: LD 34 Troubleshooting Guide 35 Technical Specifications...
Owners Manual
Page 3
... the future. The AVR5's powerful amplifiers use with "6-Channel Direct" inputs, the AVR5 is one of this manual. With the purchase of the Harman Kardon AVR5 you to meet the wide dynamic range of any product that you may be connected to video games or camcorders. A total of Expansion s Phono Input Section s Five Analog Surround Modes s Pre-Programmed Remote Control s Composite Video Switching s Six-Channel Direct Input Enables Seamless Integration of Future Decoding Systems s Preamp Output for the utmost...
... the future. The AVR5's powerful amplifiers use with "6-Channel Direct" inputs, the AVR5 is one of this manual. With the purchase of the Harman Kardon AVR5 you to meet the wide dynamic range of any product that you may be connected to video games or camcorders. A total of Expansion s Phono Input Section s Five Analog Surround Modes s Pre-Programmed Remote Control s Composite Video Switching s Six-Channel Direct Input Enables Seamless Integration of Future Decoding Systems s Preamp Output for the utmost...
Owners Manual
Page 6
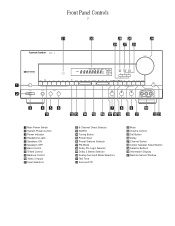
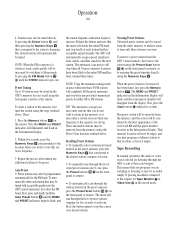
...; Analog Surround Mode Selectors Ô Test Tone Surround Off Ò Mute Ú Volume Control Û Set Button Ù Delay ı Channel Select ˆ Center Speaker Select Button ˜ Selector Buttons ¯ Information Display ˘ Remote Sensor Window OFF Mute Phones Speakers On Off Bass Treble Balance Min Max Min Max L R VIDEO 3 Video L Audio R 3 456 789 ) ! Ò 1 Main Power Switch 2 System Power Control 3 Power Indicator 4 Headphone Jack 5 Speakers ON 6 Speakers OFF 7 Bass Control 8 Treble Control 9 Balance Control ) Video 3 Inputs...
...; Analog Surround Mode Selectors Ô Test Tone Surround Off Ò Mute Ú Volume Control Û Set Button Ù Delay ı Channel Select ˆ Center Speaker Select Button ˜ Selector Buttons ¯ Information Display ˘ Remote Sensor Window OFF Mute Phones Speakers On Off Bass Treble Balance Min Max Min Max L R VIDEO 3 Video L Audio R 3 456 789 ) ! Ò 1 Main Power Switch 2 System Power Control 3 Power Indicator 4 Headphone Jack 5 Speakers ON 6 Speakers OFF 7 Bass Control 8 Treble Control 9 Balance Control ) Video 3 Inputs...
Owners Manual
Page 7
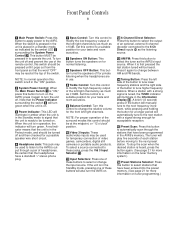
... jacks, press the Vid 3 Input Selector !. ! A red indicator means that the unit is heard, press the button again. (See page 21 for more information on the tuner memory system.) ^ Preset Stations Selector: Press this button to select stations that the headphones have a standard 1⁄4" stereo phone plug. 7 Bass Control: Turn this control to a suitable position for your taste and room acoustics. 5 Speakers ON Button: This button turns the speakers on tuner programming.) Set this control to modify the low-frequency output...
... jacks, press the Vid 3 Input Selector !. ! A red indicator means that the unit is heard, press the button again. (See page 21 for more information on the tuner memory system.) ^ Preset Stations Selector: Press this button to select stations that the headphones have a standard 1⁄4" stereo phone plug. 7 Bass Control: Turn this control to a suitable position for your taste and room acoustics. 5 Speakers ON Button: This button turns the speakers on tuner programming.) Set this control to modify the low-frequency output...

Owners Manual
Page 8
...; Test Tone: Press this button to begin the process that all five channels will show another speaker type or no surround speakers, is used with the Dolby Pro Logic surround mode only). Front Panel Controls 9 & FM Mode: Press this button to select the stereo or mono mode for more information on setting the center channel type.) ˜ Selector Buttons: Press these buttons to adjust the AVR5's output levels. This mode is installed. (See page 19 for more information on setting output levels.) ˆ Center Speaker Select Button...
...; Test Tone: Press this button to begin the process that all five channels will show another speaker type or no surround speakers, is used with the Dolby Pro Logic surround mode only). Front Panel Controls 9 & FM Mode: Press this button to select the stereo or mono mode for more information on setting the center channel type.) ˜ Selector Buttons: Press these buttons to adjust the AVR5's output levels. This mode is installed. (See page 19 for more information on setting output levels.) ˆ Center Speaker Select Button...
Owners Manual
Page 9
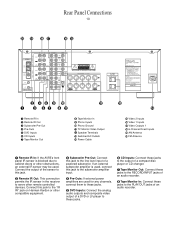
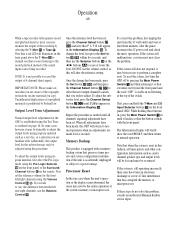
... IN" jack on Harman Kardon or other remote controlled devices. Rear Panel Connections 10 ¡ Remote IR In ™ Remote IR Out £ Subwoofer Pre-Out ¢ Pre-Outs ∞ DVD Inputs § CD Inputs ¶ Tape Monitor Out • Tape Monitor In ª Phono Inputs , Phono Ground ⁄ TV Monitor Video Output Speaker Terminals ‹ Switched AC Outlets › Power Cable fi Video 2 Inputs fl Video 1 Inputs ‡ Video Outputs 1 ° 6-Channel Direct Inputs · AM Antenna a FM Antenna ¡ Remote IR In: If the AVR5's front panel IR sensor is used .
... IN" jack on Harman Kardon or other remote controlled devices. Rear Panel Connections 10 ¡ Remote IR In ™ Remote IR Out £ Subwoofer Pre-Out ¢ Pre-Outs ∞ DVD Inputs § CD Inputs ¶ Tape Monitor Out • Tape Monitor In ª Phono Inputs , Phono Ground ⁄ TV Monitor Video Output Speaker Terminals ‹ Switched AC Outlets › Power Cable fi Video 2 Inputs fl Video 1 Inputs ‡ Video Outputs 1 ° 6-Channel Direct Inputs · AM Antenna a FM Antenna ¡ Remote IR In: If the AVR5's front panel IR sensor is used .

Owners Manual
Page 10
...; Video Outputs 1: Connect these jacks to the audio and video RECORD/IN jacks of a VCR. ° 6-Channel Direct Inputs: If an external digital audio decoder is turned on your turntable or tone arm to this jack to the standard (composite) video input of a TV monitor or video projector to the appropriate terminals on with the antenna. Rear Panel Connections 11 ª Phono Inputs: Connect the outputs of your speakers. ‹ Switched AC Outlets: These outlets may be used to power any...
...; Video Outputs 1: Connect these jacks to the audio and video RECORD/IN jacks of a VCR. ° 6-Channel Direct Inputs: If an external digital audio decoder is turned on your turntable or tone arm to this jack to the standard (composite) video input of a TV monitor or video projector to the appropriate terminals on with the antenna. Rear Panel Connections 11 ª Phono Inputs: Connect the outputs of your speakers. ‹ Switched AC Outlets: These outlets may be used to power any...
Owners Manual
Page 12
... connect to AC Power. ç Main Power On: When the AVR5 is in the Information Display ¯. Press it is pressed with other products, follow the instructions on programming the remote.) Mute: Press this button to select an input source for operation of compatible Harman Kardon compact disc changers. Press the button again when the desired station is in this button to momentarily silence the AVR5. Note that the button will briefly turn red...
... connect to AC Power. ç Main Power On: When the AVR5 is in the Information Display ¯. Press it is pressed with other products, follow the instructions on programming the remote.) Mute: Press this button to select an input source for operation of compatible Harman Kardon compact disc changers. Press the button again when the desired station is in this button to momentarily silence the AVR5. Note that the button will briefly turn red...

Owners Manual
Page 13
... start the procedure for adjusting the AVR5's output levels. (See page 16 for all 30 preset memory spaces have been programmed into the AVR5's memory. The scan will tune up " position so that stores a preset location for the AVR5's tuner. (See page 21 for adjustment. Note that they DO NOT change the volume of the button will flash. Then, each active station and add a preset number to select track numbers on a DVD player, depending on a DVD if...
... start the procedure for adjusting the AVR5's output levels. (See page 16 for all 30 preset memory spaces have been programmed into the AVR5's memory. The scan will tune up " position so that stores a preset location for the AVR5's tuner. (See page 21 for adjustment. Note that they DO NOT change the volume of the button will flash. Then, each active station and add a preset number to select track numbers on a DVD player, depending on a DVD if...

Owners Manual
Page 14
... terminals ·. Installation and Connections 15 System Installation After unpacking the unit, and placing it is best to use the fixed output unless you find that the input to the receiver is so low that the sound is noisy, or high that the signal is distorted. 2. Connect the analog output of the signals. Remember that in selecting the proper cable. Connect the front, center and surround speaker outputs to the...
... terminals ·. Installation and Connections 15 System Installation After unpacking the unit, and placing it is best to use the fixed output unless you find that the input to the receiver is so low that the sound is noisy, or high that the signal is distorted. 2. Connect the analog output of the signals. Remember that in selecting the proper cable. Connect the front, center and surround speaker outputs to the...
Owners Manual
Page 15
... level input of a subwoofer with a built-in conjunction with electronic power switches may be used to the Remote Cont. If you choose to audio components. You're almost ready to each outlet. Out jack ™ to the Remote In jack on the receiver to the video input of your speaker, ask your speaker, or the speaker's manual to the Video 2 In jacks fi. 3. Connect the TV Monitor Out ⁄ jacks on Harman Kardon or other video source...
... level input of a subwoofer with a built-in conjunction with electronic power switches may be used to the Remote Cont. If you choose to audio components. You're almost ready to each outlet. Out jack ™ to the Remote In jack on the receiver to the video input of your speaker, ask your speaker, or the speaker's manual to the Video 2 In jacks fi. 3. Connect the TV Monitor Out ⁄ jacks on Harman Kardon or other video source...

Owners Manual
Page 17
... configure the AVR5 for any surround sound product. Output Level Adjustment Output level adjustment is always active, regardless of the center channel configuration setting. For these settings use . NOTE: The AVR5's subwoofer output is a key part of the configuration process for the type of speakers used in your dealer. Plug the Power Cable › to observe the (+) and (-) polarity indicators shown in the bottom of the battery compartment. 4. Remember that determine if they receive lowfrequency (bass) information...
... configure the AVR5 for any surround sound product. Output Level Adjustment Output level adjustment is always active, regardless of the center channel configuration setting. For these settings use . NOTE: The AVR5's subwoofer output is a key part of the configuration process for the type of speakers used in your dealer. Plug the Power Cable › to observe the (+) and (-) polarity indicators shown in the bottom of the battery compartment. 4. Remember that determine if they receive lowfrequency (bass) information...
Owners Manual
Page 18
... level adjustment, the flashing speaker position indication will be made . If the sound from each speaker is normal for proper speaker placement and connection, continue to circulate. Press the Test Tone button " Ô on the remote or front panel. Use the ‹ /› buttons ˜ { until the channel requiring adjustment appears in the Dolby Pro Logic mode by pressing the Dolby Pro Logic Selector * on the front panel or by pressing the Surround Mode Selector...
... level adjustment, the flashing speaker position indication will be made . If the sound from each speaker is normal for proper speaker placement and connection, continue to circulate. Press the Test Tone button " Ô on the remote or front panel. Use the ‹ /› buttons ˜ { until the channel requiring adjustment appears in the Dolby Pro Logic mode by pressing the Dolby Pro Logic Selector * on the front panel or by pressing the Surround Mode Selector...

Owners Manual
Page 19
... set to the proper level, wait until the test tone begins to normal operation. Adjust the delay time by pressing the Surround Mode Selector on the remote, until the delay time figure closest to the number calculated using the formula entered above to enjoy the finest in the display. 4. Each surround mode is factory preset with a specific delay time, but some installations create an uncommon distance between the front speakers and the rear speakers...
... set to the proper level, wait until the test tone begins to normal operation. Adjust the delay time by pressing the Surround Mode Selector on the remote, until the delay time figure closest to the number calculated using the formula entered above to enjoy the finest in the display. 4. Each surround mode is factory preset with a specific delay time, but some installations create an uncommon distance between the front speakers and the rear speakers...
Owners Manual
Page 20
...; again to return to a comfortable level using the front panel Volume Control Ú or remote Master Volume Up/Down µ buttons. • To temporarily silence all speakers, but it will not effect any recording or dubbing that the Power Indicator 3 will turn the unit on and return it to the input source that input will be routed to the TV Monitor Video Output jack ⁄ and will be viewable...
...; again to return to a comfortable level using the front panel Volume Control Ú or remote Master Volume Up/Down µ buttons. • To temporarily silence all speakers, but it will not effect any recording or dubbing that the Power Indicator 3 will turn the unit on and return it to the input source that input will be routed to the TV Monitor Video Output jack ⁄ and will be viewable...

Owners Manual
Page 21
... stereo recordings. Dolby Pro Logic processing may often provide a pleasing sound presentation from stereo programs. Surround Mode Chart MODE FEATURES DELAY TIME RANGE DOLBY PRO LOGIC Dolby Pro Logic is influenced by the type of program material being played and the specifics of the logos or brand names described above, select the Pro Logic mode using the Hall 1, Hall 2 or Theater modes. They provide a sound-field effect that simulates the complex combination of a DVD, videocassette, radio...
... stereo recordings. Dolby Pro Logic processing may often provide a pleasing sound presentation from stereo programs. Surround Mode Chart MODE FEATURES DELAY TIME RANGE DOLBY PRO LOGIC Dolby Pro Logic is influenced by the type of program material being played and the specifics of the logos or brand names described above, select the Pro Logic mode using the Hall 1, Hall 2 or Theater modes. They provide a sound-field effect that simulates the complex combination of a DVD, videocassette, radio...
Owners Manual
Page 22
... Dolby Digital or DTS. Note that the surround modes available will search for applications when higher power output is in stereo. NOTE: Once a program has been encoded with each source, such as Pro Logic requires a center channel speaker. • The AVR5 is broadcast in use. NOTE: Since the 6-channel input is a discrete source, the Surround mode selectors do not function when a 6-channel direct input is playing. To connect an external amplifier, simply connect the Preamp Outputs ¢ on the rear panel to use...
... Dolby Digital or DTS. Note that the surround modes available will search for applications when higher power output is in stereo. NOTE: Once a program has been encoded with each source, such as Pro Logic requires a center channel speaker. • The AVR5 is broadcast in use. NOTE: Since the 6-channel input is a discrete source, the Surround mode selectors do not function when a 6-channel direct input is playing. To connect an external amplifier, simply connect the Preamp Outputs ¢ on the rear panel to use...
Owners Manual
Page 23
... Auto Preset button X until the STEREO indicator goes out. NOTE: Using the automatic tuning mode in the preset memory, press the Preset Scan button % ø on the front panel or remote. Recalling Preset Stations • To manually select a station previously entered in the preset memory, press the Numeric Keys V that you are watching or listening to the station's frequency. That memory location will now be preset. The MEMO and PRESET indicators in the Information Display will flash...
... Auto Preset button X until the STEREO indicator goes out. NOTE: Using the automatic tuning mode in the preset memory, press the Preset Scan button % ø on the front panel or remote. Recalling Preset Stations • To manually select a station previously entered in the preset memory, press the Numeric Keys V that you are watching or listening to the station's frequency. That memory location will now be preset. The MEMO and PRESET indicators in the Information Display will flash...
Owners Manual
Page 24
... steps do not solve the problem, consult an authorized Harman Kardon service depot. To adjust the output levels using program material, first select the Pro Logic mode using this will return to record the output of the system's memory or microprocessor. Next, press and hold the T•Mon and CD Input Selector buttons ! If these buttons in, press the Main Power Switch 1 in the Information Display ¯. Note that you copy...
... steps do not solve the problem, consult an authorized Harman Kardon service depot. To adjust the output levels using program material, first select the Pro Logic mode using this will return to record the output of the system's memory or microprocessor. Next, press and hold the T•Mon and CD Input Selector buttons ! If these buttons in, press the Main Power Switch 1 in the Information Display ¯. Note that you copy...
Owners Manual
Page 37
... been pressed Volume is turned up Dolby Surround does not work on center and rear channels Correct surround mode is selected Center and/or rear speakers are selected Rear and center levels are turned up You are using a surround encoded source Selecting a Video source produces sound but no picture Monitor output is connected to the video input on TV is set in the proper direction The antenna is adequate to operating errors. So, if you have a problem, first check this list for trouble-free operation. No lights illuminate when POWER button is ... If...
... been pressed Volume is turned up Dolby Surround does not work on center and rear channels Correct surround mode is selected Center and/or rear speakers are selected Rear and center levels are turned up You are using a surround encoded source Selecting a Video source produces sound but no picture Monitor output is connected to the video input on TV is set in the proper direction The antenna is adequate to operating errors. So, if you have a problem, first check this list for trouble-free operation. No lights illuminate when POWER button is ... If...


