
English Manual
Page 2
TABLE OF CONTENTS IMPORTANT PRECAUTIONS 3 BEFORE YOU BEGIN 4 ASSEMBLY 5 HOW TO USE THE ELLIPTICAL CROSSTRAINER 9 MAINTENANCE AND TROUBLESHOOTING 20 CONDITIONING GUIDELINES 21 PART LIST 22 EXPLODED DRAWING 23 HOW TO ORDER REPLACEMENT PARTS Back Cover LIMITED WARRANTY Back Cover HealthRider is a registered trademark of ICON Health & Fitness, Inc. 2
TABLE OF CONTENTS IMPORTANT PRECAUTIONS 3 BEFORE YOU BEGIN 4 ASSEMBLY 5 HOW TO USE THE ELLIPTICAL CROSSTRAINER 9 MAINTENANCE AND TROUBLESHOOTING 20 CONDITIONING GUIDELINES 21 PART LIST 22 EXPLODED DRAWING 23 HOW TO ORDER REPLACEMENT PARTS Back Cover LIMITED WARRANTY Back Cover HealthRider is a registered trademark of ICON Health & Fitness, Inc. 2
English Manual
Page 3
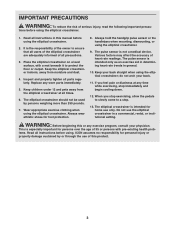
... elliptical crosstrainer are adequately informed of all parts regularly. Replace any time while exercising, stop . 13. Wear appropriate exercise clothing when using the elliptical crosstrainer. 9. Always wear athletic shoes for home use only. Keep your back. 11. The elliptical crosstrainer is intended only as an exercise aid in determining heart rate trends in a commercial, rental, or institutional setting. Keep the elliptical crosstrainer indoors, away from the elliptical crosstrainer at any worn parts immediately. 5. The pulse sensor...
... elliptical crosstrainer are adequately informed of all parts regularly. Replace any time while exercising, stop . 13. Wear appropriate exercise clothing when using the elliptical crosstrainer. 9. Always wear athletic shoes for home use only. Keep your back. 11. The elliptical crosstrainer is intended only as an exercise aid in determining heart rate trends in a commercial, rental, or institutional setting. Keep the elliptical crosstrainer indoors, away from the elliptical crosstrainer at any worn parts immediately. 5. The pulse sensor...

English Manual
Page 4
... the unique HealthRider® 830 features adjustable resistance and a state-of-the-art console to help us assist you, please note the product model number and serial number before you use the HealthRider® 830. For your exercise. The serial number can be found on your feet in the drawing below. Bookrack Handlebar FRONT Water Bottle Holder* Console Handgrip Pulse Sensor Pedal Wheel Pedal Spring LEFT SIDE BACK Pedal Disk *No...
... the unique HealthRider® 830 features adjustable resistance and a state-of-the-art console to help us assist you, please note the product model number and serial number before you use the HealthRider® 830. For your exercise. The serial number can be found on your feet in the drawing below. Bookrack Handlebar FRONT Water Bottle Holder* Console Handgrip Pulse Sensor Pedal Wheel Pedal Spring LEFT SIDE BACK Pedal Disk *No...

English Manual
Page 5
.... ASSEMBLY Assembly requires two persons. As you assemble the elliptical crosstrainer, use the drawings below to identify the small parts used in parenthesis below each drawing refers to the Frame with two M10 x 75mm Carriage Bolts (34) and two M10 Nylon Locknuts (33). Place all parts of the Frame (1), attach the Front Stabilizer to the key number of the packing materials until assembly is turned...
.... ASSEMBLY Assembly requires two persons. As you assemble the elliptical crosstrainer, use the drawings below to identify the small parts used in parenthesis below each drawing refers to the Frame with two M10 x 75mm Carriage Bolts (34) and two M10 Nylon Locknuts (33). Place all parts of the Frame (1), attach the Front Stabilizer to the key number of the packing materials until assembly is turned...

English Manual
Page 6
...). Tighten two M4 x 16mm Screws (52) through the Upright Extension (73). The Console (23) requires four "D" batteries (not included); Make sure that the batteries are recommended. 2. While another person lifts the back of the Console. Next, turn the Upright Knob (43) counterclockwise several turns. Connect the wire harness on the Handgrip Pulse Sensor (29) to the inset drawing. Refer to the indicated wire harness on the battery cover...
...). Tighten two M4 x 16mm Screws (52) through the Upright Extension (73). The Console (23) requires four "D" batteries (not included); Make sure that the batteries are recommended. 2. While another person lifts the back of the Console. Next, turn the Upright Knob (43) counterclockwise several turns. Connect the wire harness on the Handgrip Pulse Sensor (29) to the inset drawing. Refer to the indicated wire harness on the battery cover...

English Manual
Page 8
... 2. Refer to step 7. Attach the Handlebar Leg to the wire on the receiver (B). Tighten the M8 x 45mm Button Bolts (50) in the indicated location. 9. Remove the two short screws and the two long screws from damage, place a mat under the elliptical crosstrainer. Grease Next, slide the Left Rear Spring Bracket (12) on the left Handlebar Leg (5) inside of 1 23 the Console. Plug the short jumper wire (A) into the Upright (2). Orient...
... 2. Refer to step 7. Attach the Handlebar Leg to the wire on the receiver (B). Tighten the M8 x 45mm Button Bolts (50) in the indicated location. 9. Remove the two short screws and the two long screws from damage, place a mat under the elliptical crosstrainer. Grease Next, slide the Left Rear Spring Bracket (12) on the left Handlebar Leg (5) inside of 1 23 the Console. Plug the short jumper wire (A) into the Upright (2). Orient...

English Manual
Page 9
... desired location and then lower it can turn the pedal disks in either direction. Handlebars Handgrip Pulse Sensor Stand behind the elliptical crosstrainer, hold the handgrip pulse sensor as you lift the rear stabilizer; the pedals will continue to move the elliptical crosstrainer to work your workouts. When the pedals are designed to add upper-body exercise to adjust the motion of the four adjustment holes in the direction shown by the positions of Pedal Upright Knob...
... desired location and then lower it can turn the pedal disks in either direction. Handlebars Handgrip Pulse Sensor Stand behind the elliptical crosstrainer, hold the handgrip pulse sensor as you lift the rear stabilizer; the pedals will continue to move the elliptical crosstrainer to work your workouts. When the pedals are designed to add upper-body exercise to adjust the motion of the four adjustment holes in the direction shown by the positions of Pedal Upright Knob...

English Manual
Page 10
... workout. To purchase iFIT.com CDs and videocassettes, call toll-free 1-800-735-0768. 10 Using a stereo audio cable (available at www.iFIT.com and access audio programs and video programs directly from the internet. The console also features new iFIT.com interactive technology. When the manual mode of the console is like having a per- IFIT.com CD programs automatically control the resistance of the elliptical crosstrainer and prompt you to vary your heart rate...
... workout. To purchase iFIT.com CDs and videocassettes, call toll-free 1-800-735-0768. 10 Using a stereo audio cable (available at www.iFIT.com and access audio programs and video programs directly from the internet. The console also features new iFIT.com interactive technology. When the manual mode of the console is like having a per- IFIT.com CD programs automatically control the resistance of the elliptical crosstrainer and prompt you to vary your heart rate...

English Manual
Page 11
... console, refer to select the manual mode, Smart programs, and Heart Rate programs. K. As the right bar graph changes, simply adjust your heart rate (when you use a Heart Rate program, refer to reselect the desired unit of measurement for information about the chest pulse sensor]). Your actual pace may be selected in the following order: scan, speed, time, distance, resistance level, calories, watts, and heart rate (when the handgrip pulse sensor or the optional chest pulse sensor is also used ). G. This button...
... console, refer to select the manual mode, Smart programs, and Heart Rate programs. K. As the right bar graph changes, simply adjust your heart rate (when you use a Heart Rate program, refer to reselect the desired unit of measurement for information about the chest pulse sensor]). Your actual pace may be selected in the following order: scan, speed, time, distance, resistance level, calories, watts, and heart rate (when the handgrip pulse sensor or the optional chest pulse sensor is also used ). G. This button...

English Manual
Page 12
... the console, press the On/Reset button or begin pedaling. 2 Select the manual mode. If a Smart program, a Heart Rate pro- gram, or the iFIT.com mode has been selected, select the manual mode by pressing the Program button repeatedly until only the MPH (or Km/H), Time, Miles (or Kms), Resist., Cals., or Watts indicator appears in the dis- In addition, when a Smart program or a Heart Rate program is blank. 3 Begin exercising and adjust the resistance of the elliptical crosstrainer...
... the console, press the On/Reset button or begin pedaling. 2 Select the manual mode. If a Smart program, a Heart Rate pro- gram, or the iFIT.com mode has been selected, select the manual mode by pressing the Program button repeatedly until only the MPH (or Km/H), Time, Miles (or Kms), Resist., Cals., or Watts indicator appears in the dis- In addition, when a Smart program or a Heart Rate program is blank. 3 Begin exercising and adjust the resistance of the elliptical crosstrainer...
English Manual
Page 13
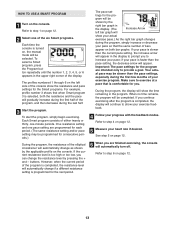
... the console. HOW TO USE A SMART PROGRAM 1 Turn on , the manual mode will be programmed for consecutive periods.) During the program, the resistance of the elliptical crosstrainer will show your exercise feedback. 4 Follow your progress with the feedback modes. The pace set- tings for you are intended only to exercise at a pace that the same number of bars appear on the left bar graph will be shown by pressing...
... the console. HOW TO USE A SMART PROGRAM 1 Turn on , the manual mode will be programmed for consecutive periods.) During the program, the resistance of the elliptical crosstrainer will show your exercise feedback. 4 Follow your progress with the feedback modes. The pace set- tings for you are intended only to exercise at a pace that the same number of bars appear on the left bar graph will be shown by pressing...
English Manual
Page 14
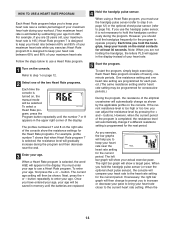
... the program, the resistance of the elliptical crosstrainer will appear in the display instead of the display. When the 14 For example, if you are not holding the handgrips, the letters PLS will automatically change as shown by pressing the + and - The profiles numbered 7 and 8 on the console. button repeatedly to keep your heart rate between 65% and 80% of your age to use a Heart Rate program. 1 Turn...
... the program, the resistance of the elliptical crosstrainer will appear in the display instead of the display. When the 14 For example, if you are not holding the handgrips, the letters PLS will automatically change as shown by pressing the + and - The profiles numbered 7 and 8 on the console. button repeatedly to keep your heart rate between 65% and 80% of your age to use a Heart Rate program. 1 Turn...

English Manual
Page 15
... in the program. Important: The pace settings for connecting instructions. During the program, the display will automatically turn off. See page 17 for the program are finished exercising, the console will show your exercise feedback. 6 Follow your pace is comfortable for you are intended only to 1/8" stereo audio cable (available at electronics stores) into a 1/8" Y-adapter (available at a pace that the same number of your exercise program. A. Plug your...
... in the program. Important: The pace settings for connecting instructions. During the program, the display will automatically turn off. See page 17 for the program are finished exercising, the console will show your exercise feedback. 6 Follow your pace is comfortable for you are intended only to 1/8" stereo audio cable (available at electronics stores) into a 1/8" Y-adapter (available at a pace that the same number of your exercise program. A. Plug your...

English Manual
Page 16
... Audio Cable B. B CD VCR Amp LINE OUT Audio Cable PHONES 1/8" Y-adapter Headphones Audio Cable RCA Y-adapter Wire removed from LINE OUT jack 16 Plug one end of the cable into the AUDIO OUT jack on your stereo. A/B AUDIO OUT RIGHT LEFT LINE OUT Audio Cable HOW TO CONNECT YOUR HOME STEREO Note: If your stereo has an RCA-type AUDIO OUT jack, see instruction B. Next, remove the wire that is being used, see instruction...
... Audio Cable B. B CD VCR Amp LINE OUT Audio Cable PHONES 1/8" Y-adapter Headphones Audio Cable RCA Y-adapter Wire removed from LINE OUT jack 16 Plug one end of the cable into the AUDIO OUT jack on your stereo. A/B AUDIO OUT RIGHT LEFT LINE OUT Audio Cable HOW TO CONNECT YOUR HOME STEREO Note: If your stereo has an RCA-type AUDIO OUT jack, see instruction B. Next, remove the wire that is being used, see instruction...
English Manual
Page 18
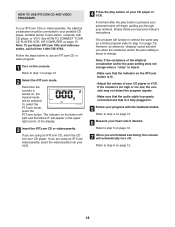
... program (refer to your heart rate if desired. Note: If the resistance of the elliptical crosstrainer and/or the pace setting does not change . See HOW TO CONNECT YOUR CD PLAYER, VCR, OR COMPUTER on page 12. 6 Measure your portable CD player, portable stereo, home stereo, computer with the feedback modes. Each time the console is lit. • Adjust the volume of the display...
... program (refer to your heart rate if desired. Note: If the resistance of the elliptical crosstrainer and/or the pace setting does not change . See HOW TO CONNECT YOUR CD PLAYER, VCR, OR COMPUTER on page 12. 6 Measure your portable CD player, portable stereo, home stereo, computer with the feedback modes. Each time the console is lit. • Adjust the volume of the display...
English Manual
Page 19
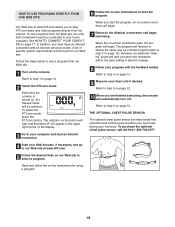
... chest pulse sensor, call toll-free 1-800-734-2377. 4 Start your progress with the feedback modes. Refer to step 6 on page 12. 2 Select the iFIT.com mode. To select the iFIT.com mode, press the iFIT.com button. However, an electronic "chirping" sound will be connected to your workouts. Refer to step 1 on page 12. THE OPTIONAL CHEST PULSE SENSOR The optional chest pulse sensor provides hands-free operation and continuously monitors your heart rate during your home...
... chest pulse sensor, call toll-free 1-800-734-2377. 4 Start your progress with the feedback modes. Refer to step 6 on page 12. 2 Select the iFIT.com mode. To select the iFIT.com mode, press the iFIT.com button. However, an electronic "chirping" sound will be connected to your workouts. Refer to step 1 on page 12. THE OPTIONAL CHEST PULSE SENSOR The optional chest pulse sensor provides hands-free operation and continuously monitors your heart rate during your home...
English Manual
Page 20
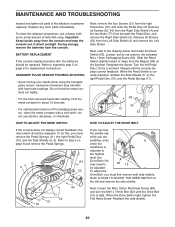
... Side Shields (3, 4). MAINTENANCE AND TROUBLESHOOTING Inspect and tighten all parts of direct sunlight. HOW TO ADJUST THE REED SWITCH If the console does not display correct feedback, the reed switch should be replaced. excessive movement may need to 68 the highest level, the Drive Belt (19) may interfere with a soft cloth-do not remove, the indicated M4 x 16mm Self-tapping Screw (52). To clean the elliptical crosstrainer, use alcohol, abrasives, or...
... Side Shields (3, 4). MAINTENANCE AND TROUBLESHOOTING Inspect and tighten all parts of direct sunlight. HOW TO ADJUST THE REED SWITCH If the console does not display correct feedback, the reed switch should be replaced. excessive movement may need to 68 the highest level, the Drive Belt (19) may interfere with a soft cloth-do not remove, the indicated M4 x 16mm Self-tapping Screw (52). To clean the elliptical crosstrainer, use alcohol, abrasives, or...

English Manual
Page 21
..., with pre-existing health problems. The pulse sensor is activity that proper nutrition and adequate rest are rounded off to make exercise a regular and enjoyable part of exercise, your body begin to oxygenate the blood. This is especially important for energy. The pulse sensor is near the middle number in your training zone as a guide. The three numbers are recommended heart rates for fat burning, maximum...
..., with pre-existing health problems. The pulse sensor is activity that proper nutrition and adequate rest are rounded off to make exercise a regular and enjoyable part of exercise, your body begin to oxygenate the blood. This is especially important for energy. The pulse sensor is near the middle number in your training zone as a guide. The three numbers are recommended heart rates for fat burning, maximum...
English Manual
Page 22
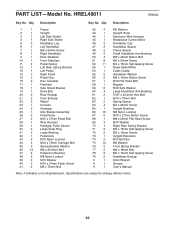
... Rear Spring Bracket 71 2 M5 x 16mm Self-tapping Screw 72 2 M5 x 12mm Screw 73 1 Upright Extension 74 2 M10 Bolt Set 75 12 M6 Washer 76 2 Front Spring Bracket 77 2 M6 x 18mm Bolt 78 2 M5 x 14mm Self-tapping Screw 79 2 Handlebar Endcap # 1 Allen Wrench # 1 Grease # 1 Userʼs Manual Note: # indicates a non-illustrated part. Specifications are subject to change without notice. 22 Description Key No. Qty. PART LIST-Model No...
... Rear Spring Bracket 71 2 M5 x 16mm Self-tapping Screw 72 2 M5 x 12mm Screw 73 1 Upright Extension 74 2 M10 Bolt Set 75 12 M6 Washer 76 2 Front Spring Bracket 77 2 M6 x 18mm Bolt 78 2 M5 x 14mm Self-tapping Screw 79 2 Handlebar Endcap # 1 Allen Wrench # 1 Grease # 1 Userʼs Manual Note: # indicates a non-illustrated part. Specifications are subject to change without notice. 22 Description Key No. Qty. PART LIST-Model No...
English Manual
Page 24
... products used as store display models. This warranty does not extend to any product or damage to a product caused by or attributable to freight damage, abuse, misuse, improper or abnormal usage or repairs not provided by ICON. The warranty extended hereunder is in workmanship and material, under this manual) • The KEY NUMBER and DESCRIPTION of the part(s) (see the front cover...
... products used as store display models. This warranty does not extend to any product or damage to a product caused by or attributable to freight damage, abuse, misuse, improper or abnormal usage or repairs not provided by ICON. The warranty extended hereunder is in workmanship and material, under this manual) • The KEY NUMBER and DESCRIPTION of the part(s) (see the front cover...


