
Canadian English Manual
Page 3
..., lower, or move the walking belt while the power is turned off position when the treadmill is capable of all warnings and precautions. 2. Do not use . (See the drawing on the treadmill at all users of this manual. 3. Failure to ensure that the storage latch is properly assembled. (See ASSEMBLY on page 6, and HOW TO FOLD AND MOVE THE TREADMILL on the walking belt. Do not operate the treadmill if the power cord...
..., lower, or move the walking belt while the power is turned off position when the treadmill is capable of all warnings and precautions. 2. Do not use . (See the drawing on the treadmill at all users of this manual. 3. Failure to ensure that the storage latch is properly assembled. (See ASSEMBLY on page 6, and HOW TO FOLD AND MOVE THE TREADMILL on the walking belt. Do not operate the treadmill if the power cord...

Canadian English Manual
Page 4
... next "chirp" is intended for the "chirp" and be performed by pressing the speed and incline buttons. Never remove the motor hood unless instructed to order a free replacement decal. Always listen for in this product. 20. When using iFIT.com CDs and videos, you when the speed and/or incline of the treadmill is not legible, please call our Customer Service Department toll-free at any exercise program, consult your...
... next "chirp" is intended for the "chirp" and be performed by pressing the speed and incline buttons. Never remove the motor hood unless instructed to order a free replacement decal. Always listen for in this product. 20. When using iFIT.com CDs and videos, you when the speed and/or incline of the treadmill is not legible, please call our Customer Service Department toll-free at any exercise program, consult your...
Canadian English Manual
Page 5
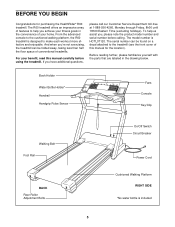
... space of your fitness goals in the drawing below. The model number is included 5 The serial number can be found on a decal attached to make each workout more effective and enjoyable. If you achieve your home. BEFORE YOU BEGIN Congratulations for the location). Book Holder Water Bottle Holder* Handrail Handgrip Pulse Sensor Fans Console Key/Clip Walking Belt Foot Rail BACK Rear Roller Adjustment Bolts On/Off Switch Circuit Breaker Power Cord Cushioned Walking...
... space of your fitness goals in the drawing below. The model number is included 5 The serial number can be found on a decal attached to make each workout more effective and enjoyable. If you achieve your home. BEFORE YOU BEGIN Congratulations for the location). Book Holder Water Bottle Holder* Handrail Handgrip Pulse Sensor Fans Console Key/Clip Walking Belt Foot Rail BACK Rear Roller Adjustment Bolts On/Off Switch Circuit Breaker Power Cord Cushioned Walking...

Canadian English Manual
Page 9
... from the adapter must be installed by sudden voltage changes in drawing 2 if a properly grounded outlet is used only until a properly grounded outlet (drawing 1) can be connected to the walking belt or the walking platform. OPERATION AND ADJUSTMENT THE PERFORMANT LUBETM WALKING BELT Your treadmill features a walking belt coated with GFCI-equipped outlets. Do not modify the plug provided with your home's power. Whenever the adapter is not...
... from the adapter must be installed by sudden voltage changes in drawing 2 if a properly grounded outlet is used only until a properly grounded outlet (drawing 1) can be connected to the walking belt or the walking platform. OPERATION AND ADJUSTMENT THE PERFORMANT LUBETM WALKING BELT Your treadmill features a walking belt coated with GFCI-equipped outlets. Do not modify the plug provided with your home's power. Whenever the adapter is not...

Canadian English Manual
Page 10
... incline of the treadmill as a personal trainer guides you can also go to your home stereo, portable stereo, computer, or VCR and play special iFIT.com CD and video programs (iFIT.com CDs and videocassettes are also offered. In addition, the console offers six preset workout programs. Each program automatically controls the speed and incline of the treadmill can even measure your heart rate using the handgrip pulse sensor or the optional chest pulse sensor...
... incline of the treadmill as a personal trainer guides you can also go to your home stereo, portable stereo, computer, or VCR and play special iFIT.com CD and video programs (iFIT.com CDs and videocassettes are also offered. In addition, the console offers six preset workout programs. Each program automatically controls the speed and incline of the treadmill can even measure your heart rate using the handgrip pulse sensor or the optional chest pulse sensor...
Canadian English Manual
Page 11
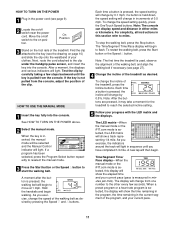
..., the display will light. For simplicity, all instructions in this display will light. To change the speed setting quickly, press the OneTouch Speed buttons. As you have completed 1/4 mile. HOW TO TURN ON THE POWER 1 Plug in the power cord (see page 9). 2 Locate the on/off switch to the on position. If a program has been selected, press the Program Select button repeatedly to reselect the manual mode. 3 Press the Start button or the Speed v button to start the walking belt. Test...
..., the display will light. For simplicity, all instructions in this display will light. To change the speed setting quickly, press the OneTouch Speed buttons. As you have completed 1/4 mile. HOW TO TURN ON THE POWER 1 Plug in the power cord (see page 9). 2 Locate the on/off switch to the on position. If a program has been selected, press the Program Select button repeatedly to reselect the manual mode. 3 Press the Start button or the Speed v button to start the walking belt. Test...
Canadian English Manual
Page 12
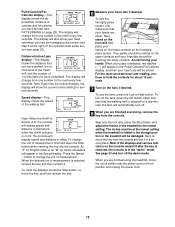
... console will appear in the "demo" mode. Press the Speed v button to change from one number to the storage position or the treadmill will be shown. Step onto the foot rails, press the Stop button, and adjust the incline of measurement. Distance/Incline/Laps display-This display shows the distance that you have walked, the incline level of the treadmill, and the number of measurement, first hold the contacts for a few seconds. To use the handgrip pulse sensor...
... console will appear in the "demo" mode. Press the Speed v button to change from one number to the storage position or the treadmill will be shown. Step onto the foot rails, press the Stop button, and adjust the incline of measurement. Distance/Incline/Laps display-This display shows the distance that you have walked, the incline level of the treadmill, and the number of measurement, first hold the contacts for a few seconds. To use the handgrip pulse sensor...

Canadian English Manual
Page 14
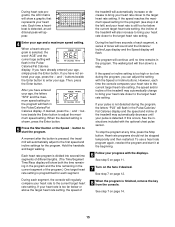
... the target heart rate will change during heart rate program 2, your heart rate will reach approximately 85% of your progress with the optional chest pulse sensor. 2 Insert the key fully into the console. See page 23 and turn off position and unplug the power cord. See the instructions included with the displays. To select a heart rate program, press the Program Select button repeatedly until one of the treadmill is determined by subtracting your heart rate will reach...
... the target heart rate will change during heart rate program 2, your heart rate will reach approximately 85% of your progress with the optional chest pulse sensor. 2 Insert the key fully into the console. See page 23 and turn off position and unplug the power cord. See the instructions included with the displays. To select a heart rate program, press the Program Select button repeatedly until one of the treadmill is determined by subtracting your heart rate will reach...
Canadian English Manual
Page 15
... treadmill will automatically adjust to a stop the program at the beginning. 6 Follow your age and a maximum speed setting. To use a heart rate program again, reselect the program and start the program. The program will appear. 4 Enter your progress with the optional chest pulse sensor. However, each segment, the console will then slow to the first speed and incline settings for the program will flash. If this occurs, See the instructions included with the displays...
... treadmill will automatically adjust to a stop the program at the beginning. 6 Follow your age and a maximum speed setting. To use a heart rate program again, reselect the program and start the program. The program will appear. 4 Enter your progress with the optional chest pulse sensor. However, each segment, the console will then slow to the first speed and incline settings for the program will flash. If this occurs, See the instructions included with the displays...

Canadian English Manual
Page 20
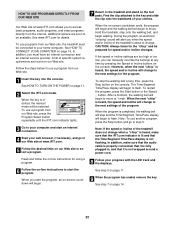
... page 11. 2 Select the iFIT.com mode. Plug one end of the audio cable into the jack on the console. To use an iFIT.com CD or video program. 1 Insert the key into your VCR. 4 Press the PLAY button on your personal trainer's instructions. A moment after the button is pressed, your personal trainer will alert you when the speed and/or incline of the Y-adapter. The treadmill will be prepared for the...
... page 11. 2 Select the iFIT.com mode. Plug one end of the audio cable into the jack on the console. To use an iFIT.com CD or video program. 1 Insert the key into your VCR. 4 Press the PLAY button on your personal trainer's instructions. A moment after the button is pressed, your personal trainer will alert you when the speed and/or incline of the Y-adapter. The treadmill will be prepared for the...
Canadian English Manual
Page 21
... remove the key and go to step 1 on page 20. See step 5 on page 11. 6 Measure your progress with the LED track and the displays. To restart the program, press the Start button or the Speed v button. After a moment, the walking belt will change to the next settings of your CD player or VCR. When the next "chirp" is flashing, press the Start button or the Speed v button on the console. • Adjust...
... remove the key and go to step 1 on page 20. See step 5 on page 11. 6 Measure your progress with the LED track and the displays. To restart the program, press the Start button or the Speed v button. After a moment, the walking belt will change to the next settings of your CD player or VCR. When the next "chirp" is flashing, press the Start button or the Speed v button on the console. • Adjust...
Canadian English Manual
Page 22
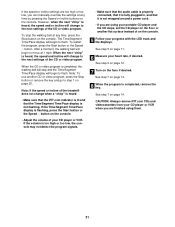
... TO USE PROGRAMS DIRECTLY FROM OUR WEB SITE 7 Return to step 5. Our Web site at any time by pressing the Speed or Incline buttons on -line instructions for details. See www.iFIT.com for using a program. 8 Follow your clothes. See HOW TO TURN ON THE POWER on page 14. 22 To use programs from our Web site. 1 Insert the key into the console. Hold the handrails, step onto the walking belt...
... TO USE PROGRAMS DIRECTLY FROM OUR WEB SITE 7 Return to step 5. Our Web site at any time by pressing the Speed or Incline buttons on -line instructions for details. See www.iFIT.com for using a program. 8 Follow your clothes. See HOW TO TURN ON THE POWER on page 14. 22 To use programs from our Web site. 1 Insert the key into the console. Hold the handrails, step onto the walking belt...
Canadian English Manual
Page 23
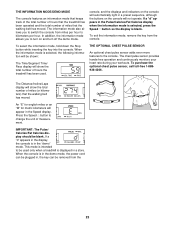
... number of miles that the walking belt has moved. The chest pulse sensor provides hands-free operation and continuously monitors your heart rate during your workouts. Press the Speed v button to turn on the console will automatically light in the Speed display. When the console is in the demo mode, the power cord can be plugged in the Pulse/Calories/Fat Calories display when the information mode is selected, press the Speed w button so the display is blank. THE INFORMATION MODE/DEMO MODE The console features an information mode that keeps track...
... number of miles that the walking belt has moved. The chest pulse sensor provides hands-free operation and continuously monitors your heart rate during your workouts. Press the Speed v button to turn on the console will automatically light in the Speed display. When the console is in the demo mode, the power cord can be plugged in the Pulse/Calories/Fat Calories display when the information mode is selected, press the Speed w button so the display is blank. THE INFORMATION MODE/DEMO MODE The console features an information mode that keeps track...
Canadian English Manual
Page 26
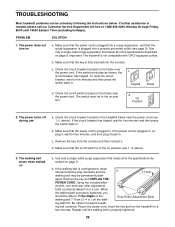
... the instructions below. Check the circuit breaker located on position. above ). 3. b. ing belt centered. The switch must be able to keep the walk- c. Make sure that meets all of the specifications described on a. c. above ). If the walking belt is in . Plug in the power cord, insert the key and run the treadmill for five minutes and then press the switch back in .) off switch located on a. TROUBLESHOOTING Most treadmill problems...
... the instructions below. Check the circuit breaker located on position. above ). 3. b. ing belt centered. The switch must be able to keep the walk- c. Make sure that meets all of the specifications described on a. c. above ). If the walking belt is in . Plug in the power cord, insert the key and run the treadmill for five minutes and then press the switch back in .) off switch located on a. TROUBLESHOOTING Most treadmill problems...
Canadian English Manual
Page 27
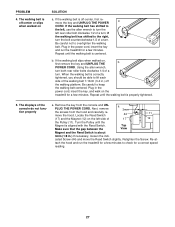
... wrench, turn both rear roller bolts clockwise 1/4 of the walking belt 7-10cm (3-4 in .) If necessary, loosen the indi- Plug in the power cord, insert the key and run the treadmill for a few minutes. Remove the key from the hood and carefully re- Locate the Reed Switch 44 11 (17) and the Magnet (12) on the treadmill for a correct speed reading. 27 cated Screw (44) and move the key and UNPLUG THE POWER CORD. Re...
... wrench, turn both rear roller bolts clockwise 1/4 of the walking belt 7-10cm (3-4 in .) If necessary, loosen the indi- Plug in the power cord, insert the key and run the treadmill for a few minutes. Remove the key from the hood and carefully re- Locate the Reed Switch 44 11 (17) and the Magnet (12) on the treadmill for a correct speed reading. 27 cated Screw (44) and move the key and UNPLUG THE POWER CORD. Re...

Canadian English Manual
Page 28
...." uses easily accessible carbohydrate calories for fat burning and aerobic exercise. To find the proper heart rate for you, first find the three numbers above your "training zone." To measure your age near the lowest number in your training zone. During the first few minutes of exercise, your body Training Zone Exercise-After warming up to five workouts each workout with preexisting health problems. The pulse sensors are...
...." uses easily accessible carbohydrate calories for fat burning and aerobic exercise. To find the proper heart rate for you, first find the three numbers above your "training zone." To measure your age near the lowest number in your training zone. During the first few minutes of exercise, your body Training Zone Exercise-After warming up to five workouts each workout with preexisting health problems. The pulse sensors are...
Canadian English Manual
Page 29
... Holder Roller Adj. Washer Rear Roller Adjustment Bolt Left Rear Endcap Frame Allen Wrench Rear Platform Screw Rear Roller Idler Assembly Audio Wire Nut Pulse Bar Left Foam Grip Idler Arm Idler Spring Upright Hood Screw Latch Knob Latch Housing Latch Knob Spring Latch Pin Collar Pin Clip Latch Pin Incline Pivot Bolt Flywheel Plastic Fastener Handrail Extension Front Wheel Wheel Bolt Pulley Nut Console Console Cover Fan Key Clip Foot Screw Upright Wire Harness Shock Large Upright Endcap Upright Base Cap Filter Wire Latch Warning Decal Incline Motor Motor Controller Wire Fan Screw Plastic...
... Holder Roller Adj. Washer Rear Roller Adjustment Bolt Left Rear Endcap Frame Allen Wrench Rear Platform Screw Rear Roller Idler Assembly Audio Wire Nut Pulse Bar Left Foam Grip Idler Arm Idler Spring Upright Hood Screw Latch Knob Latch Housing Latch Knob Spring Latch Pin Collar Pin Clip Latch Pin Incline Pivot Bolt Flywheel Plastic Fastener Handrail Extension Front Wheel Wheel Bolt Pulley Nut Console Console Cover Fan Key Clip Foot Screw Upright Wire Harness Shock Large Upright Endcap Upright Base Cap Filter Wire Latch Warning Decal Incline Motor Motor Controller Wire Fan Screw Plastic...

Canadian English Manual
Page 30
... 2 109 1 110 1 111 1 112 2 113 2 114 1 115 1 116 1 117 1 118* 1 119 1 120 1 121 2 122 1 Description Circuit Breaker Power Cord Power Cord Grommet Warning Decal 1/2" Screw Jack iFIT.com Audio Cable rear Roller Star Washer Pulley Washer Idler Pulley Pulley Spacer Outlet Bracket Star Washer Static Decal Book Plate Idler Pulley Bolt Right Foam Grip Console Base Latch Assembly Right Fan Cover Left Fan Cover Motor Bushing Idler Arm Nylon Washer Key No. Key No.
... 2 109 1 110 1 111 1 112 2 113 2 114 1 115 1 116 1 117 1 118* 1 119 1 120 1 121 2 122 1 Description Circuit Breaker Power Cord Power Cord Grommet Warning Decal 1/2" Screw Jack iFIT.com Audio Cable rear Roller Star Washer Pulley Washer Idler Pulley Pulley Spacer Outlet Bracket Star Washer Static Decal Book Plate Idler Pulley Bolt Right Foam Grip Console Base Latch Assembly Right Fan Cover Left Fan Cover Motor Bushing Idler Arm Nylon Washer Key No. Key No.

Canadian English Manual
Page 31
..., please be prepared to give the following information: • The MODEL NUMBER of the product (HCTL07120) • The NAME of the product (HealthRider® R60 treadmill) • The SERIAL NUMBER of the product (see the front cover of this manual) • The KEY NUMBER and DESCRIPTION of the part(s) (see the PART LIST on pages 29 and 30) ICON OF/DU CANADA, INC. 900 de l'Industrie...
..., please be prepared to give the following information: • The MODEL NUMBER of the product (HCTL07120) • The NAME of the product (HealthRider® R60 treadmill) • The SERIAL NUMBER of the product (see the front cover of this manual) • The KEY NUMBER and DESCRIPTION of the part(s) (see the PART LIST on pages 29 and 30) ICON OF/DU CANADA, INC. 900 de l'Industrie...

Canadian English Manual
Page 32
...; Bicycle ❏ Exercise Cycle ❏ Treadmill ❏ Home Gym ❏ Weight Bench ❏ Stepper ❏ Cardio Glide ❏ Other 11) Which type of magazines do not allow the exclusion or limitation of whatsoever nature. ICON of /du Canada Inc. PRODUCT WARRANTY REGISTRATION IMPORTANT: MAIL WITHIN 14 DAYS OF PURCHASE NAME: ADDRESS: COUNTY: PHONE: POSTCODE: MODEL NO. RETAILER NAME: SERIAL NO. Part No. 187868...
...; Bicycle ❏ Exercise Cycle ❏ Treadmill ❏ Home Gym ❏ Weight Bench ❏ Stepper ❏ Cardio Glide ❏ Other 11) Which type of magazines do not allow the exclusion or limitation of whatsoever nature. ICON of /du Canada Inc. PRODUCT WARRANTY REGISTRATION IMPORTANT: MAIL WITHIN 14 DAYS OF PURCHASE NAME: ADDRESS: COUNTY: PHONE: POSTCODE: MODEL NO. RETAILER NAME: SERIAL NO. Part No. 187868...


