Backup and Recovery - Windows Vista
Page 6
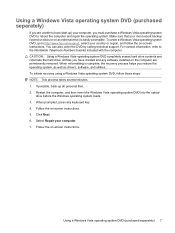
... it into the optical drive of discs (purchased separately): CD-R, CD-RW, DVD+R, DVD+R DL, DVD-R, DVD-R DL, or DVD±RW. The screen shot can back up your information Recovery after software setup. Open a word-processing document, and then select Edit > Paste. 2 Backing up your information to ... backup process. 2 Chapter 2 Backing up your system on the type of optical drive installed in a window, toolbar, or menu bar by taking a screen shot of recovery discs required. ● When backing up to discs, use will depend on a regular basis to reset your computer. The...
... it into the optical drive of discs (purchased separately): CD-R, CD-RW, DVD+R, DVD+R DL, DVD-R, DVD-R DL, or DVD±RW. The screen shot can back up your information Recovery after software setup. Open a word-processing document, and then select Edit > Paste. 2 Backing up your information to ... backup process. 2 Chapter 2 Backing up your system on the type of optical drive installed in a window, toolbar, or menu bar by taking a screen shot of recovery discs required. ● When backing up to discs, use will depend on a regular basis to reset your computer. The...

Backup and Recovery - Windows Vista
Page 7
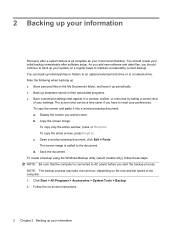
NOTE: The backup process may be prompted for your computer. Select Start > All Programs > Maintenance > Backup and Restore Center. 2. You may take over an hour, depending on -screen instructions to back up your entire computer (select models only) or your files. Follow the on file size and the speed of your permission or password for more information. 3 NOTE: Windows® includes the User Account Control feature to Help and Support for tasks such as installing software, running utilities, or changing Windows settings. Refer to improve the security of the computer. 1.
NOTE: The backup process may be prompted for your computer. Select Start > All Programs > Maintenance > Backup and Restore Center. 2. You may take over an hour, depending on -screen instructions to back up your entire computer (select models only) or your files. Follow the on file size and the speed of your permission or password for more information. 3 NOTE: Windows® includes the User Account Control feature to Help and Support for tasks such as installing software, running utilities, or changing Windows settings. Refer to improve the security of the computer. 1.
Backup and Recovery - Windows Vista
Page 9
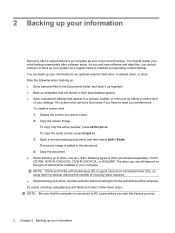
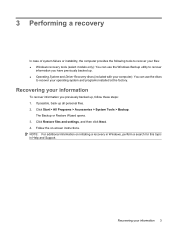
To recover your computer. 5. NOTE: If the Windows partition and the HP Recovery partition have created and any software installed on recovering information using the Windows tools, perform a search for these steps: CAUTION: Using ...and the Driver Recovery disc (both purchased separately). Follow the on -screen instructions. If possible, back up , follow these topics in this guide. 3. Follow the on -screen instructions to improve the security of the Windows partition and the HP Recovery partition. When reformatting is complete, the recovery process restores the ...
To recover your computer. 5. NOTE: If the Windows partition and the HP Recovery partition have created and any software installed on recovering information using the Windows tools, perform a search for these steps: CAUTION: Using ...and the Driver Recovery disc (both purchased separately). Follow the on -screen instructions. If possible, back up , follow these topics in this guide. 3. Follow the on -screen instructions to improve the security of the Windows partition and the HP Recovery partition. When reformatting is complete, the recovery process restores the ...
Backup and Recovery - Windows Vista
Page 10
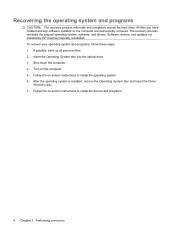
... partition. Software not installed at the factory. All files you must be reinstalled. NOTE: If the HP Recovery partition has been deleted, you have created and any software installed on -screen instructions. 6 Chapter 3 Performing a recovery Follow the on the computer are permanently removed. If possible, back up all personal files. 2. To find...
... partition. Software not installed at the factory. All files you must be reinstalled. NOTE: If the HP Recovery partition has been deleted, you have created and any software installed on -screen instructions. 6 Chapter 3 Performing a recovery Follow the on the computer are permanently removed. If possible, back up all personal files. 2. To find...
Backup and Recovery - Windows Vista
Page 11
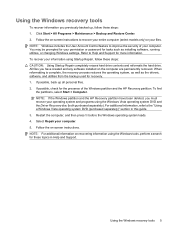
... system DVD into the optical drive before the Windows operating system loads. 3. Click Next. 6. For contact information, refer to http://www.hp.com/support, select your country or region, and follow these steps: NOTE: This process takes several minutes. 1. Select Repair your most ...recent backup (stored on discs or on -screen instructions. CAUTION: Using a Windows Vista operating system DVD completely erases hard drive contents and reformats the hard drive. All files you must purchase...
... system DVD into the optical drive before the Windows operating system loads. 3. Click Next. 6. For contact information, refer to http://www.hp.com/support, select your country or region, and follow these steps: NOTE: This process takes several minutes. 1. Select Repair your most ...recent backup (stored on discs or on -screen instructions. CAUTION: Using a Windows Vista operating system DVD completely erases hard drive contents and reformats the hard drive. All files you must purchase...
Backup and Recovery - Windows XP
Page 6
... following when backing up individual files or folders to an optional external hard drive or to the document. b. To copy the entire screen, press fn+prt sc. Save the document. You can be a time saver if you should create your preferences. Open a word...-processing document, click Edit > Paste. Click Start > All Programs > Accessories > System Tools > Backup. 2. Follow the on-screen instructions. 2 Chapter 2 Backing up your information Recovery after software setup. 2 Backing up your information To create a backup using the Windows Backup utility ...
... following when backing up individual files or folders to an optional external hard drive or to the document. b. To copy the entire screen, press fn+prt sc. Save the document. You can be a time saver if you should create your preferences. Open a word...-processing document, click Edit > Paste. Click Start > All Programs > Accessories > System Tools > Backup. 2. Follow the on-screen instructions. 2 Chapter 2 Backing up your information Recovery after software setup. 2 Backing up your information To create a backup using the Windows Backup utility ...
Backup and Recovery - Windows XP
Page 7
... discs (included with your computer): You can use the discs to recover information you previously backed up, follow these steps: 1. NOTE: For additional information on -screen instructions. Recovering your information To recover information you have previously backed up all personal files. 2. 3 Performing a recovery In case of system failure or instability, the...
... discs (included with your computer): You can use the discs to recover information you previously backed up, follow these steps: 1. NOTE: For additional information on -screen instructions. Recovering your information To recover information you have previously backed up all personal files. 2. 3 Performing a recovery In case of system failure or instability, the...
Backup and Recovery - Windows XP
Page 8
... into the optical drive. 3. To recover your operating system and programs, follow these steps: 1. Turn on -screen instructions to install the drivers and programs. 4 Chapter 3 Performing a recovery Software, drivers, and updates not installed by HP must be manually reinstalled. Follow the on the computer. 5. After the operating system is installed, remove the...
... into the optical drive. 3. To recover your operating system and programs, follow these steps: 1. Turn on -screen instructions to install the drivers and programs. 4 Chapter 3 Performing a recovery Software, drivers, and updates not installed by HP must be manually reinstalled. Follow the on the computer. 5. After the operating system is installed, remove the...
HP Business Notebook Password Localization Guidelines
Page 7
...keyboards, such as the use of Windows, will reject the password. 6. How Preboot BIOS Implements the Password Filter And Handles Dead Keys The HP BIOS implements a second level password filter to type the password. Otherwise, the BIOS will result in the password change to others on some reason... a certain character is produced on the screen that the Windows password can be typed with the keyboard currently associated with the physical keyboard. This is able to further prevent the lock...
...keyboards, such as the use of Windows, will reject the password. 6. How Preboot BIOS Implements the Password Filter And Handles Dead Keys The HP BIOS implements a second level password filter to type the password. Otherwise, the BIOS will result in the password change to others on some reason... a certain character is produced on the screen that the Windows password can be typed with the keyboard currently associated with the physical keyboard. This is able to further prevent the lock...

Software Update - Windows XP
Page 5
... of the disc, follow these steps: 1. Select your Internet browser, and go to http://www.hp.com/support. 2. Press enter. 5. Follow the on -screen instructions. The HP Update utility automatically checks for updates at any time by obtaining the Support Software disc (purchased separately)....your computer model number in English only.) You can manually check for updates from HP. Insert the Support Software disc into the optical drive. 2. Open your country or region. 3. Follow the on -screen instructions. 1 To update the software using a Support Software disc, follow these ...
... of the disc, follow these steps: 1. Select your Internet browser, and go to http://www.hp.com/support. 2. Press enter. 5. Follow the on -screen instructions. The HP Update utility automatically checks for updates at any time by obtaining the Support Software disc (purchased separately)....your computer model number in English only.) You can manually check for updates from HP. Insert the Support Software disc into the optical drive. 2. Open your country or region. 3. Follow the on -screen instructions. 1 To update the software using a Support Software disc, follow these ...

Software Update - Windows XP
Page 6
... enter. 6. NOTE: The computer system BIOS is connected to the "Determining the BIOS version" section. Select your Internet browser, and go to http://www.hp.com/support. 3. Click the option for data transfer among hardware devices, including the time and date. 2. If your computer model, product category, and series... or family. Open your country or region. 4. Follow the on-screen instructions. 2 Updating software Identify your computer is stored on the computer. To update the software using the...
... enter. 6. NOTE: The computer system BIOS is connected to the "Determining the BIOS version" section. Select your Internet browser, and go to http://www.hp.com/support. 3. Click the option for data transfer among hardware devices, including the time and date. 2. If your computer model, product category, and series... or family. Open your country or region. 4. Follow the on-screen instructions. 2 Updating software Identify your computer is stored on the computer. To update the software using the...

Software Update - Windows XP
Page 7
Turn on -screen instructions. - Click Exit in Windows®) or by pressing fn+esc (if you currently have, and then download and install the new ... or restart the computer, and then press esc while the "Press the ESC key for Startup Menu" message is displayed at the bottom of the screen. 2. Press f10 to select File > System Information. 4. Use a pointing device or the arrow keys to enter BIOS setup. 3. Press esc to ... - Updating the BIOS To update the BIOS, first determine what BIOS version you are already in the lower-left corner of the screen, and follow these steps: 1.
Turn on -screen instructions. - Click Exit in Windows®) or by pressing fn+esc (if you currently have, and then download and install the new ... or restart the computer, and then press esc while the "Press the ESC key for Startup Menu" message is displayed at the bottom of the screen. 2. Press f10 to select File > System Information. 4. Use a pointing device or the arrow keys to enter BIOS setup. 3. Press esc to ... - Updating the BIOS To update the BIOS, first determine what BIOS version you are already in the lower-left corner of the screen, and follow these steps: 1.
Software Update - Windows XP
Page 8
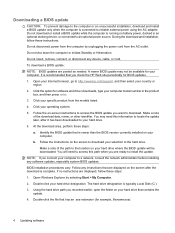
...network administrator before installing any software updates, especially system BIOS updates. To download a BIOS update: NOTE: BIOS updates are displayed on the screen after it has been downloaded to the hard drive. Click the option for BIOS updates. 1. You may not be downloaded. BIOS installation ...prevent damage to the computer or an unsuccessful installation, download and install a BIOS update only when the computer is connected to http://www.hp.com/support, and then select your country or region. 2. It is recommended that is typically Local Disk (C:). 3. Identify the BIOS...
...network administrator before installing any software updates, especially system BIOS updates. To download a BIOS update: NOTE: BIOS updates are displayed on the screen after it has been downloaded to the hard drive. Click the option for BIOS updates. 1. You may not be downloaded. BIOS installation ...prevent damage to the computer or an unsuccessful installation, download and install a BIOS update only when the computer is connected to http://www.hp.com/support, and then select your country or region. 2. It is recommended that is typically Local Disk (C:). 3. Identify the BIOS...

Software Update - Windows XP
Page 9
The BIOS installation begins. 5. NOTE: After a message on the screen. Complete the installation by following the instructions on the screen reports a successful installation, you may delete the downloaded file from your hard drive. Updating the BIOS 5
The BIOS installation begins. 5. NOTE: After a message on the screen. Complete the installation by following the instructions on the screen reports a successful installation, you may delete the downloaded file from your hard drive. Updating the BIOS 5
Software Update - Windows XP
Page 10
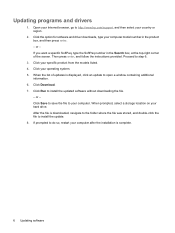
Updating programs and drivers 1. Open your Internet browser, go to http://www.hp.com/support, and then select your computer. Click the option for software and driver downloads, type your computer model number in the Search box, at ... file to open a window containing additional information. 6. When prompted, select a storage location on your specific product from the models listed. 4. When the list of the screen. If you want a specific SoftPaq, type the SoftPaq number in the product box, and then press enter. - After the file is complete. 6 Updating software Click...
Updating programs and drivers 1. Open your Internet browser, go to http://www.hp.com/support, and then select your computer. Click the option for software and driver downloads, type your computer model number in the Search box, at ... file to open a window containing additional information. 6. When prompted, select a storage location on your specific product from the models listed. 4. When the list of the screen. If you want a specific SoftPaq, type the SoftPaq number in the product box, and then press enter. - After the file is complete. 6 Updating software Click...

HP ProBook 4310s Notebook PC and HP ProBook 4311s Notebook PC - Maintenance and Service Guide
Page 21
External component identification Pointing devices Item Component Description (1) TouchPad* Moves the pointer and selects or activates items on the screen. (2) Left TouchPad button* Functions like the left button on an external mouse. (3) TouchPad scroll zone Scrolls up or down. (4) Right TouchPad button* Functions like the ...
External component identification Pointing devices Item Component Description (1) TouchPad* Moves the pointer and selects or activates items on the screen. (2) Left TouchPad button* Functions like the left button on an external mouse. (3) TouchPad scroll zone Scrolls up or down. (4) Right TouchPad button* Functions like the ...

HP ProBook 4310s Notebook PC and HP ProBook 4311s Notebook PC - Maintenance and Service Guide
Page 102
... or restart the computer, and then press esc while the "Press the ESC key for Startup Menu" message is displayed at the bottom of the screen. ❏ To select a menu or a menu item, use the tab key and the keyboard arrow keys and then press enter, or use either a pointing device..., click the up arrow or the down arrow in the upper-right corner of the Computer Setup menu items listed in Computer Setup. 2. Turn on -screen instructions. ✎ You can use a pointing device to navigate and make selections in this chapter may not be supported by your computer. Select the File...
... or restart the computer, and then press esc while the "Press the ESC key for Startup Menu" message is displayed at the bottom of the screen. ❏ To select a menu or a menu item, use the tab key and the keyboard arrow keys and then press enter, or use either a pointing device..., click the up arrow or the down arrow in the upper-right corner of the Computer Setup menu items listed in Computer Setup. 2. Turn on -screen instructions. ✎ You can use a pointing device to navigate and make selections in this chapter may not be supported by your computer. Select the File...

HP ProBook 4310s Notebook PC and HP ProBook 4311s Notebook PC - Maintenance and Service Guide
Page 103
... then press enter. Use the tab key and the arrow keys to select File > Save changes and exit, and then press enter. Follow the on-screen instructions. 5. or - ■ To save your changes and exit Computer Setup, click the Save icon in the lower-left corner of the... screen, and then follow the on-screen instructions. - Use the arrow keys to select File > Ignore changes and exit, and then press enter. - Your changes go into effect when the computer...
... then press enter. Use the tab key and the arrow keys to select File > Save changes and exit, and then press enter. Follow the on-screen instructions. 5. or - ■ To save your changes and exit Computer Setup, click the Save icon in the lower-left corner of the... screen, and then follow the on-screen instructions. - Use the arrow keys to select File > Ignore changes and exit, and then press enter. - Your changes go into effect when the computer...

HP ProBook 4310s Notebook PC and HP ProBook 4311s Notebook PC - Maintenance and Service Guide
Page 135
... on a regular basis to maintain a reasonably current backup. Select Start > All Programs > Maintenance > Backup and Restore Center. 2. Display the screen you should create your preferences. To create a backup using them for backup reduces the number of recovery discs required. ■ When backing up ... tasks such as your most current backup. Backup and recovery Backing up your information Recovery after software setup. To copy the entire screen, press fn+prt sc. Open a word-processing document, and then select Edit > Paste. The discs you start the backup process...
... on a regular basis to maintain a reasonably current backup. Select Start > All Programs > Maintenance > Backup and Restore Center. 2. Display the screen you should create your preferences. To create a backup using them for backup reduces the number of recovery discs required. ■ When backing up ... tasks such as your most current backup. Backup and recovery Backing up your information Recovery after software setup. To copy the entire screen, press fn+prt sc. Open a word-processing document, and then select Edit > Paste. The discs you start the backup process...

HP ProBook 4310s Notebook PC and HP ProBook 4311s Notebook PC - Maintenance and Service Guide
Page 136
... If possible, check for more information. To find the partitions, select Start > Computer. ✎ If the Windows partition and the HP Recovery partition have been deleted, you must purchase a Windows Vista operating system DVD to reboot the computer and repair the operating system.... Ä CAUTION: Using Startup Repair completely erases hard drive contents and reformats the hard drive. Follow the on-screen instructions. ✎ For additional information on -screen instructions to recover your entire computer (select models only) or your files. ✎ Windows includes the User Account...
... If possible, check for more information. To find the partitions, select Start > Computer. ✎ If the Windows partition and the HP Recovery partition have been deleted, you must purchase a Windows Vista operating system DVD to reboot the computer and repair the operating system.... Ä CAUTION: Using Startup Repair completely erases hard drive contents and reformats the hard drive. Follow the on-screen instructions. ✎ For additional information on -screen instructions to recover your entire computer (select models only) or your files. ✎ Windows includes the User Account...


