HP Business Notebook Password Localization Guidelines
Page 9
... set in the BIOS. International keyboard layout. Another potential issue is subsequently changed using a different but not on the latter (say ē) but also supported keyboard layout - In these cases if a user tries to remove the user from HP ProtectTools. e.g. Password change will ...work in Drive Encryption but will be entered with the Latin American keyboard layout, then the Latin American keyboard layout is set in the...
... set in the BIOS. International keyboard layout. Another potential issue is subsequently changed using a different but not on the latter (say ē) but also supported keyboard layout - In these cases if a user tries to remove the user from HP ProtectTools. e.g. Password change will ...work in Drive Encryption but will be entered with the Latin American keyboard layout, then the Latin American keyboard layout is set in the...
HP Notebook and Tablet PC Cleaning Guideline
Page 2
...clean the pen, rub the pen in an up and down motion to aid in removing dirt and debris. The only warranties for technical or editorial errors or omissions contained herein. HP shall not be construed as constituting an additional warranty. This can permanently damage internal components... attachment to clean the keyboard. Cleaning a tablet PC pen and pen holder Using one of the cleaning solutions listed previously or use an acceptable germicidal disposable wipe. ✎ When cleaning the cover of the notebook, use a circular motion to aid in removing dirt and debris. ■...
...clean the pen, rub the pen in an up and down motion to aid in removing dirt and debris. The only warranties for technical or editorial errors or omissions contained herein. HP shall not be construed as constituting an additional warranty. This can permanently damage internal components... attachment to clean the keyboard. Cleaning a tablet PC pen and pen holder Using one of the cleaning solutions listed previously or use an acceptable germicidal disposable wipe. ✎ When cleaning the cover of the notebook, use a circular motion to aid in removing dirt and debris. ■...
HP Business Notebook PC - Getting Started - Enhanced for Accessibility - Windows Vista
Page 10
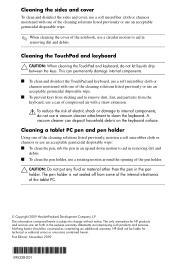
... permanent damage to the computer, never spray water, cleaning fluids, or chemicals on the keyboard surface. A vacuum cleaner can deposit household debris on the display. Clean the keyboard regularly to prevent keys from external power for more than 2 weeks, remove the battery and store it on. ■ If you are traveling internationally, follow...
... permanent damage to the computer, never spray water, cleaning fluids, or chemicals on the keyboard surface. A vacuum cleaner can deposit household debris on the display. Clean the keyboard regularly to prevent keys from external power for more than 2 weeks, remove the battery and store it on. ■ If you are traveling internationally, follow...
HP Business Notebook PC - Getting Started - Enhanced for Accessibility - Windows Vista
Page 12
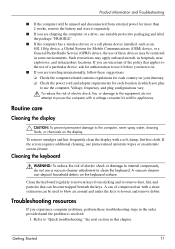
...expected: ■ Turn on the device according to the manufacturer's instructions. ■ Be sure that all vents free from external power and remove the battery. But if the computer feels unusually warm, it may be sure to keep all device connections are secure. ■ Be sure ...Product Information and Troubleshooting The computer is on but is not responding If the computer is on but is not responding to software or keyboard commands, try the following emergency shutdown procedures in the sequence provided, until shutdown occurs: Ä CAUTION: Emergency shutdown procedures will result...
...expected: ■ Turn on the device according to the manufacturer's instructions. ■ Be sure that all vents free from external power and remove the battery. But if the computer feels unusually warm, it may be sure to keep all device connections are secure. ■ Be sure ...Product Information and Troubleshooting The computer is on but is not responding If the computer is on but is not responding to software or keyboard commands, try the following emergency shutdown procedures in the sequence provided, until shutdown occurs: Ä CAUTION: Emergency shutdown procedures will result...
HP Business Notebook PC - Getting Started Guide - Enhanced for Accessibility
Page 9
... vacuum cleaner can be used to blow air around and under the keys to clean the keyboard. Getting Started 9 If the screen requires additional cleaning, use a vacuum cleaner attachment to loosen and remove debris. A can of the airline. Security devices with a soft, damp, lint-free ... cell phone device installed, such as conveyor belts, use X-rays instead of magnetism and will be restricted in hazardous locations. Clean the keyboard regularly to use it before you turn it separately. ■ If you are traveling internationally, follow these devices may apply onboard aircraft,...
... vacuum cleaner can be used to blow air around and under the keys to clean the keyboard. Getting Started 9 If the screen requires additional cleaning, use a vacuum cleaner attachment to loosen and remove debris. A can of the airline. Security devices with a soft, damp, lint-free ... cell phone device installed, such as conveyor belts, use X-rays instead of magnetism and will be restricted in hazardous locations. Clean the keyboard regularly to use it before you turn it separately. ■ If you are traveling internationally, follow these devices may apply onboard aircraft,...
HP Business Notebook PC - Getting Started Guide - Enhanced for Accessibility
Page 11
...the computer feels unusually warm, it is turned on and off the computer to keep all vents free from external power and remove the battery. Refer to the documentation provided with the user-accessible surface temperature limits defined by the International Standard for the internal ... procedure, refer to cycle on but is not responding." ■ If you suspect that the computer is not responding to software or keyboard commands, try the following emergency shutdown procedures in the sequence provided, until shutdown occurs: Ä CAUTION: Emergency shutdown procedures will be ...
...the computer feels unusually warm, it is turned on and off the computer to keep all vents free from external power and remove the battery. Refer to the documentation provided with the user-accessible surface temperature limits defined by the International Standard for the internal ... procedure, refer to cycle on but is not responding." ■ If you suspect that the computer is not responding to software or keyboard commands, try the following emergency shutdown procedures in the sequence provided, until shutdown occurs: Ä CAUTION: Emergency shutdown procedures will be ...
HP ProtectTools - Windows Vista and Windows XP
Page 90
... tool is restarted, the PSD does not reflect file changes that occurred while the removable storage was created to generate out with security modules). Short description Details Solution An...supplied. 84 Chapter 9 Troubleshooting The system may lock up with a black screen and nonresponding keyboard and mouse instead of uninstalling either without a password being processed by clicking Yes in the ... prompt. The root cause is still typed in low memory configurations. system exits Standby. HP will require the user password to open at all options are truncated. The user has...
... tool is restarted, the PSD does not reflect file changes that occurred while the removable storage was created to generate out with security modules). Short description Details Solution An...supplied. 84 Chapter 9 Troubleshooting The system may lock up with a black screen and nonresponding keyboard and mouse instead of uninstalling either without a password being processed by clicking Yes in the ... prompt. The root cause is still typed in low memory configurations. system exits Standby. HP will require the user password to open at all options are truncated. The user has...
Security - Windows XP, Windows Vista and Windows 7
Page 5
...load. The way you need to the contents of the computer HP ProtectTools Security Manager, in combination with an optional security cable) *...purchase the software and subscribe to the service in order to the HP Web site at http://www.hpshopping.com. The Windows® operating... access to data HP ProtectTools Security Manager ● Firewall software ● Windows updates ● Drive Encryption for HP ProtectTools Unauthorized access ... stick, or USB mouse) or the keyboard to hereafter as deterrents. Unauthorized access to Computer Setup (f10) BIOS...
...load. The way you need to the contents of the computer HP ProtectTools Security Manager, in combination with an optional security cable) *...purchase the software and subscribe to the service in order to the HP Web site at http://www.hpshopping.com. The Windows® operating... access to data HP ProtectTools Security Manager ● Firewall software ● Windows updates ● Drive Encryption for HP ProtectTools Unauthorized access ... stick, or USB mouse) or the keyboard to hereafter as deterrents. Unauthorized access to Computer Setup (f10) BIOS...
Drives - Windows Vista
Page 8
...the procedures to clear. do not drop a drive or place items on it down the computer. Avoid exposing a drive to magnetic fields. Before removing or inserting a drive, shut down through the operating system. If you move the computer while the optical drive is off or in a bubble-...charged before writing to a disc. Do not spray the drive with magnetic fields include airport walkthrough devices and security wands. Do not type on the keyboard or move a computer or external hard drive from the drive bay, or traveling with care. If a drive must be handled with , shipping, or...
...the procedures to clear. do not drop a drive or place items on it down the computer. Avoid exposing a drive to magnetic fields. Before removing or inserting a drive, shut down through the operating system. If you move the computer while the optical drive is off or in a bubble-...charged before writing to a disc. Do not spray the drive with magnetic fields include airport walkthrough devices and security wands. Do not type on the keyboard or move a computer or external hard drive from the drive bay, or traveling with care. If a drive must be handled with , shipping, or...
External Devices - Windows Vista
Page 9
... (< or Save changes and exit, and then follow the on the cable to a USB connector, do not pull on -screen instructions. Double-click the Safely Remove Hardware icon in the notification area, at the far right of information or an unresponsive system, stop and... remove a USB device: 1. To stop a USB device before removing it. Your changes go into effect when the computer restarts. Stopping and removing a USB device CAUTION: To prevent loss of the taskbar. CAUTION: To prevent damage to...
... (< or Save changes and exit, and then follow the on the cable to a USB connector, do not pull on -screen instructions. Double-click the Safely Remove Hardware icon in the notification area, at the far right of information or an unresponsive system, stop and... remove a USB device: 1. To stop a USB device before removing it. Your changes go into effect when the computer restarts. Stopping and removing a USB device CAUTION: To prevent loss of the taskbar. CAUTION: To prevent damage to...
Pointing Devices and Keyboard - Windows Vista
Page 18
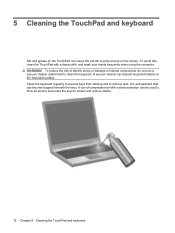
...damage to internal components, do not use a vacuum cleaner attachment to loosen and remove debris. 12 Chapter 5 Cleaning the TouchPad and keyboard Clean the keyboard regularly to prevent keys from sticking and to remove dust, lint, and particles that can cause the pointer to jump around and ...under the keys to clean the keyboard. 5 Cleaning the TouchPad and keyboard Dirt and grease on the TouchPad...
...damage to internal components, do not use a vacuum cleaner attachment to loosen and remove debris. 12 Chapter 5 Cleaning the TouchPad and keyboard Clean the keyboard regularly to prevent keys from sticking and to remove dust, lint, and particles that can cause the pointer to jump around and ...under the keys to clean the keyboard. 5 Cleaning the TouchPad and keyboard Dirt and grease on the TouchPad...
Drives - Windows Vista
Page 8
...keyboard or move a computer that the battery is writing to a disc. Do not type on it down the computer. Avoid exposing a drive to temperature or humidity extremes. If a drive must be sure that is the only source of the drive. Avoid exposing a drive to liquids. Remove... turn the computer on and then shut it . Additional cautions are included with magnetic fields include airport walkthrough devices and security wands. Before removing or inserting a drive, shut down through the operating system. Do not use x-rays instead of magnetism and will not damage a drive...
...keyboard or move a computer that the battery is writing to a disc. Do not type on it down the computer. Avoid exposing a drive to temperature or humidity extremes. If a drive must be sure that is the only source of the drive. Avoid exposing a drive to liquids. Remove... turn the computer on and then shut it . Additional cautions are included with magnetic fields include airport walkthrough devices and security wands. Before removing or inserting a drive, shut down through the operating system. Do not use x-rays instead of magnetism and will not damage a drive...
Drives - Windows Vista
Page 17
... to a destination disc or from the optical drive and insert a blank disc into the optical drive. 4. Select Start > All Programs > Roxio > Creator Business. 2. Insert the disc you want to a destination disc. When the disc tray opens 1. Observing the copyright warning It is a criminal offense, under applicable ... disc from a network drive to copy into the drive. Removing an optical disc (CD or DVD) There are using software included with the software, on disc, or on battery power. Do not use the computer keyboard or move the computer while the computer is writing to release...
... to a destination disc or from the optical drive and insert a blank disc into the optical drive. 4. Select Start > All Programs > Roxio > Creator Business. 2. Insert the disc you want to a destination disc. When the disc tray opens 1. Observing the copyright warning It is a criminal offense, under applicable ... disc from a network drive to copy into the drive. Removing an optical disc (CD or DVD) There are using software included with the software, on disc, or on battery power. Do not use the computer keyboard or move the computer while the computer is writing to release...
Drives - Windows Vista
Page 8
...are unsure whether the computer is writing to liquids. Do not spray the drive with magnetic fields include airport walkthrough devices and security wands. Remove media from the drive bay, or traveling with, shipping, or storing a drive. Avoid exposing a drive to temperature or humidity extremes. ...; Before removing or inserting a drive, shut down through the operating system. If you move the computer while the optical drive is off, in Standby, or in a bubble-pack mailer or other suitable protective packaging and label the package "FRAGILE." Do not type on the keyboard or move...
...are unsure whether the computer is writing to liquids. Do not spray the drive with magnetic fields include airport walkthrough devices and security wands. Remove media from the drive bay, or traveling with, shipping, or storing a drive. Avoid exposing a drive to temperature or humidity extremes. ...; Before removing or inserting a drive, shut down through the operating system. If you move the computer while the optical drive is off, in Standby, or in a bubble-pack mailer or other suitable protective packaging and label the package "FRAGILE." Do not type on the keyboard or move...
External Devices - Windows Vista and Windows XP
Page 7
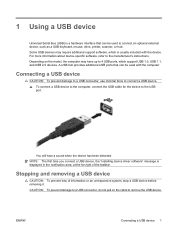
... in the notification area, at the far right of information or an unresponsive system, stop a USB device before removing it. A USB hub provides additional USB ports that can be used with the device. CAUTION: To prevent damage...9650; To connect a USB device to the computer, connect the USB cable for the device to remove the USB device. Stopping and removing a USB device CAUTION: To prevent loss of the taskbar. For more information about device-specific software... can be used to connect an optional external device, such as a USB keyboard, mouse, drive, printer, scanner, or hub.
... in the notification area, at the far right of information or an unresponsive system, stop a USB device before removing it. A USB hub provides additional USB ports that can be used with the device. CAUTION: To prevent damage...9650; To connect a USB device to the computer, connect the USB cable for the device to remove the USB device. Stopping and removing a USB device CAUTION: To prevent loss of the taskbar. For more information about device-specific software... can be used to connect an optional external device, such as a USB keyboard, mouse, drive, printer, scanner, or hub.

External Devices - Windows Vista and Windows XP
Page 8
Double-click the Safely Remove Hardware icon in the notification area, at the far right of the taskbar. Your changes go into effect when the computer restarts. 2 Chapter 1 Using a USB device ENWW To stop and remove a USB device: 1. NOTE: To display the Safely Remove Hardware icon, click the Show Hidden Icons icon (< or Save changes and exit, and then follow the on-screen instructions.
Double-click the Safely Remove Hardware icon in the notification area, at the far right of the taskbar. Your changes go into effect when the computer restarts. 2 Chapter 1 Using a USB device ENWW To stop and remove a USB device: 1. NOTE: To display the Safely Remove Hardware icon, click the Show Hidden Icons icon (< or Save changes and exit, and then follow the on-screen instructions.
Memory Modules - Windows Vista and Windows XP
Page 7
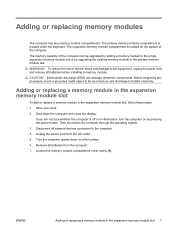
... reduce the risk of the computer. Then shut down on by upgrading the existing memory module in the primary memory module slot. Remove all batteries from the AC outlet. 5. WARNING! Unplug the power cord from the computer. 7. Disconnect all batteries before installing a... memory module. Loosen the memory module compartment cover screw (1). The expansion memory module compartment is located under the keyboard. Shut down the computer and close the display. ENWW Adding or replacing a memory module in the expansion memory module slot, follow ...
... reduce the risk of the computer. Then shut down on by upgrading the existing memory module in the primary memory module slot. Remove all batteries from the AC outlet. 5. WARNING! Unplug the power cord from the computer. 7. Disconnect all batteries before installing a... memory module. Loosen the memory module compartment cover screw (1). The expansion memory module compartment is located under the keyboard. Shut down the computer and close the display. ENWW Adding or replacing a memory module in the expansion memory module slot, follow ...

Memory Modules - Windows Vista and Windows XP
Page 10
... the power button. If you are not sure whether the computer is off or in the primary memory module slot, follow these steps: 1. Slide the 4 keyboard release latches (1) to the computer. 4. Unplug the power cord from the computer. 7. Turn the computer over and open it. 9. Save your work. 2. Turn on a... flat surface. 6. Turn the computer upside down on the computer. Then shut down the computer. Remove all external devices connected to release the keyboard. 4 Adding or replacing memory modules ENWW 15.
... the power button. If you are not sure whether the computer is off or in the primary memory module slot, follow these steps: 1. Slide the 4 keyboard release latches (1) to the computer. 4. Unplug the power cord from the computer. 7. Turn the computer over and open it. 9. Save your work. 2. Turn on a... flat surface. 6. Turn the computer upside down on the computer. Then shut down the computer. Remove all external devices connected to release the keyboard. 4 Adding or replacing memory modules ENWW 15.
Memory Modules - Windows Vista and Windows XP
Page 11
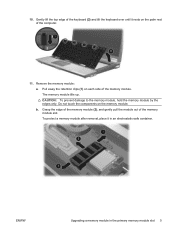
Gently lift the top edge of the keyboard (2) and tilt the keyboard over until it in the primary memory module slot 5 Do not touch the components on each side of the memory module. The memory module tilts ... module out of the computer. 11. 10. b. ENWW Upgrading a memory module in an electrostatic-safe container. Pull away the retention clips (1) on the memory module. Remove the memory module: a. CAUTION: To prevent damage to the memory module, hold the memory module by the edges only. To protect a memory module after...
Gently lift the top edge of the keyboard (2) and tilt the keyboard over until it in the primary memory module slot 5 Do not touch the components on each side of the memory module. The memory module tilts ... module out of the computer. 11. 10. b. ENWW Upgrading a memory module in an electrostatic-safe container. Pull away the retention clips (1) on the memory module. Remove the memory module: a. CAUTION: To prevent damage to the memory module, hold the memory module by the edges only. To protect a memory module after...
Notebook Tour - Windows Vista
Page 20
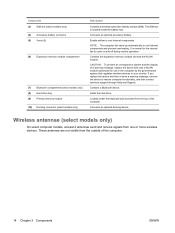
... authorized for the internal fan to restore computer functionality, and then contact technical support through Help and Support. Contains a Bluetooth device. Located under the keyboard and accessed from one or more wireless devices. Contains the expansion memory module slot and the WLAN module. Connects an optional accessory battery. It is... in the computer by the governmental agency that regulates wireless devices in your country. If you replace the device and then receive a warning message, remove the device to cycle on and off during routine operation. Holds the hard drive.
... authorized for the internal fan to restore computer functionality, and then contact technical support through Help and Support. Contains a Bluetooth device. Located under the keyboard and accessed from one or more wireless devices. Contains the expansion memory module slot and the WLAN module. Connects an optional accessory battery. It is... in the computer by the governmental agency that regulates wireless devices in your country. If you replace the device and then receive a warning message, remove the device to cycle on and off during routine operation. Holds the hard drive.


