
Setup Guide
Page 1
... Contents Installation CD Power Cable Basics Guide Color Cartridges Printhead 4 X 6 photo paper* 3 Remove packaging 5a Install the printhead a. b. While the initialization process continues, proceed to the next step to the left. Start Here HP Photosmart D5400 series 1 Do not connect the.... Carriage latch b. Twist the orange cap to load paper. Colored icons c. Remove the printhead from the display. Do not touch the copper colored contacts. b. Press to turn on the printer or other surface. The initialization process begins, which takes about ...
... Contents Installation CD Power Cable Basics Guide Color Cartridges Printhead 4 X 6 photo paper* 3 Remove packaging 5a Install the printhead a. b. While the initialization process continues, proceed to the next step to the left. Start Here HP Photosmart D5400 series 1 Do not connect the.... Carriage latch b. Twist the orange cap to load paper. Colored icons c. Remove the printhead from the display. Do not touch the copper colored contacts. b. Press to turn on the printer or other surface. The initialization process begins, which takes about ...

Setup Guide
Page 2
... a non-powered USB hub. Complete the Setup Assistant screen. c. English Printed in [country] - Windows: The HP Solution Center provides convenient access to many features of the HP device, and then to the port on the computer. HP Photosmart Pro HP PhotosmBa88rt0P0roserBie8s800 Series TTuuttQooQrruiiuaiacicllkkiinnSSccttallauurrddtt eedd Product in again. b. Insert the CD and follow the onscreen instructions...
... a non-powered USB hub. Complete the Setup Assistant screen. c. English Printed in [country] - Windows: The HP Solution Center provides convenient access to many features of the HP device, and then to the port on the computer. HP Photosmart Pro HP PhotosmBa88rt0P0roserBie8s800 Series TTuuttQooQrruiiuaiacicllkkiinnSSccttallauurrddtt eedd Product in again. b. Insert the CD and follow the onscreen instructions...

Basics Guide
Page 3
Contents Contents 1 HP Photosmart overview The HP Photosmart at a glance 2 Control panel features...3 Find more information...4 Load paper...4 Avoid paper jams...7 Print directly onto a CD/DVD...7 Print a photo on photo paper...9 Replace the ...
Contents Contents 1 HP Photosmart overview The HP Photosmart at a glance 2 Control panel features...3 Find more information...4 Load paper...4 Avoid paper jams...7 Print directly onto a CD/DVD...7 Print a photo on photo paper...9 Replace the ...

Basics Guide
Page 4
...Help details the full range of features and functions, including use of specially coated CDs and DVDs. The HP Photosmart at a glance Overview Label 1 2 3 4 5 6 7 8 9 10 11 12 Description Color graphics display (also referred to as the display) Control panel Memory card slots and Photo light Front USB ...holder Main input tray (also referred to print photos from the control panel, without turning on the surface of the HP Photosmart Software that came with the HP Photosmart. NOTE: This guide introduces basic operations and troubleshooting, as well as the input tray) Photo tray CD/DVD ...
...Help details the full range of features and functions, including use of specially coated CDs and DVDs. The HP Photosmart at a glance Overview Label 1 2 3 4 5 6 7 8 9 10 11 12 Description Color graphics display (also referred to as the display) Control panel Memory card slots and Photo light Front USB ...holder Main input tray (also referred to print photos from the control panel, without turning on the surface of the HP Photosmart Software that came with the HP Photosmart. NOTE: This guide introduces basic operations and troubleshooting, as well as the input tray) Photo tray CD/DVD ...

Basics Guide
Page 5
...) Label 13 14 15 Description Rear door Rear USB port Power connection* * Use only with the power adapter supplied by HP. Overview Label 1 2 3 Icon 4 5 6 7 8 9 Name and Description Color graphics display (also referred to the previous display screen or photo on when a memory card is still used. This feature turns...or photo on your memory card. OK: Selects a photo for more information. Right arrow: The right arrow button advances to the HP Photosmart control panel features. Cancel: Stops the current operation and returns to the main screen. Control panel features 3
...) Label 13 14 15 Description Rear door Rear USB port Power connection* * Use only with the power adapter supplied by HP. Overview Label 1 2 3 Icon 4 5 6 7 8 9 Name and Description Color graphics display (also referred to the previous display screen or photo on when a memory card is still used. This feature turns...or photo on your memory card. OK: Selects a photo for more information. Right arrow: The right arrow button advances to the HP Photosmart control panel features. Cancel: Stops the current operation and returns to the main screen. Control panel features 3
Basics Guide
Page 6
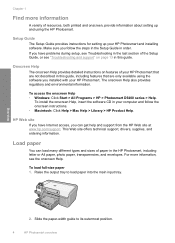
...-width guide to load paper into the main input tray. Chapter 1 Find more information, see "Troubleshooting and support" on features of your HP Photosmart that are not described in the HP Photosmart, including letter or A4 paper, photo paper, transparencies, and envelopes. Load paper You can get help and support from the...during setup, see Troubleshooting in the last section of paper in this guide. To install the onscreen Help, insert the software CD in your HP Photosmart. HP Web site If you can load many different types and sizes of the Setup Guide, or see the onscreen Help.
...-width guide to load paper into the main input tray. Chapter 1 Find more information, see "Troubleshooting and support" on features of your HP Photosmart that are not described in the HP Photosmart, including letter or A4 paper, photo paper, transparencies, and envelopes. Load paper You can get help and support from the...during setup, see Troubleshooting in the last section of paper in this guide. To install the onscreen Help, insert the software CD in your HP Photosmart. HP Web site If you can load many different types and sizes of the Setup Guide, or see the onscreen Help.

Basics Guide
Page 8
... legal-size paper, leave the tray extender closed. Raise the photo tray lid to its outermost position. Insert the stack of the paper-width guide. 6 HP Photosmart overview Slide the paper-width guide to load photo paper in the photo tray 1. Slide the paper-width guide inward until it stops at the...
... legal-size paper, leave the tray extender closed. Raise the photo tray lid to its outermost position. Insert the stack of the paper-width guide. 6 HP Photosmart overview Slide the paper-width guide to load photo paper in the photo tray 1. Slide the paper-width guide inward until it stops at the...

Basics Guide
Page 9
... flat in a resealable bag. • Ensure that paper loaded in the input tray. • Use paper types that came with the product. Labels on an inkjet printable CD/DVD. 2. When prompted, carefully remove the CD/DVD holder that are no more than two years old. 5. Make sure the paper-width guide... in the input tray lays flat and the edges are not bent or torn. • If you are printing labels, ensure that came with the HP Photosmart. Print directly onto a CD/DVD You can then print the label directly onto your CD or DVD using the software that the label sheets are...
... flat in a resealable bag. • Ensure that paper loaded in the input tray. • Use paper types that came with the product. Labels on an inkjet printable CD/DVD. 2. When prompted, carefully remove the CD/DVD holder that are no more than two years old. 5. Make sure the paper-width guide... in the input tray lays flat and the edges are not bent or torn. • If you are printing labels, ensure that came with the HP Photosmart. Print directly onto a CD/DVD You can then print the label directly onto your CD or DVD using the software that the label sheets are...

Basics Guide
Page 10
When in its lowered position, the CD/DVD tray sits on the ring at the end of the output tray. Lower the CD/DVD access door to access the CD/DVD tray. Securely snap the inkjet printable media onto the CD/DVD holder with the arrows. The CD/DVD should you are using a smaller-sized media, only then should be placed on top of the holder with the printable side up. Overview 8 HP Photosmart overview NOTE: If you flip the CD/ DVD holder ring over the CD/DVD. 4. Chapter 1 3. The CD/DVD access door is located just below the control panel.
When in its lowered position, the CD/DVD tray sits on the ring at the end of the output tray. Lower the CD/DVD access door to access the CD/DVD tray. Securely snap the inkjet printable media onto the CD/DVD holder with the arrows. The CD/DVD should you are using a smaller-sized media, only then should be placed on top of the holder with the printable side up. Overview 8 HP Photosmart overview NOTE: If you flip the CD/ DVD holder ring over the CD/DVD. 4. Chapter 1 3. The CD/DVD access door is located just below the control panel.

Basics Guide
Page 12
... setting up to print. If you follow the prompts to print appears. 4. To replace the ink cartridges 1. Insert a memory card into place. 10 HP Photosmart overview Load up the product for the first time, make sure you do not already have a new ink cartridge available before removing the old ink... you have replacement ink cartridges for an extended period of the product, until the photo you want to print, you need to www.hp.com/buy/supplies. Do not leave the ink cartridge outside of the product for the HP Photosmart, to order cartridges, go to replace ink cartridges.
... setting up to print. If you follow the prompts to print appears. 4. To replace the ink cartridges 1. Insert a memory card into place. 10 HP Photosmart overview Load up the product for the first time, make sure you do not already have a new ink cartridge available before removing the old ink... you have replacement ink cartridges for an extended period of the product, until the photo you want to print, you need to www.hp.com/buy/supplies. Do not leave the ink cartridge outside of the product for the HP Photosmart, to order cartridges, go to replace ink cartridges.

Basics Guide
Page 14
... the latch handle on the print carriage to correctly install the ink cartridges. Overview 12 HP Photosmart overview Using the colored shaped icons for each ink cartridge you are replacing. 8. Make sure that has the same shaped icon and color as the one you are installing. 7. Close the ink cartridge access door. Repeat steps...
... the latch handle on the print carriage to correctly install the ink cartridges. Overview 12 HP Photosmart overview Using the colored shaped icons for each ink cartridge you are replacing. 8. Make sure that has the same shaped icon and color as the one you are installing. 7. Close the ink cartridge access door. Repeat steps...

Basics Guide
Page 15
...it . 5. If you connected the HP Photosmart to your computer before the HP Photosmart software is installed on the CD-ROM drive and double-click it. Reinstall the HP Photosmart software. To uninstall and reinstall the software 1. Select HP Photosmart All-In-One Driver Software, and ... Control Panel). 2. NOTE: It is provided for the HP Photosmart. Many issues are caused when the HP Photosmart is complete, the HP Digital Imaging Monitor icon appears in the Setup Guide that came with the HP Photosmart. Troubleshooting and support Uninstall and reinstall the software 13 Uninstall...
...it . 5. If you connected the HP Photosmart to your computer before the HP Photosmart software is installed on the CD-ROM drive and double-click it. Reinstall the HP Photosmart software. To uninstall and reinstall the software 1. Select HP Photosmart All-In-One Driver Software, and ... Control Panel). 2. NOTE: It is provided for the HP Photosmart. Many issues are caused when the HP Photosmart is complete, the HP Digital Imaging Monitor icon appears in the Setup Guide that came with the HP Photosmart. Troubleshooting and support Uninstall and reinstall the software 13 Uninstall...
Basics Guide
Page 16
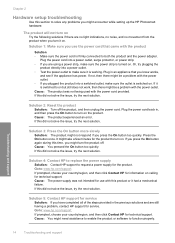
... Solution: The product might not respond if you turn on the product. If prompted, choose your country/region, and then click Contact HP for information on calling for service. Or, try the next solution. Cause: The product experienced an error. Troubleshooting and support 14 Troubleshooting...support Cause: You pressed the On button too quickly. If it is switched to solve any problems you might encounter while setting up the HP Photosmart hardware. Solution 2: Reset the product Solution: Turn off . The product will not turn on Try the following solutions if there are still ...
... Solution: The product might not respond if you turn on the product. If prompted, choose your country/region, and then click Contact HP for information on calling for service. Or, try the next solution. Cause: The product experienced an error. Troubleshooting and support 14 Troubleshooting...support Cause: You pressed the On button too quickly. If it is switched to solve any problems you might encounter while setting up the HP Photosmart hardware. Solution 2: Reset the product Solution: Turn off . The product will not turn on Try the following solutions if there are still ...

Basics Guide
Page 18
... from the product, more paper jams are removing it away from the rear door 1. Gently pull the paper out of the holder marked with the HP Photosmart. Replace the rear door. Gently push the door forward until the lines on CD/DVD surfaces with arrows goes into place. 4. Chapter 2 To clear a paper...
... from the product, more paper jams are removing it away from the rear door 1. Gently pull the paper out of the holder marked with the HP Photosmart. Replace the rear door. Gently push the door forward until the lines on CD/DVD surfaces with arrows goes into place. 4. Chapter 2 To clear a paper...

Basics Guide
Page 23
... high electromagnetic fields, it is assigned a Regulatory Model Number. The Regulatory Model Number for the HP Photosmart are located in length to minimize injected noise due to 20 NOTE: For a complete list of regulatory notices, see the printer software. 3 Technical information The technical specifications and international regulatory information for your product is SDGOB...
... high electromagnetic fields, it is assigned a Regulatory Model Number. The Regulatory Model Number for the HP Photosmart are located in length to minimize injected noise due to 20 NOTE: For a complete list of regulatory notices, see the printer software. 3 Technical information The technical specifications and international regulatory information for your product is SDGOB...

User Guide
Page 2
Contents Contents 1 HP Photosmart D5400 Printer series Help 3 2 HP Photosmart overview The HP Photosmart at a glance 5 Control panel features...6 Use the HP Photosmart Software 7 3 Find more information...9 4 Computer connection information Supported connection types...11 Use printer sharing...11 5 How do I?...13 6 Load paper Choose papers for printing...25 Avoid paper jams...29 7 Print from your computer Print from a software application 31 Make the HP Photosmart the default printer 32 Change the print settings for the current job 32 Change the default print settings 36 Printing ...
Contents Contents 1 HP Photosmart D5400 Printer series Help 3 2 HP Photosmart overview The HP Photosmart at a glance 5 Control panel features...6 Use the HP Photosmart Software 7 3 Find more information...9 4 Computer connection information Supported connection types...11 Use printer sharing...11 5 How do I?...13 6 Load paper Choose papers for printing...25 Avoid paper jams...29 7 Print from your computer Print from a software application 31 Make the HP Photosmart the default printer 32 Change the print settings for the current job 32 Change the default print settings 36 Printing ...

User Guide
Page 3
......203 Ink cartridge warranty information 203 Support process...204 Before you call HP support...204 HP support by phone...205 Additional warranty options...205 HP Quick Exchange Service (Japan 206 HP Korea customer support 206 Prepare the product for shipment 207 Pack the HP Photosmart...208 13 Technical information Specifications...209 Environmental product stewardship program 210...
......203 Ink cartridge warranty information 203 Support process...204 Before you call HP support...204 HP support by phone...205 Additional warranty options...205 HP Quick Exchange Service (Japan 206 HP Korea customer support 206 Prepare the product for shipment 207 Pack the HP Photosmart...208 13 Technical information Specifications...209 Environmental product stewardship program 210...

User Guide
Page 4
1 HP Photosmart D5400 Printer series Help For information about the HP Photosmart, see: • "HP Photosmart overview" on page 5 • "Find more information" on page 9 • "Computer connection information" on page 209 HP Photosmart D5400 Printer series Help HP Photosmart D5400 Printer series Help 3 on page 13 • "Load paper" on page 15 • "Print from your computer" on page 31 • "Use the...
1 HP Photosmart D5400 Printer series Help For information about the HP Photosmart, see: • "HP Photosmart overview" on page 5 • "Find more information" on page 9 • "Computer connection information" on page 209 HP Photosmart D5400 Printer series Help HP Photosmart D5400 Printer series Help 3 on page 13 • "Load paper" on page 15 • "Print from your computer" on page 31 • "Use the...

User Guide
Page 6
This section contains the following topics: • The HP Photosmart at a glance • Control panel features • Use the HP Photosmart Software The HP Photosmart at a glance Overview Label 1 2 3 4 5 6 7 8 9 10 11 12 Description Color graphics display (also referred to as the display) Control panel Memory card slots... the surface of specially coated CDs and DVDs. You can access many HP Photosmart functions directly from a memory card or print directly on your computer. 2 HP Photosmart overview Use the HP Photosmart to as the input tray) Photo tray CD/DVD tray Ink cartridge access...
This section contains the following topics: • The HP Photosmart at a glance • Control panel features • Use the HP Photosmart Software The HP Photosmart at a glance Overview Label 1 2 3 4 5 6 7 8 9 10 11 12 Description Color graphics display (also referred to as the display) Control panel Memory card slots... the surface of specially coated CDs and DVDs. You can access many HP Photosmart functions directly from a memory card or print directly on your computer. 2 HP Photosmart overview Use the HP Photosmart to as the input tray) Photo tray CD/DVD tray Ink cartridge access...

User Guide
Page 7
... and error messages. Print Photos: Prints the photos selected on or off. Cancel: Stops the current operation and returns to the HP Photosmart control panel features. On: Turns the product on your memory card. Control panel features The following diagram and related table provide ...off , a minimal amount of power is off the product, and then unplug the power cord. 6 HP Photosmart overview OK: Selects a photo for more information. The product automatically corrects red-eye coloring in the photo currently shown on a memory card. Chapter 2 (continued) Label 13 14 15 Description...
... and error messages. Print Photos: Prints the photos selected on or off. Cancel: Stops the current operation and returns to the HP Photosmart control panel features. On: Turns the product on your memory card. Control panel features The following diagram and related table provide ...off , a minimal amount of power is off the product, and then unplug the power cord. 6 HP Photosmart overview OK: Selects a photo for more information. The product automatically corrects red-eye coloring in the photo currently shown on a memory card. Chapter 2 (continued) Label 13 14 15 Description...


