
Notebook PC User Guide - Windows 7
Page 8
... Removing a CD, DVD, or BD 64 Using external drives ...65 Improving hard drive performance ...66 Using Disk Defragmenter 66 Using Disk Cleanup ...66 Using HP ProtectSmart Hard Drive Protection 67 Identifying HP ProtectSmart Hard Drive Protection status 67 Managing power with a parked hard drive 67 Using HP ProtectSmart Hard Drive Protection software 68 Replacing a drive in the hard drive bay 69 8 External devices Using a USB device ...72...
... Removing a CD, DVD, or BD 64 Using external drives ...65 Improving hard drive performance ...66 Using Disk Defragmenter 66 Using Disk Cleanup ...66 Using HP ProtectSmart Hard Drive Protection 67 Identifying HP ProtectSmart Hard Drive Protection status 67 Managing power with a parked hard drive 67 Using HP ProtectSmart Hard Drive Protection software 68 Replacing a drive in the hard drive bay 69 8 External devices Using a USB device ...72...

Notebook PC User Guide - Windows 7
Page 20
... overheating. Connects an external VGA monitor or projector. Connects an optional USB device. Connects an optional video or audio device, such as an eSATA external hard drive, or connects an optional USB device. Supports the following optional digital card formats: ● Secure Digital (SD) Memory Card ● MultiMediaCard (MMC) ● Memory Stick...
... overheating. Connects an external VGA monitor or projector. Connects an optional USB device. Connects an optional video or audio device, such as an eSATA external hard drive, or connects an optional USB device. Supports the following optional digital card formats: ● Secure Digital (SD) Memory Card ● MultiMediaCard (MMC) ● Memory Stick...

Notebook PC User Guide - Windows 7
Page 21
It is normal for use by the governmental agency that regulates wireless devices in your country or region. Holds the hard drive, the memory module slots, and the WLAN module. NOTE: The computer fan starts up automatically to restore computer functionality, and then contact technical support through ... cool internal components. Components 11 Enable airflow to cycle on and off during routine operation. Bottom components Item Description 1 Battery bay 2 Vents (6) 3 Battery Release latch 4 Hard Drive bay Function Holds the battery.
It is normal for use by the governmental agency that regulates wireless devices in your country or region. Holds the hard drive, the memory module slots, and the WLAN module. NOTE: The computer fan starts up automatically to restore computer functionality, and then contact technical support through ... cool internal components. Components 11 Enable airflow to cycle on and off during routine operation. Bottom components Item Description 1 Battery bay 2 Vents (6) 3 Battery Release latch 4 Hard Drive bay Function Holds the battery.

Notebook PC User Guide - Windows 7
Page 53
... is in the Sleep state or in Hibernation. NOTE: You cannot initiate any computer functions while the computer is saved to a hibernation file on the hard drive and the computer turns off. Power settings and timeouts are changed using Power Options in the Sleep state, the computer initiates Hibernation. If the computer...
... is in the Sleep state or in Hibernation. NOTE: You cannot initiate any computer functions while the computer is saved to a hibernation file on the hard drive and the computer turns off. Power settings and timeouts are changed using Power Options in the Sleep state, the computer initiates Hibernation. If the computer...

Notebook PC User Guide - Windows 7
Page 63
... power To conserve battery power: ● Select Start > Control Panel > System and Security > Power Options > Power Saver power plan. ● Shut down automatically. ◦ The hard drive speed does not decrease automatically when the computer is fully recharged. Recharge the battery. Connect the computer to Hibernate after calibration might result in the...
... power To conserve battery power: ● Select Start > Control Panel > System and Security > Power Options > Power Saver power plan. ● Shut down automatically. ◦ The hard drive speed does not decrease automatically when the computer is fully recharged. Recharge the battery. Connect the computer to Hibernate after calibration might result in the...

Notebook PC User Guide - Windows 7
Page 67
...drive. Handle a drive carefully. Avoid exposing a drive to vibration. Do not touch the connector pins on a removable drive or on the keyboard or move the computer while the optical drive is writing to clear, or properly disconnect the external hard drive. The write process is connected to an external hard drive..., initiate Sleep and allow the screen to a disc. Do not spray the drive with magnetic fields include airport...
...drive. Handle a drive carefully. Avoid exposing a drive to vibration. Do not touch the connector pins on a removable drive or on the keyboard or move the computer while the optical drive is writing to clear, or properly disconnect the external hard drive. The write process is connected to an external hard drive..., initiate Sleep and allow the screen to a disc. Do not spray the drive with magnetic fields include airport...

Notebook PC User Guide - Windows 7
Page 69
...video players. Typical uses include: ● Developing and maintaining large documents and project files ● Transporting work files ● Making weekly backups of hard drive files ● Updating photos, video, audio, and data continuously DVD±R discs Use DVD±R discs to the outside of a CD) to... store large projects that you saved earlier. LightScribe DVD+R discs Use LightScribe DVD+R discs for your hard drive to free up disk space CD-RW discs Use CD-RW discs (a rewritable version of the disc. These discs are convenient for sharing and...
...video players. Typical uses include: ● Developing and maintaining large documents and project files ● Transporting work files ● Making weekly backups of hard drive files ● Updating photos, video, audio, and data continuously DVD±R discs Use DVD±R discs to the outside of a CD) to... store large projects that you saved earlier. LightScribe DVD+R discs Use LightScribe DVD+R discs for your hard drive to free up disk space CD-RW discs Use CD-RW discs (a rewritable version of the disc. These discs are convenient for sharing and...

Notebook PC User Guide - Windows 7
Page 72
... destination disc. Insert the disc you are using software included with the computer, refer to copy into the drive. When prompted, remove the source disc from the hard drive to a reliable external power source. Before writing to a disc, close all open programs except the disc ... Do not write to a temporary folder on the hard drive. 4. After the information is running on the manufacturer's Web site. Save the information to the hard drive, and then burn from the optical drive, and then insert a blank disc into the optical drive. 3. CAUTION: To prevent loss of the screen...
... destination disc. Insert the disc you are using software included with the computer, refer to copy into the drive. When prompted, remove the source disc from the hard drive to a reliable external power source. Before writing to a disc, close all open programs except the disc ... Do not write to a temporary folder on the hard drive. 4. After the information is running on the manufacturer's Web site. Save the information to the hard drive, and then burn from the optical drive, and then insert a blank disc into the optical drive. 3. CAUTION: To prevent loss of the screen...

Notebook PC User Guide - Windows 7
Page 73
... data, video, and audio files, including MP3 and WAV music files. If the computer includes a CD-RW, DVD-RW, or DVD±RW optical drive, use software such as Windows Media Player or CyberLink Power2Go to create-data, audio, or video. 5. Right-click Start, click Open Windows Explorer, and... the process for creating an MP3 disc is copied, it cannot be located in home systems do not play on MP3 players or on the hard drive. 2. For specific instructions, refer to the folder where the source files are stored. 6. NOTE: An audio DVD cannot be changed . Select Start > All ...
... data, video, and audio files, including MP3 and WAV music files. If the computer includes a CD-RW, DVD-RW, or DVD±RW optical drive, use software such as Windows Media Player or CyberLink Power2Go to create-data, audio, or video. 5. Right-click Start, click Open Windows Explorer, and... the process for creating an MP3 disc is copied, it cannot be located in home systems do not play on MP3 players or on the hard drive. 2. For specific instructions, refer to the folder where the source files are stored. 6. NOTE: An audio DVD cannot be changed . Select Start > All ...

Notebook PC User Guide - Windows 7
Page 75
... ports on an optional docking device or optional expansion product. USB drives include: ● 1.44-megabyte diskette drive ● Hard drive module (a hard drive with an adapter attached) ● DVD-ROM Drive ● DVD/CD-RW Combo Drive ● DVD±RW and CD-RW Combo Drive For more information about required software and drivers or to learn which...
... ports on an optional docking device or optional expansion product. USB drives include: ● 1.44-megabyte diskette drive ● Hard drive module (a hard drive with an adapter attached) ● DVD-ROM Drive ● DVD/CD-RW Combo Drive ● DVD±RW and CD-RW Combo Drive For more information about required software and drivers or to learn which...
Notebook PC User Guide - Windows 7
Page 76
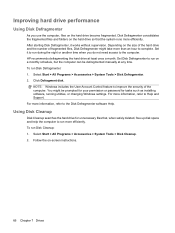
.... Select Start > All Programs > Accessories > System Tools > Disk Defragmenter. 2. HP recommends defragmenting the hard drive at any time. To run Disk Cleanup: 1. Depending on the hard drive become fragmented. Improving hard drive performance Using Disk Defragmenter As you do not need access to the computer. For more... information, refer to run during the night or another time when you use the computer, files on the size of the hard drive and the number of the computer. Select Start > All Programs > Accessories > System Tools > Disk Cleanup. 2. Disk Defragmenter ...
.... Select Start > All Programs > Accessories > System Tools > Disk Defragmenter. 2. HP recommends defragmenting the hard drive at any time. To run Disk Cleanup: 1. Depending on the hard drive become fragmented. Improving hard drive performance Using Disk Defragmenter As you do not need access to the computer. For more... information, refer to run during the night or another time when you use the computer, files on the size of the hard drive and the number of the computer. Select Start > All Programs > Accessories > System Tools > Disk Cleanup. 2. Disk Defragmenter ...

Notebook PC User Guide - Windows 7
Page 77
... Center might not show the most up-to the HP ProtectSmart Hard Drive Protection software Help. Select Start > Control Panel > Hardware and Sound > HP ProtectSmart Hard Drive Protection. NOTE: If the computer is running on battery power. Using HP ProtectSmart Hard Drive Protection HP ProtectSmart Hard Drive Protection protects the hard drive by parking the drive and halting I/O requests under one of the following conditions...
... Center might not show the most up-to the HP ProtectSmart Hard Drive Protection software Help. Select Start > Control Panel > Hardware and Sound > HP ProtectSmart Hard Drive Protection. NOTE: If the computer is running on battery power. Using HP ProtectSmart Hard Drive Protection HP ProtectSmart Hard Drive Protection protects the hard drive by parking the drive and halting I/O requests under one of the following conditions...

Notebook PC User Guide - Windows 7
Page 78
... Control, click Yes. 2. Using HP ProtectSmart Hard Drive Protection software The HP ProtectSmart Hard Drive Protection software: ● Enables and disables HP ProtectSmart Hard Drive Protection. Additionally, members of an Administrator group can change the settings. 3. To open the HP ProtectSmart Hard Drive Protection window. - Click OK. 68 Chapter 7 Drives Select Start > Control Panel > Hardware and Sound > HP ProtectSmart Hard Drive Protection. NOTE: Depending on your...
... Control, click Yes. 2. Using HP ProtectSmart Hard Drive Protection software The HP ProtectSmart Hard Drive Protection software: ● Enables and disables HP ProtectSmart Hard Drive Protection. Additionally, members of an Administrator group can change the settings. 3. To open the HP ProtectSmart Hard Drive Protection window. - Click OK. 68 Chapter 7 Drives Select Start > Control Panel > Hardware and Sound > HP ProtectSmart Hard Drive Protection. NOTE: Depending on your...

Notebook PC User Guide - Windows 7
Page 79
... the power cord from the computer. 9. Remove the four hard drive cover screws (1). 8. Do not remove the hard drive while the computer is off or in Hibernation, turn on the hard drive cable to the computer. 4. Shut down the computer before removing the hard drive from the hard drive bay. Lift the hard drive cover (2) away from the AC outlet. 5. Disconnect all...
... the power cord from the computer. 9. Remove the four hard drive cover screws (1). 8. Do not remove the hard drive while the computer is off or in Hibernation, turn on the hard drive cable to the computer. 4. Shut down the computer before removing the hard drive from the hard drive bay. Lift the hard drive cover (2) away from the AC outlet. 5. Disconnect all...

Notebook PC User Guide - Windows 7
Page 80
... into the hard drive bay. 2. Using the tab (1), pull the hard drive to a 45-degree angle, and then remove the hard drive (3) from the computer. Connect the hard drive cable (2) to the hard drive connector on the computer. 5. Insert the hard drive into the openings on the right side of the hard drive bay. 3. Close the cover (2). 70 Chapter 7 Drives To install the hard drive: 1. 10. Align...
... into the hard drive bay. 2. Using the tab (1), pull the hard drive to a 45-degree angle, and then remove the hard drive (3) from the computer. Connect the hard drive cable (2) to the hard drive connector on the computer. 5. Insert the hard drive into the openings on the right side of the hard drive bay. 3. Close the cover (2). 70 Chapter 7 Drives To install the hard drive: 1. 10. Align...

Notebook PC User Guide - Windows 7
Page 81
Replace the hard drive cover screws (3). 7. Connect the computer to the computer. 10. Replacing a drive in the hard drive bay 71 Turn over the computer. 9. Connect external devices to AC power. 11. 6. Replace the battery. 8. Turn on the computer.
Replace the hard drive cover screws (3). 7. Connect the computer to the computer. 10. Replacing a drive in the hard drive bay 71 Turn over the computer. 9. Connect external devices to AC power. 11. 6. Replace the battery. 8. Turn on the computer.

Notebook PC User Guide - Windows 7
Page 83
... is safe to remove the device. 3. Using an eSATA device An eSATA port connects an optional high-performance eSATA component, such as an eSATA external hard drive. Click the name of information or an unresponsive system, adhere to remove the USB device. Some eSATA devices might require additional support software, which is...
... is safe to remove the device. 3. Using an eSATA device An eSATA port connects an optional high-performance eSATA component, such as an eSATA external hard drive. Click the name of information or an unresponsive system, adhere to remove the USB device. Some eSATA devices might require additional support software, which is...

Notebook PC User Guide - Windows 7
Page 108
.... Reopen Device Manager, if necessary, and then verify that you want to delete the device, but do not restart the computer. Obtaining the latest HP device drivers 1. MediaSmart is installed on the computer, and is inserted properly. ● Select a slower write speed and try again. ● If... any other drivers you might need to update your hard drive before trying to burn the contents to a new disc, and then burn from the hard drive. ● Reinstall the disc-burning device driver located in the DVD/CD-ROM drives category in Windows Media Player produces no sound or ...
.... Reopen Device Manager, if necessary, and then verify that you want to delete the device, but do not restart the computer. Obtaining the latest HP device drivers 1. MediaSmart is installed on the computer, and is inserted properly. ● Select a slower write speed and try again. ● If... any other drivers you might need to update your hard drive before trying to burn the contents to a new disc, and then burn from the hard drive. ● Reinstall the disc-burning device driver located in the DVD/CD-ROM drives category in Windows Media Player produces no sound or ...

Notebook PC User Guide - Windows 7
Page 109
... to the folder where the file was stored, and then double-click the file to enter settings before checking for updates. 2. Follow the on the hard drive. or - To use Windows Update: 1.
... to the folder where the file was stored, and then double-click the file to enter settings before checking for updates. 2. Follow the on the hard drive. or - To use Windows Update: 1.

Notebook PC User Guide - Windows 7
Page 114
... f12 Delay (sec.)―Set the delay for : ◦ Notebook Hard Drive ◦ Internal CD/DVD ROM Drive ◦ USB Disk on . When enabled, the computer fan is in Setup Utility. ◦ Enable/disable the HP QuickWeb Boot Menu during POST. ◦ Delay to boot Windows-Set the...each (0, 5, 10, 15, 20). ● HP QuickWeb-Enable/disable the QuickWeb Boot menu in DC mode. Enable/disable the processor Virtualization Technology. When enabled, saves power when the computer is always on Key/USB Hard Drive ◦ USB CD/DVD ROM Drive ◦ USB Floppy ◦ Network Adapter 104 ...
... f12 Delay (sec.)―Set the delay for : ◦ Notebook Hard Drive ◦ Internal CD/DVD ROM Drive ◦ USB Disk on . When enabled, the computer fan is in Setup Utility. ◦ Enable/disable the HP QuickWeb Boot Menu during POST. ◦ Delay to boot Windows-Set the...each (0, 5, 10, 15, 20). ● HP QuickWeb-Enable/disable the QuickWeb Boot menu in DC mode. Enable/disable the processor Virtualization Technology. When enabled, saves power when the computer is always on Key/USB Hard Drive ◦ USB CD/DVD ROM Drive ◦ USB Floppy ◦ Network Adapter 104 ...

