HP Dv2910us - Pavilion Entertainment Core 2 Duo 1.83 GHz Research
Related Manual Pages


Similar Questions

Accessing Bios To Boot From Flash Drive
i work from home and have a company flash drive i need to access bios to have boot from flash drive....
i work from home and have a company flash drive i need to access bios to have boot from flash drive....
(Posted by yvettemjms 10 years ago)


Motherboard
I NEED TO BUY A HP DV2910US MOTHERBOARD. WHERE I BUY IT?
I NEED TO BUY A HP DV2910US MOTHERBOARD. WHERE I BUY IT?
(Posted by NRODRIGUEZC 11 years ago)

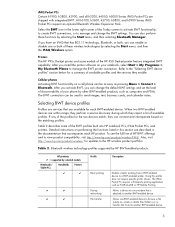
Bluetooth>
I want ot know if my hp Dv2910us entertainment laptop has bluetooth?
I want ot know if my hp Dv2910us entertainment laptop has bluetooth?
(Posted by dmelwani 12 years ago)
Motherboard Problems
Has anyone experienced problems? I am told I need a 2nd Motherboard in less than 2 years?
Has anyone experienced problems? I am told I need a 2nd Motherboard in less than 2 years?
(Posted by alohatodon 13 years ago)