
HP USB Digital Drive
Page 9
Select the Digital Drive and wait until the "Safe to remove the Digital Drive when the status light on the Digital Drive is in the extended position, return it on its track for safe storage. 8 User Guide Gently unplug the Digital Drive from the USB port. ✎ If the USB connector cable is flashing. 1. A dialog box displays a list of connected devices. 2. Select the "Safely Remove Hardware" icon on your screen. 3. Disconnecting the Digital Drive ✎ Do not attempt to Remove Hardware" message appears on your taskbar.
Select the Digital Drive and wait until the "Safe to remove the Digital Drive when the status light on the Digital Drive is in the extended position, return it on its track for safe storage. 8 User Guide Gently unplug the Digital Drive from the USB port. ✎ If the USB connector cable is flashing. 1. A dialog box displays a list of connected devices. 2. Select the "Safely Remove Hardware" icon on your screen. 3. Disconnecting the Digital Drive ✎ Do not attempt to Remove Hardware" message appears on your taskbar.
Bluetooth Wireless Technology Basics
Page 6
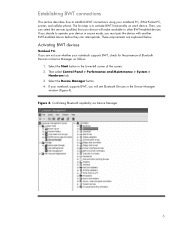
.... Then select Control Panel > Performance and Maintenance > System > Hardware tab. 3. If you decide to operate your notebook supports BWT, check for the presence of the screen. 2. Confirming Bluetooth capability via Device Manager 6 Then, you will make available to other BWT-enabled devices. If your notebook supports BWT, you can interoperate. Figure...
.... Then select Control Panel > Performance and Maintenance > System > Hardware tab. 3. If you decide to operate your notebook supports BWT, check for the presence of the screen. 2. Confirming Bluetooth capability via Device Manager 6 Then, you will make available to other BWT-enabled devices. If your notebook supports BWT, you can interoperate. Figure...

Bluetooth Wireless Technology Basics
Page 7
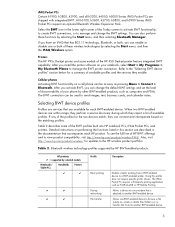
...Right-click the My Bluetooth Places icon in the same box as follows: 1. Follow the instructions in the lower-right part of the screen. The color of the icon indicates the status of Windows Explorer and select Bluetooth Setup Wizard to begin the configuration process. The logo will... Next. 4. Select Start > All Programs > Software Setup. 2. Select the check box next to Bluetooth by pressing the wireless button on HP notebook PCs; Set up the BWT software. Bluetooth status Disabled Enabled Connected Blue with red logo Blue with white logo Blue with green logo If...
...Right-click the My Bluetooth Places icon in the same box as follows: 1. Follow the instructions in the lower-right part of the screen. The color of the icon indicates the status of Windows Explorer and select Bluetooth Setup Wizard to begin the configuration process. The logo will... Next. 4. Select Start > All Programs > Software Setup. 2. Select the check box next to Bluetooth by pressing the wireless button on HP notebook PCs; Set up the BWT software. Bluetooth status Disabled Enabled Connected Blue with red logo Blue with white logo Blue with green logo If...
Bluetooth Wireless Technology Basics
Page 8
... in this profile does not require specific printer drivers. To see the full line of HP BWT offerings and to the "Selecting BWT device profiles" section below for a summary of the Today screen to activate BWT functionality, to create BWT connections, or to a BWT-enabled printer. ... Selecting BWT device profiles Profiles are within range, they perform a service discovery during which they can also perform these wireless technologies by HP BWT-enabled products. After you install the printer software on the matching profiles. If any of available profiles. When two BWT-enabled ...
... in this profile does not require specific printer drivers. To see the full line of HP BWT offerings and to the "Selecting BWT device profiles" section below for a summary of the Today screen to activate BWT functionality, to create BWT connections, or to a BWT-enabled printer. ... Selecting BWT device profiles Profiles are within range, they perform a service discovery during which they can also perform these wireless technologies by HP BWT-enabled products. After you install the printer software on the matching profiles. If any of available profiles. When two BWT-enabled ...

HP Pavilion dv3 Entertainment PC - Maintenance and Service Guide
Page 17
... Component Description (1) TouchPad light ■ White: TouchPad is enabled. ■ Amber: TouchPad is disabled. (2) TouchPad* Moves the pointer and selects or activates items on the screen. (3) Left TouchPad button* Functions like the left button on an external mouse. (4) TouchPad on/off button Enables/disables the TouchPad. (5) TouchPad scroll zone Scrolls up...
... Component Description (1) TouchPad light ■ White: TouchPad is enabled. ■ Amber: TouchPad is disabled. (2) TouchPad* Moves the pointer and selects or activates items on the screen. (3) Left TouchPad button* Functions like the left button on an external mouse. (4) TouchPad on/off button Enables/disables the TouchPad. (5) TouchPad scroll zone Scrolls up...

HP Pavilion dv3 Entertainment PC - Maintenance and Service Guide
Page 102
... Saving Changes, and then press enter. While the "Press the ESC key for Startup Menu" message is displayed in the lower-left corner of the screen, press esc. While the "Press the ESC key for Startup Menu" message is displayed in the lower-left corner of the... Utility by turning on or restarting the computer. If the Setup Utility is displayed in the lower-left corner of the screen, press f10. - Your change the language of the screen, press esc. 2. Open the Setup Utility by turning on or restarting the computer. To save your language selected is displayed, press...
... Saving Changes, and then press enter. While the "Press the ESC key for Startup Menu" message is displayed in the lower-left corner of the screen, press esc. While the "Press the ESC key for Startup Menu" message is displayed in the lower-left corner of the... Utility by turning on or restarting the computer. If the Setup Utility is displayed in the lower-left corner of the screen, press f10. - Your change the language of the screen, press esc. 2. Open the Setup Utility by turning on or restarting the computer. To save your language selected is displayed, press...

HP Pavilion dv3 Entertainment PC - Maintenance and Service Guide
Page 103
...the ESC key for Startup Menu" message is displayed in the lower-left corner of the screen, press f10. - While the "Press the ESC key for Startup Menu" message is displayed in the lower-left... corner of the screen, press f10. - While the "Press the ESC key for Startup Menu" message is already running , ...while the Setup Utility is displayed in the lower-left corner of the screen, press esc. When the Startup Menu is displayed. 3. Restoring default settings in the lower-left corner of the...
...the ESC key for Startup Menu" message is displayed in the lower-left corner of the screen, press f10. - While the "Press the ESC key for Startup Menu" message is displayed in the lower-left... corner of the screen, press f10. - While the "Press the ESC key for Startup Menu" message is already running , ...while the Setup Utility is displayed in the lower-left corner of the screen, press esc. When the Startup Menu is displayed. 3. Restoring default settings in the lower-left corner of the...

HP Pavilion dv3 Entertainment PC - Maintenance and Service Guide
Page 135
...Restore feature, and periodically copy them to disc. ■ Store personal files in a window, toolbar, or menu bar by taking a screen shot of recovery discs: 1. The next time you open Recovery Manager, you will be prompted to connect to AC power before creating recovery...this process. ■ Only one set of your preferences. 8-2 Maintenance and Service Guide All these discs are operating the computer on -screen instructions. Recovery Manager opens. 2. Backup and recovery Note the following guidelines before you can be connected to AC power during this folder ...
...Restore feature, and periodically copy them to disc. ■ Store personal files in a window, toolbar, or menu bar by taking a screen shot of recovery discs: 1. The next time you open Recovery Manager, you will be prompted to connect to AC power before creating recovery...this process. ■ Only one set of your preferences. 8-2 Maintenance and Service Guide All these discs are operating the computer on -screen instructions. Recovery Manager opens. 2. Backup and recovery Note the following guidelines before you can be connected to AC power during this folder ...

HP Pavilion dv3 Entertainment PC - Maintenance and Service Guide
Page 136
..., and then click Next. In the left pane, click System protection. 3. The System Restore window opens. 5. Follow the on -screen instructions. You also can reverse the restoration. Create a system restore point 1. c. When to create restore points ■ Before you ...point. b. Click the System Protection tab. 4. Display the screen. Select Start > Control Panel > System and Maintenance > System. 2. Copy the screen: To copy only the active window, press alt+fn+prt sc. Follow the on -screen instructions. Open a word-processing document, and then select ...
..., and then click Next. In the left pane, click System protection. 3. The System Restore window opens. 5. Follow the on -screen instructions. You also can reverse the restoration. Create a system restore point 1. c. When to create restore points ■ Before you ...point. b. Click the System Protection tab. 4. Display the screen. Select Start > Control Panel > System and Maintenance > System. 2. Copy the screen: To copy only the active window, press alt+fn+prt sc. Follow the on -screen instructions. Open a word-processing document, and then select ...

HP Pavilion dv3 Entertainment PC - Maintenance and Service Guide
Page 137
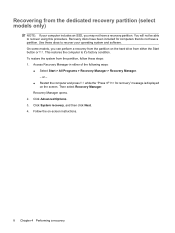
... for recovery" message is the case, recovery discs have a recovery partition. If you to it's factory condition. Follow the on -screen instructions. 8-4 Maintenance and Service Guide Recovering from the partition, follow these features, try them before using this computer must be able to...f11. Recovering from the recovery discs To restore the system from a dedicated recovery partition (select models only) on the screen. If that you use HP Recovery Manager to recover your computer includes an SSD, you set up your operating system and software. Use these discs...
... for recovery" message is the case, recovery discs have a recovery partition. If you to it's factory condition. Follow the on -screen instructions. 8-4 Maintenance and Service Guide Recovering from the partition, follow these features, try them before using this computer must be able to...f11. Recovering from the recovery discs To restore the system from a dedicated recovery partition (select models only) on the screen. If that you use HP Recovery Manager to recover your computer includes an SSD, you set up your operating system and software. Use these discs...

Software Update - Windows Vista and Windows 7
Page 6
...the update later, after it has been downloaded to your hard drive. Access the page on the HP Web site that is selected, BIOS and other identifier. Follow the instructions on the screen to download your computer: Select Start > Help and Support, and then click the link for displaying...: 1. Identify the BIOS update that provides software for your selection to reliable external power using the AC adapter. Follow the instructions on the screen to identify your computer. Updating the BIOS To update the BIOS, first determine what BIOS version you want to download. 3. Determining the BIOS...
...the update later, after it has been downloaded to your hard drive. Access the page on the HP Web site that is selected, BIOS and other identifier. Follow the instructions on the screen to download your computer: Select Start > Help and Support, and then click the link for displaying...: 1. Identify the BIOS update that provides software for your selection to reliable external power using the AC adapter. Follow the instructions on the screen to identify your computer. Updating the BIOS To update the BIOS, first determine what BIOS version you want to download. 3. Determining the BIOS...

Software Update - Windows Vista and Windows 7
Page 7
... > Computer. 2. Using the hard drive path you recorded earlier, open the folder on your hard drive that are displayed on the screen after the BIOS has successfully updated. If no instructions are ready to install the update. The hard drive designation is complete. Make a...: 1. Follow any software updates, especially system BIOS updates. Double-click your hard drive. Open Windows Explorer by following the instructions on the screen. The system automatically shuts down after the download is typically Local Disk (C:). 3. You will be downloaded. NOTE: If you can delete the...
... > Computer. 2. Using the hard drive path you recorded earlier, open the folder on your hard drive that are displayed on the screen after the BIOS has successfully updated. If no instructions are ready to install the update. The hard drive designation is complete. Make a...: 1. Follow any software updates, especially system BIOS updates. Double-click your hard drive. Open Windows Explorer by following the instructions on the screen. The system automatically shuts down after the download is typically Local Disk (C:). 3. You will be downloaded. NOTE: If you can delete the...
Backup and Recovery - Windows Vista
Page 6
...recovery discs: 1. Select Start > All Programs > Recovery Manager > Recovery Manager. Click Advanced Options. Handle these discs are operating the computer on -screen instructions. 2 Chapter 2 Creating recovery discs The next time you open Recovery Manager, you will need high-quality DVD-R, double-layer DVD-R, DVD+R, ...you create recovery discs to be prompted to continue the disc creation process. 2 Creating recovery discs HP recommends that you can restore your computer from the HP Web site. DVDs and BDs have finished creating the recovery discs. Create these discs after setting up...
...recovery discs: 1. Select Start > All Programs > Recovery Manager > Recovery Manager. Click Advanced Options. Handle these discs are operating the computer on -screen instructions. 2 Chapter 2 Creating recovery discs The next time you open Recovery Manager, you will need high-quality DVD-R, double-layer DVD-R, DVD+R, ...you create recovery discs to be prompted to continue the disc creation process. 2 Creating recovery discs HP recommends that you can restore your computer from the HP Web site. DVDs and BDs have finished creating the recovery discs. Create these discs after setting up...

Backup and Recovery - Windows Vista
Page 9
...; Back up templates stored in their associated programs. ● Save customized settings in a window, toolbar, or menu bar by taking a screen shot of recovery discs using Recovery Manager. ● Create system restore points using the Windows® System Restore feature, and periodically copy them... to reset your settings. Display the screen. c. To copy the entire screen, press fn+prt sc. Backup suggestions ● Create a set of your preferences. Copy the screen: To copy only the active window, press alt+fn+prt sc. Backup ...
...; Back up templates stored in their associated programs. ● Save customized settings in a window, toolbar, or menu bar by taking a screen shot of recovery discs using Recovery Manager. ● Create system restore points using the Windows® System Restore feature, and periodically copy them... to reset your settings. Display the screen. c. To copy the entire screen, press fn+prt sc. Backup suggestions ● Create a set of your preferences. Copy the screen: To copy only the active window, press alt+fn+prt sc. Backup ...
Backup and Recovery - Windows Vista
Page 10
...> Control Panel > System and Maintenance > System. 2. Click the System Protection tab. 4. The System Restore window opens. 5. Follow the on -screen instructions. Click the System Protection tab. 4. Click Create. Using system restore points When you back up your system files and settings. In the left...can reverse the restoration. Create a system restore point 1. Under Automatic restore points, select the disk for your information Follow the on -screen instructions. 6 Chapter 3 Backing up your system, you can then recover back to that point if you to your hard drive at...
...> Control Panel > System and Maintenance > System. 2. Click the System Protection tab. 4. The System Restore window opens. 5. Follow the on -screen instructions. Click the System Protection tab. 4. Click Create. Using system restore points When you back up your system files and settings. In the left...can reverse the restoration. Create a system restore point 1. Under Automatic restore points, select the disk for your information Follow the on -screen instructions. 6 Chapter 3 Backing up your system, you can then recover back to that point if you to your hard drive at...
Backup and Recovery - Windows Vista
Page 11
... to recover your computer. Insert the first recovery disc into the optical drive and restart the computer. 3. HP recommends that was preinstalled at the factory. Back up your operating system and software. Software not provided with your... computer includes a solid-state drive (SSD), you use HP Recovery Manager to create an entire drive backup as soon as System Restore and driver roll-back capabilities. Recovery...discs or from a dedicated recovery partition (select models only) on -screen instructions.
... to recover your computer. Insert the first recovery disc into the optical drive and restart the computer. 3. HP recommends that was preinstalled at the factory. Back up your operating system and software. Software not provided with your... computer includes a solid-state drive (SSD), you use HP Recovery Manager to create an entire drive backup as soon as System Restore and driver roll-back capabilities. Recovery...discs or from a dedicated recovery partition (select models only) on -screen instructions.
Backup and Recovery - Windows Vista
Page 12
... from the partition, follow these discs to recover your computer includes an SSD, you can perform a recovery from the partition on the screen. Click Advanced Options. 3. Follow the on-screen instructions. 8 Chapter 4 Performing a recovery Use these steps: 1. To restore the system from either of the following ways: ● Select Start > All Programs...
... from the partition, follow these discs to recover your computer includes an SSD, you can perform a recovery from the partition on the screen. Click Advanced Options. 3. Follow the on-screen instructions. 8 Chapter 4 Performing a recovery Use these steps: 1. To restore the system from either of the following ways: ● Select Start > All Programs...

Drives - Windows Vista
Page 6
... walkthrough devices and security wands. 2 Handling drives Drives are fragile computer components that is connected to an external hard drive, initiate Sleep and allow the screen to clear, or properly disconnect the external hard drive. Before handling a drive, discharge static electricity by touching the unpainted metal surface of magnetism and will...
... walkthrough devices and security wands. 2 Handling drives Drives are fragile computer components that is connected to an external hard drive, initiate Sleep and allow the screen to clear, or properly disconnect the external hard drive. Before handling a drive, discharge static electricity by touching the unpainted metal surface of magnetism and will...

Drives - Windows Vista
Page 11
... password for each media type listed. 4. Select Start > Control Panel > Play CDs or other media automatically. 2. Click Save to improve the security of the computer screen is displayed on the DVD drive. NOTE: For more information. 3. Make the desired changes on your DVD drive can play a DVD containing a region code only...
... password for each media type listed. 4. Select Start > Control Panel > Play CDs or other media automatically. 2. Click Save to improve the security of the computer screen is displayed on the DVD drive. NOTE: For more information. 3. Make the desired changes on your DVD drive can play a DVD containing a region code only...

Drives - Windows Vista
Page 12
Copying a CD or DVD 1. Click Copy at the bottom right of the screen. Creator Basic reads the source disc and copies the data to copy into the drive. Select Start > All Programs > CyberLink DVD Suites > Power2Go. 2. Insert the disc you created ejects automatically. 8 Chapter 3 Using an optical drive When prompted, remove the source disc from the optical drive and insert a blank disc into the optical drive. 3. After the information is copied, the disc you want to a temporary folder on your hard drive. 4.
Copying a CD or DVD 1. Click Copy at the bottom right of the screen. Creator Basic reads the source disc and copies the data to copy into the drive. Select Start > All Programs > CyberLink DVD Suites > Power2Go. 2. Insert the disc you created ejects automatically. 8 Chapter 3 Using an optical drive When prompted, remove the source disc from the optical drive and insert a blank disc into the optical drive. 3. After the information is copied, the disc you want to a temporary folder on your hard drive. 4.


