
Service Guide
Page 6
... Optical drive ...57 Hard drive ...59 WLAN module ...62 WWAN module ...65 Memory module ...67 RTC battery ...69 Camera/microphone module for standard display assembly 70 Keyboard ...72 Keyboard cover ...74 Bluetooth module ...76 Speaker assembly ...77 SIM connector board ...79 Display assembly ...80 Standard display assembly 84 Flush Glass display assembly 87 Top cover ...92 TouchPad ...95 Fingerprint reader board ...97 Modem module ...99 Audio board ...101 USB board ...103 TV tuner antenna ...105 System board ...107 Power button board ...110 Modem module cable ...112 Fan...
... Optical drive ...57 Hard drive ...59 WLAN module ...62 WWAN module ...65 Memory module ...67 RTC battery ...69 Camera/microphone module for standard display assembly 70 Keyboard ...72 Keyboard cover ...74 Bluetooth module ...76 Speaker assembly ...77 SIM connector board ...79 Display assembly ...80 Standard display assembly 84 Flush Glass display assembly 87 Top cover ...92 TouchPad ...95 Fingerprint reader board ...97 Modem module ...99 Audio board ...101 USB board ...103 TV tuner antenna ...105 System board ...107 Power button board ...110 Modem module cable ...112 Fan...

Service Guide
Page 15
...; 64-bit) Windows Vista Ultimate (64-bit) √ Serviceability End-user replaceable parts: AC adapter √ Battery (system) √ Hard drive √ Memory module √ Optical drive √ Mini Card components √ Intel processors with UMA graphics subsystem AMD processors with ground pin, supports 2-pin DC connector) Standard commercial smart pin √ Security Security cable slot √ Fingerprint reader √ Operating system Preinstalled: Windows Vista Business (32-bit) √ Windows Vista Home Basic...
...; 64-bit) Windows Vista Ultimate (64-bit) √ Serviceability End-user replaceable parts: AC adapter √ Battery (system) √ Hard drive √ Memory module √ Optical drive √ Mini Card components √ Intel processors with UMA graphics subsystem AMD processors with ground pin, supports 2-pin DC connector) Standard commercial smart pin √ Security Security cable slot √ Fingerprint reader √ Operating system Preinstalled: Windows Vista Business (32-bit) √ Windows Vista Home Basic...

Service Guide
Page 17
... (1) Power lights (2)* (2) Battery light (3) Drive light (4) Caps lock light (5) Volume mute light (6) Volume down light (7) Volume up light Description ● On: The computer is on . ● Amber: Computer sound is turned off until the battery reaches a low battery level. ● Blinking: The hard drive or optical drive (select models only) is being accessed. ● On: HP ProtectSmart Hard Drive Protection has temporarily parked the internal hard drive, and if present, the hard drive in this section. On: The volume scroll zone is being used to...
... (1) Power lights (2)* (2) Battery light (3) Drive light (4) Caps lock light (5) Volume mute light (6) Volume down light (7) Volume up light Description ● On: The computer is on . ● Amber: Computer sound is turned off until the battery reaches a low battery level. ● Blinking: The hard drive or optical drive (select models only) is being accessed. ● On: HP ProtectSmart Hard Drive Protection has temporarily parked the internal hard drive, and if present, the hard drive in this section. On: The volume scroll zone is being used to...
Service Guide
Page 19
... pressed simultaneously with the fn key. Top components 11 If the computer has stopped responding and Windows® shutdown procedures are ineffective, press and hold the power button for models with DVDPlay preinstalled). To learn more information. Adjusts speaker volume. Stops playback. Slide your power settings, select Start > Control Panel > System and Maintenance > Power Options. ● Launches the MediaSmart program (for models with MediaSmart preinstalled). ●...
... pressed simultaneously with the fn key. Top components 11 If the computer has stopped responding and Windows® shutdown procedures are ineffective, press and hold the power button for models with DVDPlay preinstalled). To learn more information. Adjusts speaker volume. Stops playback. Slide your power settings, select Start > Control Panel > System and Maintenance > Power Options. ● Launches the MediaSmart program (for models with MediaSmart preinstalled). ●...
Service Guide
Page 23
...; Blinking: The hard drive or optical drive (select models only) is turned off when all batteries in the SmartBay. Connects an optional computer headset microphone, stereo array microphone, or monaural microphone. If the computer is not plugged into an external power source, the light is being accessed. ● On: HP ProtectSmart Hard Drive Protection has temporarily parked the internal hard drive, and if present, the hard drive in the computer are fully charged. Produce sound when connected...
...; Blinking: The hard drive or optical drive (select models only) is turned off when all batteries in the SmartBay. Connects an optional computer headset microphone, stereo array microphone, or monaural microphone. If the computer is not plugged into an external power source, the light is being accessed. ● On: HP ProtectSmart Hard Drive Protection has temporarily parked the internal hard drive, and if present, the hard drive in the computer are fully charged. Produce sound when connected...

Service Guide
Page 25
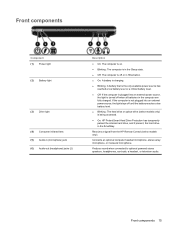
... External monitor port (3) Expansion port 3 (4) RJ-45 (network) jack (5) HDMI port (6) eSATA/USB port (7) Digital Media Slot light (8) Digital Media Slot (9) ExpressCard slot Description Attaches an optional security cable to an optional docking device or optional expansion product. The term expansion port 3 describes the type of expansion port. Connects high-performance eSATA components, such as an eSATA external hard drive, or connect an optional USB device. Left-side components 17 Connects the computer to the computer. NOTE: The computer has only one expansion port. Supports...
... External monitor port (3) Expansion port 3 (4) RJ-45 (network) jack (5) HDMI port (6) eSATA/USB port (7) Digital Media Slot light (8) Digital Media Slot (9) ExpressCard slot Description Attaches an optional security cable to an optional docking device or optional expansion product. The term expansion port 3 describes the type of expansion port. Connects high-performance eSATA components, such as an eSATA external hard drive, or connect an optional USB device. Left-side components 17 Connects the computer to the computer. NOTE: The computer has only one expansion port. Supports...

Service Guide
Page 26
... Support. CAUTION: To prevent an unresponsive system, replace the wireless module only with a wireless module authorized for use in the computer by the governmental agency that regulates wireless devices in your country or region. NOTE: The computer fan starts up automatically to cool internal components. Bottom components Component (1) Hard drive and WLAN module compartment (2) SmartBay release latch (3) Memory module compartment (4) Mini Card compartment (5) Battery release latch (6) SIM slot (select models only) (7) Battery...
... Support. CAUTION: To prevent an unresponsive system, replace the wireless module only with a wireless module authorized for use in the computer by the governmental agency that regulates wireless devices in your country or region. NOTE: The computer fan starts up automatically to cool internal components. Bottom components Component (1) Hard drive and WLAN module compartment (2) SmartBay release latch (3) Memory module compartment (4) Mini Card compartment (5) Battery release latch (6) SIM slot (select models only) (7) Battery...

Service Guide
Page 60
... all CMOS settings have been cleared. 52 Chapter 4 Removal and replacement procedures Wait approximately 5 minutes. 7. Replace the RTC battery and reassemble the computer. 8. All passwords and all external devices connected to the computer. 3. Remove the battery (see RTC battery on page 69). 6. Remove the RTC battery (see Battery on page 55). 5. Turn on the computer. Before disassembling the computer, follow these steps: 1. Connect AC power to clear the password. Shut down through the operating...
... all CMOS settings have been cleared. 52 Chapter 4 Removal and replacement procedures Wait approximately 5 minutes. 7. Replace the RTC battery and reassemble the computer. 8. All passwords and all external devices connected to the computer. 3. Remove the battery (see RTC battery on page 69). 6. Remove the RTC battery (see Battery on page 55). 5. Turn on the computer. Before disassembling the computer, follow these steps: 1. Connect AC power to clear the password. Shut down through the operating...
Service Guide
Page 72
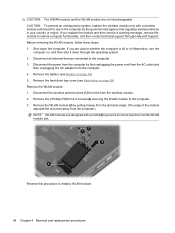
... an angle. (The edge of the module opposite the slot rises away from the wireless module. 2. Remove the hard drive bay cover (see Battery on page 59) Remove the WLAN module: 1. Remove the WLAN module (3) by pulling it down the computer. If you replace the module and then receive a warning message, remove the module to install a WLAN module. 64 Chapter 4 Removal and replacement procedures Disconnect all external devices connected to the computer. 3. Disconnect the...
... an angle. (The edge of the module opposite the slot rises away from the wireless module. 2. Remove the hard drive bay cover (see Battery on page 59) Remove the WLAN module: 1. Remove the WLAN module (3) by pulling it down the computer. If you replace the module and then receive a warning message, remove the module to install a WLAN module. 64 Chapter 4 Removal and replacement procedures Disconnect all external devices connected to the computer. 3. Disconnect the...

Service Guide
Page 73
... (2). 3. Remove the battery (see Battery on the WWAN module. WWAN module Description WWAN modules HP EVDO-A WWAN module for use in your country or region. Lift the inside edge of the module opposite the slot rises away from the terminals on page 55). If you are not interchangeable. Disconnect all external devices connected to restore computer functionality, and then contact technical support through the operating system. 2. Component replacement procedures...
... (2). 3. Remove the battery (see Battery on the WWAN module. WWAN module Description WWAN modules HP EVDO-A WWAN module for use in your country or region. Lift the inside edge of the module opposite the slot rises away from the terminals on page 55). If you are not interchangeable. Disconnect all external devices connected to restore computer functionality, and then contact technical support through the operating system. 2. Component replacement procedures...

Service Guide
Page 75
... off or in computer models with AMD processors: ● 2048-GB ● 1024-MB ● 512-MB For use in Hibernation, turn the computer on page 55). Disconnect all external devices connected to the computer. Remove the memory module: 1. Loosen the Phillips PM2.5×6.0 captive screw (1) that secures the memory module compartment cover to the computer. 3. Remove the battery (see Battery on , and then shut...
... off or in computer models with AMD processors: ● 2048-GB ● 1024-MB ● 512-MB For use in Hibernation, turn the computer on page 55). Disconnect all external devices connected to the computer. Remove the memory module: 1. Loosen the Phillips PM2.5×6.0 captive screw (1) that secures the memory module compartment cover to the computer. 3. Remove the battery (see Battery on , and then shut...

Service Guide
Page 107
... is off or in Australia and New Zealand Spare part number 461749-001 461749-011 Before removing the modem module, follow these steps: 1. Disconnect all external devices connected to the system board. WLAN cover (see Keyboard on page 62) c. Keyboard (see WLAN module on page 72) e. Keyboard cover (see Hard drive on page 74) f. Disconnect the modem module cable (1) from the computer. 4. Disconnect the power from the computer by first...
... is off or in Australia and New Zealand Spare part number 461749-001 461749-011 Before removing the modem module, follow these steps: 1. Disconnect all external devices connected to the system board. WLAN cover (see Keyboard on page 62) c. Keyboard (see WLAN module on page 72) e. Keyboard cover (see Hard drive on page 74) f. Disconnect the modem module cable (1) from the computer. 4. Disconnect the power from the computer by first...
Service Guide
Page 129
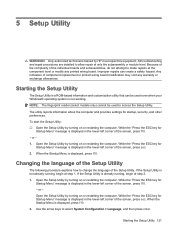
... change the language of the individual boards and subassemblies, do not attempt to access the Setup Utility. Open the Setup Utility by HP must repair this equipment. Use the arrow keys to allow repair at step 1. Any indication of the screen, press f10. - When the Startup Menu is displayed, press f10. 2. When the Startup Menu is displayed, press f10. All troubleshooting and repair procedures are detailed to select System Configuration > Language, and then press enter...
... change the language of the individual boards and subassemblies, do not attempt to access the Setup Utility. Open the Setup Utility by HP must repair this equipment. Use the arrow keys to allow repair at step 1. Any indication of the screen, press f10. - When the Startup Menu is displayed, press f10. 2. When the Startup Menu is displayed, press f10. All troubleshooting and repair procedures are detailed to select System Configuration > Language, and then press enter...
Service Guide
Page 131
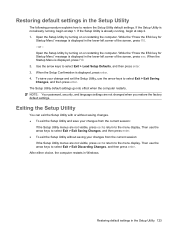
... select Exit > Exit Saving Changes, and then press enter. Then use the arrow keys to the menu display. Open the Setup Utility by turning on or restarting the computer. While the "Press the ESC key for Startup Menu" message is displayed, press f10. 2. To save your changes from the current session: If the Setup Utility menus are not changed when you restore the factory default settings. The Setup Utility default settings go into effect when the...
... select Exit > Exit Saving Changes, and then press enter. Then use the arrow keys to the menu display. Open the Setup Utility by turning on or restarting the computer. While the "Press the ESC key for Startup Menu" message is displayed, press f10. 2. To save your changes from the current session: If the Setup Utility menus are not changed when you restore the factory default settings. The Setup Utility default settings go into effect when the...
Service Guide
Page 132
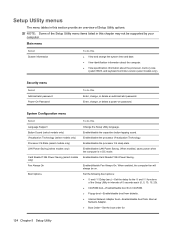
...9679; CD-ROM boot―Enable/disable boot from CD-ROM. ● Floppy boot―Enable/disable boot from diskette. ● Internal Network Adapter boot―Enable/disable boot from Internal Network Adapter. ● Boot Order―Set the boot order for: 124 Chapter 5 Setup Utility Enter, change, or delete a power-on . Enable/disable the processor C6 sleep state. Enable/disable Card Reader/1394 Power Saving. Enabled/disable Fan Always On. NOTE: Some of Setup Utility options. System Configuration menu Select Language Support Button Sound (select models only) Virtualization...
...9679; CD-ROM boot―Enable/disable boot from CD-ROM. ● Floppy boot―Enable/disable boot from diskette. ● Internal Network Adapter boot―Enable/disable boot from Internal Network Adapter. ● Boot Order―Set the boot order for: 124 Chapter 5 Setup Utility Enter, change, or delete a power-on . Enable/disable the processor C6 sleep state. Enable/disable Card Reader/1394 Power Saving. Enabled/disable Fan Always On. NOTE: Some of Setup Utility options. System Configuration menu Select Language Support Button Sound (select models only) Virtualization...

Service Guide
Page 133
Run a diagnostic test on the hard drive. Select To do this ◦ USB Floppy ◦ Internal CD/DVD ROM drive ◦ USB CD/DVD ROM drive ◦ Hard drive ◦ USB Diskette on Key ◦ USB Hard drive ◦ Network adapter Diagnostics menu Select Hard Disk Self Test Secondary Hard Disk Self Test (select models only) Memory Test To do this menu option is called the Primary Hard Disk Self Test. Setup Utility menus 125 NOTE: On models with two hard drives, this Run a comprehensive self-test on the system memory. Run a comprehensive self-test on a secondary hard drive.
Run a diagnostic test on the hard drive. Select To do this ◦ USB Floppy ◦ Internal CD/DVD ROM drive ◦ USB CD/DVD ROM drive ◦ Hard drive ◦ USB Diskette on Key ◦ USB Hard drive ◦ Network adapter Diagnostics menu Select Hard Disk Self Test Secondary Hard Disk Self Test (select models only) Memory Test To do this menu option is called the Primary Hard Disk Self Test. Setup Utility menus 125 NOTE: On models with two hard drives, this Run a comprehensive self-test on the system memory. Run a comprehensive self-test on a secondary hard drive.
Service Guide
Page 191
... battery light, identifying 9, 15 battery release latch, identifying 18 bays battery 18 hard drive 18 bezel illustrated 25 spare part numbers 25, 80, 84 Blu-ray Disc ROM Drive specifications 129 Blu-ray Drive, spare part number 30, 31, 57 Bluetooth module removal 76 spare part number 76 boot options 124 boot order 124 button sound 124 buttons media 11 next/fast forward 11 play/pause 11 power 11 previous/rewind 11 stop 11 TouchPad 8 TouchPad on/off 8 volume mute 11 wireless 11 C cables, service...
... battery light, identifying 9, 15 battery release latch, identifying 18 bays battery 18 hard drive 18 bezel illustrated 25 spare part numbers 25, 80, 84 Blu-ray Disc ROM Drive specifications 129 Blu-ray Drive, spare part number 30, 31, 57 Bluetooth module removal 76 spare part number 76 boot options 124 boot order 124 button sound 124 buttons media 11 next/fast forward 11 play/pause 11 power 11 previous/rewind 11 stop 11 TouchPad 8 TouchPad on/off 8 volume mute 11 wireless 11 C cables, service...

Service Guide
Page 192
... specifications 130 E electrostatic discharge 49 eSATA/USB port, identifying 17 esc key, identifying 13 Ethernet, product description 5 exiting the Setup Utility 123 expansion port, identifying 17 ExpressCard slot bezel, illustrated 28 ExpressCard slot, identifying 17 external media cards, product description 6 external monitor port identifying 17 pin assignments 170 F f11 166 fan always on 124 fan and heat sink assembly removal 114 spare part number 114 feet locations 54 spare part number 54 fingerprint reader...
... specifications 130 E electrostatic discharge 49 eSATA/USB port, identifying 17 esc key, identifying 13 Ethernet, product description 5 exiting the Setup Utility 123 expansion port, identifying 17 ExpressCard slot bezel, illustrated 28 ExpressCard slot, identifying 17 external media cards, product description 6 external monitor port identifying 17 pin assignments 170 F f11 166 fan always on 124 fan and heat sink assembly removal 114 spare part number 114 feet locations 54 spare part number 54 fingerprint reader...
Service Guide
Page 193
..., 72 Keyboard cover removal 74 spare part numbers 74 keypad keys, identifying 13 keys esc 13 fn 13 function 13 keypad 13 Windows applications 13 Windows logo 13 L LAN Power Saving 124 language support 124 latch battery release 18 swappable bay release 18 lights battery 9, 15 caps lock 9 Digital Media Slot 17 drive 9, 15 integrated webcam 14 mute 9 num lock 10 power 9, 15 TouchPad 8 volume down 9 volume mute 9 volume up 9 wireless 10 M main menu 124 mass storage devices, spare part numbers 29 media activity buttons...
..., 72 Keyboard cover removal 74 spare part numbers 74 keypad keys, identifying 13 keys esc 13 fn 13 function 13 keypad 13 Windows applications 13 Windows logo 13 L LAN Power Saving 124 language support 124 latch battery release 18 swappable bay release 18 lights battery 9, 15 caps lock 9 Digital Media Slot 17 drive 9, 15 integrated webcam 14 mute 9 num lock 10 power 9, 15 TouchPad 8 volume down 9 volume mute 9 volume up 9 wireless 10 M main menu 124 mass storage devices, spare part numbers 29 media activity buttons...
Service Guide
Page 194
... 1 removal 118 spare part numbers 24, 118 Processor C6 State 124 product description audio 5 camera/microphone 4 chipset 2 display panel 3 docking support 6 Ethernet 5 external media cards 6 graphics 3 hard drives 4 internal cards 6 keyboard 6 memory module 4 microphone 4 modem module 5 operating system 7 optical drives 4 pointing devices 6 ports 6 power requirements 7 processors 1 product name 1 security 7 serviceability 7 wireless 5 product name 1 R recovering a program or driver 163 recovering from the dedicated recovery partition 166 recovering from the recovery discs 166 recovery 166...
... 1 removal 118 spare part numbers 24, 118 Processor C6 State 124 product description audio 5 camera/microphone 4 chipset 2 display panel 3 docking support 6 Ethernet 5 external media cards 6 graphics 3 hard drives 4 internal cards 6 keyboard 6 memory module 4 microphone 4 modem module 5 operating system 7 optical drives 4 pointing devices 6 ports 6 power requirements 7 processors 1 product name 1 security 7 serviceability 7 wireless 5 product name 1 R recovering a program or driver 163 recovering from the dedicated recovery partition 166 recovering from the recovery discs 166 recovery 166...


