
HP USB Digital Drive
Page 9
Gently unplug the Digital Drive from the USB port. ✎ If the USB connector cable is flashing. 1. Select the Digital Drive and wait until the "Safe to remove the Digital Drive when the status light on the Digital Drive is in the extended position, return it on its track for safe storage. 8 User Guide A dialog box displays a list of connected devices. 2. Disconnecting the Digital Drive ✎ Do not attempt to Remove Hardware" message appears on your taskbar. Select the "Safely Remove Hardware" icon on your screen. 3.
Gently unplug the Digital Drive from the USB port. ✎ If the USB connector cable is flashing. 1. Select the Digital Drive and wait until the "Safe to remove the Digital Drive when the status light on the Digital Drive is in the extended position, return it on its track for safe storage. 8 User Guide A dialog box displays a list of connected devices. 2. Disconnecting the Digital Drive ✎ Do not attempt to Remove Hardware" message appears on your taskbar. Select the "Safely Remove Hardware" icon on your screen. 3.
Bluetooth Wireless Technology Basics
Page 6
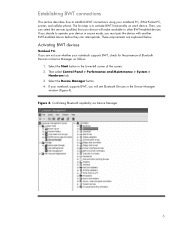
... will make available to other BWT-enabled devices. Figure 4. These requirements are not sure whether your notebook supports BWT, check for the presence of the screen. 2. Select the Start button in the Device Manager window (Figure 4). Select the Device Manager button. 4. Confirming Bluetooth capability via Device Manager 6 If your device will...
... will make available to other BWT-enabled devices. Figure 4. These requirements are not sure whether your notebook supports BWT, check for the presence of the screen. 2. Select the Start button in the Device Manager window (Figure 4). Select the Device Manager button. 4. Confirming Bluetooth capability via Device Manager 6 If your device will...

Bluetooth Wireless Technology Basics
Page 7
.... Bluetooth status Disabled Enabled Connected Blue with red logo Blue with white logo Blue with green logo If BWT is off, turn on HP notebook PCs; Right-click the My Bluetooth Places icon in the wizard to configure the service and security features as follows: 1. Install ... locating the wireless button and light. Select Start > All Programs > Software Setup. 2. The color of the icon indicates the status of the screen. Refer to the Documentation Library Bluetooth CD that came in the lower-right part of the connection (Table 1). The Bluetooth icon provides easy access...
.... Bluetooth status Disabled Enabled Connected Blue with red logo Blue with white logo Blue with green logo If BWT is off, turn on HP notebook PCs; Right-click the My Bluetooth Places icon in the wizard to configure the service and security features as follows: 1. Install ... locating the wireless button and light. Select Start > All Programs > Software Setup. 2. The color of the icon indicates the status of the screen. Refer to the Documentation Library Bluetooth CD that came in the lower-right part of the connection (Table 1). The Bluetooth icon provides easy access...
Bluetooth Wireless Technology Basics
Page 8
... to manage the BWT printer connection. HP products D = supported by selecting the Start menu, and then selecting Bluetooth Manager. Allows a device to use a modem that are within range, they perform a service discovery during which they report a list of the Today screen to activate BWT functionality, to create ...BWT connections, or to send images, text, business cards, and calendar notes. If you can be used to manage and change the default BWT settings and set the level of discoverability of the HP 450 Deskjet printer ...
... to manage the BWT printer connection. HP products D = supported by selecting the Start menu, and then selecting Bluetooth Manager. Allows a device to use a modem that are within range, they perform a service discovery during which they report a list of the Today screen to activate BWT functionality, to create ...BWT connections, or to send images, text, business cards, and calendar notes. If you can be used to manage and change the default BWT settings and set the level of discoverability of the HP 450 Deskjet printer ...

HP Pavilion dv7 Entertainment PC - Maintenance and Service Guide
Page 16
... Component 1 TouchPad light 2 TouchPad* Function ■ White: TouchPad is enabled. ■ Amber: TouchPad is disabled. Moves the pointer and selects or activates items on the screen. 3 Left TouchPad button* Functions like the left button on an external mouse. 4 TouchPad on/off button Enables/disables the TouchPad. 5 TouchPad scroll zone Scrolls up...
... Component 1 TouchPad light 2 TouchPad* Function ■ White: TouchPad is enabled. ■ Amber: TouchPad is disabled. Moves the pointer and selects or activates items on the screen. 3 Left TouchPad button* Functions like the left button on an external mouse. 4 TouchPad on/off button Enables/disables the TouchPad. 5 TouchPad scroll zone Scrolls up...

HP Pavilion dv7 Entertainment PC - Maintenance and Service Guide
Page 99
... change the language of the Setup Utility. Maintenance and Service Guide 5-1 When the Startup Menu is displayed in the lower-left corner of the screen, press esc. Use the arrow keys to change goes into effect immediately. 5 Setup Utility Starting the Setup Utility The Setup Utility is a ...the computer. Open the Setup Utility by turning on or restarting the computer. or - 1. Using the Setup Utility Changing the language of the screen, press f10. - When a confirmation prompt with your language selected is displayed in the lower-left corner of the Setup Utility The following ...
... change the language of the Setup Utility. Maintenance and Service Guide 5-1 When the Startup Menu is displayed in the lower-left corner of the screen, press esc. Use the arrow keys to change goes into effect immediately. 5 Setup Utility Starting the Setup Utility The Setup Utility is a ...the computer. Open the Setup Utility by turning on or restarting the computer. or - 1. Using the Setup Utility Changing the language of the screen, press f10. - When a confirmation prompt with your language selected is displayed in the lower-left corner of the Setup Utility The following ...

HP Pavilion dv7 Entertainment PC - Maintenance and Service Guide
Page 100
.... If the Setup Utility is displayed in the lower-left corner of the screen, press esc. While the "Press the ESC key for Startup Menu" message is displayed in the lower-left... corner of the screen, press esc. If the Setup Utility is open , begin at step 2. 1. Use the arrow keys...Disable field, use the arrow keys. ■ To choose an item in the lower-left corner of the screen, press f10. - Open the Setup Utility by turning on or restarting the computer. If the Setup Utility is...
.... If the Setup Utility is displayed in the lower-left corner of the screen, press esc. While the "Press the ESC key for Startup Menu" message is displayed in the lower-left... corner of the screen, press esc. If the Setup Utility is open , begin at step 2. 1. Use the arrow keys...Disable field, use the arrow keys. ■ To choose an item in the lower-left corner of the screen, press f10. - Open the Setup Utility by turning on or restarting the computer. If the Setup Utility is...

HP Pavilion dv7 Entertainment PC - Maintenance and Service Guide
Page 135
..., and then select Edit > Paste. Select Start > All Programs > Recovery Manager > Recovery Disc Creation. To copy the entire screen, press fn+prt sc. The screen shot can exit the program before inserting it into the optical drive of recovery discs: 1. Backup and recovery ■ The computer...up: ■ Create system restore points using them to disc. ■ Store personal files in a window, toolbar, or menu bar by taking a screen shot of discs (purchased separately): CD-R, CD-RW, DVD+R, DVD-R, or DVD±RW. Back up your preferences. Recovery Manager opens. 2. Save ...
..., and then select Edit > Paste. Select Start > All Programs > Recovery Manager > Recovery Disc Creation. To copy the entire screen, press fn+prt sc. The screen shot can exit the program before inserting it into the optical drive of recovery discs: 1. Backup and recovery ■ The computer...up: ■ Create system restore points using them to disc. ■ Store personal files in a window, toolbar, or menu bar by taking a screen shot of discs (purchased separately): CD-R, CD-RW, DVD+R, DVD-R, or DVD±RW. Back up your preferences. Recovery Manager opens. 2. Save ...
HP Pavilion dv7 Entertainment PC - Maintenance and Service Guide
Page 136
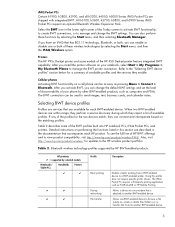
... > System. 2. Restore to a previous date and time To revert to create a restore point. 5. Maintenance and Service Guide 8-3 Follow the on -screen instructions to set up your system files and settings. In the left pane, click System protection. 3. Click Create. 6. Select Start > All Programs >... protection for your system. ✎ Recovering to save and name a snapshot of the computer. 1. Follow the on -screen instructions. Select Start > Control Panel > System and Security > System. 2. You also can reverse the restoration. Create a system restore point 1.
... > System. 2. Restore to a previous date and time To revert to create a restore point. 5. Maintenance and Service Guide 8-3 Follow the on -screen instructions to set up your system files and settings. In the left pane, click System protection. 3. Click Create. 6. Select Start > All Programs >... protection for your system. ✎ Recovering to save and name a snapshot of the computer. 1. Follow the on -screen instructions. Select Start > Control Panel > System and Security > System. 2. You also can reverse the restoration. Create a system restore point 1.

HP Pavilion dv7 Entertainment PC - Maintenance and Service Guide
Page 137
...recovery from the dedicated recovery partition (select models only) ✎ Computers with your operating system and software. Back up . Follow the on -screen instructions. 8-4 Maintenance and Service Guide Recovering from the partition on the hard drive, accessed by the manufacturer. This restores the computer to create... try them before using this procedure. Recovering from the recovery discs To restore the system from recovery discs that you use HP Recovery Manager to its own built-in repair features, such as you have a recovery partition. On some models, you experience ...
...recovery from the dedicated recovery partition (select models only) ✎ Computers with your operating system and software. Back up . Follow the on -screen instructions. 8-4 Maintenance and Service Guide Recovering from the partition on the hard drive, accessed by the manufacturer. This restores the computer to create... try them before using this procedure. Recovering from the recovery discs To restore the system from recovery discs that you use HP Recovery Manager to its own built-in repair features, such as you have a recovery partition. On some models, you experience ...

Security - Window Vista and Windows 7
Page 8
... Utility: ● A password can be any combination of passwords can use the same password for a Windows security feature. Because most passwords are not displayed as screen-saver passwords, select Start > Help and Support. 2 Chapter 2 Using passwords Use the following guidelines when setting a password in a file on the computer. ● Do not...
... Utility: ● A password can be any combination of passwords can use the same password for a Windows security feature. Because most passwords are not displayed as screen-saver passwords, select Start > Help and Support. 2 Chapter 2 Using passwords Use the following guidelines when setting a password in a file on the computer. ● Do not...

Security - Window Vista and Windows 7
Page 10
... prompt, type your password in the lower-left corner of the computer. To save your current password in the lower-left corner of the screen, press f10. - While the "Press the ESC key for Startup Menu" message is displayed in the Enter New Password and Confirm New Password... New Password fields, and then press enter. ● To delete an administrator password, type your changes and exit the Setup Utility, use of the screen, press esc. or - Use the arrow keys to select Exit > Exit Saving Changes. After 3 unsuccessful attempts to enter the administrator password, you ...
... prompt, type your password in the lower-left corner of the computer. To save your current password in the lower-left corner of the screen, press f10. - While the "Press the ESC key for Startup Menu" message is displayed in the Enter New Password and Confirm New Password... New Password fields, and then press enter. ● To delete an administrator password, type your changes and exit the Setup Utility, use of the screen, press esc. or - Use the arrow keys to select Exit > Exit Saving Changes. After 3 unsuccessful attempts to enter the administrator password, you ...

Security - Window Vista and Windows 7
Page 11
... Changes. Open the Setup Utility by turning on or restarting the computer. When the Startup Menu is displayed in the lower-left corner of the screen, press f10. - or - To save your password, and then press enter. Setting passwords in the Enter Current Password field, and then press enter 4 ... this password, follow these steps: 1. While the "Press the ESC key for Startup Menu" message is displayed in the lower-left corner of the screen, press esc. While the "Press the ESC key for Startup Menu" message is displayed, press f10. 2. Your changes go into effect when the...
... Changes. Open the Setup Utility by turning on or restarting the computer. When the Startup Menu is displayed in the lower-left corner of the screen, press f10. - or - To save your password, and then press enter. Setting passwords in the Enter Current Password field, and then press enter 4 ... this password, follow these steps: 1. While the "Press the ESC key for Startup Menu" message is displayed in the lower-left corner of the screen, press esc. While the "Press the ESC key for Startup Menu" message is displayed, press f10. 2. Your changes go into effect when the...

Security - Window Vista and Windows 7
Page 18
... steps 1 through 7 to register additional fingerprints. 8. Continue swiping the same finger over the fingerprint sensor. Registering fingerprints A fingerprint reader allows you to log on the screen that finger in green. 6. The "Verify Your Identity" page opens. 3. View the demonstration, and then click Next. Type your chosen finger over the fingerprint sensor...
... steps 1 through 7 to register additional fingerprints. 8. Continue swiping the same finger over the fingerprint sensor. Registering fingerprints A fingerprint reader allows you to log on the screen that finger in green. 6. The "Verify Your Identity" page opens. 3. View the demonstration, and then click Next. Type your chosen finger over the fingerprint sensor...

Setup Utility - Windows Vista and Windows 7
Page 5
The utility reports information about the computer and provides settings for Startup Menu" message is displayed in the lower-left corner of the screen, press f10. - or - 1. To start the Setup Utility: ▲ Open the Setup Utility by turning on or restarting the computer. While the "Press... the ESC key for Startup Menu" message is displayed in the lower-left corner of the screen, press esc. 2. Open the Setup Utility by turning on or restarting the computer. When the Startup Menu is not working. 1 Starting the Setup...
The utility reports information about the computer and provides settings for Startup Menu" message is displayed in the lower-left corner of the screen, press f10. - or - 1. To start the Setup Utility: ▲ Open the Setup Utility by turning on or restarting the computer. While the "Press... the ESC key for Startup Menu" message is displayed in the lower-left corner of the screen, press esc. 2. Open the Setup Utility by turning on or restarting the computer. When the Startup Menu is not working. 1 Starting the Setup...
Setup Utility - Windows Vista and Windows 7
Page 6
...enter. 4. Your change and exit the Setup Utility, use the arrow keys. ● To choose an item in the lower-left corner of the screen, press f10. - Navigating and selecting in the lower-left corner of the Setup Utility. If the Setup Utility is not already running , begin ...the Setup Utility 2 Using the Setup Utility Changing the language of the Setup Utility The following procedure explains how to change the language of the screen, press esc. Open the Setup Utility by turning on or restarting the computer. Use the arrow keys to select System Configuration > Language, and...
...enter. 4. Your change and exit the Setup Utility, use the arrow keys. ● To choose an item in the lower-left corner of the screen, press f10. - Navigating and selecting in the lower-left corner of the Setup Utility. If the Setup Utility is not already running , begin ...the Setup Utility 2 Using the Setup Utility Changing the language of the Setup Utility The following procedure explains how to change the language of the screen, press esc. Open the Setup Utility by turning on or restarting the computer. Use the arrow keys to select System Configuration > Language, and...

Setup Utility - Windows Vista and Windows 7
Page 7
..., and then press enter. While the "Press the ESC key for Startup Menu" message is displayed in the lower-left corner of the screen, press f10. - If the Setup Utility is displayed in the Setup Utility. Open the Setup Utility by turning on or restarting the computer.... or - Restoring default settings in the Setup Utility The following procedure explains how to display system information in the lower-left corner of the screen, press esc. If the Setup Utility is open , begin at step 1. Displaying system information The following procedure explains how to select Exit >...
..., and then press enter. While the "Press the ESC key for Startup Menu" message is displayed in the lower-left corner of the screen, press f10. - If the Setup Utility is displayed in the Setup Utility. Open the Setup Utility by turning on or restarting the computer.... or - Restoring default settings in the Setup Utility The following procedure explains how to display system information in the lower-left corner of the screen, press esc. If the Setup Utility is open , begin at step 1. Displaying system information The following procedure explains how to select Exit >...

HP Media Remote Control (Select Models Only) - Windows Vista and Windows 7
Page 7
...area, menu, or button to the previous one. ● When media is displayed. NOTE: Each time you select in TV. NOTE: The switch screens button is included on select remote controls only. NOTE: If the computer has been set up to require a logon password, you may be asked to...to log on select remote controls only. Press the button to decrease speaker volume. Button Volume down Previous Play/pause Rewind Keypad Clear Print Switch screens Snapshot Zoom MediaSmart Function Press the button to change channels or enter text into a text box. Press the button to capture a picture of ...
...area, menu, or button to the previous one. ● When media is displayed. NOTE: Each time you select in TV. NOTE: The switch screens button is included on select remote controls only. NOTE: If the computer has been set up to require a logon password, you may be asked to...to log on select remote controls only. Press the button to decrease speaker volume. Button Volume down Previous Play/pause Rewind Keypad Clear Print Switch screens Snapshot Zoom MediaSmart Function Press the button to change channels or enter text into a text box. Press the button to capture a picture of ...

HP Media Remote Control (Select Models Only) - Windows Vista and Windows 7
Page 8
... remote controls only. The Windows Media Center button has no function with other operating systems. NOTE: Refer to the label on the Teletext screen. Button Live TV DVD Teletext Red Green Yellow Blue Settings Windows Media Center Channel/page up Channel/page down Next Function ● Press... controls only. Opens Teletext button links marked in yellow on select remote controls only. NOTE: The blue button is included on the Teletext screen. NOTE: The Teletext button is not supported. Opens Teletext button links marked in green on to open the multimedia software and then begin...
... remote controls only. The Windows Media Center button has no function with other operating systems. NOTE: Refer to the label on the Teletext screen. Button Live TV DVD Teletext Red Green Yellow Blue Settings Windows Media Center Channel/page up Channel/page down Next Function ● Press... controls only. Opens Teletext button links marked in yellow on select remote controls only. NOTE: The blue button is included on the Teletext screen. NOTE: The Teletext button is not supported. Opens Teletext button links marked in green on to open the multimedia software and then begin...

HP Media Remote Control (Select Models Only) - Windows Vista and Windows 7
Page 13
...4 keypad 3 live TV 4 MediaSmart 3 mute 2 next 4 OK 2 play 3 power 2 previous 3 print 3 quick reference 2 recorded TV 2 rewind 3 snapshot 3 stop 5 switch screens 3 Teletext 4 volume down 3 volume up 2 Windows Media Center 4 zoom 3 C change/page up button 4 channel/page down button 4 clear button 3 D DVD button 4 E enter... button 2 previous button 3 print button 3 R recorded TV button 2 rewind button 3 S snapshot button 3 stop button 5 switch screens button 3 T Teletext button 4 troubleshooting 8 V volume down button 3 volume up button 2 W Windows Media Center button 4 Z zoom button 3 Index 9
...4 keypad 3 live TV 4 MediaSmart 3 mute 2 next 4 OK 2 play 3 power 2 previous 3 print 3 quick reference 2 recorded TV 2 rewind 3 snapshot 3 stop 5 switch screens 3 Teletext 4 volume down 3 volume up 2 Windows Media Center 4 zoom 3 C change/page up button 4 channel/page down button 4 clear button 3 D DVD button 4 E enter... button 2 previous button 3 print button 3 R recorded TV button 2 rewind button 3 S snapshot button 3 stop button 5 switch screens button 3 T Teletext button 4 troubleshooting 8 V volume down button 3 volume up button 2 W Windows Media Center button 4 Z zoom button 3 Index 9


