
Bluetooth Wireless Technology Basics
Page 7
... and select Bluetooth Setup Wizard to white. For specific instructions about discovering and connecting to other BWT-enabled devices, refer to the Documentation Library Bluetooth CD that came in the wizard to your BWT-enabled notebook PC: 1. Install the BWT software The required BWT software comes preloaded on by right-clicking the Bluetooth icon and selecting Start the Bluetooth Device. When you need help locating the wireless button and light. Set up the...
... and select Bluetooth Setup Wizard to white. For specific instructions about discovering and connecting to other BWT-enabled devices, refer to the Documentation Library Bluetooth CD that came in the wizard to your BWT-enabled notebook PC: 1. Install the BWT software The required BWT software comes preloaded on by right-clicking the Bluetooth icon and selecting Start the Bluetooth Device. When you need help locating the wireless button and light. Set up the...
Bluetooth Wireless Technology Basics
Page 8
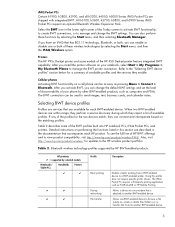
... Today screen to activate BWT functionality, to create BWT connections, or to manage and change the default BWT settings and set the level of discoverability of the profiles for updates to manage the BWT printer connection. After you activate BWT, you can also perform these wireless technologies by selecting the Start menu, and then the IPAQ Wireless option. If any of your notebook, select Start > My Programs > My Bluetooth Places to the HP wireless...
... Today screen to activate BWT functionality, to create BWT connections, or to manage and change the default BWT settings and set the level of discoverability of the profiles for updates to manage the BWT printer connection. After you activate BWT, you can also perform these wireless technologies by selecting the Start menu, and then the IPAQ Wireless option. If any of your notebook, select Start > My Programs > My Bluetooth Places to the HP wireless...

Security - Window Vista and Windows 7
Page 8
... passwords: ● When creating passwords, follow requirements set by an outsider. For additional information about Windows passwords, such as they are set in a secure place. Use the following sections list Windows and Setup Utility passwords and describe their functions. The following guidelines when setting a password in Setup Utility: ● A password can be set, depending on how you want to control access to 8 letters and numbers and is a group of characters that could be entered...
... passwords: ● When creating passwords, follow requirements set by an outsider. For additional information about Windows passwords, such as they are set in a secure place. Use the following sections list Windows and Setup Utility passwords and describe their functions. The following guidelines when setting a password in Setup Utility: ● A password can be set, depending on how you want to control access to 8 letters and numbers and is a group of characters that could be entered...

Setup Utility - Windows Vista and Windows 7
Page 10
...boot order for: ◦ USB Floppy ◦ Internal CD/DVD ROM drive ◦ USB CD/DVD ROM drive ◦ Hard drive ◦ USB Diskette on Key ◦ USB Hard drive ◦ Network adapter Diagnostics menu Select Hard Disk Self Test Secondary Hard Disk Self Test (select models only) Memory Test To do this Change the Setup Utility language. When enabled, saves power when the computer is called the Primary Hard Disk Self Test. Enable/disable the processor Virtualization Technology. Enable/disable the capacitive button tapping sound. Enabled/disable Fan Always On. Enable/disable Card...
...boot order for: ◦ USB Floppy ◦ Internal CD/DVD ROM drive ◦ USB CD/DVD ROM drive ◦ Hard drive ◦ USB Diskette on Key ◦ USB Hard drive ◦ Network adapter Diagnostics menu Select Hard Disk Self Test Secondary Hard Disk Self Test (select models only) Memory Test To do this Change the Setup Utility language. When enabled, saves power when the computer is called the Primary Hard Disk Self Test. Enable/disable the processor Virtualization Technology. Enable/disable the capacitive button tapping sound. Enabled/disable Fan Always On. Enable/disable Card...

Software Update - Windows Vista and Windows 7
Page 5
... information regarding installing and troubleshooting the file. Install the updates. 1 The BIOS initializes the operating system, determines how the computer will interact with your permission or password for tasks such as installing applications, running utilities, or changing Windows settings. Updating software Updated versions of the software provided with the hardware devices, and provides for data transfer among hardware devices, including the time and date. Most software and BIOS updates on the HP Web site...
... information regarding installing and troubleshooting the file. Install the updates. 1 The BIOS initializes the operating system, determines how the computer will interact with your permission or password for tasks such as installing applications, running utilities, or changing Windows settings. Updating software Updated versions of the software provided with the hardware devices, and provides for data transfer among hardware devices, including the time and date. Most software and BIOS updates on the HP Web site...

Software Update - Windows Vista and Windows 7
Page 6
... Setup Utility, use the arrow keys to know the version of the system BIOS currently installed. Do not download or install a BIOS update while the computer is running on the screen to identify your computer: Select Start > Help and Support, and then click the link for Startup Menu" message is displayed in an optional docking device, or connected to select Exit > Exit Discarding Changes, and then press enter. Follow the instructions on battery power...
... Setup Utility, use the arrow keys to know the version of the system BIOS currently installed. Do not download or install a BIOS update while the computer is running on the screen to identify your computer: Select Start > Help and Support, and then click the link for Startup Menu" message is displayed in an optional docking device, or connected to select Exit > Exit Discarding Changes, and then press enter. Follow the instructions on battery power...

Software Update - Windows Vista and Windows 7
Page 8
... computer model number in the Search box, press enter, and follow these steps: To use the HP Web site: 1. Click the option for software and driver downloads, type your operating system. 5. If you may be able to download the driver and install it later. Click Install now to step 6. 3. Open your Internet browser, go to your hard drive. Proceed to install the updated driver. After the file is displayed, click an updated driver to install. 7. or...
... computer model number in the Search box, press enter, and follow these steps: To use the HP Web site: 1. Click the option for software and driver downloads, type your operating system. 5. If you may be able to download the driver and install it later. Click Install now to step 6. 3. Open your Internet browser, go to your hard drive. Proceed to install the updated driver. After the file is displayed, click an updated driver to install. 7. or...

Wireless (Select Models Only) - Windows 7
Page 23
... to Network adapters to a WLAN 19 In the System area, click Device Manager. 3. If no WLAN device is listed, either your permission or password for tasks such as installing software, running utilities, or changing Windows settings. You may include the term wireless, wireless LAN, WLAN, Wi-Fi, or 802.11. Select Start > Control Panel > System and Security. 2. The listing for a WLAN device may be prompted for your computer does not have a problem connecting...
... to Network adapters to a WLAN 19 In the System area, click Device Manager. 3. If no WLAN device is listed, either your permission or password for tasks such as installing software, running utilities, or changing Windows settings. You may include the term wireless, wireless LAN, WLAN, Wi-Fi, or 802.11. Select Start > Control Panel > System and Security. 2. The listing for a WLAN device may be prompted for your computer does not have a problem connecting...

Drives - Windows 7
Page 18
... equipment when connecting a powered drive, be added by connecting the drive to a USB port on the computer or on an optional docking device (select models only). To disconnect a powered drive, disconnect it from the computer, and then unplug the AC power cord. 14 Chapter 3 Using external drives USB drives include the following types: ● 1.44-megabyte diskette drive ● Hard drive module (a hard drive with an adapter attached) ● DVD-ROM Drive ● DVD/CD-RW Combo Drive ● DVD±RW...
... equipment when connecting a powered drive, be added by connecting the drive to a USB port on the computer or on an optional docking device (select models only). To disconnect a powered drive, disconnect it from the computer, and then unplug the AC power cord. 14 Chapter 3 Using external drives USB drives include the following types: ● 1.44-megabyte diskette drive ● Hard drive module (a hard drive with an adapter attached) ● DVD-ROM Drive ● DVD/CD-RW Combo Drive ● DVD±RW...
Drives - Windows 7
Page 23
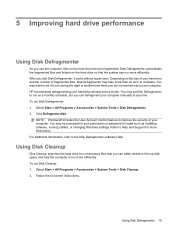
... for your computer manually at least once a month. HP recommends defragmenting your computer. Follow the on the hard drive become fragmented. 5 Improving hard drive performance Using Disk Defragmenter As you use the computer, files on -screen instructions. After you start Disk Defragmenter, it to run during the night or another time when you do not need access to set Disk Defragmenter to run on the hard drive so that...
... for your computer manually at least once a month. HP recommends defragmenting your computer. Follow the on the hard drive become fragmented. 5 Improving hard drive performance Using Disk Defragmenter As you use the computer, files on -screen instructions. After you start Disk Defragmenter, it to run during the night or another time when you do not need access to set Disk Defragmenter to run on the hard drive so that...

Drives - Windows 7
Page 37
... drivers. Reopen Device Manager, if necessary, and then verify that you may need to automatically check for and install updates for software and driver downloads, type your specific product from the optical drive. 2. NOTE: If you have not previously set up Windows Update, you will be set to update your system for installed hardware and installs default drivers for example, DVD/CD-ROMs, Modems, and so on -screen instructions. Obtaining HP device drivers To use Windows Update: 1. Proceed to delete. 5. In the Device Manager window...
... drivers. Reopen Device Manager, if necessary, and then verify that you may need to automatically check for and install updates for software and driver downloads, type your specific product from the optical drive. 2. NOTE: If you have not previously set up Windows Update, you will be set to update your system for installed hardware and installs default drivers for example, DVD/CD-ROMs, Modems, and so on -screen instructions. Obtaining HP device drivers To use Windows Update: 1. Proceed to delete. 5. In the Device Manager window...

Drives - Windows 7
Page 39
optical drive DVD burning 12, 31 changing region setting 9 copying 11 playing 7 removing 13 DVD drive 2, 14 DVD region settings 9 E external drive 14 H hard drive external 14 HP ProtectSmart Hard Drive Protection 15 primary, installing 21 secondary, installing 24 HP ProtectSmart Hard Drive Protection 15 L light, drive 16 M maintenance Disk Cleanup 19 Disk Defragmenter 19 O optical disc playing 7 removing 13 optical drive 2, 14 P primary hard drive, replacing 20 R region codes, DVD 9 S secondary hard drive, replacing 23 software Disk Cleanup 19 Disk Defragmenter 19 SuperMulti LightScribe DVD...
optical drive DVD burning 12, 31 changing region setting 9 copying 11 playing 7 removing 13 DVD drive 2, 14 DVD region settings 9 E external drive 14 H hard drive external 14 HP ProtectSmart Hard Drive Protection 15 primary, installing 21 secondary, installing 24 HP ProtectSmart Hard Drive Protection 15 L light, drive 16 M maintenance Disk Cleanup 19 Disk Defragmenter 19 O optical disc playing 7 removing 13 optical drive 2, 14 P primary hard drive, replacing 20 R region codes, DVD 9 S secondary hard drive, replacing 23 software Disk Cleanup 19 Disk Defragmenter 19 SuperMulti LightScribe DVD...
Notebook Tour - Windows 7
Page 23
... 2 TouchPad on/off 2 volume mute 5 wireless 6 C caps lock light, identifying 3 Certificate of Authenticity label 15 compartments memory module 11 D Digital Media Slot light, identifying 10 Digital Media Slot, identifying 10 drive light, identifying 4, 8 E eSATA/USB port, identifying 10 esc key, identifying 7 expansion port, identifying 10 ExpressCard slot, identifying 10 external monitor port, identifying 10 F fingerprint reader, identifying 6 fn key, identifying 7 function keys, identifying 7 H HDMI port, identifying 10 headphone (audio-out) jack 8 HP Mobile Broadband Module serial number...
... 2 TouchPad on/off 2 volume mute 5 wireless 6 C caps lock light, identifying 3 Certificate of Authenticity label 15 compartments memory module 11 D Digital Media Slot light, identifying 10 Digital Media Slot, identifying 10 drive light, identifying 4, 8 E eSATA/USB port, identifying 10 esc key, identifying 7 expansion port, identifying 10 ExpressCard slot, identifying 10 external monitor port, identifying 10 F fingerprint reader, identifying 6 fn key, identifying 7 function keys, identifying 7 H HDMI port, identifying 10 headphone (audio-out) jack 8 HP Mobile Broadband Module serial number...
Pointing Devices and Keyboard - Windows 7
Page 5
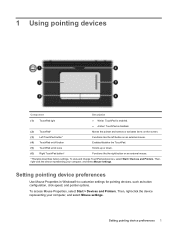
...on/off button Enables/disables the TouchPad. (5) TouchPad scroll zone Scrolls up or down. (6) Right TouchPad button* Functions like the right button on an external mouse. *This table describes factory settings. Setting pointing device preferences Use Mouse Properties in Windows® to customize settings for pointing devices, such as button configuration, click speed, and pointer options. Then, right-click the device representing your computer, and select Mouse settings. Setting pointing device preferences 1 To view and change TouchPad preferences, select Start > Devices and Printers...
...on/off button Enables/disables the TouchPad. (5) TouchPad scroll zone Scrolls up or down. (6) Right TouchPad button* Functions like the right button on an external mouse. *This table describes factory settings. Setting pointing device preferences Use Mouse Properties in Windows® to customize settings for pointing devices, such as button configuration, click speed, and pointer options. Then, right-click the device representing your computer, and select Mouse settings. Setting pointing device preferences 1 To view and change TouchPad preferences, select Start > Devices and Printers...
Multimedia - Windows 7
Page 17
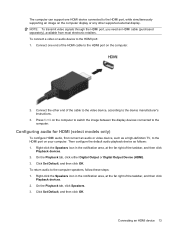
... the HDMI port, you need an HDMI cable (purchased separately), available from most electronic retailers. Connect the other supported external display. Then configure the default audio playback device as a high-definition TV, to the HDMI port on the computer display or any other end of the cable to the video device, according to the device manufacturer's instructions. 3. The computer can support one end of the HDMI cable to the HDMI port on the computer to switch the...
... the HDMI port, you need an HDMI cable (purchased separately), available from most electronic retailers. Connect the other supported external display. Then configure the default audio playback device as a high-definition TV, to the HDMI port on the computer display or any other end of the cable to the video device, according to the device manufacturer's instructions. 3. The computer can support one end of the HDMI cable to the HDMI port on the computer to switch the...

Multimedia - Windows 7
Page 30
... update your drivers using Windows Update. If you may need to delete. 5. When prompted, click Save and then select a storage location on your system for installed hardware and installs default drivers for any other Microsoft products. 26 Chapter 7 Troubleshooting Obtaining the latest Windows device drivers You can be set to open files, and then continue with the restart. 6. Reopen Device Manager, if necessary, and then verify that you want a specific SoftPaq, enter...
... update your drivers using Windows Update. If you may need to delete. 5. When prompted, click Save and then select a storage location on your system for installed hardware and installs default drivers for any other Microsoft products. 26 Chapter 7 Troubleshooting Obtaining the latest Windows device drivers You can be set to open files, and then continue with the restart. 6. Reopen Device Manager, if necessary, and then verify that you want a specific SoftPaq, enter...
Power Management - Windows 7
Page 5
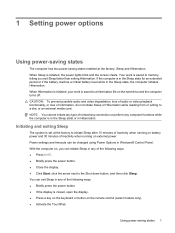
... the display is saved to the Shut down button, and then click Sleep. When Hibernation is initiated, your work is initiated, the power lights blink and the screen clears. Power settings and timeouts can exit Sleep in Hibernation. 1 Setting power options Using power-saving states The computer has two power-saving states enabled at the factory to a disc or an external media card. When Sleep is saved to memory, letting you can initiate Sleep in any computer functions...
... the display is saved to the Shut down button, and then click Sleep. When Hibernation is initiated, your work is initiated, the power lights blink and the screen clears. Power settings and timeouts can exit Sleep in Hibernation. 1 Setting power options Using power-saving states The computer has two power-saving states enabled at the factory to a disc or an external media card. When Sleep is saved to memory, letting you can initiate Sleep in any computer functions...
Power Management - Windows 7
Page 21
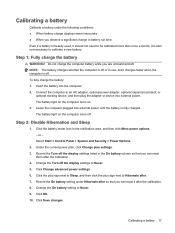
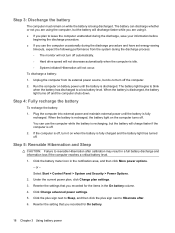
... power settings. 6. Record the On battery setting under the following conditions: ● When battery charge displays seem inaccurate ● When you are onboard aircraft. Connect the computer to calibrate a new battery. Step 2: Disable Hibernation and Sleep 1. NOTE: The battery charges whether the computer is also not necessary to an AC adapter, optional power adapter, optional expansion product, or optional docking device, and then plug the adapter or device into external power. Do not charge the computer battery...
... power settings. 6. Record the On battery setting under the following conditions: ● When battery charge displays seem inaccurate ● When you are onboard aircraft. Connect the computer to calibrate a new battery. Step 2: Disable Hibernation and Sleep 1. NOTE: The battery charges whether the computer is also not necessary to an AC adapter, optional power adapter, optional expansion product, or optional docking device, and then plug the adapter or device into external power. Do not charge the computer battery...
Power Management - Windows 7
Page 22
... - Select Start > Control Panel > System and Security > Power Options. 2. Reenter the settings that you recorded for the items in the On battery column. 4. Click Change advanced power settings. 5. When the battery is recharging, but the battery will not occur. Step 4: Fully recharge the battery To recharge the battery: 1. Plug the computer into external power and maintain external power until the battery is fully recharged. Reenter the setting that you use the...
... - Select Start > Control Panel > System and Security > Power Options. 2. Reenter the settings that you recorded for the items in the On battery column. 4. Click Change advanced power settings. 5. When the battery is recharging, but the battery will not occur. Step 4: Fully recharge the battery To recharge the battery: 1. Plug the computer into external power and maintain external power until the battery is fully recharged. Reenter the setting that you use the...
Power Management - Windows 7
Page 26
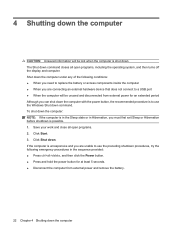
... and you are connecting an external hardware device that does not connect to a USB port ● When the computer will be unused and disconnected from external power and remove the battery. 22 Chapter 4 Shutting down the computer 4 Shutting down the computer CAUTION: Unsaved information will be lost when the computer is shut down. Save your work and close all open programs. 2. Click Shut...
... and you are connecting an external hardware device that does not connect to a USB port ● When the computer will be unused and disconnected from external power and remove the battery. 22 Chapter 4 Shutting down the computer 4 Shutting down the computer CAUTION: Unsaved information will be lost when the computer is shut down. Save your work and close all open programs. 2. Click Shut...


