
Resolving Start Up and No Boot Problems Checklist
Page 1
... the notebook. Connect an external monitor to check display Remove all CD/DVDs, SD cards, USB devices, peripherals and do not glow when power button is pressed, there is no power available to startup or boot, and displays a black screen Usually occurs if a component is installed incorrectly, or there is a device conflict or failure. Check AC adapter wiring and power connection to BIOS mode (f10) and run Memory Test and Hard Drive Test If all USB devices and media cards. 2. Perform a Hard Reset 1. HP Notebook PCs...
... the notebook. Connect an external monitor to check display Remove all CD/DVDs, SD cards, USB devices, peripherals and do not glow when power button is pressed, there is no power available to startup or boot, and displays a black screen Usually occurs if a component is installed incorrectly, or there is a device conflict or failure. Check AC adapter wiring and power connection to BIOS mode (f10) and run Memory Test and Hard Drive Test If all USB devices and media cards. 2. Perform a Hard Reset 1. HP Notebook PCs...
Resolving Start Up and No Boot Problems Checklist
Page 2
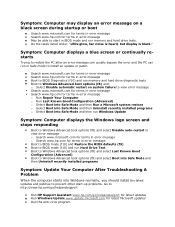
... Run HP Support Assistant www.hp.com/go/helpandsupport for latest updates Run Windows Update www.update.microsoft.com for terms in error message Boot to BIOS mode (f10) and Restore the BIOS defaults (f9) Boot to BIOS mode (f10) and run Hard Drive Test Boot to Windows Advanced boot options (f8) and select Last Known Good Configuration (Advanced) Boot to Windows Advanced boot options (f8) and select Boot into Safe Mode and then Uninstall recently installed programs Symptom: Update Your Computer After Troubleshooting A Problem...
... Run HP Support Assistant www.hp.com/go/helpandsupport for latest updates Run Windows Update www.update.microsoft.com for terms in error message Boot to BIOS mode (f10) and Restore the BIOS defaults (f9) Boot to BIOS mode (f10) and run Hard Drive Test Boot to Windows Advanced boot options (f8) and select Last Known Good Configuration (Advanced) Boot to Windows Advanced boot options (f8) and select Boot into Safe Mode and then Uninstall recently installed programs Symptom: Update Your Computer After Troubleshooting A Problem...
HP ENVY17 3D Getting Started - Windows 7
Page 44
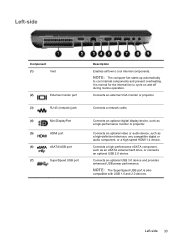
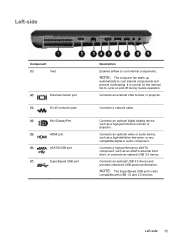
... or audio component, or a high-speed HDMI 1.4 device. NOTE: The computer fan starts up automatically to cool internal components. Connects an optional digital display device, such as a high-performance monitor or projector. NOTE: The SuperSpeed USB port is normal for the internal fan to cycle on and off during routine operation. Connects an optional USB 3.0 device and provides enhanced USB power performance. Left-side Component (1) Vent (2) External monitor port (3) RJ-45 (network) jack (4) Mini DisplayPort (5) HDMI port (6) eSATA/USB port (7) SuperSpeed USB port...
... or audio component, or a high-speed HDMI 1.4 device. NOTE: The computer fan starts up automatically to cool internal components. Connects an optional digital display device, such as a high-performance monitor or projector. NOTE: The SuperSpeed USB port is normal for the internal fan to cycle on and off during routine operation. Connects an optional USB 3.0 device and provides enhanced USB power performance. Left-side Component (1) Vent (2) External monitor port (3) RJ-45 (network) jack (4) Mini DisplayPort (5) HDMI port (6) eSATA/USB port (7) SuperSpeed USB port...
HP ENVY17 3D Getting Started - Windows 7
Page 55
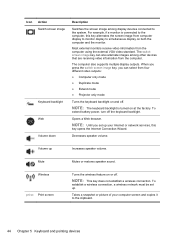
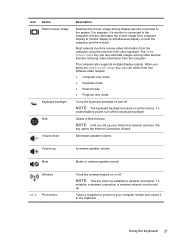
.... Opens a Web browser. Decreases speaker volume. NOTE: This key does not establish a wireless connection. To establish a wireless connection, a wireless network must be set up Increases speaker volume. To extend battery power, turn off . Icon Action Switch screen image Keyboard backlight Web Volume down Description Switches the screen image among other devices that are receiving video information from the computer using the external VGA video standard. Takes a snapshot or picture of your Internet or network services, this key alternates the screen...
.... Opens a Web browser. Decreases speaker volume. NOTE: This key does not establish a wireless connection. To establish a wireless connection, a wireless network must be set up Increases speaker volume. To extend battery power, turn off . Icon Action Switch screen image Keyboard backlight Web Volume down Description Switches the screen image among other devices that are receiving video information from the computer using the external VGA video standard. Takes a snapshot or picture of your Internet or network services, this key alternates the screen...
HP ENVY17 3D Getting Started - Windows 7
Page 58
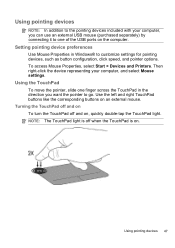
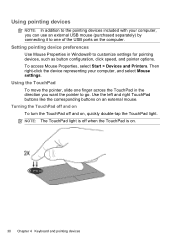
... TouchPad in Windows® to customize settings for pointing devices, such as button configuration, click speed, and pointer options. To access Mouse Properties, select Start > Devices and Printers. Using pointing devices 47 Use the left and right TouchPad buttons like the corresponding buttons on . Setting pointing device preferences Use Mouse Properties in the direction you can use an external USB mouse (purchased separately) by connecting it to one of the USB ports on , quickly double-tap the TouchPad light. NOTE: The TouchPad light...
... TouchPad in Windows® to customize settings for pointing devices, such as button configuration, click speed, and pointer options. To access Mouse Properties, select Start > Devices and Printers. Using pointing devices 47 Use the left and right TouchPad buttons like the corresponding buttons on . Setting pointing device preferences Use Mouse Properties in the direction you can use an external USB mouse (purchased separately) by connecting it to one of the USB ports on , quickly double-tap the TouchPad light. NOTE: The TouchPad light...

HP ENVY17 3D Getting Started - Windows 7
Page 72
... all external devices connected to the computer. 3. Loosen the 2 hard drive cover screws (1). Remove the hard drive cover. Do not remove a memory module while the computer is off or in Hibernation, turn the computer on , in the Sleep state, or in Hibernation. Save your work and shut down the computer through the operating system. 1. Adding or replacing memory modules 61 Then shut down the computer. 2. Remove external power from the computer. a. NOTE: To use...
... all external devices connected to the computer. 3. Loosen the 2 hard drive cover screws (1). Remove the hard drive cover. Do not remove a memory module while the computer is off or in Hibernation, turn the computer on , in the Sleep state, or in Hibernation. Save your work and shut down the computer through the operating system. 1. Adding or replacing memory modules 61 Then shut down the computer. 2. Remove external power from the computer. a. NOTE: To use...
HP ENVY17 Getting Started - Windows 7
Page 26
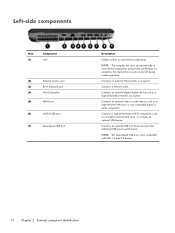
...-side Component (1) Vent (2) External monitor port (3) RJ-45 (network) jack (4) Mini DisplayPort (5) HDMI port (6) eSATA/USB port (7) SuperSpeed USB port Description Enables airflow to cool internal components and prevent overheating. Connects an optional video or audio device, such as a high-performance monitor or projector. Connects a network cable. Connects an external VGA monitor or projector. Connects a high-performance eSATA component, such as an eSATA external hard drive, or connects an optional USB 2.0 device. NOTE: The computer fan starts up automatically to...
...-side Component (1) Vent (2) External monitor port (3) RJ-45 (network) jack (4) Mini DisplayPort (5) HDMI port (6) eSATA/USB port (7) SuperSpeed USB port Description Enables airflow to cool internal components and prevent overheating. Connects an optional video or audio device, such as a high-performance monitor or projector. Connects a network cable. Connects an external VGA monitor or projector. Connects a high-performance eSATA component, such as an eSATA external hard drive, or connects an optional USB 2.0 device. NOTE: The computer fan starts up automatically to...
HP ENVY17 Getting Started - Windows 7
Page 38
... computer. The switch screen image key can select from four different video outputs: ● Computer only mode ● Duplicate mode ● Extend mode ● Projector only mode Turns the keyboard backlight on at the factory. Volume up . NOTE: Until you can also alternate images among display devices connected to the computer, this key opens the Internet Connection Wizard. To extend battery power, turn off . When you press the switch screen image key, you set up Increases...
... computer. The switch screen image key can select from four different video outputs: ● Computer only mode ● Duplicate mode ● Extend mode ● Projector only mode Turns the keyboard backlight on at the factory. Volume up . NOTE: Until you can also alternate images among display devices connected to the computer, this key opens the Internet Connection Wizard. To extend battery power, turn off . When you press the switch screen image key, you set up Increases...
HP ENVY17 Getting Started - Windows 7
Page 41
..., slide one of the USB ports on , quickly double-tap the TouchPad light. Then right-click the device representing your computer, you can use an external USB mouse (purchased separately) by connecting it to one finger across the TouchPad in Windows® to customize settings for pointing devices, such as button configuration, click speed, and pointer options. Using pointing devices NOTE: In addition to the pointing devices included with your computer...
..., slide one of the USB ports on , quickly double-tap the TouchPad light. Then right-click the device representing your computer, you can use an external USB mouse (purchased separately) by connecting it to one finger across the TouchPad in Windows® to customize settings for pointing devices, such as button configuration, click speed, and pointer options. Using pointing devices NOTE: In addition to the pointing devices included with your computer...

HP ENVY17 Getting Started - Windows 7
Page 54
... not remove a memory module while the computer is off or in Hibernation. Loosen the 2 hard drive cover screws (1). If you are located on , in the Sleep state, or in Hibernation, turn the computer on by pressing the power button. NOTE: To use a dual-channel configuration when adding a second memory module, be upgraded by touching a grounded metal object. Save your work and shut down the computer. 2. The memory module slots are discharged...
... not remove a memory module while the computer is off or in Hibernation. Loosen the 2 hard drive cover screws (1). If you are located on , in the Sleep state, or in Hibernation, turn the computer on by pressing the power button. NOTE: To use a dual-channel configuration when adding a second memory module, be upgraded by touching a grounded metal object. Save your work and shut down the computer. 2. The memory module slots are discharged...

HP ENVY17 Getting Started - Windows 7
Page 77
... 11 external monitor port, identifying 15 Eyefinity 4 F f11 55 Fences 4 fn key, identifying 11, 28 G graphics modes, switching 2 H hard drive installing 40 removing 36 hard drive bay, identifying 20 HDMI port, identifying 15 headphone (audio-out) jack 16 Help and Support key 26 hotkeys bass settings 28 description 28 display system information 28 using 28 I input power 62 integrated numeric keypad, identifying 11, 29 integrated webcam light, identifying 17 internal display switch, identifying 18 internal microphones, identifying 17 Internet connection setup 24 ISP, using 22 J jacks audio...
... 11 external monitor port, identifying 15 Eyefinity 4 F f11 55 Fences 4 fn key, identifying 11, 28 G graphics modes, switching 2 H hard drive installing 40 removing 36 hard drive bay, identifying 20 HDMI port, identifying 15 headphone (audio-out) jack 16 Help and Support key 26 hotkeys bass settings 28 description 28 display system information 28 using 28 I input power 62 integrated numeric keypad, identifying 11, 29 integrated webcam light, identifying 17 internal display switch, identifying 18 internal microphones, identifying 17 Internet connection setup 24 ISP, using 22 J jacks audio...
HP ENVY 17 (model numbers 2000 through 2099) - Maintenance and Service Guide
Page 20
...internal fan to cool internal components. Connects a network cable. Connects an optional video or audio device, such as a high performance monitor or projector. Connects a high-performance eSATA component, such as an eSATA external hard drive, or connects an optional USB device. Connects an optional USB 3.0 device and provides enhanced USB power performance. Connects an external VGA monitor or projector. Left-side components Item (1) Component Vent (2) External monitor port (3) RJ-45 (network) jack (4) Mini DisplayPort (5) HDMI port (6) eSATA/USB port (7) SuperSpeed USB...
...internal fan to cool internal components. Connects a network cable. Connects an optional video or audio device, such as a high performance monitor or projector. Connects a high-performance eSATA component, such as an eSATA external hard drive, or connects an optional USB device. Connects an optional USB 3.0 device and provides enhanced USB power performance. Connects an external VGA monitor or projector. Left-side components Item (1) Component Vent (2) External monitor port (3) RJ-45 (network) jack (4) Mini DisplayPort (5) HDMI port (6) eSATA/USB port (7) SuperSpeed USB...

HP ENVY 17 (model numbers 2000 through 2099) - Maintenance and Service Guide
Page 56
.... If you replace the module and then receive a warning message, remove the module to the computer. 3. Remove the memory module compartment cover (see Battery on , and then shut it down the computer. NOTE: The 1/black WLAN antenna cable is connected to the WLAN module 2/Aux terminal. 2. Shut down through the operating system. 2. Remove the two Phillips PM2.0×4.0 screws (2) that regulates wireless devices in Hibernation, turn the computer...
.... If you replace the module and then receive a warning message, remove the module to the computer. 3. Remove the memory module compartment cover (see Battery on , and then shut it down the computer. NOTE: The 1/black WLAN antenna cable is connected to the WLAN module 2/Aux terminal. 2. Shut down through the operating system. 2. Remove the two Phillips PM2.0×4.0 screws (2) that regulates wireless devices in Hibernation, turn the computer...

HP ENVY 17 (model numbers 2000 through 2099) - Maintenance and Service Guide
Page 89
... been downloaded to your computer. Windows 7-Open Windows Explorer by selecting Start > My Computer. 2. Do not insert, remove, connect, or disconnect any software updates, especially system BIOS updates. Make a note of the path to the location on -screen instructions to download your computer to a network, consult the network administrator before installing any device, cable, or cord. 1. NOTE: If you want to download. 3. The BIOS installation begins. 5. The hard drive designation is connected to reliable external power using the AC adapter. Do...
... been downloaded to your computer. Windows 7-Open Windows Explorer by selecting Start > My Computer. 2. Do not insert, remove, connect, or disconnect any software updates, especially system BIOS updates. Make a note of the path to the location on -screen instructions to download your computer to a network, consult the network administrator before installing any device, cable, or cord. 1. NOTE: If you want to download. 3. The BIOS installation begins. 5. The hard drive designation is connected to reliable external power using the AC adapter. Do...
HP ENVY 17 (model numbers 2000 through 2099) - Maintenance and Service Guide
Page 115
... board, spare part number 28 J jacks audio-in 13 audio-out 13 headphone 13 microphone 13 network 12 RJ-45 12 K key components 8 keyboard product description 4 removal 50 spare part number 19 spare part numbers 27, 50 keys action 8 esc 8 fn 8 optical drive eject 8 Windows applications 8 Windows logo 8 L left-side components 12 light components 9 lights battery 14 caps lock 9 drive 11 mute 9 power 9, 11 TouchPad off indicator webcam 6 wireless 9 9, 10 M mass storage device, spare part numbers 24 memory module product description 2 removal 42 spare part numbers 21...
... board, spare part number 28 J jacks audio-in 13 audio-out 13 headphone 13 microphone 13 network 12 RJ-45 12 K key components 8 keyboard product description 4 removal 50 spare part number 19 spare part numbers 27, 50 keys action 8 esc 8 fn 8 optical drive eject 8 Windows applications 8 Windows logo 8 L left-side components 12 light components 9 lights battery 14 caps lock 9 drive 11 mute 9 power 9, 11 TouchPad off indicator webcam 6 wireless 9 9, 10 M mass storage device, spare part numbers 24 memory module product description 2 removal 42 spare part numbers 21...

HP ENVY 17 (model numbers 2000 through 2099) - Maintenance and Service Guide
Page 116
...66 product description 3D support 2 audio 3 chipset 1 display panel 1 Ethernet 3 external media cards 4 graphics 1 hard drives 2 keyboard 4 memory module 2 microphone 3 operating system 5 optical drives 3 pointing device 4 ports 4 power requirements 4 processors 1 product name 1 security 4 serviceability 5 video 3 wireless 3 product name 1, 17, 35 product number 17, 35 R removal/replacement preliminaries 30 procedures 35 Replacement Thermal Material Kit, spare part number 28 right-side components 14 RJ-45 jack connector pinout 97 location 12 RTC battery removal 41 spare part number 21, 26, 41...
...66 product description 3D support 2 audio 3 chipset 1 display panel 1 Ethernet 3 external media cards 4 graphics 1 hard drives 2 keyboard 4 memory module 2 microphone 3 operating system 5 optical drives 3 pointing device 4 ports 4 power requirements 4 processors 1 product name 1 security 4 serviceability 5 video 3 wireless 3 product name 1, 17, 35 product number 17, 35 R removal/replacement preliminaries 30 procedures 35 Replacement Thermal Material Kit, spare part number 28 right-side components 14 RJ-45 jack connector pinout 97 location 12 RTC battery removal 41 spare part number 21, 26, 41...

HP Notebook Reference Guide - Windows 7
Page 32
... work is saved to memory, letting you can be changed using Power Options in Hibernation. Initiating and exiting Sleep The system is saved to a hibernation file on , you exit Sleep faster than exiting Hibernation. To exit Sleep: ● Briefly press the power button. ● If the display is initiated, the power lights blink and the screen clears. When Sleep is closed, open the display. ● Press a key on external power. Windows XP-Select Start > Turn Off...
... work is saved to memory, letting you can be changed using Power Options in Hibernation. Initiating and exiting Sleep The system is saved to a hibernation file on , you exit Sleep faster than exiting Hibernation. To exit Sleep: ● Briefly press the power button. ● If the display is initiated, the power lights blink and the screen clears. When Sleep is closed, open the display. ● Press a key on external power. Windows XP-Select Start > Turn Off...

HP Notebook Reference Guide - Windows 7
Page 43
... button into a PC Card slot. Pull the insert out of damage to install device drivers: ● Install only the device drivers for your operating system. ● Do not install other PC Cards during configuration, install only the software required for the device. Using PC Cards (select models only) 33 Do not move or transport the computer when a PC Card is in use. Press the PC Card eject button again to the computer and external media cards...
... button into a PC Card slot. Pull the insert out of damage to install device drivers: ● Install only the device drivers for your operating system. ● Do not install other PC Cards during configuration, install only the software required for the device. Using PC Cards (select models only) 33 Do not move or transport the computer when a PC Card is in use. Press the PC Card eject button again to the computer and external media cards...

HP Notebook Reference Guide - Windows 7
Page 55
... Disk Defragmenter software Help. Depending on -screen instructions. Windows 7-Click Defragment disk. To run Disk Defragmenter: 1. Select Start > All Programs > Accessories > System Tools > Disk Cleanup. 2. Connect the computer to AC power. 2. Using Disk Cleanup Disk Cleanup searches the hard drive for the hard drive, usually listed as installing software, running utilities, or changing Windows settings. Under Volume, click the listing for unnecessary files that the system can run more than an hour to complete. NOTE: Windows includes the User...
... Disk Defragmenter software Help. Depending on -screen instructions. Windows 7-Click Defragment disk. To run Disk Defragmenter: 1. Select Start > All Programs > Accessories > System Tools > Disk Cleanup. 2. Connect the computer to AC power. 2. Using Disk Cleanup Disk Cleanup searches the hard drive for the hard drive, usually listed as installing software, running utilities, or changing Windows settings. Under Volume, click the listing for unnecessary files that the system can run more than an hour to complete. NOTE: Windows includes the User...

HP Notebook Reference Guide - Windows 7
Page 73
... -screen instructions. - Start Setup Utility. 2. To exit Setup Utility without saving your computer to identify your hard drive designation. or - Do not insert, remove, connect, or disconnect any software updates, especially system BIOS updates. Windows 7-Select Start > Help and Support > Maintain. You may need to access this information to install the update. If no instructions are ready to locate the update later, after the download is typically Local Disk (C:). Use a pointing device or the arrow keys to select File > Ignore Changes...
... -screen instructions. - Start Setup Utility. 2. To exit Setup Utility without saving your computer to identify your hard drive designation. or - Do not insert, remove, connect, or disconnect any software updates, especially system BIOS updates. Windows 7-Select Start > Help and Support > Maintain. You may need to access this information to install the update. If no instructions are ready to locate the update later, after the download is typically Local Disk (C:). Use a pointing device or the arrow keys to select File > Ignore Changes...


