HP ENVY 17 (model numbers 2000 through 2099) - Maintenance and Service Guide
Page 20
...) jack (4) Mini DisplayPort (5) HDMI port (6) eSATA/USB port (7) SuperSpeed USB port Description Enables airflow to cycle on and off during routine operation. Connects an external VGA monitor or projector. Connects a network cable. Connects a high-performance eSATA component, such as a high performance monitor or projector. NOTE: The SuperSpeed USB port is normal for the internal fan to cool internal components. Connects an optional USB 3.0 device and provides enhanced USB power performance. Connects an optional digital display device such as an eSATA external hard...
...) jack (4) Mini DisplayPort (5) HDMI port (6) eSATA/USB port (7) SuperSpeed USB port Description Enables airflow to cycle on and off during routine operation. Connects an external VGA monitor or projector. Connects a network cable. Connects a high-performance eSATA component, such as a high performance monitor or projector. NOTE: The SuperSpeed USB port is normal for the internal fan to cool internal components. Connects an optional USB 3.0 device and provides enhanced USB power performance. Connects an optional digital display device such as an eSATA external hard...

HP ENVY 17 (model numbers 2000 through 2099) - Maintenance and Service Guide
Page 56
... unresponsive system, replace the wireless module only with a wireless module authorized for use in the computer by first unplugging the power cord from the AC outlet and then unplugging the AC adapter from the computer. 4. If you are unsure whether the computer is connected to the WLAN module 2/Aux terminal. 2. NOTE: The 1/black WLAN antenna cable is connected to restore device functionality, and then contact technical support.
... unresponsive system, replace the wireless module only with a wireless module authorized for use in the computer by first unplugging the power cord from the AC outlet and then unplugging the AC adapter from the computer. 4. If you are unsure whether the computer is connected to the WLAN module 2/Aux terminal. 2. NOTE: The 1/black WLAN antenna cable is connected to restore device functionality, and then contact technical support.

HP ENVY 17 (model numbers 2000 through 2099) - Maintenance and Service Guide
Page 89
... extension (for your hard drive. Windows XP-Select Start > Help and Support, and then select the software and drivers update. 2. Make a note of the date, name, or other identifier. Using the hard drive path you want to download. 3. Updating the BIOS 81 You will need this path when you connect your computer to your computer: Windows 7-Select Start > Help and Support > Maintain. Follow any instructions that are displayed on -screen instructions. Double-click your...
... extension (for your hard drive. Windows XP-Select Start > Help and Support, and then select the software and drivers update. 2. Make a note of the date, name, or other identifier. Using the hard drive path you want to download. 3. Updating the BIOS 81 You will need this path when you connect your computer to your computer: Windows 7-Select Start > Help and Support > Maintain. Follow any instructions that are displayed on -screen instructions. Double-click your...
HP ENVY 17 (model numbers 2000 through 2099) - Maintenance and Service Guide
Page 115
... board, spare part number 28 J jacks audio-in 13 audio-out 13 headphone 13 microphone 13 network 12 RJ-45 12 K key components 8 keyboard product description 4 removal 50 spare part number 19 spare part numbers 27, 50 keys action 8 esc 8 fn 8 optical drive eject 8 Windows applications 8 Windows logo 8 L left-side components 12 light components 9 lights battery 14 caps lock 9 drive 11 mute 9 power 9, 11 TouchPad off indicator webcam 6 wireless 9 9, 10 M mass storage device, spare part numbers 24 memory module product description 2 removal 42 spare part numbers 21...
... board, spare part number 28 J jacks audio-in 13 audio-out 13 headphone 13 microphone 13 network 12 RJ-45 12 K key components 8 keyboard product description 4 removal 50 spare part number 19 spare part numbers 27, 50 keys action 8 esc 8 fn 8 optical drive eject 8 Windows applications 8 Windows logo 8 L left-side components 12 light components 9 lights battery 14 caps lock 9 drive 11 mute 9 power 9, 11 TouchPad off indicator webcam 6 wireless 9 9, 10 M mass storage device, spare part numbers 24 memory module product description 2 removal 42 spare part numbers 21...

HP ENVY 17 (model numbers 2000 through 2099) - Maintenance and Service Guide
Page 116
...66 product description 3D support 2 audio 3 chipset 1 display panel 1 Ethernet 3 external media cards 4 graphics 1 hard drives 2 keyboard 4 memory module 2 microphone 3 operating system 5 optical drives 3 pointing device 4 ports 4 power requirements 4 processors 1 product name 1 security 4 serviceability 5 video 3 wireless 3 product name 1, 17, 35 product number 17, 35 R removal/replacement preliminaries 30 procedures 35 Replacement Thermal Material Kit, spare part number 28 right-side components 14 RJ-45 jack connector pinout 97 location 12 RTC battery removal 41 spare part number 21, 26, 41...
...66 product description 3D support 2 audio 3 chipset 1 display panel 1 Ethernet 3 external media cards 4 graphics 1 hard drives 2 keyboard 4 memory module 2 microphone 3 operating system 5 optical drives 3 pointing device 4 ports 4 power requirements 4 processors 1 product name 1 security 4 serviceability 5 video 3 wireless 3 product name 1, 17, 35 product number 17, 35 R removal/replacement preliminaries 30 procedures 35 Replacement Thermal Material Kit, spare part number 28 right-side components 14 RJ-45 jack connector pinout 97 location 12 RTC battery removal 41 spare part number 21, 26, 41...

Getting Started - Windows 7 (For 2D Models Only)
Page 26
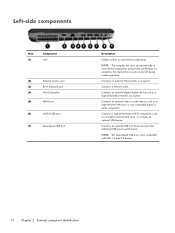
... eSATA external hard drive, or connects an optional USB 2.0 device. NOTE: The computer fan starts up automatically to cool internal components. Connects an optional USB 3.0 device and provides enhanced USB power performance. Connects a network cable. Connects a high-performance eSATA component, such as a high-definition television, or any compatible digital or audio component. Left-side 15 Connects an optional digital display device, such as a high-performance monitor or projector. Left-side Component (1) Vent (2) External monitor port (3) RJ-45 (network) jack (4) Mini...
... eSATA external hard drive, or connects an optional USB 2.0 device. NOTE: The computer fan starts up automatically to cool internal components. Connects an optional USB 3.0 device and provides enhanced USB power performance. Connects a network cable. Connects a high-performance eSATA component, such as a high-definition television, or any compatible digital or audio component. Left-side 15 Connects an optional digital display device, such as a high-performance monitor or projector. Left-side Component (1) Vent (2) External monitor port (3) RJ-45 (network) jack (4) Mini...

Getting Started - Windows 7 (For 2D Models Only)
Page 38
... right TouchPad buttons like an external numeric keypad. Setting pointing device preferences Use Mouse Properties in the direction you can use an external USB mouse (purchased separately) by connecting it to go. Using pointing devices NOTE: In addition to customize settings for pointing devices, such as button configuration, click speed, and pointer options. Using the TouchPad To move the pointer, slide one of the USB ports on an external mouse. Using pointing devices 27 To access Mouse Properties, select Start > Devices...
... right TouchPad buttons like an external numeric keypad. Setting pointing device preferences Use Mouse Properties in the direction you can use an external USB mouse (purchased separately) by connecting it to go. Using pointing devices NOTE: In addition to customize settings for pointing devices, such as button configuration, click speed, and pointer options. Using the TouchPad To move the pointer, slide one of the USB ports on an external mouse. Using pointing devices 27 To access Mouse Properties, select Start > Devices...

Getting Started - Windows 7 (For 2D Models Only)
Page 51
... hard drive cover. Do not remove a memory module while the computer is off or in Hibernation, turn the computer on by touching a grounded metal object. Disconnect all external devices connected to the equipment, unplug the power cord and remove all batteries before removing a memory module from the AC outlet and remove the battery. 4. Remove the hard drive cover. The memory capacity of static electricity by pressing the power button. Before beginning any procedure, ensure that both memory modules...
... hard drive cover. Do not remove a memory module while the computer is off or in Hibernation, turn the computer on by touching a grounded metal object. Disconnect all external devices connected to the equipment, unplug the power cord and remove all batteries before removing a memory module from the AC outlet and remove the battery. 4. Remove the hard drive cover. The memory capacity of static electricity by pressing the power button. Before beginning any procedure, ensure that both memory modules...

Getting Started - Windows 7 (For 2D Models Only)
Page 70
... you have the service recovery discs. Press the spacebar to select the first hard drive, and then press the down arrow key to select System Configuration, and then change and restart the computer. 5. Disabling RAID 0 59 Turn on the computer are permanently removed. RAID, and then press enter. All files you have the set of recovery discs. To disable RAID 0: 1. When the Startup Menu is enabled by the manufacturer...
... you have the service recovery discs. Press the spacebar to select the first hard drive, and then press the down arrow key to select System Configuration, and then change and restart the computer. 5. Disabling RAID 0 59 Turn on the computer are permanently removed. RAID, and then press enter. All files you have the set of recovery discs. To disable RAID 0: 1. When the Startup Menu is enabled by the manufacturer...

Getting Started - Windows 7 (For 2D Models Only)
Page 72
... 33 fn key, identifying 11, 26 G graphics modes, switching 2 H hard drive installing 38 removing 36 hard drive bay, identifying 20 hard drive light 12 HDMI port, identifying 15 headphone (audio-out) jack 16 Help and Support key 24 hotkeys bass settings 26 description 26 display system information 26 using 26 HP Recovery Manager 49 I input power 57 integrated numeric keypad, identifying 11, 27 integrated webcam light, identifying 17 internal display switch, identifying 18 internal microphones, identifying 17 Internet connection setup 22 ISP, using 21 J jacks audio-in (microphone) 16 Index...
... 33 fn key, identifying 11, 26 G graphics modes, switching 2 H hard drive installing 38 removing 36 hard drive bay, identifying 20 hard drive light 12 HDMI port, identifying 15 headphone (audio-out) jack 16 Help and Support key 24 hotkeys bass settings 26 description 26 display system information 26 using 26 HP Recovery Manager 49 I input power 57 integrated numeric keypad, identifying 11, 27 integrated webcam light, identifying 17 internal display switch, identifying 18 internal microphones, identifying 17 Internet connection setup 22 ISP, using 21 J jacks audio-in (microphone) 16 Index...

GETTING STARTED - Windows 7 (For select 3D Models Only)
Page 43
... enhanced USB power performance. NOTE: The SuperSpeed USB port is normal for the internal fan to cool internal components and prevent overheating. Connects an optional video or audio device, such as an eSATA external hard drive, or connects an optional USB 2.0 device. Connects a network cable. Connects an optional digital display device, such as a high-performance monitor or projector. Left-side Component (1) Vent (2) External monitor port (3) RJ-45 (network) jack (4) Mini DisplayPort (5) HDMI port (6) eSATA/USB port (7) SuperSpeed USB port Description Enables airflow...
... enhanced USB power performance. NOTE: The SuperSpeed USB port is normal for the internal fan to cool internal components and prevent overheating. Connects an optional video or audio device, such as an eSATA external hard drive, or connects an optional USB 2.0 device. Connects a network cable. Connects an optional digital display device, such as a high-performance monitor or projector. Left-side Component (1) Vent (2) External monitor port (3) RJ-45 (network) jack (4) Mini DisplayPort (5) HDMI port (6) eSATA/USB port (7) SuperSpeed USB port Description Enables airflow...

GETTING STARTED - Windows 7 (For select 3D Models Only)
Page 54
To access Mouse Properties, select Start > Devices and Printers. Setting pointing device preferences Use Mouse Properties in Windows to the pointing devices included with your computer, and select Mouse settings. Using pointing devices 43 Then rightclick the device representing your computer, you can use an external USB mouse (purchased separately) by connecting it to one of the USB ports on the computer. NOTE: The computer does not have a num lock key. Using the keypad Using the integrated...
To access Mouse Properties, select Start > Devices and Printers. Setting pointing device preferences Use Mouse Properties in Windows to the pointing devices included with your computer, and select Mouse settings. Using pointing devices 43 Then rightclick the device representing your computer, you can use an external USB mouse (purchased separately) by connecting it to one of the USB ports on the computer. NOTE: The computer does not have a num lock key. Using the keypad Using the integrated...

GETTING STARTED - Windows 7 (For select 3D Models Only)
Page 87
... 17 A action keys adjusting volume 41 Help and Support 40 identifying 29 keyboard backlight 41 muting speaker sound 41 screen brightness down 40 screen brightness up 40 switching screen image 41 using 40 wireless 41 AMD Catalyst Control Center 6 AMD Eyefinity 5 audio-in (microphone) jack, identifying 33 audio-out (headphone) jack, identifying 33 B backing up customized window, toolbar, and menu bar settings 67 personal files 67 bass settings hotkey 42 battery bay 71 battery bay, identifying 36 battery light 31 battery...
... 17 A action keys adjusting volume 41 Help and Support 40 identifying 29 keyboard backlight 41 muting speaker sound 41 screen brightness down 40 screen brightness up 40 switching screen image 41 using 40 wireless 41 AMD Catalyst Control Center 6 AMD Eyefinity 5 audio-in (microphone) jack, identifying 33 audio-out (headphone) jack, identifying 33 B backing up customized window, toolbar, and menu bar settings 67 personal files 67 bass settings hotkey 42 battery bay 71 battery bay, identifying 36 battery light 31 battery...

HP Notebook Reference Guide - Windows 7
Page 28
... have a power button or a power switch. The term power button is called Shut Down instead of power controls. NOTE: If you must first exit Sleep or Hibernation before shutdown is lost when the computer shuts down . Save your work and close all open programs. 2. If the computer is unresponsive and you are connecting an external hardware device that does not connect to a network domain, the button you can...
... have a power button or a power switch. The term power button is called Shut Down instead of power controls. NOTE: If you must first exit Sleep or Hibernation before shutdown is lost when the computer shuts down . Save your work and close all open programs. 2. If the computer is unresponsive and you are connecting an external hardware device that does not connect to a network domain, the button you can...
HP Notebook Reference Guide - Windows 7
Page 29
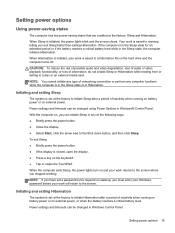
... a disc or an external media card. When the computer exits Sleep, the power lights turn on and your work will return to the Shut down button, and then click Sleep. Setting power options 19 If the computer is in the Sleep state or in Windows Control Panel. NOTE: You cannot initiate any type of networking connection or perform any of inactivity when running on battery power or on the hard drive and the computer turns off. Power settings...
... a disc or an external media card. When the computer exits Sleep, the power lights turn on and your work will return to the Shut down button, and then click Sleep. Setting power options 19 If the computer is in the Sleep state or in Windows Control Panel. NOTE: You cannot initiate any type of networking connection or perform any of inactivity when running on battery power or on the hard drive and the computer turns off. Power settings...
HP Notebook Reference Guide - Windows 7
Page 47
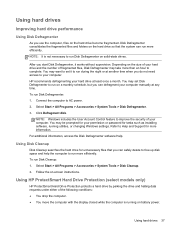
... not need access to your computer. Select Start > All Programs > Accessories > System Tools > Disk Defragmenter. 3. NOTE: It is running utilities, or changing Windows settings. Refer to Help and Support for unnecessary files that the system can safely delete to free up disk space and help the computer to run more efficiently. For additional information, access the Disk Defragmenter software Help. Using HP ProtectSmart Hard Drive Protection (select models only) HP ProtectSmart Hard Drive...
... not need access to your computer. Select Start > All Programs > Accessories > System Tools > Disk Defragmenter. 3. NOTE: It is running utilities, or changing Windows settings. Refer to Help and Support for unnecessary files that the system can safely delete to free up disk space and help the computer to run more efficiently. For additional information, access the Disk Defragmenter software Help. Using HP ProtectSmart Hard Drive Protection (select models only) HP ProtectSmart Hard Drive...
HP Notebook Reference Guide - Windows 7
Page 55
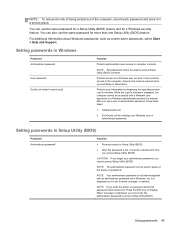
... also use the same password for a Setup Utility (BIOS) feature and for more than one Setup Utility (BIOS) feature. After you exit Sleep or Hibernation. NOTE: Your administrator password is not interchangeable with an administrator password set in Windows, nor is it is entered. For additional information about Windows passwords, such as it displayed as screen-saver passwords, select Start > Help and Support. NOTE: This password cannot be accessed until a Windows user password or a Windows administrator password is set a user...
... also use the same password for a Setup Utility (BIOS) feature and for more than one Setup Utility (BIOS) feature. After you exit Sleep or Hibernation. NOTE: Your administrator password is not interchangeable with an administrator password set in Windows, nor is it is entered. For additional information about Windows passwords, such as it displayed as screen-saver passwords, select Start > Help and Support. NOTE: This password cannot be accessed until a Windows user password or a Windows administrator password is set a user...

HP Notebook Reference Guide - Windows 7
Page 63
... instructions. - Use the arrow keys to enter Setup Utility (BIOS). or - Restoring factory settings in Setup Utility (BIOS) NOTE: Restoring defaults will not change the hard drive mode. To exit Setup Utility (BIOS) menus, choose one of the screen. 2. Use the arrow keys to enter Setup Utility (BIOS). Displaying system information 1. Start Setup Utility (BIOS). 2. To exit Setup Utility (BIOS) without saving your changes and exit Setup Utility (BIOS) menus, press f10, and then follow the on or restart the computer, and then press esc while the "Press the ESC key for Startup Menu...
... instructions. - Use the arrow keys to enter Setup Utility (BIOS). or - Restoring factory settings in Setup Utility (BIOS) NOTE: Restoring defaults will not change the hard drive mode. To exit Setup Utility (BIOS) menus, choose one of the screen. 2. Use the arrow keys to enter Setup Utility (BIOS). Displaying system information 1. Start Setup Utility (BIOS). 2. To exit Setup Utility (BIOS) without saving your changes and exit Setup Utility (BIOS) menus, press f10, and then follow the on or restart the computer, and then press esc while the "Press the ESC key for Startup Menu...
HP Notebook Reference Guide - Windows 7
Page 65
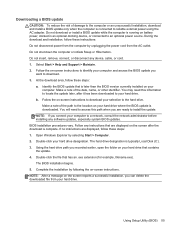
... currently installed on battery power, docked in an optional docking device, or connected to your hard drive. BIOS installation procedures vary. Select Start > Help and Support > Maintain. 2. Follow the on the screen after it has been downloaded to an optional power source. Make a note of the path to a network, consult the network administrator before installing any device, cable, or cord. 1. Using the hard drive path you recorded earlier, open the folder on -screen instructions. Complete the installation by selecting Start...
... currently installed on battery power, docked in an optional docking device, or connected to your hard drive. BIOS installation procedures vary. Select Start > Help and Support > Maintain. 2. Follow the on the screen after it has been downloaded to an optional power source. Make a note of the path to a network, consult the network administrator before installing any device, cable, or cord. 1. Using the hard drive path you recorded earlier, open the folder on -screen instructions. Complete the installation by selecting Start...

HP Notebook Reference Guide - Windows 7
Page 72
...9 connecting a modem cable adapter 9 selecting a location setting 10 N network cable, connecting 11 network icon 2 O operating system controls 4 optical disc inserting 39 removing 40 optical drive 34 optional external devices, using 34 P passwords set in Setup Utility (BIOS) 45 set in Windows 45 ports DisplayPort 15 expansion 34 external monitor 15 HDMI 16 Intel Wireless Display 17 VGA 15 power battery 22 conserving 24 options 19 power button 18 power meter 20 power plans customizing 21 selecting 20 viewing current 20 power switch 18 power-on password creating 47 entering 47 managing 47 power...
...9 connecting a modem cable adapter 9 selecting a location setting 10 N network cable, connecting 11 network icon 2 O operating system controls 4 optical disc inserting 39 removing 40 optical drive 34 optional external devices, using 34 P passwords set in Setup Utility (BIOS) 45 set in Windows 45 ports DisplayPort 15 expansion 34 external monitor 15 HDMI 16 Intel Wireless Display 17 VGA 15 power battery 22 conserving 24 options 19 power button 18 power meter 20 power plans customizing 21 selecting 20 viewing current 20 power switch 18 power-on password creating 47 entering 47 managing 47 power...


