
User Guide
Page 2
Second Edition: June 2018 First Edition: April 2018 Document Part Number: L26793-002 HP shall not be construed as constituting an additional warranty. Nothing herein should be liable for HP products and services are set forth in the express warranty statements accompanying such products and services. The information contained herein is subject to change without notice. © Copyright 2018 HP Development Company, L.P. The only warranties for technical or editorial errors or omissions contained herein.
Second Edition: June 2018 First Edition: April 2018 Document Part Number: L26793-002 HP shall not be construed as constituting an additional warranty. Nothing herein should be liable for HP products and services are set forth in the express warranty statements accompanying such products and services. The information contained herein is subject to change without notice. © Copyright 2018 HP Development Company, L.P. The only warranties for technical or editorial errors or omissions contained herein.

User Guide
Page 3
CAUTION: Text set off in this manner indicates that failure to follow directions could result in damage to follow directions could result in this manner provides helpful hints. About This Guide This guide provides information on monitor features, setting up the monitor, using the software and technical specifications. NOTE: Text set off in bodily harm or loss of information. TIP: Text set off in this manner indicates that failure to equipment or loss of life. Text set off in this manner provides important supplemental information. iii WARNING!
CAUTION: Text set off in this manner indicates that failure to follow directions could result in damage to follow directions could result in this manner provides helpful hints. About This Guide This guide provides information on monitor features, setting up the monitor, using the software and technical specifications. NOTE: Text set off in bodily harm or loss of information. TIP: Text set off in this manner indicates that failure to equipment or loss of life. Text set off in this manner provides important supplemental information. iii WARNING!

User Guide
Page 4
iv About This Guide
iv About This Guide

User Guide
Page 5
... up and using the monitor ...4 Attaching the protective cover and setting up the monitor 4 Attaching the protective cover ...4 Setting up the monitor ...5 Connecting an HP notebook computer ...7 Display modes ...7 Extend mode (default) ...7 Mirror mode ...8 Selecting the Low Blue Light mode ...8 Primary display ...8 Turning on the monitor ...9 Using the on-screen display (OSD) menu ...10 4 Finding more information ...11 Product support ...11 Preparing to call technical support ...11 Locating the rating labels ...11 Appendix A Technical specifications ...12 Monitor specifications ...12 Energy...
... up and using the monitor ...4 Attaching the protective cover and setting up the monitor 4 Attaching the protective cover ...4 Setting up the monitor ...5 Connecting an HP notebook computer ...7 Display modes ...7 Extend mode (default) ...7 Mirror mode ...8 Selecting the Low Blue Light mode ...8 Primary display ...8 Turning on the monitor ...9 Using the on-screen display (OSD) menu ...10 4 Finding more information ...11 Product support ...11 Preparing to call technical support ...11 Locating the rating labels ...11 Appendix A Technical specifications ...12 Monitor specifications ...12 Energy...

User Guide
Page 7
... versions of HP programs and drivers. 1 Product features The LCD (liquid crystal display) monitor has an active matrix, thin-film transistor (TFT) panel with the following features: ● 35.6 cm (14-inch) diagonal viewable area display with 1920 x 1080 resolution, plus full-screen support for lower resolutions ● Single USB Type-C connection for power and video (with USB Type-C cable provided) ● LED backlit panel with ultra-thin screen ● Integrated, adjustable stand transforms...
... versions of HP programs and drivers. 1 Product features The LCD (liquid crystal display) monitor has an active matrix, thin-film transistor (TFT) panel with the following features: ● 35.6 cm (14-inch) diagonal viewable area display with 1920 x 1080 resolution, plus full-screen support for lower resolutions ● Single USB Type-C connection for power and video (with USB Type-C cable provided) ● LED backlit panel with ultra-thin screen ● Integrated, adjustable stand transforms...

User Guide
Page 8
... service provider. ● Use only a power source and connection appropriate for your product, go to http://www.hp.com/support, select your country, and follow the on dressers, bookcases, shelves, desks, speakers, chests, or carts may fall . This guide is not covered under the HP warranty. ● Slots and openings in the cabinet are inappropriately situated on -screen instructions to find your product. LCD monitors that...
... service provider. ● Use only a power source and connection appropriate for your product, go to http://www.hp.com/support, select your country, and follow the on dressers, bookcases, shelves, desks, speakers, chests, or carts may fall . This guide is not covered under the HP warranty. ● Slots and openings in the cabinet are inappropriately situated on -screen instructions to find your product. LCD monitors that...

User Guide
Page 9
... gently wipe the screen surface. CAUTION: Do not use the damp cloth to clean the monitor screen or cabinet. Shipping the monitor Keep the original packing box in a storage area. Maintenance guidelines 3 For more difficult cleaning situations, use a 50/50 mix of the unit. 2. Never spray the cleaner directly on the screen surface. Turn off the monitor and unplug the USB cable from the...
... gently wipe the screen surface. CAUTION: Do not use the damp cloth to clean the monitor screen or cabinet. Shipping the monitor Keep the original packing box in a storage area. Maintenance guidelines 3 For more difficult cleaning situations, use a 50/50 mix of the unit. 2. Never spray the cleaner directly on the screen surface. Turn off the monitor and unplug the USB cable from the...
User Guide
Page 10
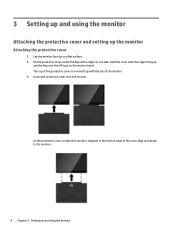
... and attach to the monitor. 4 Chapter 3 Setting up and using the monitor Attaching the protective cover and setting up the monitor Attaching the protective cover 1. Lower the protective cover onto the monitor. As the protective cover contacts the monitor, magnets in the bottom edge of the monitor. 3. Lay the monitor face up and the flap over the HP logo on the monitor bezel. On the protective...
... and attach to the monitor. 4 Chapter 3 Setting up and using the monitor Attaching the protective cover and setting up the monitor Attaching the protective cover 1. Lower the protective cover onto the monitor. As the protective cover contacts the monitor, magnets in the bottom edge of the monitor. 3. Lay the monitor face up and the flap over the HP logo on the monitor bezel. On the protective...

User Guide
Page 11
The case and monitor are attached together by its protective case. If held improperly, the monitor could detach from the case and fall. 1. Support the monitor with one hand and lift the flap. Attaching the protective cover and setting up the monitor by magnets. Setting up the monitor CAUTION: Do not pick up the monitor 5
The case and monitor are attached together by its protective case. If held improperly, the monitor could detach from the case and fall. 1. Support the monitor with one hand and lift the flap. Attaching the protective cover and setting up the monitor by magnets. Setting up the monitor CAUTION: Do not pick up the monitor 5

User Guide
Page 12
2. Fold the protective case toward the back of the monitor on a flat surface with the protective case behind the monitor. 4. Continue to form a triangle support for the monitor. 6 Chapter 3 Setting up and using the monitor Set the bottom edge of the monitor to support the monitor and open the protective case. 3.
2. Fold the protective case toward the back of the monitor on a flat surface with the protective case behind the monitor. 4. Continue to form a triangle support for the monitor. 6 Chapter 3 Setting up and using the monitor Set the bottom edge of the monitor to support the monitor and open the protective case. 3.

User Guide
Page 13
... icons in the window at the top of the provided USB Type-C cable to the monitor. NOTE: Some applications may not support display on your notebook monitor and the attached monitor. Extend mode (default) To set up extend mode: 1. Connecting an HP notebook computer 1. Connecting an HP notebook computer 7 Turn on power to the USB Type-C port on the computer. 2. In the Display drop-down menu, click the attached monitor, and then select...
... icons in the window at the top of the provided USB Type-C cable to the monitor. NOTE: Some applications may not support display on your notebook monitor and the attached monitor. Extend mode (default) To set up extend mode: 1. Connecting an HP notebook computer 1. Connecting an HP notebook computer 7 Turn on power to the USB Type-C port on the computer. 2. In the Display drop-down menu, click the attached monitor, and then select...

User Guide
Page 14
... blue light emitted by the monitor reduces the blue light exposure to a comfortable viewing light, follow the steps below. 1. To adjust your monitor to your Windows desktop, right-click, and then click Personalize > Display Settings. 2. In mirror mode, the settings on the primary monitor (screen resolution, color depth, and refresh rate) are replicated on your eyes. Press the Viewing Modes button to close the settings screen. It describes proper workstation setup, and proper posture, health, and work...
... blue light emitted by the monitor reduces the blue light exposure to a comfortable viewing light, follow the steps below. 1. To adjust your monitor to your Windows desktop, right-click, and then click Personalize > Display Settings. 2. In mirror mode, the settings on the primary monitor (screen resolution, color depth, and refresh rate) are replicated on your eyes. Press the Viewing Modes button to close the settings screen. It describes proper workstation setup, and proper posture, health, and work...
User Guide
Page 15
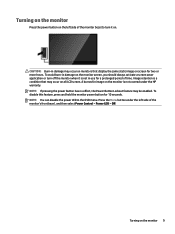
.... Turning on the monitor Press the power button on the left side of the monitor's front bezel, and then select Power Control > Power LED > Off. NOTE: You can disable the power LED in damage on the monitor is a condition that may occur on monitors that display the same static image on screen for 10 seconds. To avoid burn-in the OSD menu. Turning on the monitor 9 NOTE: If pressing the power button has...
.... Turning on the monitor Press the power button on the left side of the monitor's front bezel, and then select Power Control > Power LED > Off. NOTE: You can disable the power LED in damage on the monitor is a condition that may occur on monitors that display the same static image on screen for 10 seconds. To avoid burn-in the OSD menu. Turning on the monitor 9 NOTE: If pressing the power button has...

User Guide
Page 16
... navigate, select, and adjust the menu choices. Information: Shows monitor information window. The following : 1. If the OSD menu is not already on, press the power button on the left side of the monitor to turn on the OSD menu. If the monitor is on your preferences. Use the control buttons under the left side of the monitor bezel. 3. Using the on-screen display (OSD) menu Use the on-screen display (OSD) menu to adjust the screen image based on , press to...
... navigate, select, and adjust the menu choices. Information: Shows monitor information window. The following : 1. If the OSD menu is not already on, press the power button on the left side of the monitor to turn on the OSD menu. If the monitor is on your preferences. Use the control buttons under the left side of the monitor bezel. 3. Using the on-screen display (OSD) menu Use the on-screen display (OSD) menu to adjust the screen image based on , press to...
User Guide
Page 17
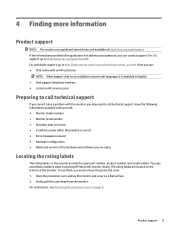
... provided in English. ● Find support telephone numbers ● Locate an HP service center Preparing to call technical support. Here you must remove the protective cover. 1. Open the protective cover and lay the monitor and cover on the bottom of the hardware and software you may need to call : ● Monitor model number ● Monitor serial number ● Purchase date on invoice ● Conditions under which the problem occurred ● Error messages...
... provided in English. ● Find support telephone numbers ● Locate an HP service center Preparing to call technical support. Here you must remove the protective cover. 1. Open the protective cover and lay the monitor and cover on the bottom of the hardware and software you may need to call : ● Monitor model number ● Monitor serial number ● Purchase date on invoice ● Conditions under which the problem occurred ● Error messages...
User Guide
Page 18
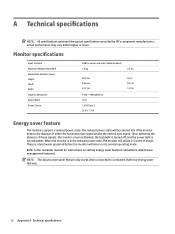
Monitor specifications Input Terminal Maximum Weight (Unpacked) Dimensions (includes cover) Height Depth Width Graphics Resolution Aspect Ratio Power Source USB for instructions on setting energy saver features (sometimes called power management features). The reduced power state will utilize 0.5 watts of power. When the monitor is in Energy saver feature The monitors support a reduced power state. NOTE: The above power saver feature only works when connected to the computer manual for power and video (cable included) 1.0 kg...
Monitor specifications Input Terminal Maximum Weight (Unpacked) Dimensions (includes cover) Height Depth Width Graphics Resolution Aspect Ratio Power Source USB for instructions on setting energy saver features (sometimes called power management features). The reduced power state will utilize 0.5 watts of power. When the monitor is in Energy saver feature The monitors support a reduced power state. NOTE: The above power saver feature only works when connected to the computer manual for power and video (cable included) 1.0 kg...
User Guide
Page 19
... by everyone, including people with additional assistive technologies. Supported assistive technologies HP products support a wide variety of our products and services and welcome feedback from users. to 9 p.m. Contacting support We are deaf or hard-of-hearing and use TRS/VRS/WebCapTel, contact us if you require technical support or have helped you are constantly refining the accessibility of operating system...
... by everyone, including people with additional assistive technologies. Supported assistive technologies HP products support a wide variety of our products and services and welcome feedback from users. to 9 p.m. Contacting support We are deaf or hard-of-hearing and use TRS/VRS/WebCapTel, contact us if you require technical support or have helped you are constantly refining the accessibility of operating system...

Quick Setup Guide
Page 1
... subject to change without notice. HP shall not be construed as constituting an additional warranty. The only warranties for technical or editorial errors or omissions contained herein. Quick Setup Optimum Resolution: 1920 x 1080 @ 60 Hz 1 2 3 4 USB-C 5 L26792-B22 © Copyright 2018 HP Development Company, L.P. Nothing herein should be liable for HP products and services are set forth in XXX USB-C www.hp.com/support
... subject to change without notice. HP shall not be construed as constituting an additional warranty. The only warranties for technical or editorial errors or omissions contained herein. Quick Setup Optimum Resolution: 1920 x 1080 @ 60 Hz 1 2 3 4 USB-C 5 L26792-B22 © Copyright 2018 HP Development Company, L.P. Nothing herein should be liable for HP products and services are set forth in XXX USB-C www.hp.com/support


