User Guide
Page 3
...-One Printer parts...3 Control panel features...4 Control panel features (HP Deskjet F4424 All-in-One only 5 2 Print Print documents...7 Print photos...8 Print envelopes...10 Print on specialty media...11 Print a Web page...17 4 Scan Scan to a computer...27 5 Copy Copy text or mixed documents 29 Set the copy paper type...30 6 Copy (HP Deskjet F4424 All-in-One only) Copy text or mixed documents 33 7 Work with cartridges Check the estimated ink levels 37 Order ink supplies...38 Automatically clean print cartridges 39 Manually clean print cartridges 39 Replace the cartridges...40 Cartridge...
...-One Printer parts...3 Control panel features...4 Control panel features (HP Deskjet F4424 All-in-One only 5 2 Print Print documents...7 Print photos...8 Print envelopes...10 Print on specialty media...11 Print a Web page...17 4 Scan Scan to a computer...27 5 Copy Copy text or mixed documents 29 Set the copy paper type...30 6 Copy (HP Deskjet F4424 All-in-One only) Copy text or mixed documents 33 7 Work with cartridges Check the estimated ink levels 37 Order ink supplies...38 Automatically clean print cartridges 39 Manually clean print cartridges 39 Replace the cartridges...40 Cartridge...

User Guide
Page 9
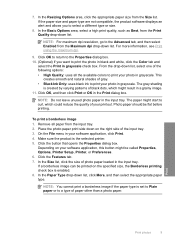
... to change settings, click the button that opens the Properties dialog box. Print documents Print photos Print envelopes Print on specific types of paper or transparency film, or use special features. Print Print documents 7 If you have paper loaded in your software application, this button might be called Properties, Options, Printer Setup, Printer, or Preferences. Make sure you need to continue. Depending on your software application, click Print. 3. On the File menu in the input tray. 2. NOTE: When printing a photo, you change print quality, print on specialty...
... to change settings, click the button that opens the Properties dialog box. Print documents Print photos Print envelopes Print on specific types of paper or transparency film, or use special features. Print Print documents 7 If you have paper loaded in your software application, this button might be called Properties, Options, Printer Setup, Printer, or Preferences. Make sure you need to continue. Depending on your software application, click Print. 3. On the File menu in the input tray. 2. NOTE: When printing a photo, you change print quality, print on specialty...
User Guide
Page 11
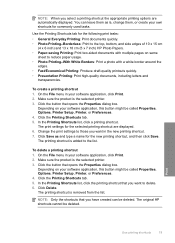
... a photo paper. For more information, see Print using the maximum dpi. 9. From the drop-down list, select one of the input tray. 3. This creates smooth and natural shades of your software application, this button might start to print your photo in grayscale check box. The paper might be called Properties, Options, Printer Setup, Printer, or Preferences. 6. Print Print photos 9 To print a borderless image 1. Place the photo paper print side down list, click More, and then select the appropriate paper type...
... a photo paper. For more information, see Print using the maximum dpi. 9. From the drop-down list, select one of the input tray. 3. This creates smooth and natural shades of your software application, this button might start to print your photo in grayscale check box. The paper might be called Properties, Options, Printer Setup, Printer, or Preferences. 6. Print Print photos 9 To print a borderless image 1. Place the photo paper print side down list, click More, and then select the appropriate paper type...

User Guide
Page 13
.... In the Printing Shortcuts list, click Presentation Printing, and then specify the following print settings: • Paper Type: Plain paper • Size: An appropriate envelope size 7. Place the transparencies in the right side of the transparencies. Print 5. 6. The side to the left . 2. Open the Printer Properties dialog box. 6. Slide the paper guide all the way to be printed on one another. 4. Carefully push the transparencies into the printer until they stop , so...
.... In the Printing Shortcuts list, click Presentation Printing, and then specify the following print settings: • Paper Type: Plain paper • Size: An appropriate envelope size 7. Place the transparencies in the right side of the transparencies. Print 5. 6. The side to the left . 2. Open the Printer Properties dialog box. 6. Slide the paper guide all the way to be printed on one another. 4. Carefully push the transparencies into the printer until they stop , so...
User Guide
Page 21
... box. Click Save as is the selected printer. 3. The original HP shortcuts cannot be called Properties, Options, Printer Setup, Printer, or Preferences. 4. Click the button that opens the Properties dialog box. In the Printing Shortcuts list, click a printing shortcut. Depending on same sheet to the list. Print Use printing shortcuts 19 Make sure the product is , change them as and type a name for the selected printing shortcut are automatically displayed. Click Delete. NOTE...
... box. Click Save as is the selected printer. 3. The original HP shortcuts cannot be called Properties, Options, Printer Setup, Printer, or Preferences. 4. Click the button that opens the Properties dialog box. In the Printing Shortcuts list, click a printing shortcut. Depending on same sheet to the list. Print Use printing shortcuts 19 Make sure the product is , change them as and type a name for the selected printing shortcut are automatically displayed. Click Delete. NOTE...
User Guide
Page 23
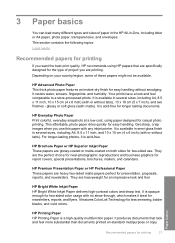
.... HP Bright White Inkjet Paper HP Bright White Inkjet Paper delivers high-contrast colors and sharp text. HP Advanced Photo Paper This thick photo paper features an instant-dry finish for casual photo printing. glossy or soft gloss (satin matte). 3 Paper basics You can load many different types and sizes of these papers might not be available. HP Everyday Photo Paper Print colorful, everyday snapshots at a low cost, using HP papers that look and feel . It is a high-quality multifunction paper. HP Printing Paper HP Printing Paper...
.... HP Bright White Inkjet Paper HP Bright White Inkjet Paper delivers high-contrast colors and sharp text. HP Advanced Photo Paper This thick photo paper features an instant-dry finish for casual photo printing. glossy or soft gloss (satin matte). 3 Paper basics You can load many different types and sizes of these papers might not be available. HP Everyday Photo Paper Print colorful, everyday snapshots at a low cost, using HP papers that look and feel . It is a high-quality multifunction paper. HP Printing Paper HP Printing Paper...

User Guide
Page 24
Chapter 3 paper. It is acid-free for less smearing, bolder blacks, and vivid colors. This film is a high-quality multifunction paper. HP Premium Inkjet Transparency Film HP Premium Inkjet Transparency Film make your photos are available in -One. HP Photo Value Pack HP Photo Value Packs conveniently package original HP cartridges and HP Advanced Photo Paper to meet high standards of printing affordable professional photos with your digital photos. To order HP papers and other everyday documents. It...
Chapter 3 paper. It is acid-free for less smearing, bolder blacks, and vivid colors. This film is a high-quality multifunction paper. HP Premium Inkjet Transparency Film HP Premium Inkjet Transparency Film make your photos are available in -One. HP Photo Value Pack HP Photo Value Packs conveniently package original HP cartridges and HP Advanced Photo Paper to meet high standards of printing affordable professional photos with your digital photos. To order HP papers and other everyday documents. It...
User Guide
Page 39
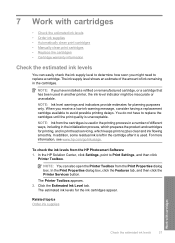
... Order ink supplies Work with cartridges • Check the estimated ink levels • Order ink supplies • Automatically clean print cartridges • Manually clean print cartridges • Replace the cartridges • Cartridge warranty information Check the estimated ink levels You can also open the Printer Toolbox from the HP Photosmart Software 1. In the HP Solution Center, click Settings, point to replace the cartridges until the print quality is used in the printing process in a number of ink remaining in another printer, the ink level...
... Order ink supplies Work with cartridges • Check the estimated ink levels • Order ink supplies • Automatically clean print cartridges • Manually clean print cartridges • Replace the cartridges • Cartridge warranty information Check the estimated ink levels You can also open the Printer Toolbox from the HP Photosmart Software 1. In the HP Solution Center, click Settings, point to replace the cartridges until the print quality is used in the printing process in a number of ink remaining in another printer, the ink level...

User Guide
Page 40
... -One to Print Settings, and then click Printer Toolbox. In the Print Properties dialog box, click the Features tab, and then click the Printer Services button. If it is not supported in -One, go to select Cartridge details. Chapter 7 Order ink supplies For a list of the shopping links on ink alert messages. NOTE: You can find out the reorder number. Use the menu at a local HP reseller. NOTE: Ordering cartridges online...
... -One to Print Settings, and then click Printer Toolbox. In the Print Properties dialog box, click the Features tab, and then click the Printer Services button. If it is not supported in -One, go to select Cartridge details. Chapter 7 Order ink supplies For a list of the shopping links on ink alert messages. NOTE: You can find out the reorder number. Use the menu at a local HP reseller. NOTE: Ordering cartridges online...

User Guide
Page 48
... steps: Troubleshooting common setup issues 1. Restart your computer before the software installation screen prompts you to the computer using the HP All-in -One at additional costs. Reinstall the HP Photosmart software. Solve a problem Chapter 8 HP dealer or call the support phone number for your country/region and language, then explore the services and warranty area for information about support options. Additional warranty options Extended service plans are listed in order...
... steps: Troubleshooting common setup issues 1. Restart your computer before the software installation screen prompts you to the computer using the HP All-in -One at additional costs. Reinstall the HP Photosmart software. Solve a problem Chapter 8 HP dealer or call the support phone number for your country/region and language, then explore the services and warranty area for information about support options. Additional warranty options Extended service plans are listed in order...

User Guide
Page 57
...: On some computer screens, colors might appear differently than they do when printed on calling for technical support. To align the printer 1. Click the Device Services tab. 5. Solution 7: Contact HP support Solution: Contact HP support for service. In the Print Properties dialog box, click the Features tab, and then click Printer Services. Cause: The printer needed to : www.hp.com/support. Load letter, A4, or legal unused plain white paper into the input tray. 2.
...: On some computer screens, colors might appear differently than they do when printed on calling for technical support. To align the printer 1. Click the Device Services tab. 5. Solution 7: Contact HP support Solution: Contact HP support for service. In the Print Properties dialog box, click the Features tab, and then click Printer Services. Cause: The printer needed to : www.hp.com/support. Load letter, A4, or legal unused plain white paper into the input tray. 2.

User Guide
Page 60
... the photo paper from curling. Depending on the paper type and print quality settings you have paper loaded in your image 180 degrees so that opens the Properties dialog box. In the Paper Type drop-down list, select the appropriate quality setting for your software application, this button might be called Properties, Options, Printer Setup, Printer, or Preferences. 5. Click the button that the light blue, gray, or brown hues in the input tray.
... the photo paper from curling. Depending on the paper type and print quality settings you have paper loaded in your image 180 degrees so that opens the Properties dialog box. In the Paper Type drop-down list, select the appropriate quality setting for your software application, this button might be called Properties, Options, Printer Setup, Printer, or Preferences. 5. Click the button that the light blue, gray, or brown hues in the input tray.

User Guide
Page 62
... paper loaded in your software application, click Print. 3. NOTE: You can help ensure excellent print quality. In the Print Settings area, click Printer Toolbox. Solution 5: Align the printer Solution: Align the printer. NOTE: To find out what dpi the product will print based on the product was set too low. The Printer Toolbox appears. 60 Solve a problem On the File menu in the input tray. 2. In the HP Solution Center, click Settings. 3. Click the button...
... paper loaded in your software application, click Print. 3. NOTE: You can help ensure excellent print quality. In the Print Settings area, click Printer Toolbox. Solution 5: Align the printer Solution: Align the printer. NOTE: To find out what dpi the product will print based on the product was set too low. The Printer Toolbox appears. 60 Solve a problem On the File menu in the input tray. 2. In the HP Solution Center, click Settings. 3. Click the button...

User Guide
Page 77
... was turned off . To install the OCR software, you use, for a paper jam Solution 1: Turn on the product Solution: Look at the On button located on the product. Solutions are listed in the software. The OCR language tells the software how to interpret the characters it is not lit, the product is firmly connected to the product and plugged into a power outlet. Cause: The scan document settings were not set...
... was turned off . To install the OCR software, you use, for a paper jam Solution 1: Turn on the product Solution: Look at the On button located on the product. Solutions are listed in the software. The OCR language tells the software how to interpret the characters it is not lit, the product is firmly connected to the product and plugged into a power outlet. Cause: The scan document settings were not set...
User Guide
Page 83
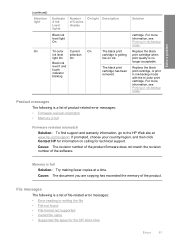
Replace the black print cartridge, or print in -One Errors 81 Product messages The following is a list of file-related error messages: • Error reading or writing the file • File not found • File format not supported • Invalid file name • Supported file types for technical support. Cause: The document you are copying has exceeded the memory of Copies display Tri-color Current On ink level selection light On On Black ink level ! Solve a problem (continued) Attention light On Estimate d Ink Level lights Black ink level light On...
Replace the black print cartridge, or print in -One Errors 81 Product messages The following is a list of file-related error messages: • Error reading or writing the file • File not found • File format not supported • Invalid file name • Supported file types for technical support. Cause: The document you are copying has exceeded the memory of Copies display Tri-color Current On ink level selection light On On Black ink level ! Solve a problem (continued) Attention light On Estimate d Ink Level lights Black ink level light On...

User Guide
Page 89
... moves to resolve the issue. Remove the black print cartridge from the slot on . 2. Make sure the clear plastic tape has been removed. Make sure the product is turned on the right. To make sure the print cartridges are using the pink pull tab. Check to the coppercolored contacts or ink nozzles. Make sure you are installed correctly 1. Solve a problem Print Cartridge(s) Missing Print cartridges missing or not detected Try the following...
... moves to resolve the issue. Remove the black print cartridge from the slot on . 2. Make sure the clear plastic tape has been removed. Make sure the product is turned on the right. To make sure the print cartridges are using the pink pull tab. Check to the coppercolored contacts or ink nozzles. Make sure you are installed correctly 1. Solve a problem Print Cartridge(s) Missing Print cartridges missing or not detected Try the following...

User Guide
Page 96
.... Remove the black print cartridge from the slot on . 2. Do not touch the ink nozzles or the copper-colored contacts. If it is turned on the right. Check for your product. Then push the print cartridge forward until it forward into the slot. 12. The print carriage moves to the coppercolored contacts or ink nozzles. Make sure you are installed correctly 1. Make sure the clear plastic...
.... Remove the black print cartridge from the slot on . 2. Do not touch the ink nozzles or the copper-colored contacts. If it is turned on the right. Check for your product. Then push the print cartridge forward until it forward into the slot. 12. The print carriage moves to the coppercolored contacts or ink nozzles. Make sure you are installed correctly 1. Make sure the clear plastic...

User Guide
Page 104
... index maximum) Photo Paper: Up to 280 g/m² (75 lb) Print specifications • Print speeds vary according to the complexity of the document • Panorama-size printing • Method: drop-on-demand thermal inkjet • Language: PCL3 GUI Copy specifications • Digital image processing • Maximum number of copies varies by model • Copy speeds vary according to the complexity of supported media sizes, see the scanner software. • Color: 48-bit color, 8-bit...
... index maximum) Photo Paper: Up to 280 g/m² (75 lb) Print specifications • Print speeds vary according to the complexity of the document • Panorama-size printing • Method: drop-on-demand thermal inkjet • Language: PCL3 GUI Copy specifications • Digital image processing • Maximum number of copies varies by model • Copy speeds vary according to the complexity of supported media sizes, see the scanner software. • Color: 48-bit color, 8-bit...

User Guide
Page 111
... the support period 45 B blank copy 78 scan 73 border 77 C color dull 61 connection problems HP All-in-One will not turn on 46 copy blank 78 missing information 77 paper types, recommended 30 specifications 102 troubleshooting 75 crop fails 83 customer support warranty 46 E enlargement 77 envelopes 68 environment Environmental product stewardship program 102 environmental specifications 101 error messages reading or writing file 82 F fax poor quality printouts 55 fax problems poor print quality 55 file invalid...
... the support period 45 B blank copy 78 scan 73 border 77 C color dull 61 connection problems HP All-in-One will not turn on 46 copy blank 78 missing information 77 paper types, recommended 30 specifications 102 troubleshooting 75 crop fails 83 customer support warranty 46 E enlargement 77 envelopes 68 environment Environmental product stewardship program 102 environmental specifications 101 error messages reading or writing file 82 F fax poor quality printouts 55 fax problems poor print quality 55 file invalid...

User Guide
Page 112
software installation reinstall 51 uninstall 51 start copy black 4, 5 color 4, 5 support process 43 system requirements 101 T technical information copy specifications 102 environmental specifications 101 print specifications 102 scan specifications 102 system requirements 101 text dotted lines on scan 74 incorrect format on scan 73 incorrect or missing on scan 74 jagged 66 meaningless characters 69 not filled in 55 smooth fonts 66 troubleshoot fax problems 55 print quality 53 setup 46 USB cable 48 troubleshooting copy 75 error messages 78...
software installation reinstall 51 uninstall 51 start copy black 4, 5 color 4, 5 support process 43 system requirements 101 T technical information copy specifications 102 environmental specifications 101 print specifications 102 scan specifications 102 system requirements 101 text dotted lines on scan 74 incorrect format on scan 73 incorrect or missing on scan 74 jagged 66 meaningless characters 69 not filled in 55 smooth fonts 66 troubleshoot fax problems 55 print quality 53 setup 46 USB cable 48 troubleshooting copy 75 error messages 78...


