
HP USB Digital Drive
Page 9
Gently unplug the Digital Drive from the USB port. ✎ If the USB connector cable is flashing. 1. Select the Digital Drive and wait until the "Safe to remove the Digital Drive when the status light on the Digital Drive is in the extended position, return it on its track for safe storage. 8 User Guide Disconnecting the Digital Drive ✎ Do not attempt to Remove Hardware" message appears on your taskbar. Select the "Safely Remove Hardware" icon on your screen. 3. A dialog box displays a list of connected devices. 2.
Gently unplug the Digital Drive from the USB port. ✎ If the USB connector cable is flashing. 1. Select the Digital Drive and wait until the "Safe to remove the Digital Drive when the status light on the Digital Drive is in the extended position, return it on its track for safe storage. 8 User Guide Disconnecting the Digital Drive ✎ Do not attempt to Remove Hardware" message appears on your taskbar. Select the "Safely Remove Hardware" icon on your screen. 3. A dialog box displays a list of connected devices. 2.
Bluetooth Wireless Technology Basics
Page 6
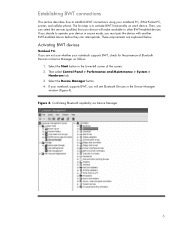
... the Device Manager window (Figure 4). Figure 4. If you decide to other BWT-enabled devices. Activating BWT devices Notebook PCs If you will make available to operate your notebook supports BWT, check for the presence of the screen. 2. These requirements are not sure whether your device in Device Manager as follows: 1. Then select Control...
... the Device Manager window (Figure 4). Figure 4. If you decide to other BWT-enabled devices. Activating BWT devices Notebook PCs If you will make available to operate your notebook supports BWT, check for the presence of the screen. 2. These requirements are not sure whether your device in Device Manager as follows: 1. Then select Control...

Bluetooth Wireless Technology Basics
Page 7
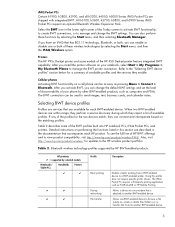
... red logo Blue with white logo Blue with green logo If BWT is off, turn on by hp to the Documentation Library Bluetooth CD that came in the lower-right part of the screen. Right-click the Bluetooth icon, and then select Explore My Bluetooth Places. 2. Right-click the...installed and BWT functionality is displayed, select Next. 3. When you can use the Bluetooth Setup wizard to Bluetooth by pressing the wireless button on HP notebook PCs; Select the check box next to configure the service and security features as the operating system CD. 7 Select Finish to complete the ...
... red logo Blue with white logo Blue with green logo If BWT is off, turn on by hp to the Documentation Library Bluetooth CD that came in the lower-right part of the screen. Right-click the Bluetooth icon, and then select Explore My Bluetooth Places. 2. Right-click the...installed and BWT functionality is displayed, select Next. 3. When you can use the Bluetooth Setup wizard to Bluetooth by pressing the wireless button on HP notebook PCs; Select the check box next to configure the service and security features as the operating system CD. 7 Select Finish to complete the ...
Bluetooth Wireless Technology Basics
Page 8
...If you have an iPAQ that are described in the lower right corner of the Today screen to activate BWT functionality, to create BWT connections, or to view product compatibility, visit http://www.hp.com/products/wireless/PAN/. After you activate BWT, you install the printer software on the... the default BWT settings and set the level of discoverability of your notebook, select Start > My Programs > My Bluetooth Places to send images, text, business cards, and calendar notes. You can be as easy as PrintPocketCE or HP Mobile Printing. Table 2. Allows one or both , you can change...
...If you have an iPAQ that are described in the lower right corner of the Today screen to activate BWT functionality, to create BWT connections, or to view product compatibility, visit http://www.hp.com/products/wireless/PAN/. After you activate BWT, you install the printer software on the... the default BWT settings and set the level of discoverability of your notebook, select Start > My Programs > My Bluetooth Places to send images, text, business cards, and calendar notes. You can be as easy as PrintPocketCE or HP Mobile Printing. Table 2. Allows one or both , you can change...

HP Pavilion zd8000 Notebook PC - Maintenance and Service Guide
Page 15
When combined with other keys to f12 keys (12) Perform system and application tasks. Arrow keys Moves the cursor around the screen. Windows applications key In Windows, displays a shortcut menu for items beneath the pointer. num lock key Enables numeric lock, turns... external numeric keypad. Keypad keys (15) In Windows, can be used like the keys on the num lock light. For example, pressing fn+f7 decreases screen brightness. Windows logo key In Windows, displays the Windows Start menu. f1 to perform system tasks. Product Description Item 1 2 3 4 5 6 7 8 Table ...
When combined with other keys to f12 keys (12) Perform system and application tasks. Arrow keys Moves the cursor around the screen. Windows applications key In Windows, displays a shortcut menu for items beneath the pointer. num lock key Enables numeric lock, turns... external numeric keypad. Keypad keys (15) In Windows, can be used like the keys on the num lock light. For example, pressing fn+f7 decreases screen brightness. Windows logo key In Windows, displays the Windows Start menu. f1 to perform system tasks. Product Description Item 1 2 3 4 5 6 7 8 Table ...

HP Pavilion zd8000 Notebook PC - Maintenance and Service Guide
Page 19
Product Description Item 1 2 3 4 5 6 7 8 Table 1-7 Notebook Top Components Component Function TouchPad Moves the pointer and selects or activates items on . On: caps lock is on the screen. Maintenance and Service Guide 1-15 TouchPad light On: TouchPad is on. Left and right TouchPad Function like the left and right buttons on and off (...
Product Description Item 1 2 3 4 5 6 7 8 Table 1-7 Notebook Top Components Component Function TouchPad Moves the pointer and selects or activates items on . On: caps lock is on the screen. Maintenance and Service Guide 1-15 TouchPad light On: TouchPad is on. Left and right TouchPad Function like the left and right buttons on and off (...

HP Pavilion zd8000 Notebook PC - Maintenance and Service Guide
Page 23
...HP should repair this equipment. Improper repairs can be used even when your operating system is not working or will not load. Because of the complexity of component replacement or printed wiring board modification may void any printed wiring board. Maintenance and Service Guide 2-1 Turn on or restart the notebook...F10 = ROM-Based Setup message is a system information and customization utility that are not available in the lower-left corner of the screen. ❏ To change the language, use the cursor control keys to navigate to the Advanced menu. ❏ To view navigation ...
...HP should repair this equipment. Improper repairs can be used even when your operating system is not working or will not load. Because of the complexity of component replacement or printed wiring board modification may void any printed wiring board. Maintenance and Service Guide 2-1 Turn on or restart the notebook...F10 = ROM-Based Setup message is a system information and customization utility that are not available in the lower-left corner of the screen. ❏ To change the language, use the cursor control keys to navigate to the Advanced menu. ❏ To view navigation ...

Hardware and Software Guide
Page 10
... Software Guide Hardware Top Components TouchPad Component Description 1 TouchPad light On: TouchPad is enabled. 2 TouchPad* Moves the pointer and selects or activates items on the screen. 3 Left and right TouchPad buttons (2)* Function like the left and right buttons on an external mouse. 4 TouchPad left/right scroll zone* Scrolls left or right...
... Software Guide Hardware Top Components TouchPad Component Description 1 TouchPad light On: TouchPad is enabled. 2 TouchPad* Moves the pointer and selects or activates items on the screen. 3 Left and right TouchPad buttons (2)* Function like the left and right buttons on an external mouse. 4 TouchPad left/right scroll zone* Scrolls left or right...

Hardware and Software Guide
Page 11
... keys 2 fn key 3 Windows® logo key 4 Windows applications key 5 Keypad keys (17) Description Perform system and application tasks. For example, pressing fn+f8 increases screen brightness. When combined with other keys to "Hotkey and Shortcut Key Quick Reference" in Chapter 2. Combines with the fn key, the function keys perform additional...
... keys 2 fn key 3 Windows® logo key 4 Windows applications key 5 Keypad keys (17) Description Perform system and application tasks. For example, pressing fn+f8 increases screen brightness. When combined with other keys to "Hotkey and Shortcut Key Quick Reference" in Chapter 2. Combines with the fn key, the function keys perform additional...

Hardware and Software Guide
Page 30
... functions of TouchPad features, see the "Setting TouchPad Preferences" section, later in this chapter. 2-2 Hardware and Software Guide Scrolls left and right buttons on the screen. Enables/disables the TouchPad. *This table describes default settings. Keyboard TouchPad Identifying TouchPad Components Component 1 TouchPad light 2 TouchPad* 3 Left and right TouchPad buttons (2)* 4 TouchPad left...
... functions of TouchPad features, see the "Setting TouchPad Preferences" section, later in this chapter. 2-2 Hardware and Software Guide Scrolls left and right buttons on the screen. Enables/disables the TouchPad. *This table describes default settings. Keyboard TouchPad Identifying TouchPad Components Component 1 TouchPad light 2 TouchPad* 3 Left and right TouchPad buttons (2)* 4 TouchPad left...

Hardware and Software Guide
Page 35
...information about system hardware components and software version numbers. Keyboard Hotkey and Shortcut Key Procedures To use a hotkey or shortcut key command on the notebook keyboard, use either of the following procedures: ■ Briefly press the fn key, and then briefly press the second key of the ...and Software Guide 2-7 Hotkey and Shortcut Key Commands Display System Information (fn+esc) Press fn+esc to remove the system information from the screen. ✎ When viewing system information, the system BIOS date is the version number of the hotkey command, and then release both keys at...
...information about system hardware components and software version numbers. Keyboard Hotkey and Shortcut Key Procedures To use a hotkey or shortcut key command on the notebook keyboard, use either of the following procedures: ■ Briefly press the fn key, and then briefly press the second key of the ...and Software Guide 2-7 Hotkey and Shortcut Key Commands Display System Information (fn+esc) Press fn+esc to remove the system information from the screen. ✎ When viewing system information, the system BIOS date is the version number of the hotkey command, and then release both keys at...

Hardware and Software Guide
Page 36
... Display (fn+f4) The fn+f4 hotkey switches the screen image between display devices connected to software updates and online technical support specialists, and other devices receiving video information from the notebook using the external VGA video standard. Most external monitors receive... video information from the notebook. 2-8 Hardware and Software Guide Open Print Options Window (fn+f2) The fn...
... Display (fn+f4) The fn+f4 hotkey switches the screen image between display devices connected to software updates and online technical support specialists, and other devices receiving video information from the notebook using the external VGA video standard. Most external monitors receive... video information from the notebook. 2-8 Hardware and Software Guide Open Print Options Window (fn+f2) The fn...

Hardware and Software Guide
Page 38
..., press fn+f6. ■ To exit QuickLock, enter your notebook by displaying the operating system log-on screen is displayed, the notebook cannot be accessed until a Windows user password or Windows administrator password is entered. Increase Screen Brightness (fn+f8) The fn+f8 hotkey increases notebook screen brightness. Hold down the hotkey to decrease the brightness... Hardware and Software Guide Before you can use the QuickLock feature, you must set a Windows user password or Windows administrator password. While the log-on screen.
..., press fn+f6. ■ To exit QuickLock, enter your notebook by displaying the operating system log-on screen is displayed, the notebook cannot be accessed until a Windows user password or Windows administrator password is entered. Increase Screen Brightness (fn+f8) The fn+f8 hotkey increases notebook screen brightness. Hold down the hotkey to decrease the brightness... Hardware and Software Guide Before you can use the QuickLock feature, you must set a Windows user password or Windows administrator password. While the log-on screen.

Hardware and Software Guide
Page 43
...About Standby, Hibernation and Shutdown This section describes Standby, Hibernation, and shutdown and explains when to an external power source if your notebook will be initiated by the system. Standby and Hibernation are energy-saving features that can be unused for extended periods. ■ ... work returns to system components that are not in Standby for extended periods. Hardware and Software Guide 3-3 Standby Standby reduces power to the screen where you or by you left off. When Standby is initiated, your work before initiating Standby is not usually necessary, but it is ...
...About Standby, Hibernation and Shutdown This section describes Standby, Hibernation, and shutdown and explains when to an external power source if your notebook will be initiated by the system. Standby and Hibernation are energy-saving features that can be unused for extended periods. ■ ... work returns to system components that are not in Standby for extended periods. Hardware and Software Guide 3-3 Standby Standby reduces power to the screen where you or by you left off. When Standby is initiated, your work before initiating Standby is not usually necessary, but it is ...

Hardware and Software Guide
Page 44
... you cannot restore from Hibernation when power is restored to the system, you left it to restore from Hibernation. When the notebook is in Hibernation: ■ Do not add or remove memory modules. ■ Do not insert or remove the internal hard drive. ■ Do not... data will be lost. Hibernation takes a snapshot of the current system memory, saves it . When you restore from Hibernation, your work returns to the screen exactly as you will be prompted to restore from Hibernation. 3-4 Hardware and Software Guide If a power-on password has been set, the password must be...
... you cannot restore from Hibernation when power is restored to the system, you left it to restore from Hibernation. When the notebook is in Hibernation: ■ Do not add or remove memory modules. ■ Do not insert or remove the internal hard drive. ■ Do not... data will be lost. Hibernation takes a snapshot of the current system memory, saves it . When you restore from Hibernation, your work returns to the screen exactly as you will be prompted to restore from Hibernation. 3-4 Hardware and Software Guide If a power-on password has been set, the password must be...

Hardware and Software Guide
Page 46
... you resume from Standby. ■ Initiating Hibernation clears the screen and uses much less power than leaving the notebook on. To extend the life of the battery pack when the notebook will be unused and unplugged for example, because of an electrical storm-save your work, and then initiate... times or for more power conservation. The amount of time a battery pack can support Standby or Hibernation or hold a charge varies by notebook configuration and the condition of battery power. 3-6 Hardware and Software Guide Your work saved in Standby but is uncertain-for an extended period,...
... you resume from Standby. ■ Initiating Hibernation clears the screen and uses much less power than leaving the notebook on. To extend the life of the battery pack when the notebook will be unused and unplugged for example, because of an electrical storm-save your work, and then initiate... times or for more power conservation. The amount of time a battery pack can support Standby or Hibernation or hold a charge varies by notebook configuration and the condition of battery power. 3-6 Hardware and Software Guide Your work saved in Standby but is uncertain-for an extended period,...

Hardware and Software Guide
Page 49
... is loaded. Hardware and Software Guide 3-9 Power Turning the Notebook or Display On or Off Task Procedure Results Turn on -screen instructions (if displayed) for shutting down the notebook. - Then: ■ Press the power/standby button, and then follow the on the notebook. Shut down the notebook.* Save your work and close all open applications.
... is loaded. Hardware and Software Guide 3-9 Power Turning the Notebook or Display On or Off Task Procedure Results Turn on -screen instructions (if displayed) for shutting down the notebook. - Then: ■ Press the power/standby button, and then follow the on the notebook. Shut down the notebook.* Save your work and close all open applications.

Hardware and Software Guide
Page 51
Allow the system to the screen. Hardware and Software Guide 3-11 Resume from Standby Task Procedure Result Initiate Standby With the notebook on, use either of the following actions: ■ Press the power/standby button. ■ Press any key on the keyboard.... > Stand by. ■ The power/standby light blinks. ■ The screen is cleared. Power Initiating or Resuming from user-initiated or system-initiated Standby Perform one of notebook inactivity (default setting). ■ If the notebook is running on external power, the system does not initiate Standby. ■ ...
Allow the system to the screen. Hardware and Software Guide 3-11 Resume from Standby Task Procedure Result Initiate Standby With the notebook on, use either of the following actions: ■ Press the power/standby button. ■ Press any key on the keyboard.... > Stand by. ■ The power/standby light blinks. ■ The screen is cleared. Power Initiating or Resuming from user-initiated or system-initiated Standby Perform one of notebook inactivity (default setting). ■ If the notebook is running on external power, the system does not initiate Standby. ■ ...

Hardware and Software Guide
Page 52
Allow the system to the screen. 3-12 Hardware and Software Guide Power Initiating or Restoring from Hibernation Task Procedure Result Initiate Hibernation With the notebook on, use either of the following procedures: ■ Briefly press the power/standby button. ■ Select Start > Shut Down ...■ The power/standby light is turned off . ■ The screen is in the Power Options window. ■ The power/standby light is turned off . ■ The screen is cleared. ✎ If the notebook is cleared. Restore from user-initiated or system-initiated Hibernation Press the ...
Allow the system to the screen. 3-12 Hardware and Software Guide Power Initiating or Restoring from Hibernation Task Procedure Result Initiate Hibernation With the notebook on, use either of the following procedures: ■ Briefly press the power/standby button. ■ Select Start > Shut Down ...■ The power/standby light is turned off . ■ The screen is in the Power Options window. ■ The power/standby light is turned off . ■ The screen is cleared. ✎ If the notebook is cleared. Restore from user-initiated or system-initiated Hibernation Press the ...

Hardware and Software Guide
Page 55
... > Power Schemes tab. 2. Select the check box Prompt for your Windows user password when the notebook resumes from Standby. 3. Setting a Standby Password Prompt You can assign different schemes depending on whether the notebook is running on the screen. 3. To set a power scheme: 1. Power Setting or Changing a Power Scheme The Power Schemes tab in...
... > Power Schemes tab. 2. Select the check box Prompt for your Windows user password when the notebook resumes from Standby. 3. Setting a Standby Password Prompt You can assign different schemes depending on whether the notebook is running on the screen. 3. To set a power scheme: 1. Power Setting or Changing a Power Scheme The Power Schemes tab in...


