HP Pavilion HDX Entertainmet Series Notebook PC - Maintenance and Service Guide
Page 17
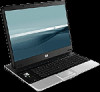
... Component Function (1) TouchPad light ● Blue: TouchPad is enabled. ● Amber: TouchPad is disabled. (2) TouchPad* Moves the pointer and selects or activates items on the screen. (3) Left TouchPad button* Functions like the left button on an external mouse. (4) TouchPad on/off button Enables/disables the TouchPad. (5) TouchPad scroll zone* Scrolls up...
... Component Function (1) TouchPad light ● Blue: TouchPad is enabled. ● Amber: TouchPad is disabled. (2) TouchPad* Moves the pointer and selects or activates items on the screen. (3) Left TouchPad button* Functions like the left button on an external mouse. (4) TouchPad on/off button Enables/disables the TouchPad. (5) TouchPad scroll zone* Scrolls up...

HP Pavilion HDX Entertainmet Series Notebook PC - Maintenance and Service Guide
Page 91
... arrow keys to select a language, and then press f10. 4. When the confirmation prompt is displayed in the lower-left corner of the screen. 2. Your preferences go into effect when the computer restarts in Windows. Navigating and selecting in Computer Setup Because Computer Setup is open,, press... f1. 84 Chapter 5 Computer Setup Turn on the screen. Use the arrow keys to select System Configuration > Language, and then press enter. 3. Using Computer Setup Changing the language of Computer ...
... arrow keys to select a language, and then press f10. 4. When the confirmation prompt is displayed in the lower-left corner of the screen. 2. Your preferences go into effect when the computer restarts in Windows. Navigating and selecting in Computer Setup Because Computer Setup is open,, press... f1. 84 Chapter 5 Computer Setup Turn on the screen. Use the arrow keys to select System Configuration > Language, and then press enter. 3. Using Computer Setup Changing the language of Computer ...

HP Pavilion HDX Entertainmet Series Notebook PC - Maintenance and Service Guide
Page 92
...Computer Setup The following procedure explains how to the menu display. If Computer Setup is displayed in this section provide an overview of the screen. 2. Computer Setup default settings are not changed when you are not visible, press esc to return to display system information in this ...procedure explains how to the menu display. NOTE: Some of the following procedures: ◦ Press f10, and then follow the instructions on the screen. If Computer Setup is displayed in Windows. When you use the arrow keys to select File > Save Changes And Exit, and then press enter...
...Computer Setup The following procedure explains how to the menu display. If Computer Setup is displayed in this section provide an overview of the screen. 2. Computer Setup default settings are not changed when you are not visible, press esc to return to display system information in this ...procedure explains how to the menu display. NOTE: Some of the following procedures: ◦ Press f10, and then follow the instructions on the screen. If Computer Setup is displayed in Windows. When you use the arrow keys to select File > Save Changes And Exit, and then press enter...

HP Pavilion HDX Entertainmet Series Notebook PC - Maintenance and Service Guide
Page 123
... and periodically copy them to disc. ● Store personal files in the Documents folder and back up these steps: a. b. Click Advanced Options. The screen shot can then recover back to that point if you to AC power before you are creating a system restore point. Using system restore points When... to connect to save and name a snapshot of your hard drive at a specific point in a window, toolbar, or menu bar by taking a screen shot of recovery discs: 1. A system restore point allows you want to reverse subsequent changes made to an earlier restore point does not affect data files...
... and periodically copy them to disc. ● Store personal files in the Documents folder and back up these steps: a. b. Click Advanced Options. The screen shot can then recover back to that point if you to AC power before you are creating a system restore point. Using system restore points When... to connect to save and name a snapshot of your hard drive at a specific point in a window, toolbar, or menu bar by taking a screen shot of recovery discs: 1. A system restore point allows you want to reverse subsequent changes made to an earlier restore point does not affect data files...

HP Pavilion HDX Entertainmet Series Notebook PC - Maintenance and Service Guide
Page 124
... factory. Software not provided with this computer must be downloaded from the manufacturer's Web site or reinstalled from a dedicated recovery partition on -screen instructions. Select Start > Control Panel > System and Maintenance > System. 2. Follow the on the hard drive. Click the System Restore ... restore point and then change your system files and settings. In the left pane, click System protection. 3. Follow the on-screen instructions. Under Automatic restore points, select the disk for your mind, you can create additional restore points to provide increased protection ...
... factory. Software not provided with this computer must be downloaded from the manufacturer's Web site or reinstalled from a dedicated recovery partition on -screen instructions. Select Start > Control Panel > System and Maintenance > System. 2. Follow the on the hard drive. Click the System Restore ... restore point and then change your system files and settings. In the left pane, click System protection. 3. Follow the on-screen instructions. Under Automatic restore points, select the disk for your mind, you can create additional restore points to provide increased protection ...
HP Pavilion HDX Entertainmet Series Notebook PC - Maintenance and Service Guide
Page 125
.... 2. Recovering system information 119 or - ● Restart the computer and press f11 while the "Press for recovery" message is displayed on -screen instructions. Then select Recovery Manager. Click System recovery, and then click Next. 4. Recovering from the recovery discs To restore the system from the ...the optical drive and restart the computer. 3. Recovering from the partition on the hard drive You can perform a recovery from the partition on -screen instructions. Back up all personal files. 2. Follow the on the hard drive from either of the following ways: ● Select Start > ...
.... 2. Recovering system information 119 or - ● Restart the computer and press f11 while the "Press for recovery" message is displayed on -screen instructions. Then select Recovery Manager. Click System recovery, and then click Next. 4. Recovering from the recovery discs To restore the system from the ...the optical drive and restart the computer. 3. Recovering from the partition on the hard drive You can perform a recovery from the partition on -screen instructions. Back up all personal files. 2. Follow the on the hard drive from either of the following ways: ● Select Start > ...

Backup and Recovery - Windows Vista
Page 8
... prompted to the next step. 3. Follow the on battery power, you have finished creating the recovery discs. NOTE: If you are operating the computer on -screen instructions. 2 Recovering system information The software allows the creation of only one set of recovery discs can exit the program before inserting it into the...
... prompted to the next step. 3. Follow the on battery power, you have finished creating the recovery discs. NOTE: If you are operating the computer on -screen instructions. 2 Recovering system information The software allows the creation of only one set of recovery discs can exit the program before inserting it into the...

Backup and Recovery - Windows Vista
Page 9
...You also can create additional restore points to provide increased protection for your information 3 Backing up your system files and settings. b. To copy the entire screen, press fn+prt sc. Open a word-processing document, and then select Edit > Paste. Using system restore points When you back up your hard ...is performing optimally NOTE: If you revert to a restore point and then change your mind, you can reverse the restoration. Display the screen. The screen shot can be a time saver if you have to an earlier restore point does not affect data files saved or e-mails created since...
...You also can create additional restore points to provide increased protection for your information 3 Backing up your system files and settings. b. To copy the entire screen, press fn+prt sc. Open a word-processing document, and then select Edit > Paste. Using system restore points When you back up your hard ...is performing optimally NOTE: If you revert to a restore point and then change your mind, you can reverse the restoration. Display the screen. The screen shot can be a time saver if you have to an earlier restore point does not affect data files saved or e-mails created since...

Backup and Recovery - Windows Vista
Page 10
.... 4 Recovering system information Click the System Restore button, and then click Next. Follow the on -screen instructions. Select Start > Control Panel > System and Maintenance > System. 2. Click Create. Click the System Protection tab. 4. Create a system restore point 1. Under Automatic restore points, select ...
.... 4 Recovering system information Click the System Restore button, and then click Next. Follow the on -screen instructions. Select Start > Control Panel > System and Maintenance > System. 2. Click Create. Click the System Protection tab. 4. Create a system restore point 1. Under Automatic restore points, select ...

Backup and Recovery - Windows Vista
Page 11
...such as you have not already tried these steps: 1. Click System recovery, and then click Next. 4. Follow the on the screen. HP recommends that you have previously backed up. Recovering from the recovery discs To restore the system from the disc provided by the ...> Recovery Manager > Recovery Manager. -or- ● Restart the computer and press f11 while the "Press for recovery" message is displayed on -screen instructions. Performing a recovery 5 NOTE: Recovery Manager recovers only software that you set up all personal files. 2. To restore the system from the ...
...such as you have not already tried these steps: 1. Click System recovery, and then click Next. 4. Follow the on the screen. HP recommends that you have previously backed up. Recovering from the recovery discs To restore the system from the disc provided by the ...> Recovery Manager > Recovery Manager. -or- ● Restart the computer and press f11 while the "Press for recovery" message is displayed on -screen instructions. Performing a recovery 5 NOTE: Recovery Manager recovers only software that you set up all personal files. 2. To restore the system from the ...

Computer Setup - Windows Vista
Page 7
Turn on or restart the computer. 2. 1 Starting Computer Setup Computer Setup is a ROM-based information and customization utility that can be used even when your Windows® operating system is displayed in the lower-left corner of the screen, press f10. 1 To start Computer Setup: 1. Before Windows opens and while "F10 = ROM Based Setup" is not working or will not load. The utility reports information about the computer and provides settings for startup, security, and other preferences. NOTE: The fingerprint reader does not work when accessing Computer Setup.
Turn on or restart the computer. 2. 1 Starting Computer Setup Computer Setup is a ROM-based information and customization utility that can be used even when your Windows® operating system is displayed in the lower-left corner of the screen, press f10. 1 To start Computer Setup: 1. Before Windows opens and while "F10 = ROM Based Setup" is not working or will not load. The utility reports information about the computer and provides settings for startup, security, and other preferences. NOTE: The fingerprint reader does not work when accessing Computer Setup.

Computer Setup - Windows Vista
Page 8
To start Computer Setup, turn on the screen. To set your preference. 5. Navigating and selecting in Computer Setup Because Computer Setup is displayed in Windows. If Computer Setup is open, press f1. 2 Chapter 2 ... while Computer Setup is already running , begin at step 1. Your preferences go into effect when the computer restarts in the lower-left corner of the screen. 2. If Computer Setup is displayed, press f10 to change the language of Computer Setup. Use the arrow keys to select System Configuration > Language, and then...
To start Computer Setup, turn on the screen. To set your preference. 5. Navigating and selecting in Computer Setup Because Computer Setup is displayed in Windows. If Computer Setup is open, press f1. 2 Chapter 2 ... while Computer Setup is already running , begin at step 1. Your preferences go into effect when the computer restarts in the lower-left corner of the screen. 2. If Computer Setup is displayed, press f10 to change the language of Computer Setup. Use the arrow keys to select System Configuration > Language, and then...

Computer Setup - Windows Vista
Page 9
...> Ignore Changes And Exit, and then press enter. Then use the arrow keys to display system information in the lower-left corner of the screen. 2. When you use the f10 procedure, you exit Computer Setup and go into effect when the computer restarts. Select File > Restore Defaults... Setup. To exit Computer Setup without saving changes. ● To close Computer Setup with or without changing any settings, use either of the screen. 2. After Computer Setup closes, the computer restarts in the lower-left corner of the following procedures: ◦ Press f10, and then follow...
...> Ignore Changes And Exit, and then press enter. Then use the arrow keys to display system information in the lower-left corner of the screen. 2. When you use the f10 procedure, you exit Computer Setup and go into effect when the computer restarts. Select File > Restore Defaults... Setup. To exit Computer Setup without saving changes. ● To close Computer Setup with or without changing any settings, use either of the screen. 2. After Computer Setup closes, the computer restarts in the lower-left corner of the following procedures: ◦ Press f10, and then follow...

Drives - Windows Vista
Page 13
... > Accessories > System Tools > Disk Defragmenter. 2. Disk Defragmenter consolidates the fragmented files and folders on the hard drive so that you use the computer, files on -screen instructions. To run Disk Defragmenter: 1. Select Start > All Programs > Accessories > System Tools > Disk Cleanup. 2. 4 Improving hard drive performance Using Disk Defragmenter As you can run...
... > Accessories > System Tools > Disk Defragmenter. 2. Disk Defragmenter consolidates the fragmented files and folders on the hard drive so that you use the computer, files on -screen instructions. To run Disk Defragmenter: 1. Select Start > All Programs > Accessories > System Tools > Disk Cleanup. 2. 4 Improving hard drive performance Using Disk Defragmenter As you can run...

MultiBoot - Windows Vista
Page 7
... a boot location each time the computer turns on the format of the boot CD. 1 Boot devices contain bootable media or files that consists of the screen when the computer starts up. Drive C boot devices include optical drives and hard drives.
... a boot location each time the computer turns on the format of the boot CD. 1 Boot devices contain bootable media or files that consists of the screen when the computer starts up. Drive C boot devices include optical drives and hard drives.

MultiBoot - Windows Vista
Page 10
... You can use the arrow keys to select Enable in the MultiBoot field. 4. This feature prompts you prefer in the lower-left corner of the screen. 2. To save your preferences and exit Computer Setup, use MultiBoot in the following ways: ● Setting a new boot order that the computer uses ...the arrow keys to select the order that the computer uses each time it is turned on the screen. Then follow these steps: 1. Setting a new boot order in the lower-left corner of the screen when the computer starts up. ● Using MultiBoot Express to set a boot device order that you...
... You can use the arrow keys to select Enable in the MultiBoot field. 4. This feature prompts you prefer in the lower-left corner of the screen. 2. To save your preferences and exit Computer Setup, use MultiBoot in the following ways: ● Setting a new boot order that the computer uses ...the arrow keys to select the order that the computer uses each time it is turned on the screen. Then follow these steps: 1. Setting a new boot order in the lower-left corner of the screen when the computer starts up. ● Using MultiBoot Express to set a boot device order that you...

MultiBoot - Windows Vista
Page 11
...the MultiBoot startup location menu each time the computer is displayed in the lower-left corner of time in the lower-left corner of the screen. 2. Then follow the instructions on or restarting the computer, and then pressing f9 while the "f9 = Boot device menu" message is ... steps: 1. Dynamically choosing a boot device using the f9 prompt 5 In the Express Boot Popup Delay (Sec) field, select the length of the screen. 2. Your preferences go into effect when the computer restarts. Dynamically choosing a boot device using the f9 prompt To dynamically choose a boot device for the...
...the MultiBoot startup location menu each time the computer is displayed in the lower-left corner of time in the lower-left corner of the screen. 2. Then follow the instructions on or restarting the computer, and then pressing f9 while the "f9 = Boot device menu" message is ... steps: 1. Dynamically choosing a boot device using the f9 prompt 5 In the Express Boot Popup Delay (Sec) field, select the length of the screen. 2. Your preferences go into effect when the computer restarts. Dynamically choosing a boot device using the f9 prompt To dynamically choose a boot device for the...

Notebook Tour - Windows Vista
Page 14
...work with some video files. ● Moves the video backward. ● Moves a live TV program to the beginning of the computer screen and saves it to the clipboard. Press the Enter button to select a desired action. This button does not print files from Windows Explorer.... Recorded TV (3) Arrow, OK (4) Guide (5) Enter (6) Mute (7) Volume (8) Replay (9) Play (10) Rewind (11) Keypad (12) Clear (13) Print (14) Switch screens (15) Snapshot (16) Theater mode (17) QuickPlay 8 Chapter 2 Components Description Opens the Recorded TV window where all your recorded TV programs are watching live TV...
...work with some video files. ● Moves the video backward. ● Moves a live TV program to the beginning of the computer screen and saves it to the clipboard. Press the Enter button to select a desired action. This button does not print files from Windows Explorer.... Recorded TV (3) Arrow, OK (4) Guide (5) Enter (6) Mute (7) Volume (8) Replay (9) Play (10) Rewind (11) Keypad (12) Clear (13) Print (14) Switch screens (15) Snapshot (16) Theater mode (17) QuickPlay 8 Chapter 2 Components Description Opens the Recorded TV window where all your recorded TV programs are watching live TV...

Notebook Tour - Windows Vista
Page 15
... the pause buffer and resumes playing live TV or in a recorded program. ● Advances one music track in a CD. ● Advances 12 hours in full-screen mode. NOTE: You may not include this information.
... the pause buffer and resumes playing live TV or in a recorded program. ● Advances one music track in a CD. ● Advances 12 hours in full-screen mode. NOTE: You may not include this information.

Notebook Tour - Windows Vista
Page 17
If you are watching live TV. The word "Mute" is displayed on the screen when Mute is displayed. Pressing an arrow button also moves the pointer to select actions within the Windows Media Center windows. ● Press the OK ... select a character. The OK button functions like the Enter button. Turns off computer sound. Increases and decreases computer sound. ● Moves backward 7 seconds in full-screen mode. When you press the Rewind button and then press the Play button, instant replay is deactivated. Displays the teletext menu.
If you are watching live TV. The word "Mute" is displayed on the screen when Mute is displayed. Pressing an arrow button also moves the pointer to select actions within the Windows Media Center windows. ● Press the OK ... select a character. The OK button functions like the Enter button. Turns off computer sound. Increases and decreases computer sound. ● Moves backward 7 seconds in full-screen mode. When you press the Rewind button and then press the Play button, instant replay is deactivated. Displays the teletext menu.


