
HP Notebook Reference Guide - Windows 7
Page 7
...card ...31 Using a USB device ...31 Connecting a USB device 31 Removing a USB device ...32 Using 1394 devices (select models only 32 Connecting a 1394 device 32 Removing a 1394 device 33 Using an eSATA device (select models only 33 Connecting an eSATA device 33 Removing an eSATA device 34 Using optional external devices ...34 Using optional external drives 34 Using the expansion port (select models only 34 6 Drives ...36 Handling drives ...36 Using hard drives ...37 Improving hard drive performance 37 Using Disk Defragmenter 37 Using Disk Cleanup 37 Using HP ProtectSmart Hard Drive...
...card ...31 Using a USB device ...31 Connecting a USB device 31 Removing a USB device ...32 Using 1394 devices (select models only 32 Connecting a 1394 device 32 Removing a 1394 device 33 Using an eSATA device (select models only 33 Connecting an eSATA device 33 Removing an eSATA device 34 Using optional external devices ...34 Using optional external drives 34 Using the expansion port (select models only 34 6 Drives ...36 Handling drives ...36 Using hard drives ...37 Improving hard drive performance 37 Using Disk Defragmenter 37 Using Disk Cleanup 37 Using HP ProtectSmart Hard Drive...

HP Notebook Reference Guide - Windows 7
Page 28
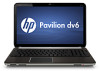
... a network domain, the button you are connecting an external hardware device that does not connect to a USB or video port ● When the computer will be unused and disconnected from external power for at least 5 seconds. ● Disconnect the computer from external power and remove the battery. 18 Chapter 4 Power management Shut down the computer under any of the following emergency procedures in Hibernation, you must first exit Sleep...
... a network domain, the button you are connecting an external hardware device that does not connect to a USB or video port ● When the computer will be unused and disconnected from external power for at least 5 seconds. ● Disconnect the computer from external power and remove the battery. 18 Chapter 4 Power management Shut down the computer under any of the following emergency procedures in Hibernation, you must first exit Sleep...
HP Notebook Reference Guide - Windows 7
Page 29
... the screen where you stopped working. Your work will return to a disc or an external media card. NOTE: You cannot initiate any type of networking connection or perform any of inactivity when running on battery power or on , you have set at the factory: Sleep and Hibernation. Power settings and timeouts can be changed using Power Options in the Sleep state, the computer initiates Hibernation. Setting power options Using power-saving states The computer has two power-saving...
... the screen where you stopped working. Your work will return to a disc or an external media card. NOTE: You cannot initiate any type of networking connection or perform any of inactivity when running on battery power or on , you have set at the factory: Sleep and Hibernation. Power settings and timeouts can be changed using Power Options in the Sleep state, the computer initiates Hibernation. Setting power options Using power-saving states The computer has two power-saving...

HP Notebook Reference Guide - Windows 7
Page 44
... power cord. NOTE: HP external USB optical drives should be connected to the powered USB port on -screen instructions. 3. Turn on the cable to remove the eSATA device. Using optional external drives Removable external drives expand your information and close all programs associated with the computer. 34 Chapter 5 External cards and devices Remove the device. If you are connecting a powered device, plug the device power cord into a grounded AC outlet. 3. USB drives include the following procedure to the computer. 2. To remove an eSATA device, save your options...
... power cord. NOTE: HP external USB optical drives should be connected to the powered USB port on -screen instructions. 3. Turn on the cable to remove the eSATA device. Using optional external drives Removable external drives expand your information and close all programs associated with the computer. 34 Chapter 5 External cards and devices Remove the device. If you are connecting a powered device, plug the device power cord into a grounded AC outlet. 3. USB drives include the following procedure to the computer. 2. To remove an eSATA device, save your options...
HP Notebook Reference Guide - Windows 7
Page 47
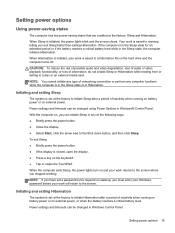
... safely delete to free up disk space and help the computer to run on solid-state drives. You may take more efficiently. Using hard drives 37 Click Defragment disk. For additional information, access the Disk Defragmenter software Help. NOTE: It is running utilities, or changing Windows settings. After you start Disk Defragmenter, it to run Disk Defragmenter: 1. Refer to Help and Support for tasks such as installing software, running on the hard drive...
... safely delete to free up disk space and help the computer to run on solid-state drives. You may take more efficiently. Using hard drives 37 Click Defragment disk. For additional information, access the Disk Defragmenter software Help. NOTE: It is running utilities, or changing Windows settings. After you start Disk Defragmenter, it to run Disk Defragmenter: 1. Refer to Help and Support for tasks such as installing software, running on the hard drive...
HP Notebook Reference Guide - Windows 7
Page 55
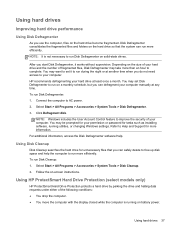
... User password QuickLock (select models only) Function Protects administrator-level access to a Windows user account. Setting passwords in Windows, nor is displayed, the computer cannot be entered each time you access Setup Utility (BIOS). Protects access to computer contents. While the Log On window is it displayed as screen-saver passwords, select Start > Help and Support. NOTE: If you enter the power-on password. Protects your information by entering your administrator password, you cannot access Setup Utility (BIOS). Exit QuickLock by displaying the operating...
... User password QuickLock (select models only) Function Protects administrator-level access to a Windows user account. Setting passwords in Windows, nor is displayed, the computer cannot be entered each time you access Setup Utility (BIOS). Protects access to computer contents. While the Log On window is it displayed as screen-saver passwords, select Start > Help and Support. NOTE: If you enter the power-on password. Protects your information by entering your administrator password, you cannot access Setup Utility (BIOS). Exit QuickLock by displaying the operating...
HP Notebook Reference Guide - Windows 7
Page 61
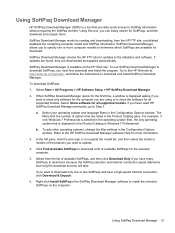
... file containing computer model and SoftPaq information. Using SoftPaq Download Manager HP SoftPaq Download Manager (SDM) is a tool that are listed in the Product Catalog pane. When SoftPaq Download Manager opens for all supported models. Select your operating system and language filters in the Configuration Options window. Using SoftPaq Download Manager 51 To download SoftPaqs: 1. To add other operating systems, change the filter settings in the Configuration Options window. Select Show software for the first time, a window is available...
... file containing computer model and SoftPaq information. Using SoftPaq Download Manager HP SoftPaq Download Manager (SDM) is a tool that are listed in the Product Catalog pane. When SoftPaq Download Manager opens for all supported models. Select your operating system and language filters in the Configuration Options window. Using SoftPaq Download Manager 51 To download SoftPaqs: 1. To add other operating systems, change the filter settings in the Configuration Options window. Select Show software for the first time, a window is available...

HP Notebook Reference Guide - Windows 7
Page 63
... ESC key for Startup Menu" message is displayed at the factory, follow the onscreen instructions. - To exit Setup Utility (BIOS) menus, choose one of the screen. 2. Use the arrow keys to enter Setup Utility (BIOS). Using Setup Utility (BIOS) 53 or - Restoring factory settings in Setup Utility (BIOS) NOTE: Restoring defaults will not change the hard drive mode. Press f10 to select Exit > Exit Saving Changes, and then press enter. Your changes go into effect when the computer restarts. Turn on -screen instructions. 2. Navigating and selecting in Setup Utility (BIOS) To...
... ESC key for Startup Menu" message is displayed at the factory, follow the onscreen instructions. - To exit Setup Utility (BIOS) menus, choose one of the screen. 2. Use the arrow keys to enter Setup Utility (BIOS). Using Setup Utility (BIOS) 53 or - Restoring factory settings in Setup Utility (BIOS) NOTE: Restoring defaults will not change the hard drive mode. Press f10 to select Exit > Exit Saving Changes, and then press enter. Your changes go into effect when the computer restarts. Turn on -screen instructions. 2. Navigating and selecting in Setup Utility (BIOS) To...
HP Notebook Reference Guide - Windows 7
Page 65
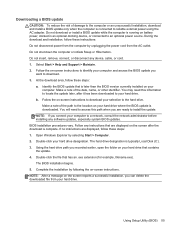
... to the location on -screen instructions to identify your hard drive that is complete. Double-click your computer to a network, consult the network administrator before installing any device, cable, or cord. 1. Using Setup Utility (BIOS) 55 Follow the on your computer. Open Windows Explorer by following the on your computer and access the BIOS update you connect your hard drive designation. Complete the installation by selecting Start > Computer. 2. Identify the BIOS update that contains the update. 4. Downloading a BIOS update CAUTION...
... to the location on -screen instructions to identify your hard drive that is complete. Double-click your computer to a network, consult the network administrator before installing any device, cable, or cord. 1. Using Setup Utility (BIOS) 55 Follow the on your computer. Open Windows Explorer by following the on your computer and access the BIOS update you connect your hard drive designation. Complete the installation by selecting Start > Computer. 2. Identify the BIOS update that contains the update. 4. Downloading a BIOS update CAUTION...
HP Notebook Reference Guide - Windows 7
Page 71
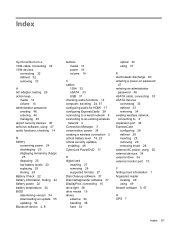
...displaying remaining charge 23 disposing 25 low battery levels 23 replacing 25 storing 24 Battery Check 22 battery information, finding 22 battery power 22 battery temperature 24 BIOS determining version 54 downloading an update 55 updating 54 Bluetooth device 2, 8 buttons media 13 power 18 volume 14 C cables 1394 32 eSATA 33 USB 31 checking audio functions 14 computer, traveling 24, 57 configuring audio for HDMI 17 configuring ExpressCards 28 connecting to a wired network 8 connecting to an existing wireless network 4 Connection Manager 3 conservation, power 24 creating a wireless connection...
...displaying remaining charge 23 disposing 25 low battery levels 23 replacing 25 storing 24 Battery Check 22 battery information, finding 22 battery power 22 battery temperature 24 BIOS determining version 54 downloading an update 55 updating 54 Bluetooth device 2, 8 buttons media 13 power 18 volume 14 C cables 1394 32 eSATA 33 USB 31 checking audio functions 14 computer, traveling 24, 57 configuring audio for HDMI 17 configuring ExpressCards 28 connecting to a wired network 8 connecting to an existing wireless network 4 Connection Manager 3 conservation, power 24 creating a wireless connection...

HP Notebook Reference Guide - Windows 7
Page 72
...9 connecting a modem cable adapter 9 selecting a location setting 10 N network cable, connecting 11 network icon 2 O operating system controls 4 optical disc inserting 39 removing 40 optical drive 34 optional external devices, using 34 P passwords set in Setup Utility (BIOS) 45 set in Windows 45 ports DisplayPort 15 expansion 34 external monitor 15 HDMI 16 Intel Wireless Display 17 VGA 15 power battery 22 conserving 24 options 19 power button 18 power meter 20 power plans customizing 21 selecting 20 viewing current 20 power switch 18 power-on password creating 47 entering 47 managing 47 power...
...9 connecting a modem cable adapter 9 selecting a location setting 10 N network cable, connecting 11 network icon 2 O operating system controls 4 optical disc inserting 39 removing 40 optical drive 34 optional external devices, using 34 P passwords set in Setup Utility (BIOS) 45 set in Windows 45 ports DisplayPort 15 expansion 34 external monitor 15 HDMI 16 Intel Wireless Display 17 VGA 15 power battery 22 conserving 24 options 19 power button 18 power meter 20 power plans customizing 21 selecting 20 viewing current 20 power switch 18 power-on password creating 47 entering 47 managing 47 power...

HP Limited Warranty and Techincal Support - 3-year - North America
Page 10
... services, call your portable computer needs a hardware repair that HP replace them for warranty repair. If, during shipping. If you will be charged for which customer self-repair is mandatory. These parts are unable to the location of this may be accomplished by the use of help you diagnose the problem. If your local HP Technical Support Center (see Worldwide Phone Numbers booklet). HP pays shipping costs. Free...
... services, call your portable computer needs a hardware repair that HP replace them for warranty repair. If, during shipping. If you will be charged for which customer self-repair is mandatory. These parts are unable to the location of this may be accomplished by the use of help you diagnose the problem. If your local HP Technical Support Center (see Worldwide Phone Numbers booklet). HP pays shipping costs. Free...

HP Limited Warranty and Technical Support - 90 day - North America
Page 10
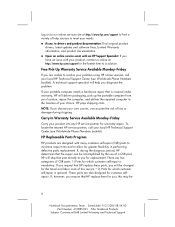
... your problem using HP online services, call your product into any HP service partner for customer selfrepair. If, during shipping. HP Replaceable Parts Program HP products are two categories of a CSR part, HP will help sources to meet your needs: „ Access to drivers and product documentation: Find original product drivers, latest updates and software fixes, Limited Warranty information, and product documentation. „ Open an online service event with an HP Support Specialist...
... your problem using HP online services, call your product into any HP service partner for customer selfrepair. If, during shipping. HP Replaceable Parts Program HP products are two categories of a CSR part, HP will help sources to meet your needs: „ Access to drivers and product documentation: Find original product drivers, latest updates and software fixes, Limited Warranty information, and product documentation. „ Open an online service event with an HP Support Specialist...
HP Limited Warranty and Technical Support 1-yr - North America
Page 10
... you choose your needs: „ Access to drivers and product documentation: Find original product drivers, latest updates and software fixes, Limited Warranty information, and product documentation. „ Open an online service event with an HP Support Specialist: If you , this service.* 2) Parts for which customer self-repair is mandatory. If, during shipping. If you request that part directly to you will be charged for the travel...
... you choose your needs: „ Access to drivers and product documentation: Find original product drivers, latest updates and software fixes, Limited Warranty information, and product documentation. „ Open an online service event with an HP Support Specialist: If you , this service.* 2) Parts for which customer self-repair is mandatory. If, during shipping. If you request that part directly to you will be charged for the travel...

HP Limited Worldwide Warranty and Technical Support 3-yr - North America
Page 10
... services may involve performing routine diagnostic procedures, installing additional software updates or patches, removing third-party options, and/or substituting options. „ Make periodic backup copies of your files, data, or programs stored on HP Hardware Products), you will be applicable to the HP Hardware Product you to use available support technologies provided by HP. Customer Responsibilities In order to avoid the risk of charges for warranty support or repairs...
... services may involve performing routine diagnostic procedures, installing additional software updates or patches, removing third-party options, and/or substituting options. „ Make periodic backup copies of your files, data, or programs stored on HP Hardware Products), you will be applicable to the HP Hardware Product you to use available support technologies provided by HP. Customer Responsibilities In order to avoid the risk of charges for warranty support or repairs...

HP Limited Worldwide Warranty and Technical Support 3-yr - North America
Page 14
... HP" for your installation questions (how to, first steps, and prerequisites). „ Setting up and configuring the software and options supplied or purchased with HP Hardware Products (how-to and first steps). Support includes assistance with: „ Answering your product that all manufacturers labels (such as serial numbers) are in place, accessible, and legible „ Maintain an environment consistent with product specifications and supported configurations Service Upgrades HP...
... HP" for your installation questions (how to, first steps, and prerequisites). „ Setting up and configuring the software and options supplied or purchased with HP Hardware Products (how-to and first steps). Support includes assistance with: „ Answering your product that all manufacturers labels (such as serial numbers) are in place, accessible, and legible „ Maintain an environment consistent with product specifications and supported configurations Service Upgrades HP...

Worldwide Waranty and Technical Support - HP - 90day - North America
Page 14
... assistance with HP Hardware Products. Excludes system optimization, customization and network configuration. „ Interpreting system error messages. „ Isolating system problems to this will be purchased locally. Initial Setup and Technical Support for Included Software Technical Support for your HP Software, HP pre-installed third-party software and third-party software purchased from HP, including initial setup support, is available from HP via multiple contact methods, including electronic media and telephone...
... assistance with HP Hardware Products. Excludes system optimization, customization and network configuration. „ Interpreting system error messages. „ Isolating system problems to this will be purchased locally. Initial Setup and Technical Support for Included Software Technical Support for your HP Software, HP pre-installed third-party software and third-party software purchased from HP, including initial setup support, is available from HP via multiple contact methods, including electronic media and telephone...

Getting Started HP Notebook - Windows 7
Page 5
... ...6 TouchPad ...6 Lights ...7 Buttons, speakers, and fingerprint reader (select models only 8 Keys ...9 Front ...10 Right side ...11 Left side ...12 Display ...13 Rear ...14 Bottom ...15 3 Networking ...16 Using an Internet service provider (ISP 17 Connecting to a wireless network ...17 Connecting to an existing WLAN 18 Setting up a new WLAN network 19 Configuring a wireless router 20 Protecting your WLAN 20 4 Keyboard and pointing devices ...21 Using the keyboard ...22 Using the action keys ...22 Using the hotkeys ...23 Using the...
... ...6 TouchPad ...6 Lights ...7 Buttons, speakers, and fingerprint reader (select models only 8 Keys ...9 Front ...10 Right side ...11 Left side ...12 Display ...13 Rear ...14 Bottom ...15 3 Networking ...16 Using an Internet service provider (ISP 17 Connecting to a wireless network ...17 Connecting to an existing WLAN 18 Setting up a new WLAN network 19 Configuring a wireless router 20 Protecting your WLAN 20 4 Keyboard and pointing devices ...21 Using the keyboard ...22 Using the action keys ...22 Using the hotkeys ...23 Using the...

Getting Started HP Notebook - Windows 7
Page 59
... HP power supply 49 Digital Media Slot, identifying 10 E esc key, identifying 9 external monitor port 12 F f11 40 fingerprint reader light 7 fn key, identifying 9, 23 H hard drive installing 33 removing 31 hard drive bay, identifying 15 hard drive light 11 HDMI port, identifying 12 hotkeys bass settings 24 description 23 display system information 23 TouchPad accent light 24 using 23 HP Recovery Manager 40 I input power 49 integrated numeric keypad, identifying 9, 24 integrated webcam light, identifying 13 internal microphones, identifying 13 Internet connection setup 19 ISP, using 17 J jacks...
... HP power supply 49 Digital Media Slot, identifying 10 E esc key, identifying 9 external monitor port 12 F f11 40 fingerprint reader light 7 fn key, identifying 9, 23 H hard drive installing 33 removing 31 hard drive bay, identifying 15 hard drive light 11 HDMI port, identifying 12 hotkeys bass settings 24 description 23 display system information 23 TouchPad accent light 24 using 23 HP Recovery Manager 40 I input power 49 integrated numeric keypad, identifying 9, 24 integrated webcam light, identifying 13 internal microphones, identifying 13 Internet connection setup 19 ISP, using 17 J jacks...

Getting Started HP Notebook - Windows 7
Page 60
... 47 WLAN 47 latch, battery release 15 lights battery 11 caps lock 7 fingerprint reader 7 hard drive 11 mute 7 optical drive 11 power 7, 11 TouchPad 6, 7 TouchPad accent 6, 7 webcam 13 wireless 7 M memory module inserting 36 removing 36 replacing 35 memory module compartment cover, removing 35 memory module compartment, identifying 15 Microsoft Certificate of Authenticity label 47 mouse, external setting preferences 25 mute light, identifying 7 N network jack, identifying 12 num lock key, identifying 9, 24 O operating environment 50 operating system Microsoft Certificate of Authenticity...
... 47 WLAN 47 latch, battery release 15 lights battery 11 caps lock 7 fingerprint reader 7 hard drive 11 mute 7 optical drive 11 power 7, 11 TouchPad 6, 7 TouchPad accent 6, 7 webcam 13 wireless 7 M memory module inserting 36 removing 36 replacing 35 memory module compartment cover, removing 35 memory module compartment, identifying 15 Microsoft Certificate of Authenticity label 47 mouse, external setting preferences 25 mute light, identifying 7 N network jack, identifying 12 num lock key, identifying 9, 24 O operating environment 50 operating system Microsoft Certificate of Authenticity...


