HP Notebook Series - Maintenance, Shipping and Travel Guide
Page 5
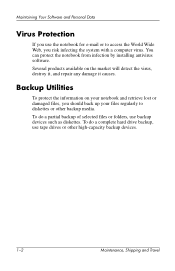
To do a complete hard drive backup, use tape drives or other backup media. To do a partial backup of selected files or folders, use backup devices such as diskettes. Maintaining Your Software and Personal Data Virus Protection If you use the notebook for e-mail or to access the World Wide Web, you should back up ...Utilities To protect the information on the market will detect the virus, destroy it, and repair any damage it causes. Several products available on your notebook and retrieve lost or damaged files, you risk infecting the system with a computer virus. You can protect the...
To do a complete hard drive backup, use tape drives or other backup media. To do a partial backup of selected files or folders, use backup devices such as diskettes. Maintaining Your Software and Personal Data Virus Protection If you use the notebook for e-mail or to access the World Wide Web, you should back up ...Utilities To protect the information on the market will detect the virus, destroy it, and repair any damage it causes. Several products available on your notebook and retrieve lost or damaged files, you risk infecting the system with a computer virus. You can protect the...
HP Notebook Series - Maintenance, Shipping and Travel Guide
Page 12
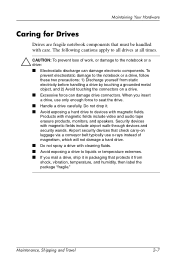
... times. Ä CAUTION: To prevent loss of magnetism, which will not damage a hard drive. ■ Do not spray a drive with cleaning fluids. ■ Avoid exposing a drive to the notebook or a drive: ■ Electrostatic discharge can damage drive connectors. Security devices with care. When you insert a drive, use x-rays instead of work, or damage to liquids or temperature extremes...
... times. Ä CAUTION: To prevent loss of magnetism, which will not damage a hard drive. ■ Do not spray a drive with cleaning fluids. ■ Avoid exposing a drive to the notebook or a drive: ■ Electrostatic discharge can damage drive connectors. Security devices with care. When you insert a drive, use x-rays instead of work, or damage to liquids or temperature extremes...

Startup and Reference Guide
Page 18
...with a three-pin attachment plug, plug the cord into an electrical outlet that is included with your notebook. This guide is available on the Web at http://www.hp.com/ergo, on the hard drive, or on your equipment: ■ Plug the power cord into a grounded (earthed) outlet. The... Regulatory and Safety Notices guide also includes information about protecting the notebook against electrostatic discharge. Å WARNING: To ...
...with a three-pin attachment plug, plug the cord into an electrical outlet that is included with your notebook. This guide is available on the Web at http://www.hp.com/ergo, on the hard drive, or on your equipment: ■ Plug the power cord into a grounded (earthed) outlet. The... Regulatory and Safety Notices guide also includes information about protecting the notebook against electrostatic discharge. Å WARNING: To ...

Startup and Reference Guide
Page 26
On: The internal hard drive or optical drive is hardware enabled. On: The wireless device button is turned on and an integrated wireless device is being accessed. On (green): Caps lock is malfunctioning and may need to be replaced. On: The notebook is receiving adequate external power. ■ On orange: A battery pack is charging. ■...
On: The internal hard drive or optical drive is hardware enabled. On: The wireless device button is turned on and an integrated wireless device is being accessed. On (green): Caps lock is malfunctioning and may need to be replaced. On: The notebook is receiving adequate external power. ■ On orange: A battery pack is charging. ■...

Startup and Reference Guide
Page 33
Holds the internal hard drive. Startup and Reference Guide-Part 2 2-13 Contains 1 memory slot for an optional 128-MB, 256-MB, 512-MB, or 1024-MB memory module. 345561-001.book Page 13 Monday, July 14, 2003 11:19 AM Underside Bays and Memory Compartment Hardware Underside: Bays and Memory Compartment 1 Battery bay Holds a battery pack. 2 Battery pack release latch 3 Memory compartment 4 Hard drive bay Releases a battery pack from the battery bay. As shipped, the memory slot may be filled with a replaceable memory module or vacant, depending on the notebook model.
Holds the internal hard drive. Startup and Reference Guide-Part 2 2-13 Contains 1 memory slot for an optional 128-MB, 256-MB, 512-MB, or 1024-MB memory module. 345561-001.book Page 13 Monday, July 14, 2003 11:19 AM Underside Bays and Memory Compartment Hardware Underside: Bays and Memory Compartment 1 Battery bay Holds a battery pack. 2 Battery pack release latch 3 Memory compartment 4 Hard drive bay Releases a battery pack from the battery bay. As shipped, the memory slot may be filled with a replaceable memory module or vacant, depending on the notebook model.

Startup and Reference Guide
Page 50
..., your work before initiating Hibernation is not usually necessary, but is a recommended precaution. ■ When the notebook is cleared. ■ Saving your work returns to the hard drive, takes a snapshot of the notebook image, then shuts down the notebook. Hibernation Hibernation saves system memory to the screen where you left off. Standby, Hibernation, and shutdown...
..., your work before initiating Hibernation is not usually necessary, but is a recommended precaution. ■ When the notebook is cleared. ■ Saving your work returns to the hard drive, takes a snapshot of the notebook image, then shuts down the notebook. Hibernation Hibernation saves system memory to the screen where you left off. Standby, Hibernation, and shutdown...
Startup and Reference Guide
Page 61
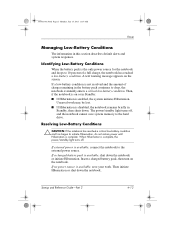
...alerts and system responses. Identifying Low-Battery Conditions When the battery pack is complete, the power/standby light turns off , and the notebook cannot save your work may be lost. ■ If Hibernation is complete. If a low-battery condition is enabled, the system ... source is available, shut down the notebook. If a charged battery pack is available, save system memory to the external power source. A text warning message appears on the notebook. If external power is available, connect the notebook to the hard drive. Then initiate Hibernation or shut down the...
...alerts and system responses. Identifying Low-Battery Conditions When the battery pack is complete, the power/standby light turns off , and the notebook cannot save your work may be lost. ■ If Hibernation is complete. If a low-battery condition is enabled, the system ... source is available, shut down the notebook. If a charged battery pack is available, save system memory to the external power source. A text warning message appears on the notebook. If external power is available, connect the notebook to the hard drive. Then initiate Hibernation or shut down the...

Startup and Reference Guide
Page 63
... following performance from the external power source, but do not turn off automatically. ■ Hard drive speed will not decrease automatically while the notebook is idle. ■ System-initiated Standby will not turn off and the notebook shuts down. Run the notebook on the taskbar or select Start > Control Panel > Performance and Maintenance icon > Power...
... following performance from the external power source, but do not turn off automatically. ■ Hard drive speed will not decrease automatically while the notebook is idle. ■ System-initiated Standby will not turn off and the notebook shuts down. Run the notebook on the taskbar or select Start > Control Panel > Performance and Maintenance icon > Power...
Startup and Reference Guide
Page 69
345561-001.book Page 1 Monday, July 14, 2003 11:19 AM 5 Drives and Drive Media Contents Understanding Drive and Drive Media Terms 5-2 Caring for Drives and Drive Media 5-3 Adding a Drive to the System 5-4 Using the IDE Drive Light 5-4 Inserting or Removing a Disc 5-5 Inserting a Disc 5-5 Removing a Disc (With Power 5-6 Removing a Disc (Without Power 5-7 Playing a Disc 5-8 Displaying Media Contents 5-8 Protecting Playback 5-9 Observing the Copyright Warning 5-9 Setting the Boot Order 5-10 Replacing the Internal Hard Drive 5-10 Startup and Reference Guide-Part 2 5-1
345561-001.book Page 1 Monday, July 14, 2003 11:19 AM 5 Drives and Drive Media Contents Understanding Drive and Drive Media Terms 5-2 Caring for Drives and Drive Media 5-3 Adding a Drive to the System 5-4 Using the IDE Drive Light 5-4 Inserting or Removing a Disc 5-5 Inserting a Disc 5-5 Removing a Disc (With Power 5-6 Removing a Disc (Without Power 5-7 Playing a Disc 5-8 Displaying Media Contents 5-8 Protecting Playback 5-9 Observing the Copyright Warning 5-9 Setting the Boot Order 5-10 Replacing the Internal Hard Drive 5-10 Startup and Reference Guide-Part 2 5-1

Startup and Reference Guide
Page 70
... system files, applications, and drivers. Optical drives support CDs and DVDs, often called a hard disk drive. 345561-001.book Page 2 Monday, July 14, 2003 11:19 AM Drives and Drive Media Understanding Drive and Drive Media Terms Hard drives are used to store or transport data. The notebook can read or write to optical drives as described in the system, select...
... system files, applications, and drivers. Optical drives support CDs and DVDs, often called a hard disk drive. 345561-001.book Page 2 Monday, July 14, 2003 11:19 AM Drives and Drive Media Understanding Drive and Drive Media Terms Hard drives are used to store or transport data. The notebook can read or write to optical drives as described in the system, select...

Startup and Reference Guide
Page 71
... x-rays instead of work: ■ Do not remove the internal hard drive except for Drives and Drive Media Ä CAUTION: To prevent damage to the notebook or a drive and loss of magnetism and will not damage a hard drive or a diskette. ■ Do not spray a drive with cleaners. ■ Avoid exposing a drive to liquids or temperature extremes. ■ If you insert...
... x-rays instead of work: ■ Do not remove the internal hard drive except for Drives and Drive Media Ä CAUTION: To prevent damage to the notebook or a drive and loss of magnetism and will not damage a hard drive or a diskette. ■ Do not spray a drive with cleaners. ■ Avoid exposing a drive to liquids or temperature extremes. ■ If you insert...

Startup and Reference Guide
Page 72
... (multimedia card) can be added with a microdrive PC Card. The type of optical drive varies by connecting it, as instructed in the drive documentation, to one of the USB (universal serial bus) connectors or to the System The internal hard drive and optical drive are standard features of the notebook. 345561-001.book Page 4 Monday, July 14...
... (multimedia card) can be added with a microdrive PC Card. The type of optical drive varies by connecting it, as instructed in the drive documentation, to one of the USB (universal serial bus) connectors or to the System The internal hard drive and optical drive are standard features of the notebook. 345561-001.book Page 4 Monday, July 14...

Startup and Reference Guide
Page 78
...all open applications, and shut down the notebook and close all open applications. 2. The Setup utility is the internal hard drive. Shut down the notebook. ■ Disconnected the notebook from any bootable CD or DVD in the hard drive bay is not a Windows utility and does...start up from external power and removed the battery pack. 1. Replacing the Internal Hard Drive The hard drive in the optical drive. Disconnect the notebook from the internal hard drive. Remove the internal hard drive only for repair or replacement. Ä CAUTION: To prevent an unresponsive system...
...all open applications, and shut down the notebook and close all open applications. 2. The Setup utility is the internal hard drive. Shut down the notebook. ■ Disconnected the notebook from any bootable CD or DVD in the hard drive bay is not a Windows utility and does...start up from external power and removed the battery pack. 1. Replacing the Internal Hard Drive The hard drive in the optical drive. Disconnect the notebook from the internal hard drive. Remove the internal hard drive only for repair or replacement. Ä CAUTION: To prevent an unresponsive system...
Startup and Reference Guide
Page 79
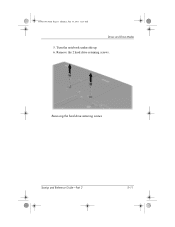
Remove the 2 hard drive retaining screws. Removing the hard drive retaining screws Startup and Reference Guide-Part 2 5-11 Turn the notebook underside up. 6. 345561-001.book Page 11 Monday, July 14, 2003 11:19 AM Drives and Drive Media 5.
Remove the 2 hard drive retaining screws. Removing the hard drive retaining screws Startup and Reference Guide-Part 2 5-11 Turn the notebook underside up. 6. 345561-001.book Page 11 Monday, July 14, 2003 11:19 AM Drives and Drive Media 5.
Startup and Reference Guide
Page 80
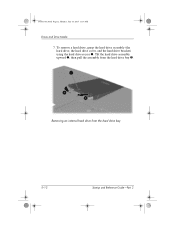
345561-001.book Page 12 Monday, July 14, 2003 11:19 AM Drives and Drive Media 7. Removing an internal hard drive from the hard drive bay 3. To remove a hard drive, grasp the hard drive assembly (the hard drive, the hard drive cover, and the hard drive bracket) using the hard drive recess 1. Tilt the hard drive assembly upward 2, then pull the assembly from the hard drive bay 5-12 Startup and Reference Guide-Part 2
345561-001.book Page 12 Monday, July 14, 2003 11:19 AM Drives and Drive Media 7. Removing an internal hard drive from the hard drive bay 3. To remove a hard drive, grasp the hard drive assembly (the hard drive, the hard drive cover, and the hard drive bracket) using the hard drive recess 1. Tilt the hard drive assembly upward 2, then pull the assembly from the hard drive bay 5-12 Startup and Reference Guide-Part 2

Startup and Reference Guide
Page 81
Inserting an internal hard drive into the hard drive bay until it is seated 2. 345561-001.book Page 13 Monday, July 14, 2003 11:19 AM Drives and Drive Media 8. To insert a hard drive, insert the 2 alignment tabs on the hard drive cover into the 2 alignment slots on the hard drive bay 1, then tilt the hard drive assembly downward into the hard drive bay Startup and Reference Guide-Part 2 5-13
Inserting an internal hard drive into the hard drive bay until it is seated 2. 345561-001.book Page 13 Monday, July 14, 2003 11:19 AM Drives and Drive Media 8. To insert a hard drive, insert the 2 alignment tabs on the hard drive cover into the 2 alignment slots on the hard drive bay 1, then tilt the hard drive assembly downward into the hard drive bay Startup and Reference Guide-Part 2 5-13

Startup and Reference Guide
Page 82
If you have inserted a hard drive, reinsert the 2 hard drive retaining screws. (If you removed but did not replace a hard drive, put the retaining screws in a safe place.) Replacing the hard drive retaining screw 5-14 Startup and Reference Guide-Part 2 345561-001.book Page 14 Monday, July 14, 2003 11:19 AM Drives and Drive Media 9.
If you have inserted a hard drive, reinsert the 2 hard drive retaining screws. (If you removed but did not replace a hard drive, put the retaining screws in a safe place.) Replacing the hard drive retaining screw 5-14 Startup and Reference Guide-Part 2 345561-001.book Page 14 Monday, July 14, 2003 11:19 AM Drives and Drive Media 9.
Startup and Reference Guide
Page 91
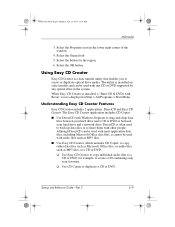
... CD Creator. DirectCD is installed, a "Burn CD & DVDs with any CD or DVD supported by any optical drive in the lower right corner of the window. 4. Using Easy CD Creator Easy CD Creator is displayed at Start...to back up data files or to share them with Windows Explorer to drag-and-drop data files between your hard drive and a CD or DVD or between your favorites. ❏ Use CD Copier to a CD or DVD, ...utility that enables you to create a CD containing only your hard drive and a network drive. Startup and Reference Guide-Part 2 6-9 Select the Properties icon in the system.
... CD Creator. DirectCD is installed, a "Burn CD & DVDs with any CD or DVD supported by any optical drive in the lower right corner of the window. 4. Using Easy CD Creator Easy CD Creator is displayed at Start...to back up data files or to share them with Windows Explorer to drag-and-drop data files between your hard drive and a CD or DVD or between your favorites. ❏ Use CD Copier to a CD or DVD, ...utility that enables you to create a CD containing only your hard drive and a network drive. Startup and Reference Guide-Part 2 6-9 Select the Properties icon in the system.

Startup and Reference Guide
Page 92
... DVD. Responding to the UDF Prompt The first time you insert a CD or DVD into an optical drive, you create the CD or DVD. 6-10 Startup and Reference Guide-Part 2 Choosing Recording Media HP recommends using high-quality media that correspond to the maximum speed of work and damage to a CD or... be prompted to install Universal Disk Format (UDF) Reader. Instead, copy from a CD, DVD, or a network drive to your hard drive, then copy from your notebook can write or copy to CDs and DVDs which provide one-time, non-erasable recording or to CDs and DVDs which DirectCD is not installed. &#...
... DVD. Responding to the UDF Prompt The first time you insert a CD or DVD into an optical drive, you create the CD or DVD. 6-10 Startup and Reference Guide-Part 2 Choosing Recording Media HP recommends using high-quality media that correspond to the maximum speed of work and damage to a CD or... be prompted to install Universal Disk Format (UDF) Reader. Instead, copy from a CD, DVD, or a network drive to your hard drive, then copy from your notebook can write or copy to CDs and DVDs which provide one-time, non-erasable recording or to CDs and DVDs which DirectCD is not installed. &#...

Startup and Reference Guide
Page 98
... an RJ-11 telephone jack (not into the RJ-11 telephone jack (not the RJ-45 network jack) on the notebook. 2. Internal compartments include the memory compartment and the battery and hard drive bays. 7-4 Startup and Reference Guide-Part 2 Plug the modem cable into an RJ-45 network jack or a PBX jack)....) Å WARNING: To reduce the risk of electric shock, disconnect the modem from the telephone network before accessing an internal compartment of the notebook. Connecting a modem to an analog telephone line that has an RJ-11 telephone jack: 1. Plug the other end of the cable toward the...
... an RJ-11 telephone jack (not into the RJ-11 telephone jack (not the RJ-45 network jack) on the notebook. 2. Internal compartments include the memory compartment and the battery and hard drive bays. 7-4 Startup and Reference Guide-Part 2 Plug the modem cable into an RJ-45 network jack or a PBX jack)....) Å WARNING: To reduce the risk of electric shock, disconnect the modem from the telephone network before accessing an internal compartment of the notebook. Connecting a modem to an analog telephone line that has an RJ-11 telephone jack: 1. Plug the other end of the cable toward the...

