
Resolving Start Up and No Boot Problems Checklist
Page 1
... there is a device conflict or failure. HP Notebook PCs - Resolving Start Up and No Boot Problems Checklist Print and use recovery disk to recover the computer to the notebook. Reconnect the AC power adapter (do hard reset If memory or hard drive components were replaced, reinstall original components Remove...mode (f10) and run Memory Test and Hard Drive Test If all USB devices and media cards. 2. Connect a different battery and disconnect AC power adapter. Symptom: LEDs blink or computer beeps but computer fails to the notebook. Connect an external monitor to check display ...
... there is a device conflict or failure. HP Notebook PCs - Resolving Start Up and No Boot Problems Checklist Print and use recovery disk to recover the computer to the notebook. Reconnect the AC power adapter (do hard reset If memory or hard drive components were replaced, reinstall original components Remove...mode (f10) and run Memory Test and Hard Drive Test If all USB devices and media cards. 2. Connect a different battery and disconnect AC power adapter. Symptom: LEDs blink or computer beeps but computer fails to the notebook. Connect an external monitor to check display ...
Resolving Start Up and No Boot Problems Checklist
Page 2
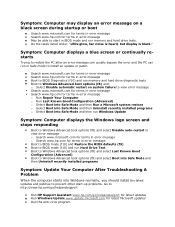
... error message o Search www.microsoft.com for terms in error message o Search www.hp.com for terms in error message Boot to BIOS mode (f10) and Restore the BIOS defaults (f9) Boot to BIOS mode (f10) and run Hard Drive Test Boot to Windows Advanced boot options (f8) and select Last Known Good... tasks listed under, "LEDs glow, fan noise is heard, but display is black." Symptom: Computer displays a blue screen or continually restarts Trying to restart the PC after an error message can usually bypass the error and the PC can run memory and hard drive tests.
... error message o Search www.microsoft.com for terms in error message o Search www.hp.com for terms in error message Boot to BIOS mode (f10) and Restore the BIOS defaults (f9) Boot to BIOS mode (f10) and run Hard Drive Test Boot to Windows Advanced boot options (f8) and select Last Known Good... tasks listed under, "LEDs glow, fan noise is heard, but display is black." Symptom: Computer displays a blue screen or continually restarts Trying to restart the PC after an error message can usually bypass the error and the PC can run memory and hard drive tests.
Limited warranty and technical support - (1 Year)
Page 8
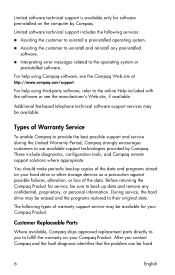
... include diagnostics, configuration tools, and Compaq remote support solutions where appropriate. You should make periodic backup copies of the data and programs stored on your hard drive or other storage devices as a precaution against possible failures, alteration, or loss of Warranty Service To enable Compaq to provide the best possible support and... the Compaq Web site at http://www.compaq.com/support. For help using Compaq software, see the manufacturer's Web site, if available. During service, the hard drive may be fixed 6 English
... include diagnostics, configuration tools, and Compaq remote support solutions where appropriate. You should make periodic backup copies of the data and programs stored on your hard drive or other storage devices as a precaution against possible failures, alteration, or loss of Warranty Service To enable Compaq to provide the best possible support and... the Compaq Web site at http://www.compaq.com/support. For help using Compaq software, see the manufacturer's Web site, if available. During service, the hard drive may be fixed 6 English

Getting Started - Windows 7
Page 6
Pinching/Zooming 24 Rotating 24 5 Maintenance Inserting or removing the battery ...25 Replacing or upgrading the hard drive 27 Removing the hard drive ...27 Installing the hard drive ...28 Adding or replacing memory modules 30 Updating programs and drivers ...33 Routine care ...33 Cleaning the display ...33 Cleaning the TouchPad and keyboard 33 6 ...
Pinching/Zooming 24 Rotating 24 5 Maintenance Inserting or removing the battery ...25 Replacing or upgrading the hard drive 27 Removing the hard drive ...27 Installing the hard drive ...28 Adding or replacing memory modules 30 Updating programs and drivers ...33 Routine care ...33 Cleaning the display ...33 Cleaning the TouchPad and keyboard 33 6 ...

Getting Started - Windows 7
Page 16
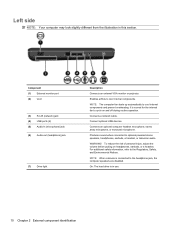
... side NOTE: Your computer may look slightly different from the illustration in (microphone) jack (6) Audio-out (headphone) jack (7) Drive light Description Connects an external VGA monitor or projector. NOTE: The computer fan starts up automatically to cycle on headphones, earbuds,...2 Getting to the Regulatory, Safety, and Environmental Notices. For additional safety information, refer to know your computer WARNING! On: The hard drive is connected to optional powered stereo speakers, headphones, earbuds, a headset, or television audio. Connects a network cable. Connects an optional...
... side NOTE: Your computer may look slightly different from the illustration in (microphone) jack (6) Audio-out (headphone) jack (7) Drive light Description Connects an external VGA monitor or projector. NOTE: The computer fan starts up automatically to cycle on headphones, earbuds,...2 Getting to the Regulatory, Safety, and Environmental Notices. For additional safety information, refer to know your computer WARNING! On: The hard drive is connected to optional powered stereo speakers, headphones, earbuds, a headset, or television audio. Connects a network cable. Connects an optional...
Getting Started - Windows 7
Page 19
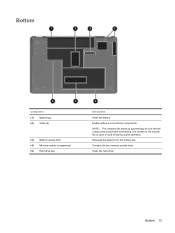
Releases the battery from the battery bay. Contains the two memory module slots. Bottom 13 Holds the hard drive. Enable airflow to cycle on and off during routine operation. It is normal for the internal fan to cool internal components. NOTE: The computer fan starts up automatically to cool internal components and prevent overheating. Bottom Component (1) Battery bay (2) Vents (4) (3) Battery release latch (4) Memory module compartment (5) Hard drive bay Description Holds the battery.
Releases the battery from the battery bay. Contains the two memory module slots. Bottom 13 Holds the hard drive. Enable airflow to cycle on and off during routine operation. It is normal for the internal fan to cool internal components. NOTE: The computer fan starts up automatically to cool internal components and prevent overheating. Bottom Component (1) Battery bay (2) Vents (4) (3) Battery release latch (4) Memory module compartment (5) Hard drive bay Description Holds the battery.

Getting Started - Windows 7
Page 31
5 Maintenance ● Inserting or removing the battery ● Replacing or upgrading the hard drive ● Adding or replacing memory modules ● Updating programs and drivers ● Routine care Inserting or removing the battery NOTE: For additional information on using the battery, refer to the HP Notebook Reference Guide. The battery release latch (3) automatically locks the battery into the battery bay (2) until it is seated. To remove the battery: Inserting or removing the battery 25 To insert the battery: ▲ Insert the battery (1) into place.
5 Maintenance ● Inserting or removing the battery ● Replacing or upgrading the hard drive ● Adding or replacing memory modules ● Updating programs and drivers ● Routine care Inserting or removing the battery NOTE: For additional information on using the battery, refer to the HP Notebook Reference Guide. The battery release latch (3) automatically locks the battery into the battery bay (2) until it is seated. To remove the battery: Inserting or removing the battery 25 To insert the battery: ▲ Insert the battery (1) into place.

Getting Started - Windows 7
Page 33
...6. Remove the three screws (1) that secure the hard drive to the computer. 4. Grasp the tabs (2) on by pressing the power button. Do not remove the hard drive while the computer is off or in Hibernation. Removing the hard drive To remove the hard drive: 1. Disconnect all external devices connected to the... upside down on , in the Sleep state, or in Hibernation, turn the computer on the hard drive, and then disconnect the hard drive cable (3) from the hard drive bay. Lift the left side of the hard drive cover (2), then lift the cover up and to the left (3) and remove it. 9.
...6. Remove the three screws (1) that secure the hard drive to the computer. 4. Grasp the tabs (2) on by pressing the power button. Do not remove the hard drive while the computer is off or in Hibernation. Removing the hard drive To remove the hard drive: 1. Disconnect all external devices connected to the... upside down on , in the Sleep state, or in Hibernation, turn the computer on the hard drive, and then disconnect the hard drive cable (3) from the hard drive bay. Lift the left side of the hard drive cover (2), then lift the cover up and to the left (3) and remove it. 9.

Getting Started - Windows 7
Page 34
Align the tabs (1) on the hard drive cover with the notches on the hard drive to the computer. 3. Installing the hard drive To install the hard drive: 1. Grasp the tabs (1) on the hard drive and lower the hard drive (2) into the hard drive bay, then press down on the computer. 4. 11. Connect the hard drive cable (3) to the system board, and then replace the three screws (4) that secure the hard drive to be sure that the drive is firmly seated. 2. Close the cover (2). 28 Chapter 5 Maintenance Remove the hard drive (4) from the hard drive bay.
Align the tabs (1) on the hard drive cover with the notches on the hard drive to the computer. 3. Installing the hard drive To install the hard drive: 1. Grasp the tabs (1) on the hard drive and lower the hard drive (2) into the hard drive bay, then press down on the computer. 4. 11. Connect the hard drive cable (3) to the system board, and then replace the three screws (4) that secure the hard drive to be sure that the drive is firmly seated. 2. Close the cover (2). 28 Chapter 5 Maintenance Remove the hard drive (4) from the hard drive bay.

Getting Started - Windows 7
Page 35
Replace the battery. 7. Reconnect external power and external devices. 9. Turn on the computer. Replacing or upgrading the hard drive 29 Turn the computer right-side up. 8. 5. Tighten the hard drive cover screws (3). 6.
Replace the battery. 7. Reconnect external power and external devices. 9. Turn on the computer. Replacing or upgrading the hard drive 29 Turn the computer right-side up. 8. 5. Tighten the hard drive cover screws (3). 6.

Getting Started - Windows 7
Page 40
...check for any reason you cannot recover using the recovery partition tools. Recovery discs HP recommends that you create recovery discs to be sure that you should continue to its original factory state if the hard drive fails, or if for the presence of recovery discs. 34 Chapter 6 Backup...full system recovery (from the partition or recovery discs) NOTE: Recovery discs have a partition. HP recommends that you with the following tasks for the first time. If the partition is present, an HP Recovery drive is as good as your system on a regular basis to help you can restore your ...
...check for any reason you cannot recover using the recovery partition tools. Recovery discs HP recommends that you create recovery discs to be sure that you should continue to its original factory state if the hard drive fails, or if for the presence of recovery discs. 34 Chapter 6 Backup...full system recovery (from the partition or recovery discs) NOTE: Recovery discs have a partition. HP recommends that you with the following tasks for the first time. If the partition is present, an HP Recovery drive is as good as your system on a regular basis to help you can restore your ...

Getting Started - Windows 7
Page 41
...created per computer. ● Number each disc before you have finished creating the recovery discs. Performing a system recovery 35 If you use HP Recovery Manager to create a set of recovery restores the computer to continue the disc creation process. The next time you open Recovery Manager... the manufacturer. If you have not already tried these features, try them before using recovery discs. Follow the on the hard drive. This type of recovery discs (entire drive backup) as soon as you set up the computer. ● Windows has its original factory state. NOTE: Read-write...
...created per computer. ● Number each disc before you have finished creating the recovery discs. Performing a system recovery 35 If you use HP Recovery Manager to create a set of recovery restores the computer to continue the disc creation process. The next time you open Recovery Manager... the manufacturer. If you have not already tried these features, try them before using recovery discs. Follow the on the hard drive. This type of recovery discs (entire drive backup) as soon as you set up the computer. ● Windows has its original factory state. NOTE: Read-write...

Getting Started - Windows 7
Page 42
... the computer from the partition, follow these steps: 1. or - ● Turn on using system restore points, refer to an optional external hard drive, a network drive, or discs. You can be a time-saver if you add or modify hardware or software Guidelines: ● Create system restore points using the...; Before the computer is displayed on your settings. Access Recovery Manager in either of the screen. Then, press f11 while the "F11 (HP Recovery)" message is repaired or restored ● Before you have to reset your computer files on page 37. ● Store personal files ...
... the computer from the partition, follow these steps: 1. or - ● Turn on using system restore points, refer to an optional external hard drive, a network drive, or discs. You can be a time-saver if you add or modify hardware or software Guidelines: ● Create system restore points using the...; Before the computer is displayed on your settings. Access Recovery Manager in either of the screen. Then, press f11 while the "F11 (HP Recovery)" message is repaired or restored ● Before you have to reset your computer files on page 37. ● Store personal files ...

Getting Started - Windows 7
Page 43
... Control feature to save and name a snapshot of the computer. Using system restore points A system restore point allows you to improve the security of your hard drive at a previous date and time), when the computer was functioning optimally, follow these steps: 1. When to create restore points ● Before you add or extensively...
... Control feature to save and name a snapshot of the computer. Using system restore points A system restore point allows you to improve the security of your hard drive at a previous date and time), when the computer was functioning optimally, follow these steps: 1. When to create restore points ● Before you add or extensively...

Getting Started - Windows 7
Page 48
...bay 39 battery bay, identifying 13 battery release latch, identifying 13 battery, identifying 14 battery, replacing 25 bays battery 13 hard drive 13 Bluetooth label 39 buttons power 7 TouchPad 5 C caps lock light, identifying 6 compartments memory module 13 components additional ...5 connector, power 9 cord, power 14 D drive light, identifying 10 drives optical drive 9 E esc key, identifying 8 external monitor port, identifying 10 F f11 36 fn key, identifying 8 full system recovery 34 H hard drive installing 28 light 10 removing 27 hard drive bay, identifying 13 headphone jack, identifying 10 ...
...bay 39 battery bay, identifying 13 battery release latch, identifying 13 battery, identifying 14 battery, replacing 25 bays battery 13 hard drive 13 Bluetooth label 39 buttons power 7 TouchPad 5 C caps lock light, identifying 6 compartments memory module 13 components additional ...5 connector, power 9 cord, power 14 D drive light, identifying 10 drives optical drive 9 E esc key, identifying 8 external monitor port, identifying 10 F f11 36 fn key, identifying 8 full system recovery 34 H hard drive installing 28 light 10 removing 27 hard drive bay, identifying 13 headphone jack, identifying 10 ...

Compaq Presario CQ56 Notebook PC and HP G56 Notebook PC - Maintenance and Service Guide
Page 6
Packaging and transporting guidelines 32 Workstation guidelines 32 Equipment guidelines 33 Component replacement procedures 34 Service tag ...34 Computer feet ...35 Battery ...36 Hard drive ...37 Optical drive ...39 WLAN module ...42 Memory module ...44 Keyboard ...46 Top cover ...49 Speaker assembly ...52 Power button board ...54 TouchPad button board ...55 USB board ...... Main menu ...80 Security menu 80 System Configuration menu 81 Diagnostics menu 81 6 Specifications ...82 Computer specifications ...82 39.6-cm (15.6-in) display specifications 83 Hard drive specifications ...84 vi
Packaging and transporting guidelines 32 Workstation guidelines 32 Equipment guidelines 33 Component replacement procedures 34 Service tag ...34 Computer feet ...35 Battery ...36 Hard drive ...37 Optical drive ...39 WLAN module ...42 Memory module ...44 Keyboard ...46 Top cover ...49 Speaker assembly ...52 Power button board ...54 TouchPad button board ...55 USB board ...... Main menu ...80 Security menu 80 System Configuration menu 81 Diagnostics menu 81 6 Specifications ...82 Computer specifications ...82 39.6-cm (15.6-in) display specifications 83 Hard drive specifications ...84 vi

Compaq Presario CQ56 Notebook PC and HP G56 Notebook PC - Maintenance and Service Guide
Page 10
Category Panel Memory Hard drives Optical drives Webcam Microphone Description 39.6-cm (15.6-in) HD LED BrightView (1366×768) 39.6-cm (15.6-in) HD CCFL BrightView (1366×768) 16:9 ... 2048 MB (1024 MB × 2) ● 1024 MB (1024 MB × 1) HP G56 AMD √ Compaq Presario CQ56 AMD √ HP G56 Intel √ √ Compaq Presario CQ56 Intel √ √ Customer accessible √ √ √ √ Supports the following 9.5-mm, 6.35-cm (2.5-in) SATA hard drives: ● 320-GB, 7200-rpm √ √ √ √ ● ...
Category Panel Memory Hard drives Optical drives Webcam Microphone Description 39.6-cm (15.6-in) HD LED BrightView (1366×768) 39.6-cm (15.6-in) HD CCFL BrightView (1366×768) 16:9 ... 2048 MB (1024 MB × 2) ● 1024 MB (1024 MB × 1) HP G56 AMD √ Compaq Presario CQ56 AMD √ HP G56 Intel √ √ Compaq Presario CQ56 Intel √ √ Customer accessible √ √ √ √ Supports the following 9.5-mm, 6.35-cm (2.5-in) SATA hard drives: ● 320-GB, 7200-rpm √ √ √ √ ● ...

Compaq Presario CQ56 Notebook PC and HP G56 Notebook PC - Maintenance and Service Guide
Page 12
Category Power requirements Security Operating system Serviceability Description 6-cell Li-ion, 2.20-Ah, 47-Wh battery HP G56 AMD √ 6-cell Li-ion, 2.55-Ah, 55-Wh battery √ 65-W AC adapter ...Linux √ End-user replaceable parts: AC adapter √ Battery (system) √ Hard drive √ Memory module √ Optical drive √ WLAN module √ Compaq Presario CQ56 AMD √ √ √ √ √ √ √ √ √ HP G56 Intel v Compaq Presario CQ56 Intel √ √ √ √ √ √ √ &#...
Category Power requirements Security Operating system Serviceability Description 6-cell Li-ion, 2.20-Ah, 47-Wh battery HP G56 AMD √ 6-cell Li-ion, 2.55-Ah, 55-Wh battery √ 65-W AC adapter ...Linux √ End-user replaceable parts: AC adapter √ Battery (system) √ Hard drive √ Memory module √ Optical drive √ WLAN module √ Compaq Presario CQ56 AMD √ √ √ √ √ √ √ √ √ HP G56 Intel v Compaq Presario CQ56 Intel √ √ √ √ √ √ √ &#...
Compaq Presario CQ56 Notebook PC and HP G56 Notebook PC - Maintenance and Service Guide
Page 18
Connect optional USB devices. WARNING! On: The hard drive is normal for the internal fan to optional powered stereo speakers, headphones, earbuds, a headset, or television audio. NOTE: The computer fan starts up automatically to ..., stereo array microphone, or monaural microphone. Left side NOTE: Your computer may look slightly different from the illustration in (microphone) jack (6) Audio-out (headphone) jack (7) Drive light Description Connects an external VGA monitor or projector. To reduce the risk of personal injury, adjust the volume before putting on and off during...
Connect optional USB devices. WARNING! On: The hard drive is normal for the internal fan to optional powered stereo speakers, headphones, earbuds, a headset, or television audio. NOTE: The computer fan starts up automatically to ..., stereo array microphone, or monaural microphone. Left side NOTE: Your computer may look slightly different from the illustration in (microphone) jack (6) Audio-out (headphone) jack (7) Drive light Description Connects an external VGA monitor or projector. To reduce the risk of personal injury, adjust the volume before putting on and off during...

Compaq Presario CQ56 Notebook PC and HP G56 Notebook PC - Maintenance and Service Guide
Page 21
...the module and then receive a warning message, remove the module to cycle on and off during routine operation. Holds the hard drive. Bottom 13 It is normal for use in the computer by the governmental agency that regulates wireless devices in your country or... region. Bottom Component (1) Battery bay (2) Vents (4) (3) Battery release latch (4) Memory module compartment (5) Hard drive bay Description Holds the battery. CAUTION: To prevent an unresponsive system, replace the wireless module only with a wireless module authorized for the ...
...the module and then receive a warning message, remove the module to cycle on and off during routine operation. Holds the hard drive. Bottom 13 It is normal for use in the computer by the governmental agency that regulates wireless devices in your country or... region. Bottom Component (1) Battery bay (2) Vents (4) (3) Battery release latch (4) Memory module compartment (5) Hard drive bay Description Holds the battery. CAUTION: To prevent an unresponsive system, replace the wireless module only with a wireless module authorized for the ...

