
Bluetooth Wireless Technology Basics
Page 7
... driver. Refer to your notebook user documentation if you can use the Bluetooth Setup wizard to the Documentation Library Bluetooth CD that came in the lower-right part of the screen. Follow the instructions in the Folders pane of the connection (Table 1). Then you need help locating the wireless button and light. The following 3 steps activate your notebook. For specific instructions about discovering and connecting to other BWT-enabled devices, refer to configure the service...
... driver. Refer to your notebook user documentation if you can use the Bluetooth Setup wizard to the Documentation Library Bluetooth CD that came in the lower-right part of the screen. Follow the instructions in the Folders pane of the connection (Table 1). Then you need help locating the wireless button and light. The following 3 steps activate your notebook. For specific instructions about discovering and connecting to other BWT-enabled devices, refer to configure the service...
Bluetooth Wireless Technology Basics
Page 8
... the functions listed in the lower right corner of the Today screen to activate BWT functionality, to create BWT connections, or to send images, text, business cards, and calendar notes. You can be used to manage and change the default BWT settings and set the level of discoverability of your notebook, select Start > My Programs > My Bluetooth Places to the "Selecting BWT device profiles" section below for each HP...
... the functions listed in the lower right corner of the Today screen to activate BWT functionality, to create BWT connections, or to send images, text, business cards, and calendar notes. You can be used to manage and change the default BWT settings and set the level of discoverability of your notebook, select Start > My Programs > My Bluetooth Places to the "Selecting BWT device profiles" section below for each HP...

Startup and Reference Guide
Page 13
... menu settings in the Search field and press enter. ✎ Using a firewall can disable the firewall or contact your notebook security and to reduce the severity of security access threats. Refer to the online Help File within a network. Startup Using Security Software Measures HP recommends that you follow these 4 protective security software measures to improve your firewall provider for configuration information. Options > Security. 3. Select Start > Help & Support. Disabling...
... menu settings in the Search field and press enter. ✎ Using a firewall can disable the firewall or contact your notebook security and to reduce the severity of security access threats. Refer to the online Help File within a network. Startup Using Security Software Measures HP recommends that you follow these 4 protective security software measures to improve your firewall provider for configuration information. Options > Security. 3. Select Start > Help & Support. Disabling...

Startup and Reference Guide
Page 42
... hotkey switches the screen image between the notebook display, the external monitor display, and a simultaneous display on the notebook. The BIOS date may display in "Startup." From the Help and Support Center, you can use the fn+f3 hotkey for quick access to the "Getting Help" section in a decimal format, such as 10/19/2002 F.07. For more information about your Internet Explorer home page, you have set up your Internet or network services...
... hotkey switches the screen image between the notebook display, the external monitor display, and a simultaneous display on the notebook. The BIOS date may display in "Startup." From the Help and Support Center, you can use the fn+f3 hotkey for quick access to the "Getting Help" section in a decimal format, such as 10/19/2002 F.07. For more information about your Internet Explorer home page, you have set up your Internet or network services...

Startup and Reference Guide
Page 58
... button, and then select Shut down from the drop-down list. ■ Press and hold down the power/standby button for at least 4 seconds. ■ Unplug the notebook from external power and remove the battery pack For battery pack removal instructions, refer to use the normal Windows shutdown procedure, try the following emergency shutdown procedures in the loss of unsaved data. 4-10 Startup and Reference Guide-Part...
... button, and then select Shut down from the drop-down list. ■ Press and hold down the power/standby button for at least 4 seconds. ■ Unplug the notebook from external power and remove the battery pack For battery pack removal instructions, refer to use the normal Windows shutdown procedure, try the following emergency shutdown procedures in the loss of unsaved data. 4-10 Startup and Reference Guide-Part...

Startup and Reference Guide
Page 79
... external power and removed the battery pack. 1. Remove the 4 hard drive retaining screws from external power. 4. Shut down the notebook and close all open applications. 2. Remove the internal hard drive only for repair or replacement. Ä CAUTION: To prevent an unresponsive system and loss of work, do not begin this procedure until you have ■ Saved your work , closed all open applications, and shut down . 6. Removing the hard drive retaining screws Startup and Reference Guide-Part 2 5-5 Remove...
... external power and removed the battery pack. 1. Remove the 4 hard drive retaining screws from external power. 4. Shut down the notebook and close all open applications. 2. Remove the internal hard drive only for repair or replacement. Ä CAUTION: To prevent an unresponsive system and loss of work, do not begin this procedure until you have ■ Saved your work , closed all open applications, and shut down . 6. Removing the hard drive retaining screws Startup and Reference Guide-Part 2 5-5 Remove...

Startup and Reference Guide
Page 136
... notebook. 9-2 Startup and Reference Guide-Part 2 Download and install the updates. ✎ The notebook ROM stores the BIOS (basic input/output system). Preparing for any software updates, particularly a ROM update. Software Updates, Restorations and Utilities Updating Software For optimal notebook performance and to a network, consult with your notebook type, series or family, and model. The BIOS determines how the notebook hardware interacts with the operating system and external devices and also supports such notebook services as they become available. Accessing Notebook...
... notebook. 9-2 Startup and Reference Guide-Part 2 Download and install the updates. ✎ The notebook ROM stores the BIOS (basic input/output system). Preparing for any software updates, particularly a ROM update. Software Updates, Restorations and Utilities Updating Software For optimal notebook performance and to a network, consult with your notebook type, series or family, and model. The BIOS determines how the notebook hardware interacts with the operating system and external devices and also supports such notebook services as they become available. Accessing Notebook...

Startup and Reference Guide
Page 154
...country-specific modem adapter identifying 2-17 customer support 1-13, 2-18 Index-2 Startup and Reference Guide Index BIOS (basic input/output system) 9-2 boot order 5-14 buttons media 3-10 mute 2-6, 6-2 optical drive release 2-12 PC Card eject 2-12, 8-7 picture 3-10 power/standby 2-4 Quick Launch 3-10 TouchPad 2-2, 3-3 volume 2-6, 6-2 wireless 3-10 See also keys, latches 2-6 C cable lock, connecting 8-19 cables audio 6-7 modem 2-8, 2-16, 7-2 network 2-16, 7-4 S-Video 6-7 See also power cord 2-16 caps lock light 2-5 card and socket services, PC Card 8-5 card. See memory, modules supported...
...country-specific modem adapter identifying 2-17 customer support 1-13, 2-18 Index-2 Startup and Reference Guide Index BIOS (basic input/output system) 9-2 boot order 5-14 buttons media 3-10 mute 2-6, 6-2 optical drive release 2-12 PC Card eject 2-12, 8-7 picture 3-10 power/standby 2-4 Quick Launch 3-10 TouchPad 2-2, 3-3 volume 2-6, 6-2 wireless 3-10 See also keys, latches 2-6 C cable lock, connecting 8-19 cables audio 6-7 modem 2-8, 2-16, 7-2 network 2-16, 7-4 S-Video 6-7 See also power cord 2-16 caps lock light 2-5 card and socket services, PC Card 8-5 card. See memory, modules supported...

Startup and Reference Guide
Page 157
... 3-5 switch image 3-6 hotkeys 2-3, 3-3 changing power options 4-13 procedures 3-5 Quick Reference 3-5 HP Customer Care Center 1-7 hubs, USB 8-3 humidity specifications A-2 I infrared communication 4-7 infrared port 2-12, 7-8 installing basic software 1-8 operating system 1-8 optional software 1-9 intake vents 2-14 Internet Explorer hotkey 3-6 Internet Explorer, security 1-11 InterVideo WinDVD 6-10 creating DVDs 6-14, 6-15 error message 6-10 managing region settings 6-11 J jacks audio line-out 2-10, 6-5, 6-6 microphone 2-10, 6-5, 6-6 RJ-11 telephone 2-8 RJ-45 network 2-8 K keyboard language...
... 3-5 switch image 3-6 hotkeys 2-3, 3-3 changing power options 4-13 procedures 3-5 Quick Reference 3-5 HP Customer Care Center 1-7 hubs, USB 8-3 humidity specifications A-2 I infrared communication 4-7 infrared port 2-12, 7-8 installing basic software 1-8 operating system 1-8 optional software 1-9 intake vents 2-14 Internet Explorer hotkey 3-6 Internet Explorer, security 1-11 InterVideo WinDVD 6-10 creating DVDs 6-14, 6-15 error message 6-10 managing region settings 6-11 J jacks audio line-out 2-10, 6-5, 6-6 microphone 2-10, 6-5, 6-6 RJ-11 telephone 2-8 RJ-45 network 2-8 K keyboard language...

Expansion Base - Maintenance and Service Guide
Page 73
...plastic parts 4-2 power connector 1-7 power cord set requirements B-1 power cord, spare part numbers 3-6 power supply removal 5-10 spare part number 3-3 R rear components 1-5 rear cover removal 5-6 spare part number 3-3 receiver function 1-9 spare part number 3-5 removal preliminaries 4-1 replacement preliminaries 4-1 right-side components 1-3, 1-5 RJ-11 telephone jack location 1-7 pin assignments A-2 RJ-45 network jack location 1-7 pin assignments A-1 S S/PDIF audio line-out jack pin assignments A-5 S/PDIF connector location 1-7 screw listing C-1 security cable slot 1-5, 1-8 serial connector...
...plastic parts 4-2 power connector 1-7 power cord set requirements B-1 power cord, spare part numbers 3-6 power supply removal 5-10 spare part number 3-3 R rear components 1-5 rear cover removal 5-6 spare part number 3-3 receiver function 1-9 spare part number 3-5 removal preliminaries 4-1 replacement preliminaries 4-1 right-side components 1-3, 1-5 RJ-11 telephone jack location 1-7 pin assignments A-2 RJ-45 network jack location 1-7 pin assignments A-1 S S/PDIF audio line-out jack pin assignments A-5 S/PDIF connector location 1-7 screw listing C-1 security cable slot 1-5, 1-8 serial connector...

HP Pavilion zd8000 Notebook PC - Maintenance and Service Guide
Page 8
... the notebook for disassembly (refer to Section 5.16, "System Board," for setting the level of performance ■ Battery calibration ■ Lid switch standby/resume ■ Power/standby button ■ Advanced Configuration and Power Management (ACPM) compliance 1-4 Maintenance and Service Guide Turn on removing and replacing the RTC battery). 3. The notebook supports the following power management features: ■ Standby ■ Hibernation ■ Setting customization by the user ■ Hotkeys for more information). 2. Connect AC power to clear the password. Wait...
... the notebook for disassembly (refer to Section 5.16, "System Board," for setting the level of performance ■ Battery calibration ■ Lid switch standby/resume ■ Power/standby button ■ Advanced Configuration and Power Management (ACPM) compliance 1-4 Maintenance and Service Guide Turn on removing and replacing the RTC battery). 3. The notebook supports the following power management features: ■ Standby ■ Hibernation ■ Setting customization by the user ■ Hotkeys for more information). 2. Connect AC power to clear the password. Wait...

HP Pavilion zd8000 Notebook PC - Maintenance and Service Guide
Page 90
Removing the Memory Module Compartment Cover 5-14 Maintenance and Service Guide Prepare the notebook for disassembly (refer to the right 2. 4. Lift the left edge of the cover up and swing it to Section 5.3). 2. Removal and Replacement Procedures 5.6 Memory Module Spare Part Number Information 1024-MB, 400 MHz DDR2 512-MB, 400 MHz DDR2 256-MB, 400 MHz DDR2 374726-001 374725-001 374724-001 1. Remove the memory module compartment cover. ✎...
Removing the Memory Module Compartment Cover 5-14 Maintenance and Service Guide Prepare the notebook for disassembly (refer to the right 2. 4. Lift the left edge of the cover up and swing it to Section 5.3). 2. Removal and Replacement Procedures 5.6 Memory Module Spare Part Number Information 1024-MB, 400 MHz DDR2 512-MB, 400 MHz DDR2 256-MB, 400 MHz DDR2 374726-001 374725-001 374724-001 1. Remove the memory module compartment cover. ✎...

HP Notebook Series - Troubleshooting
Page 20
... screen, save your unsaved work , then initiate Hibernation. Double-click Power Options, select the Hibernate tab, then select the Enable Hibernate Support check box. ◆ In Windows XP, select Start > Control Panel > Performance and Maintenance > Power Options icon. To continue working , connect the notebook to external power. To continue working , connect the notebook to external power, then restore from Hibernation. HP strongly recommends that flash or change color. ■ To interpret or set low-battery indicators, refer to your model-specific or operating...
... screen, save your unsaved work , then initiate Hibernation. Double-click Power Options, select the Hibernate tab, then select the Enable Hibernate Support check box. ◆ In Windows XP, select Start > Control Panel > Performance and Maintenance > Power Options icon. To continue working , connect the notebook to external power. To continue working , connect the notebook to external power, then restore from Hibernation. HP strongly recommends that flash or change color. ■ To interpret or set low-battery indicators, refer to your model-specific or operating...

HP Notebook Series - Troubleshooting
Page 26
... drive to your model-specific documentation or, if you cannot play a CD in a CD drive. ■ Change the regional setting on . Notebook cannot start up from a CD or DVD may take up to your model-specific or drive documentation. ■ Make sure the CD or DVD is necessary. Startup from a CD or DVD ■ Allow more time. For example, you can play a DVD in a DVD drive, but you are using optional DVD software...
... drive to your model-specific documentation or, if you cannot play a CD in a CD drive. ■ Change the regional setting on . Notebook cannot start up from a CD or DVD may take up to your model-specific or drive documentation. ■ Make sure the CD or DVD is necessary. Startup from a CD or DVD ■ Allow more time. For example, you can play a DVD in a DVD drive, but you are using optional DVD software...
HP Notebook Series - Troubleshooting
Page 39
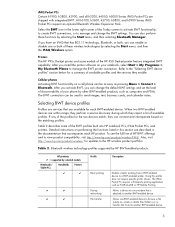
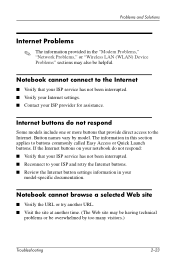
... or more buttons that your ISP service has not been interrupted. ■ Reconnect to your ISP and retry the Internet buttons. ■ Review the Internet button settings information in your model-specific documentation. Problems and Solutions Internet Problems ✎ The information provided in the "Modem Problems," "Network Problems," or "Wireless LAN (WLAN) Device Problems" sections may be having technical problems or be helpful. Button names vary by too many visitors.) Troubleshooting 2-23 Notebook cannot...
... or more buttons that your ISP service has not been interrupted. ■ Reconnect to your ISP and retry the Internet buttons. ■ Review the Internet button settings information in your model-specific documentation. Problems and Solutions Internet Problems ✎ The information provided in the "Modem Problems," "Network Problems," or "Wireless LAN (WLAN) Device Problems" sections may be having technical problems or be helpful. Button names vary by too many visitors.) Troubleshooting 2-23 Notebook cannot...

HP Notebook Series - Troubleshooting
Page 41
... work on an optional external keyboard. On other models, hotkeys are accessible through the operating system mouse window. Refer to your hand from the pointing device, and the pointer will stabilize. Or, disconnect the external keypad, then use the external keypad. On some models, these settings are used differently on an external keyboard. Pointer drifts On some models, hotkeys are typing. ■ Clean the TouchPad with a damp cloth, then wipe it is connected to turn...
... work on an optional external keyboard. On other models, hotkeys are accessible through the operating system mouse window. Refer to your hand from the pointing device, and the pointer will stabilize. Or, disconnect the external keypad, then use the external keypad. On some models, these settings are used differently on an external keyboard. Pointer drifts On some models, hotkeys are typing. ■ Clean the TouchPad with a damp cloth, then wipe it is connected to turn...

HP Notebook Series - Troubleshooting
Page 42
... an optional external mouse is securely connected to the system and that the correct drivers are accessible through the operating system mouse window. On some models, these settings are installed. ■ Clean the mouse. 2-26 Troubleshooting External mouse does not work ■ Press the TouchPad on/off button, if available on the TouchPad. ■ If an external mouse is connected to the system, it dry. ■ Adjust the TouchPad sensitivity settings. Some models include a utility, often called the Setup utility...
... an optional external mouse is securely connected to the system and that the correct drivers are accessible through the operating system mouse window. On some models, these settings are installed. ■ Clean the mouse. 2-26 Troubleshooting External mouse does not work ■ Press the TouchPad on/off button, if available on the TouchPad. ■ If an external mouse is connected to the system, it dry. ■ Adjust the TouchPad sensitivity settings. Some models include a utility, often called the Setup utility...

HP Pavilion zd7000 notebook series PC - Startup and Reference Guide HP Notebook Series
Page 85
Ryan Masterfile.book Page 5 Monday, June 9, 2003 2:33 PM Drives Replacing the Internal Hard Drive The hard drive in the hard drive bay is the internal hard drive. Shut down . 6. Disconnect the notebook from the hard drive bay. Save your work and close the display. 3. Remove the battery pack. 5. Turn the notebook upside down the notebook and close all open applications. 2. Remove the 4 hard drive retaining screws from external power. 4. Remove the internal hard drive only for repair or replacement. Ä CAUTION: To prevent an unresponsive...
Ryan Masterfile.book Page 5 Monday, June 9, 2003 2:33 PM Drives Replacing the Internal Hard Drive The hard drive in the hard drive bay is the internal hard drive. Shut down . 6. Disconnect the notebook from the hard drive bay. Save your work and close the display. 3. Remove the battery pack. 5. Turn the notebook upside down the notebook and close all open applications. 2. Remove the 4 hard drive retaining screws from external power. 4. Remove the internal hard drive only for repair or replacement. Ä CAUTION: To prevent an unresponsive...

HP Pavilion zd7000 notebook series PC - Startup and Reference Guide HP Notebook Series
Page 164
...17 connecting 7-3 country-specific adapter 2-18 specifications 7-2 virus protection 1-11 Modem and Networking guide 2-19 monitor, external external monitor connector 2-9 switching display 3-7 mouse, external USB connectors 2-9, 2-11 multimedia card 8-8 N network cable 2-17 RJ-45 jack 2-9 specifications 7-3 speed 7-3 Norton AntiVirus 2003 1-11 notebook model, family, type, and serial number 9-2 NTSC television format 6-9 num lock light 2-6 number Product Key 2-16 serial 2-16 numeric keypad 3-10 O opening the notebook 1-4, 2-2 operating environment specifications A-2 operating system installing...
...17 connecting 7-3 country-specific adapter 2-18 specifications 7-2 virus protection 1-11 Modem and Networking guide 2-19 monitor, external external monitor connector 2-9 switching display 3-7 mouse, external USB connectors 2-9, 2-11 multimedia card 8-8 N network cable 2-17 RJ-45 jack 2-9 specifications 7-3 speed 7-3 Norton AntiVirus 2003 1-11 notebook model, family, type, and serial number 9-2 NTSC television format 6-9 num lock light 2-6 number Product Key 2-16 serial 2-16 numeric keypad 3-10 O opening the notebook 1-4, 2-2 operating environment specifications A-2 operating system installing...

HP Pavilion zd7000 notebook series PC - Worldwide Limited Warranty and Technical Support
Page 7
... needs: • Access to drivers and product documentation: Find original product drivers, latest updates and software fixes, Limited Warranty information, and product documentation. • Open an online service event with an HP Support Specialist: Have a product Limited Warranty issue or need to your problem by our dedicated and professionally trained customer service team. Logon to our online services site at www.hp.com/support. Third-party hardware or software...
... needs: • Access to drivers and product documentation: Find original product drivers, latest updates and software fixes, Limited Warranty information, and product documentation. • Open an online service event with an HP Support Specialist: Have a product Limited Warranty issue or need to your problem by our dedicated and professionally trained customer service team. Logon to our online services site at www.hp.com/support. Third-party hardware or software...


