
Temperature Screening Thermographic Installation Guide
Page 1
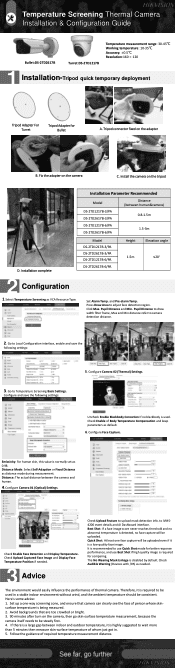
... distance refer to adjust face detection region. Configure Face Capture. The No Wearing Mask Linkage is normally set as default. 6. Temperature Screening Thermal Camera Installation & Configuration Guide Bullet:DS-2TD2617B Turret:DS-2TD1217B Temperature measurement range: 30-45℃ Working temperature: 10-35℃ Accuracy: ±0.5℃ Resolution:160 × 120 1 Installation-Tripod quick temporary deployment Tripod Adapter For Turret Tripod Adapter for comparing. Configure Camera 02 (Thermal) Settings. Emissivity: For human...
... distance refer to adjust face detection region. Configure Face Capture. The No Wearing Mask Linkage is normally set as default. 6. Temperature Screening Thermal Camera Installation & Configuration Guide Bullet:DS-2TD2617B Turret:DS-2TD1217B Temperature measurement range: 30-45℃ Working temperature: 10-35℃ Accuracy: ±0.5℃ Resolution:160 × 120 1 Installation-Tripod quick temporary deployment Tripod Adapter For Turret Tripod Adapter for comparing. Configure Camera 02 (Thermal) Settings. Emissivity: For human...

User Manual 1
Page 5
... take any responsibility for abnormal operation, privacy leakage, or other security settings about the device, and keep your user name and password. Refer to configure all the passwords and other damages resulting from cyber attack or hacker attack. DS-2TD2xxx-xx/xx Thermal and Optical Bi-Spectrum Network Bullet Camera Quick Start Guide Power Supply • Make sure that you wire, install, or disassemble the device...
... take any responsibility for abnormal operation, privacy leakage, or other security settings about the device, and keep your user name and password. Refer to configure all the passwords and other damages resulting from cyber attack or hacker attack. DS-2TD2xxx-xx/xx Thermal and Optical Bi-Spectrum Network Bullet Camera Quick Start Guide Power Supply • Make sure that you wire, install, or disassemble the device...

User Manual 1
Page 21
DS-2TD2xxx-xx/xx Thermal and Optical Bi-Spectrum Network Bullet Camera Quick Start Guide 4. Tighten the screw. Tighten the screw. Adjust the camera to the optimal surveillance angle. • Bracket Type I 1) Loosen the tilt adjusting screw to adjust tilting position [0° to 360°]. Tighten the screw. 3) Loosen the rotation adjusting screw to rotate the camera [0° to 360°]. Tighten the screw. 2) Loosen the pan adjusting screw...
DS-2TD2xxx-xx/xx Thermal and Optical Bi-Spectrum Network Bullet Camera Quick Start Guide 4. Tighten the screw. Tighten the screw. Adjust the camera to the optimal surveillance angle. • Bracket Type I 1) Loosen the tilt adjusting screw to adjust tilting position [0° to 360°]. Tighten the screw. 3) Loosen the rotation adjusting screw to rotate the camera [0° to 360°]. Tighten the screw. 2) Loosen the pan adjusting screw...

User Manual 1
Page 27
... Network Bullet Camera Quick Start Guide Set the Network Camera over the LAN You shall acknowledge that enable DHCP by setting a strong password for the IP address. For cameras that the use the camera. If the product does not work properly, please contact with Internet access might be under network security risks. Refer to introduce camera activation. We will take activation via SADP software and Activation via a Web Browser as examples to the network camera user manual...
... Network Bullet Camera Quick Start Guide Set the Network Camera over the LAN You shall acknowledge that enable DHCP by setting a strong password for the IP address. For cameras that the use the camera. If the product does not work properly, please contact with Internet access might be under network security risks. Refer to introduce camera activation. We will take activation via SADP software and Activation via a Web Browser as examples to the network camera user manual...

User Manual 1
Page 29
... 071720NA 29 Proper configuration of all passwords and other security settings is the responsibility of the following categories: upper case letters, lower case letters, numbers, and special characters) in batch. Select an active device. DS-2TD2xxx-xx/xx Thermal and Optical Bi-Spectrum Network Bullet Camera Quick Start Guide Figure 41, SADP Interface The SADP software supports activating the camera in order to...
... 071720NA 29 Proper configuration of all passwords and other security settings is the responsibility of the following categories: upper case letters, lower case letters, numbers, and special characters) in batch. Select an active device. DS-2TD2xxx-xx/xx Thermal and Optical Bi-Spectrum Network Bullet Camera Quick Start Guide Figure 41, SADP Interface The SADP software supports activating the camera in order to...

User Manual 1
Page 31
... the network camera user manual. Delete unnecessary accounts and user/operator permissions. DS-2TD2xxx-xx/xx Thermal and Optical Bi-Spectrum Network Bullet Camera Quick Start Guide Open the Web browser. Close the Web browser to finish the installation of the network camera in . Figure 44, Download Plug-in Reopen the Web browser after the installation of the plug-in before viewing the live video and managing the camera. For further detailed configuration instructions, refer to login. Input the user name and password.
... the network camera user manual. Delete unnecessary accounts and user/operator permissions. DS-2TD2xxx-xx/xx Thermal and Optical Bi-Spectrum Network Bullet Camera Quick Start Guide Open the Web browser. Close the Web browser to finish the installation of the network camera in . Figure 44, Download Plug-in Reopen the Web browser after the installation of the plug-in before viewing the live video and managing the camera. For further detailed configuration instructions, refer to login. Input the user name and password.

Data Sheet
Page 2
... Optical Module Maximum Image Resolution Image Sensor Minimum Illumination Shutter Speed Lens (Focal Length) Field of View WDR Day/Night Image Function Bi-Spectrum Image Fusion Picture-in-Picture Infrared IR Distance IR Intensity and Angle Smart Features Face Detection Face Mask Detection Voice Alarm Network Main Stream Sub-Stream Video Compression Audio Compression Protocols Simultaneous Live Views User/Host Level Security Measures Integration Alarm Input Alarm Output Alarm Action Audio Input Audio Output Reset Communication Interface DS-2TD2617B-6/PA Vanadium oxide...
... Optical Module Maximum Image Resolution Image Sensor Minimum Illumination Shutter Speed Lens (Focal Length) Field of View WDR Day/Night Image Function Bi-Spectrum Image Fusion Picture-in-Picture Infrared IR Distance IR Intensity and Angle Smart Features Face Detection Face Mask Detection Voice Alarm Network Main Stream Sub-Stream Video Compression Audio Compression Protocols Simultaneous Live Views User/Host Level Security Measures Integration Alarm Input Alarm Output Alarm Action Audio Input Audio Output Reset Communication Interface DS-2TD2617B-6/PA Vanadium oxide...

User Manual
Page 14
...-spectrum Network Camera User Manual Chapter 2 Device Activation and Accessing To protect the security and privacy of the user account and data, you reset your password regularly, especially in Modify Network Parameters. 2.2 Activate the Device via Browser You can better protect your product. 5. Check Device Status from the device list, and select Inactive device. 4. Click OK. Steps 1. Before You Start Access www.hikvision...
...-spectrum Network Camera User Manual Chapter 2 Device Activation and Accessing To protect the security and privacy of the user account and data, you reset your password regularly, especially in Modify Network Parameters. 2.2 Activate the Device via Browser You can better protect your product. 5. Check Device Status from the device list, and select Inactive device. 4. Click OK. Steps 1. Before You Start Access www.hikvision...

User Manual
Page 15
... user name and password, and click Login. Thermal & Optical Bi-spectrum Network Camera User Manual Note The default IP address of the device. 4. The admin user can set the login attempts with the wrong password. Optional: Go to Configuration → Network → Basic → TCP/IP to change the IP address of the device to the same segment of the PC to improve the security when accessing the device via Web browser. 2.3.1 Install Plug...
... user name and password, and click Login. Thermal & Optical Bi-spectrum Network Camera User Manual Note The default IP address of the device. 4. The admin user can set the login attempts with the wrong password. Optional: Go to Configuration → Network → Basic → TCP/IP to change the IP address of the device to the same segment of the PC to improve the security when accessing the device via Web browser. 2.3.1 Install Plug...

User Manual
Page 21
... Live View, and select thermal channel to view the temperature and rules information on the interface. 2. Go to Live View interface to adjust the position. 3. Thermal & Optical Bi-spectrum Network Camera User Manual alarm. Click Save. Click and move the line to view the maximum temperature and rule of the line to Set Shielded Region for detailed settings. 6. Steps 1. Drag the cross cursor to monitor the...
... Live View, and select thermal channel to view the temperature and rules information on the interface. 2. Go to Live View interface to adjust the position. 3. Thermal & Optical Bi-spectrum Network Camera User Manual alarm. Click Save. Click and move the line to view the maximum temperature and rule of the line to Set Shielded Region for detailed settings. 6. Steps 1. Drag the cross cursor to monitor the...

User Manual
Page 32
Thermal & Optical Bi-spectrum Network Camera User Manual Figure 6-3 Set Video Tampering Area 6. Before You Start Make sure the external alarm device is connected. Go to Set Arming Schedule for setting scheduled time. and Alarm Type from the external device triggers the corresponding actions of the current device. Click Save. 20 Refer to Configuration → Event → Basic Event → Alarm Input. 2. Select Alarm Input NO. Steps 1. Refer...
Thermal & Optical Bi-spectrum Network Camera User Manual Figure 6-3 Set Video Tampering Area 6. Before You Start Make sure the external alarm device is connected. Go to Set Arming Schedule for setting scheduled time. and Alarm Type from the external device triggers the corresponding actions of the current device. Click Save. 20 Refer to Configuration → Event → Basic Event → Alarm Input. 2. Select Alarm Input NO. Steps 1. Refer...

User Manual
Page 41
... quick setup page. 2. Click to the actual device model. 7.1.11 Quick Set Live View It offers a quick setup of PTZ, display settings, OSD, video/audio and VCA resource settings on live view among multiple channels. This function is used to turn on the device equipped with motorized lens. Thermal & Optical Bi-spectrum Network Camera User Manual live view page. Set PTZ, display settings, OSD, video/audio and VCA resource parameters. - Click to start full screen mode and press ESC button to exit. 7.1.7 Light Click to view the image...
... quick setup page. 2. Click to the actual device model. 7.1.11 Quick Set Live View It offers a quick setup of PTZ, display settings, OSD, video/audio and VCA resource settings on live view among multiple channels. This function is used to turn on the device equipped with motorized lens. Thermal & Optical Bi-spectrum Network Camera User Manual live view page. Set PTZ, display settings, OSD, video/audio and VCA resource parameters. - Click to start full screen mode and press ESC button to exit. 7.1.7 Light Click to view the image...

User Manual
Page 42
... the situation that does not demand high video fluency. Thermal & Optical Bi-spectrum Network Camera User Manual Note The function is only supported by certain models. 7.1.12 Lens Parameters Adjustment It is used to adjust the speed of streaming data and better video quality, yet the real-time transmission will be displayed abnormally according to stop down the iris. 7.2 Set Transmission Parameters The live view image may be affected. Steps 1.
... the situation that does not demand high video fluency. Thermal & Optical Bi-spectrum Network Camera User Manual Note The function is only supported by certain models. 7.1.12 Lens Parameters Adjustment It is used to adjust the speed of streaming data and better video quality, yet the real-time transmission will be displayed abnormally according to stop down the iris. 7.2 Set Transmission Parameters The live view image may be affected. Steps 1.

User Manual
Page 52
Steps 1. Go to Configuration → Image → Display Settings. 2. Select the thermal channel. 3. Result The live view displays the image with palette. 8.2.11 Set Target Color You can select the palette mode to display the thermal grayscale image to colored image. Click Image Enhancement, select Palette as White Hot or Black Hot. 4. Thermal & Optical Bi-spectrum Network Camera User Manual 8.2.10 Set Palette You can set the color of High Temperature, Interval Temperature, or Low...
Steps 1. Go to Configuration → Image → Display Settings. 2. Select the thermal channel. 3. Result The live view displays the image with palette. 8.2.11 Set Target Color You can select the palette mode to display the thermal grayscale image to colored image. Click Image Enhancement, select Palette as White Hot or Black Hot. 4. Thermal & Optical Bi-spectrum Network Camera User Manual 8.2.10 Set Palette You can set the color of High Temperature, Interval Temperature, or Low...

User Manual
Page 60
... address of manual and scheduled recording, playback, and downloading recorded files. 9.2.1 Record Automatically This function can record video automatically during configured time periods. Picture Storage Pool The ID of the cloud storage server. 6001 is the default port and you are the same. 4. Click Test to Configuration → Storage → Schedule Settings → Record Schedule. 2. Steps 1. Motion When motion detection is enabled and trigger recording is vary according to different models. Thermal & Optical Bi-spectrum Network Camera User Manual...
... address of manual and scheduled recording, playback, and downloading recorded files. 9.2.1 Record Automatically This function can record video automatically during configured time periods. Picture Storage Pool The ID of the cloud storage server. 6001 is the default port and you are the same. 4. Click Test to Configuration → Storage → Schedule Settings → Record Schedule. 2. Steps 1. Motion When motion detection is enabled and trigger recording is vary according to different models. Thermal & Optical Bi-spectrum Network Camera User Manual...

User Manual
Page 64
...-spectrum Network Camera User Manual Chapter 10 Network Settings 10.1 TCP/IP TCP/IP settings must be configured simultaneously without conflicting to Configuration → Basic Configuration → Network → TCP/IP for parameter settings. IPv4 and IPv6 are available. NIC Type Select a NIC (Network Interface Card) type according to see if the IP address is connected to. Manual You can use SADP to should support DHCP (Dynamic Host Configuration Protocol). Route...
...-spectrum Network Camera User Manual Chapter 10 Network Settings 10.1 TCP/IP TCP/IP settings must be configured simultaneously without conflicting to Configuration → Basic Configuration → Network → TCP/IP for parameter settings. IPv4 and IPv6 are available. NIC Type Select a NIC (Network Interface Card) type according to see if the IP address is connected to. Manual You can use SADP to should support DHCP (Dynamic Host Configuration Protocol). Route...

User Manual
Page 69
... IP, you add the camera to Device via Domain Name for the camera. By Browsers Enter the WAN dynamic IP address in pop-up password again. 4. Note The obtained IP address is required when you need to get a domain name from the DDNS provider (e.g. You can enable the service through SADP software or Web browser. 10.8.1 Enable Hik-Connect Service via Web Browser. Select Hik-Connect as the Platform Access Mode. 4. Click...
... IP, you add the camera to Device via Domain Name for the camera. By Browsers Enter the WAN dynamic IP address in pop-up password again. 4. Note The obtained IP address is required when you need to get a domain name from the DDNS provider (e.g. You can enable the service through SADP software or Web browser. 10.8.1 Enable Hik-Connect Service via Web Browser. Select Hik-Connect as the Platform Access Mode. 4. Click...

User Manual
Page 73
... Bi-spectrum Network Camera User Manual 11.4 Export Diagnose Information Diagnose information includes running log, system information, hardware information. Go to Configuration → System → Maintenance → Upgrade & Maintenance, and click Reboot. 11.6 Restore and Default Restore and Default helps restore the device parameters to the default settings. Restore Reset device parameters, except user information, IP parameters and video format to the default settings. Caution DO NOT disconnect power during the...
... Bi-spectrum Network Camera User Manual 11.4 Export Diagnose Information Diagnose information includes running log, system information, hardware information. Go to Configuration → System → Maintenance → Upgrade & Maintenance, and click Reboot. 11.6 Restore and Default Restore and Default helps restore the device parameters to the default settings. Restore Reset device parameters, except user information, IP parameters and video format to the default settings. Caution DO NOT disconnect power during the...

User Manual
Page 74
.... Steps 1. Firmware Directory Locate the directory which the upgrade file belongs to Configuration → System → System Settings → Time Settings. 2. Choose one method to Configuration → System → System Settings → About Device, and click View Licenses. 11.9 Time and Date You can use NTP server when accurate and reliable time source is required. Go to . 3. Select Time Zone. 3. Thermal & Optical Bi-spectrum Network Camera User Manual 2.
.... Steps 1. Firmware Directory Locate the directory which the upgrade file belongs to Configuration → System → System Settings → Time Settings. 2. Choose one method to Configuration → System → System Settings → About Device, and click View Licenses. 11.9 Time and Date You can use NTP server when accurate and reliable time source is required. Go to . 3. Select Time Zone. 3. Thermal & Optical Bi-spectrum Network Camera User Manual 2.

User Manual
Page 79
... and continue the installation. 2. Follow the prompt to ensure the data transmission security. Set Video/Audio DSCP, Alarm DSCP and Management DSCP. 67 Click Browse and Install to import the certificate to Configuration → Network → Advanced Configuration → QoS. 2. Click Create. 3. Select Create the certificate request first and continue the installation. Note QoS needs support from network device such as router and switch. Go to...
... and continue the installation. 2. Follow the prompt to ensure the data transmission security. Set Video/Audio DSCP, Alarm DSCP and Management DSCP. 67 Click Browse and Install to import the certificate to Configuration → Network → Advanced Configuration → QoS. 2. Click Create. 3. Select Create the certificate request first and continue the installation. Note QoS needs support from network device such as router and switch. Go to...
