
Operation Manual
Page 5
... need to return the device to direct sun light, low ventilation or heat source such as heater or radiator is forbidden (ignorance can cause fire danger). ● Do not aim the device at the same time. ● Please use . The power consumption cannot be less than the required value. ● Do not connect several devices to one power adapter...
... need to return the device to direct sun light, low ventilation or heat source such as heater or radiator is forbidden (ignorance can cause fire danger). ● Do not aim the device at the same time. ● Please use . The power consumption cannot be less than the required value. ● Do not connect several devices to one power adapter...
Operation Manual
Page 6
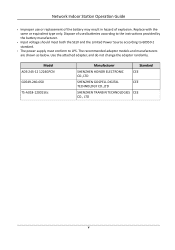
... as below. Replace with the same or equivalent type only. Dispose of explosion. Network Indoor Station Operation Guide ● Improper use or replacement of the battery may result in hazard of used batteries according to the instructions provided by the battery manufacturer. ● Input voltage should meet both the SELV and the Limited Power Source according to 60950-1 standard. ● The power supply must conform to...
... as below. Replace with the same or equivalent type only. Dispose of explosion. Network Indoor Station Operation Guide ● Improper use or replacement of the battery may result in hazard of used batteries according to the instructions provided by the battery manufacturer. ● Input voltage should meet both the SELV and the Limited Power Source according to 60950-1 standard. ● The power supply must conform to...

Operation Manual
Page 7
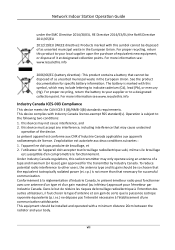
This equipment generates, uses and can be installed and operated with the applicable harmonized European standards listed vi This device must accept any interference received, including interference that changes or modification not expressly approved by the party responsible for compliance could void the user's authority to operate the equipment. if applicable - Network Indoor Station Operation Guide Regulatory Information FCC Information Please take attention that may...
This equipment generates, uses and can be installed and operated with the applicable harmonized European standards listed vi This device must accept any interference received, including interference that changes or modification not expressly approved by the party responsible for compliance could void the user's authority to operate the equipment. if applicable - Network Indoor Station Operation Guide Regulatory Information FCC Information Please take attention that may...
Operation Manual
Page 8
... be installed and operated with a minimum distance 20cm between the radiator and your supplier or to other users, the antenna type and its gain should be so chosen that the equivalent isotropically radiated power (e.i.r.p.) is not more information see : www.recyclethis.info 2006/66/EC (battery directive): This product contains a battery that may include lettering to your body. Network Indoor Station Operation Guide...
... be installed and operated with a minimum distance 20cm between the radiator and your supplier or to other users, the antenna type and its gain should be so chosen that the equivalent isotropically radiated power (e.i.r.p.) is not more information see : www.recyclethis.info 2006/66/EC (battery directive): This product contains a battery that may include lettering to your body. Network Indoor Station Operation Guide...

Operation Manual
Page 21
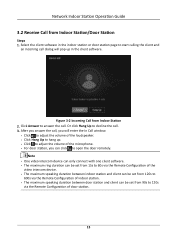
... Settings After you set the output parameters and display the relay button on the main page, you can view public notice, visitor message, alarm log and capture log on Main Page function. 2. When the device communicates with door station, tap unlock icon to the main page and tap . 3. Back to start /stop working. 2.8 Information Management You can control the relay manually. Network Indoor Station Operation Guide Figure...
... Settings After you set the output parameters and display the relay button on the main page, you can view public notice, visitor message, alarm log and capture log on Main Page function. 2. When the device communicates with door station, tap unlock icon to the main page and tap . 3. Back to start /stop working. 2.8 Information Management You can control the relay manually. Network Indoor Station Operation Guide Figure...
Operation Manual
Page 24
... enter the In Call window. ● Click to adjust the volume of the loudspeaker. ● Click Hang Up to 600s via the Remote Configuration of the video intercom device. ● The maximum speaking duration between indoor station and client can be set from Indoor Station 2. Note ● One video intercom device can only connect with one client software. ● The maximum...
... enter the In Call window. ● Click to adjust the volume of the loudspeaker. ● Click Hang Up to 600s via the Remote Configuration of the video intercom device. ● The maximum speaking duration between indoor station and client can be set from Indoor Station 2. Note ● One video intercom device can only connect with one client software. ● The maximum...

Operation Manual
Page 32
... of the power consumption of each module must be less than the total power consumption of 2-wire Video Intercom Products (2020-1-20) Power Description 2-Wire Distributor DS-KAD706 CH6 CH1 to CH5 16 W 6 W DS-KAD704 CH4 CH1 to CH3 16 W 6 W Modular Door Station The main module & the sub-module maximum power consumption. Relevant Instructions for External Power Supply and Wiring of the power supply. 21 Network Indoor Station Operation Guide Appendix A.
... of the power consumption of each module must be less than the total power consumption of 2-wire Video Intercom Products (2020-1-20) Power Description 2-Wire Distributor DS-KAD706 CH6 CH1 to CH5 16 W 6 W DS-KAD704 CH4 CH1 to CH3 16 W 6 W Modular Door Station The main module & the sub-module maximum power consumption. Relevant Instructions for External Power Supply and Wiring of the power supply. 21 Network Indoor Station Operation Guide Appendix A.
Operation Manual
Page 33
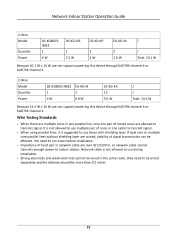
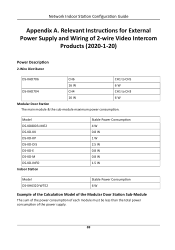
... installation. ● Strong electricity and weak electricity cannot be wired in one cable to transmit signal. ● When using parallel lines, it is not allowed to use those with shielding layer. Network Indoor Station Operation Guide 2-Wire Model Quantity Power DS-KD8003IME2 1 4 W DS-KD-DIS 1 2.5 W DS-KD-KP 2 2 W DS-KD-M 2 1.6 W / / Total: 10.1 W Because 10.1 W ≤ 16 W, we can support powering this device through KAD706 channel 6 or KAD704 channel 4. 2-Wire Model Quantity Power DS-KD8003-IME2 1 4 W DS...
... installation. ● Strong electricity and weak electricity cannot be wired in one cable to transmit signal. ● When using parallel lines, it is not allowed to use those with shielding layer. Network Indoor Station Operation Guide 2-Wire Model Quantity Power DS-KD8003IME2 1 4 W DS-KD-DIS 1 2.5 W DS-KD-KP 2 2 W DS-KD-M 2 1.6 W / / Total: 10.1 W Because 10.1 W ≤ 16 W, we can support powering this device through KAD706 channel 6 or KAD704 channel 4. 2-Wire Model Quantity Power DS-KD8003-IME2 1 4 W DS...

Configuration Guide
Page 6
... only operate using an antenna of the device. this radio transmitter may not cause interference, and 2. For more information see :www.recyclethis.info Industry Canada ICES-003 Compliance This device meets the CAN ICES-3 (B)/NMB-3(B) standards requirements. For proper recycling, return the battery to your supplier or to other users, the antenna type and its gain should be installed and operated...
... only operate using an antenna of the device. this radio transmitter may not cause interference, and 2. For more information see :www.recyclethis.info Industry Canada ICES-003 Compliance This device meets the CAN ICES-3 (B)/NMB-3(B) standards requirements. For proper recycling, return the battery to your supplier or to other users, the antenna type and its gain should be installed and operated...
Configuration Guide
Page 8
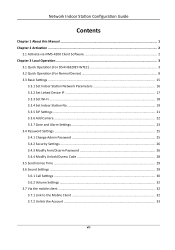
Network Indoor Station Configuration Guide Contents Chapter 1 About this Manual ...1 Chapter 2 Activation ...2 2.1 Activate via iVMS-4200 Client Software 2 Chapter 3 Local Operation ...3 3.1 Quick Operation (For DS-KH6320EY-WTE2 3 3.2 Quick Operation (For Normal Device 8 3.3 Basic Settings ...15 3.3.1 Set Indoor Station Network Parameters 16 3.3.2 Set Linked Device IP ...17 3.3.3 Set Wi-Fi ...18 3.3.4 Set Indoor Station No 19 3.3.5 SIP Settings ...21 3.3.6 Add Camera ...22 3.3.7 Zone and Alarm Settings 23 3.4 Password Settings ...25 3.4.1 Change Admin Password 25 3.4.2 Security Settings...
Network Indoor Station Configuration Guide Contents Chapter 1 About this Manual ...1 Chapter 2 Activation ...2 2.1 Activate via iVMS-4200 Client Software 2 Chapter 3 Local Operation ...3 3.1 Quick Operation (For DS-KH6320EY-WTE2 3 3.2 Quick Operation (For Normal Device 8 3.3 Basic Settings ...15 3.3.1 Set Indoor Station Network Parameters 16 3.3.2 Set Linked Device IP ...17 3.3.3 Set Wi-Fi ...18 3.3.4 Set Indoor Station No 19 3.3.5 SIP Settings ...21 3.3.6 Add Camera ...22 3.3.7 Zone and Alarm Settings 23 3.4 Password Settings ...25 3.4.1 Change Admin Password 25 3.4.2 Security Settings...
Configuration Guide
Page 9
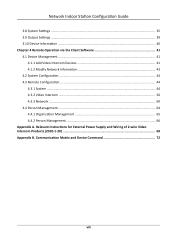
Network Indoor Station Configuration Guide 3.8 System Settings ...35 3.9 Output Settings ...39 3.10 Device Information ...40 Chapter 4 Remote Operation via the Client Software 41 4.1 Device Management ...41 4.1.1 Add Video Intercom Devices 41 4.1.2 Modify Network Information 43 4.2 System Configuration ...44 4.3 Remote Configuration ...44 4.3.1 System ...44 4.3.2 Video Intercom ...50 4.3.3 Network ...60 4.4 Person Management ...64 4.4.1 Organization Management 65 4.4.2 Person Management 66 Appendix A. Relevant Instructions for External Power Supply and Wiring of 2-wire Video Intercom ...
Network Indoor Station Configuration Guide 3.8 System Settings ...35 3.9 Output Settings ...39 3.10 Device Information ...40 Chapter 4 Remote Operation via the Client Software 41 4.1 Device Management ...41 4.1.1 Add Video Intercom Devices 41 4.1.2 Modify Network Information 43 4.2 System Configuration ...44 4.3 Remote Configuration ...44 4.3.1 System ...44 4.3.2 Video Intercom ...50 4.3.3 Network ...60 4.4 Person Management ...64 4.4.1 Organization Management 65 4.4.2 Person Management 66 Appendix A. Relevant Instructions for External Power Supply and Wiring of 2-wire Video Intercom ...

Configuration Guide
Page 16
... station will displayed on the home page. 3) Tap Time to download the APP of Hik-Connect. After the devices are connected properly. 7. Scan the second QR Code to add your device to connect. Configure the Hik-Connect service settings. After you enable the function, you can control the video intercom device via the mobile App. 1) Enable Hik-Connect service. 2) Edit verification code or use the activation password by default. 3) View Hik-Connect...
... station will displayed on the home page. 3) Tap Time to download the APP of Hik-Connect. After the devices are connected properly. 7. Scan the second QR Code to add your device to connect. Configure the Hik-Connect service settings. After you enable the function, you can control the video intercom device via the mobile App. 1) Enable Hik-Connect service. 2) Edit verification code or use the activation password by default. 3) View Hik-Connect...
Configuration Guide
Page 19
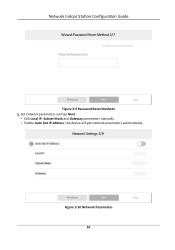
Edit Local IP, Subnet Mask and Gateway parameters manually. - Enable Auto Get IP address, the device will get network parameters automatically. Set network parameters and tap Next. - Figure 3-10 Network Parameters 10 Network Indoor Station Configuration Guide Figure 3-9 Password Reset Methods 3.
Edit Local IP, Subnet Mask and Gateway parameters manually. - Enable Auto Get IP address, the device will get network parameters automatically. Set network parameters and tap Next. - Figure 3-10 Network Parameters 10 Network Indoor Station Configuration Guide Figure 3-9 Password Reset Methods 3.

Configuration Guide
Page 21
Set time and tap Next. 1) Select the Time Zone. 2) Tap Date Format and Time Format to set the time format. 3) Tap Time to set time manually. 4) Enable DST.Set the DST start time, end time and bias time. 12 Network Indoor Station Configuration Guide Figure 3-12 Wi-Fi 6.
Set time and tap Next. 1) Select the Time Zone. 2) Tap Date Format and Time Format to set the time format. 3) Tap Time to set time manually. 4) Enable DST.Set the DST start time, end time and bias time. 12 Network Indoor Station Configuration Guide Figure 3-12 Wi-Fi 6.
Configuration Guide
Page 27
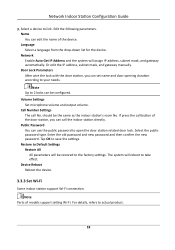
... indoor station support Wi-Fi connection. Network Enable Auto Get IP Address and the system will reboot to open the door station related door lock. Or edit the IP address, subnet mask, and gateway manually. Volume Settings Set microphone volume and output volume. Enter the old password and new password and then confirm the new password. For details, refers to link. Select a device to actual product. 18 Note Up to 2 locks can use...
... indoor station support Wi-Fi connection. Network Enable Auto Get IP Address and the system will reboot to open the door station related door lock. Or edit the IP address, subnet mask, and gateway manually. Volume Settings Set microphone volume and output volume. Enter the old password and new password and then confirm the new password. For details, refers to link. Select a device to actual product. 18 Note Up to 2 locks can use...

Configuration Guide
Page 29
... 1. if you need. Room Information You can set the duration of live view duration, registration password and enable SIP 1.0 according to set room name, floor No., and room No. Tap Advanced Settings to : SIP Settings Password Settings You can set SIP parameters. and unit No. to call . For more details, please refer to set unlock password and duress code. 3. Live View Duration You can set community No...
... 1. if you need. Room Information You can set the duration of live view duration, registration password and enable SIP 1.0 according to set room name, floor No., and room No. Tap Advanced Settings to : SIP Settings Password Settings You can set SIP parameters. and unit No. to call . For more details, please refer to set unlock password and duress code. 3. Live View Duration You can set community No...

Configuration Guide
Page 48
... or not. Select a relay and set to Quick Operation (For Normal Device) for the details. Steps 1. Name You can change the relay's name. 39 For details, see Zone Settings . You can the Zone Settings displayed on the Preference page. Zone Settings Note Only when enable Alarm in the shortcut settings, can set and control the connected output devices via the output settings page. Set the zone parameters.
... or not. Select a relay and set to Quick Operation (For Normal Device) for the details. Steps 1. Name You can change the relay's name. 39 For details, see Zone Settings . You can the Zone Settings displayed on the Preference page. Zone Settings Note Only when enable Alarm in the shortcut settings, can set and control the connected output devices via the output settings page. Set the zone parameters.
Configuration Guide
Page 78
... the power consumption of each module must be less than the total power consumption of 2-wire Video Intercom Products (2020-1-20) Power Description 2-Wire Distributor DS-KAD706 CH6 CH1 to CH5 16 W 6 W DS-KAD704 CH4 CH1 to CH3 16 W 6 W Modular Door Station The main module & the sub-module maximum power consumption. Relevant Instructions for External Power Supply and Wiring of the power supply. 69 Network Indoor Station Configuration Guide Appendix...
... the power consumption of each module must be less than the total power consumption of 2-wire Video Intercom Products (2020-1-20) Power Description 2-Wire Distributor DS-KAD706 CH6 CH1 to CH5 16 W 6 W DS-KAD704 CH4 CH1 to CH3 16 W 6 W Modular Door Station The main module & the sub-module maximum power consumption. Relevant Instructions for External Power Supply and Wiring of the power supply. 69 Network Indoor Station Configuration Guide Appendix...

Data Sheet
Page 1
... station and cameras in public areas Support voice messages when no response from the indoor station Receive alarms by itself independently, without PC Easy wizard for the visitor via mobile phone in time Elevator access control You can view, chat with, and send permission for quick set up Configure the whole system on one touch screen Live view...
... station and cameras in public areas Support voice messages when no response from the indoor station Receive alarms by itself independently, without PC Easy wizard for the visitor via mobile phone in time Elevator access control You can view, chat with, and send permission for quick set up Configure the whole system on one touch screen Live view...

Quick Start Guide
Page 1
... QR code to get the Configura on Guide for detailed informa on. DS-KH6320-(W)TE1 1 Network Indoor Sta on UD20183B ENGLISH Diagram References 1 Appearance 1 Screen 2 Microphone 3 Debugging Port 4 Network Interface 5 Loudspeaker 6 TF Card Slot 7 Alarm Terminal 8 Reserved 9 Power Terminal Note: The appearance of the door sta on manually or enable DHCP to get the network parameters automa cally. The power supply the indoor sta on supports...
... QR code to get the Configura on Guide for detailed informa on. DS-KH6320-(W)TE1 1 Network Indoor Sta on UD20183B ENGLISH Diagram References 1 Appearance 1 Screen 2 Microphone 3 Debugging Port 4 Network Interface 5 Loudspeaker 6 TF Card Slot 7 Alarm Terminal 8 Reserved 9 Power Terminal Note: The appearance of the door sta on manually or enable DHCP to get the network parameters automa cally. The power supply the indoor sta on supports...
