

Operation Manual
Page 19
... mode, away mode, and custom mode. Network Indoor Station Operation Guide Note ● Zones are disabled. ● Arming mode settings should create an Arm/Disarm Password first. 2.5.1 Arm Room Steps 1. to enable the scene.
... mode, away mode, and custom mode. Network Indoor Station Operation Guide Note ● Zones are disabled. ● Arming mode settings should create an Arm/Disarm Password first. 2.5.1 Arm Room Steps 1. to enable the scene.

Operation Manual
Page 20
Select Stay, Away, Sleeping or Custom. 4. Tap → One-Push to Disarm to enable Call Elevator. 9 Before You Start Enable call elevator via iVMS-4200 Client Software. Figure 2-7 Disarm Room 2. Enter the arm/disarm password. 3. Tap Settings → → Shortcut Settings to disarm. Steps 1. Tap OK. 2.5.2 Disarm Room Steps 1. Tap OK. 2.6 Call Elevator The indoor station supports calling the elevator. Enter the arm/disarm password to enable the scene. 5. Network Indoor Station Operation Guide 3.
Select Stay, Away, Sleeping or Custom. 4. Tap → One-Push to Disarm to enable Call Elevator. 9 Before You Start Enable call elevator via iVMS-4200 Client Software. Figure 2-7 Disarm Room 2. Enter the arm/disarm password. 3. Tap Settings → → Shortcut Settings to disarm. Steps 1. Tap OK. 2.5.2 Disarm Room Steps 1. Tap OK. 2.6 Call Elevator The indoor station supports calling the elevator. Enter the arm/disarm password to enable the scene. 5. Network Indoor Station Operation Guide 3.
Configuration Guide
Page 8
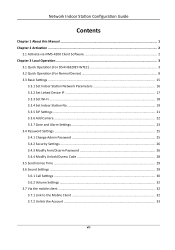
...this Manual ...1 Chapter 2 Activation ...2 2.1 Activate via iVMS-4200 Client Software 2 Chapter 3 Local Operation ...3 3.1 Quick Operation (For DS-KH6320EY-WTE2 3 3.2 Quick Operation (For Normal Device 8 3.3 Basic Settings ...15 3.3.1 Set Indoor Station Network Parameters 16 3.3.2 Set ... 19 3.3.5 SIP Settings ...21 3.3.6 Add Camera ...22 3.3.7 Zone and Alarm Settings 23 3.4 Password Settings ...25 3.4.1 Change Admin Password 25 3.4.2 Security Settings ...26 3.4.3 Modify Arm/Disarm Password 26 3.4.4 Modify Unlock/Duress Code 28 3.5 Synchronize Time ...29 3.6 Sound Settings ...29 3.6.1 ...
...this Manual ...1 Chapter 2 Activation ...2 2.1 Activate via iVMS-4200 Client Software 2 Chapter 3 Local Operation ...3 3.1 Quick Operation (For DS-KH6320EY-WTE2 3 3.2 Quick Operation (For Normal Device 8 3.3 Basic Settings ...15 3.3.1 Set Indoor Station Network Parameters 16 3.3.2 Set ... 19 3.3.5 SIP Settings ...21 3.3.6 Add Camera ...22 3.3.7 Zone and Alarm Settings 23 3.4 Password Settings ...25 3.4.1 Change Admin Password 25 3.4.2 Security Settings ...26 3.4.3 Modify Arm/Disarm Password 26 3.4.4 Modify Unlock/Duress Code 28 3.5 Synchronize Time ...29 3.6 Sound Settings ...29 3.6.1 ...

Configuration Guide
Page 11
... to activate the device. 2 Steps 1. Select an inactivated device and click the Activate. 3. And we recommend you to create a strong password of your own choosing (using a minimum of 8 characters, including at least three kinds of following categories: upper case letters, lower case ...letters, numbers, and special characters) in the high security system, changing the password monthly or weekly can only configure and operate the indoor station after creating a password for the device activation. Run the client software, enter Device Management, check the Online Device ...
... to activate the device. 2 Steps 1. Select an inactivated device and click the Activate. 3. And we recommend you to create a strong password of your own choosing (using a minimum of 8 characters, including at least three kinds of following categories: upper case letters, lower case ...letters, numbers, and special characters) in the high security system, changing the password monthly or weekly can only configure and operate the indoor station after creating a password for the device activation. Run the client software, enter Device Management, check the Online Device ...

Configuration Guide
Page 12
Steps 1. Activate the device. The description is for DS-KH6320EY-WTE2. Choose language and tap Next. Figure 3-1 Language Settings 2. Network Indoor Station Configuration Guide Chapter 3 Local Operation 3.1 Quick Operation (For DS-KH6320EY-WTE2) After device activation, the wizard page will pop up. Create a password and confirm it. Tap OK. 3
Steps 1. Activate the device. The description is for DS-KH6320EY-WTE2. Choose language and tap Next. Figure 3-1 Language Settings 2. Network Indoor Station Configuration Guide Chapter 3 Local Operation 3.1 Quick Operation (For DS-KH6320EY-WTE2) After device activation, the wizard page will pop up. Create a password and confirm it. Tap OK. 3

Configuration Guide
Page 13
Network Indoor Station Configuration Guide Figure 3-2 Activate 3. Figure 3-3 Password Reset Page - If you forget your admin password (activation password), you can change the password via the reserved email address. 4 Bind an email address. Set password reset methods and tap Next.
Network Indoor Station Configuration Guide Figure 3-2 Activate 3. Figure 3-3 Password Reset Page - If you forget your admin password (activation password), you can change the password via the reserved email address. 4 Bind an email address. Set password reset methods and tap Next.

Configuration Guide
Page 14
If you forget your admin password (activation password), you can change the password via answering the questions. 4. Set Wi-Fi. 1) Enable the Wi-Fi function. Figure 3-4 Wi-Fi Settings 5 The searched Wi-Fi will be displayed in the list. 2) Select a Wi-Fi and enter the Wi-Fi's password. 3) Tap Next. 5. Device pairing. Network Indoor Station Configuration Guide - (Optional) Tap Change to Security Question to select security questions and enter the answers.
If you forget your admin password (activation password), you can change the password via answering the questions. 4. Set Wi-Fi. 1) Enable the Wi-Fi function. Figure 3-4 Wi-Fi Settings 5 The searched Wi-Fi will be displayed in the list. 2) Select a Wi-Fi and enter the Wi-Fi's password. 3) Tap Next. 5. Device pairing. Network Indoor Station Configuration Guide - (Optional) Tap Change to Security Question to select security questions and enter the answers.

Configuration Guide
Page 16
... indoor extension that you can control the video intercom device via the mobile App. 1) Enable Hik-Connect service. 2) Edit verification code or use the activation password by default. 3) View Hik-Connect Server Status. 4) Scan the first QR Code to download the APP of Hik-Connect. The indoor extension with the same...
... indoor extension that you can control the video intercom device via the mobile App. 1) Enable Hik-Connect service. 2) Edit verification code or use the activation password by default. 3) View Hik-Connect Server Status. 4) Scan the first QR Code to download the APP of Hik-Connect. The indoor extension with the same...

Configuration Guide
Page 18
Network Indoor Station Configuration Guide Figure 3-8 Language Settings 2. Set password reset methods and tap Next. - If you forget your admin password, you can reset the password via answering the questions. 9 If you forget your admin password, you can reset the password via the reserved email address. - Tap Change to Security Question to select security questions and enter the answers. Bind an email address.
Network Indoor Station Configuration Guide Figure 3-8 Language Settings 2. Set password reset methods and tap Next. - If you forget your admin password, you can reset the password via answering the questions. 9 If you forget your admin password, you can reset the password via the reserved email address. - Tap Change to Security Question to select security questions and enter the answers. Bind an email address.
Configuration Guide
Page 19
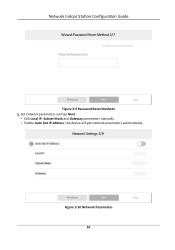
Set network parameters and tap Next. - Network Indoor Station Configuration Guide Figure 3-9 Password Reset Methods 3. Figure 3-10 Network Parameters 10 Enable Auto Get IP address, the device will get network parameters automatically. Edit Local IP, Subnet Mask and Gateway parameters manually. -
Set network parameters and tap Next. - Network Indoor Station Configuration Guide Figure 3-9 Password Reset Methods 3. Figure 3-10 Network Parameters 10 Enable Auto Get IP address, the device will get network parameters automatically. Edit Local IP, Subnet Mask and Gateway parameters manually. -

Configuration Guide
Page 20
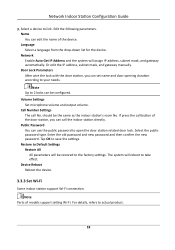
Enable the Wi-Fi function. Select a Wi-Fi from the list and enter the Wi-Fi's password to get connected. Set Comminity No., Building No. Figure 3-11 Indoor Station Settings 5. and Unit No. 5) Set Registration Password. 6) Tap Next. Note The device should support Wi-Fi. 11 Configure the indoor station. 1) Select Device Type as Indoor Station or Indoor Extension. 2) Set Floor No.. 3) Set Room No.. 4) Configure advanced settings. Tap Next. Network Indoor Station Configuration Guide 4.
Enable the Wi-Fi function. Select a Wi-Fi from the list and enter the Wi-Fi's password to get connected. Set Comminity No., Building No. Figure 3-11 Indoor Station Settings 5. and Unit No. 5) Set Registration Password. 6) Tap Next. Note The device should support Wi-Fi. 11 Configure the indoor station. 1) Select Device Type as Indoor Station or Indoor Extension. 2) Set Floor No.. 3) Set Room No.. 4) Configure advanced settings. Tap Next. Network Indoor Station Configuration Guide 4.

Configuration Guide
Page 22
Scan the second QR Code to add your device to the APP, you can configure the device remotely. 5) Tap Next. 13 After adding the device to the APP. Configure the Hik-Connect service settings. 1) Enable Hik-Connect service. 2) Edit verification code or use the activation password by default. 3) View Hik-Connect Server Status. 4) Scan the first QR Code to download the APP of Hik-Connect. Network Indoor Station Configuration Guide Figure 3-13 Time Settings 7.
Scan the second QR Code to add your device to the APP, you can configure the device remotely. 5) Tap Next. 13 After adding the device to the APP. Configure the Hik-Connect service settings. 1) Enable Hik-Connect service. 2) Edit verification code or use the activation password by default. 3) View Hik-Connect Server Status. 4) Scan the first QR Code to download the APP of Hik-Connect. Network Indoor Station Configuration Guide Figure 3-13 Time Settings 7.

Configuration Guide
Page 25
... indoor station is mandatory for you to enter the network settings page. Figure 3-17 Network Settings 3. Tap Settings → → Configuration , and enter admin (activation) password. 2. You should set the IP address manually. Enable DHCP, and the system can work properly in the same system. Disable the DHCP function, and set...
... indoor station is mandatory for you to enter the network settings page. Figure 3-17 Network Settings 3. Tap Settings → → Configuration , and enter admin (activation) password. 2. You should set the IP address manually. Enable DHCP, and the system can work properly in the same system. Disable the DHCP function, and set...

Configuration Guide
Page 26
...3-19 Device Information Set the parameters of devices (like door station, doorphone, main station, center, etc.), to which the indoor station is the activation password. 2. With the private SIP protocol, intercom can be realized only when all these devices are in the same network segment with the standard SIP protocol... devices for the indoor station refers to pop up the device information dialog. Tap to enter the device management page. Note Default admin password is linked. Tap Settings → → Configuration → to set parameters of the door station. 17
...3-19 Device Information Set the parameters of devices (like door station, doorphone, main station, center, etc.), to which the indoor station is the activation password. 2. With the private SIP protocol, intercom can be realized only when all these devices are in the same network segment with the standard SIP protocol... devices for the indoor station refers to pop up the device information dialog. Tap to enter the device management page. Note Default admin password is linked. Tap Settings → → Configuration → to set parameters of the door station. 17
Configuration Guide
Page 27
...with the door station, you can edit the name of models support setting Wi-Fi. Name You can call No. Select the public password type. Edit the following parameters. Volume Settings Set microphone volume and output volume. If press the call button of the door station,...restored to Default Settings Restore All All parameters will assign IP address, subnet mask, and gateway automatically. Enter the old password and new password and then confirm the new password. Call Number Settings The call the indoor station directly. Device Reboot Reboot the device. 3.3.3 Set Wi-Fi Some indoor...
...with the door station, you can edit the name of models support setting Wi-Fi. Name You can call No. Select the public password type. Edit the following parameters. Volume Settings Set microphone volume and output volume. If press the call button of the door station,...restored to Default Settings Restore All All parameters will assign IP address, subnet mask, and gateway automatically. Enter the old password and new password and then confirm the new password. Call Number Settings The call the indoor station directly. Device Reboot Reboot the device. 3.3.3 Set Wi-Fi Some indoor...

Configuration Guide
Page 28
... composed of the Wi-Fi, and the indoor station can connect to 5. settings page. The indoor station No., is the activation password. 19 The indoor extension No. Network Indoor Station Configuration Guide Tap Settings → to call the indoor station and the indoor extension in an intercom ...
... composed of the Wi-Fi, and the indoor station can connect to 5. settings page. The indoor station No., is the activation password. 19 The indoor extension No. Network Indoor Station Configuration Guide Tap Settings → to call the indoor station and the indoor extension in an intercom ...

Configuration Guide
Page 29
... two indoor stations that are in building 1. directly to : SIP Settings Password Settings You can set unlock password and duress code. 3. Live View Duration You can set the duration of live view duration, SIP parameters and password. For more details, please refer to call. ● If there are... No. SIP Settings You can set the room information, live view. Select Indoor Extension to set the room information, live view duration, registration password and enable SIP 1.0 according to set room name, floor No., and room No. Select Indoor Station to your needs. 20 Room Information You...
... two indoor stations that are in building 1. directly to : SIP Settings Password Settings You can set unlock password and duress code. 3. Live View Duration You can set the duration of live view duration, SIP parameters and password. For more details, please refer to call. ● If there are... No. SIP Settings You can set the room information, live view. Select Indoor Extension to set the room information, live view duration, registration password and enable SIP 1.0 according to set room name, floor No., and room No. Select Indoor Station to your needs. 20 Room Information You...

Configuration Guide
Page 30
...1.0 You can enable SIP 1.0 protocol according to set the duration of live view. Registration Password You can communicate with each other via SIP protocol. Tap Settings → → Configuration , and enter admin (activation) password. 2. Figure 3-22 SIP Settings 21 directly. If Live View Duration You can set the... devices are in Local Information Page. Tap Advanced to your needs. 3.3.5 SIP Settings Devices can create a new SIP registration password. Network Indoor Station Configuration Guide Room Information You can set VOIP account. You create set the SIP register...
...1.0 You can enable SIP 1.0 protocol according to set the duration of live view. Registration Password You can communicate with each other via SIP protocol. Tap Settings → → Configuration , and enter admin (activation) password. 2. Figure 3-22 SIP Settings 21 directly. If Live View Duration You can set the... devices are in Local Information Page. Tap Advanced to your needs. 3.3.5 SIP Settings Devices can create a new SIP registration password. Network Indoor Station Configuration Guide Room Information You can set VOIP account. You create set the SIP register...

Configuration Guide
Page 31
... Figure 3-23 VOIP Account Settings Note Up to pop up the dialog box. 4. Tap Settings → → Configuration , and enter admin (activation) password. 2. Select HIK Protocol and you can access to the third party devices. 1) Slide to add the camera. - Optional: Enable Compatible with SIP 1.0 ...SIP. 2) Tap VOIP Account Settings and configure the account information, including the user name, the phone number, the registered user name, the password, the domain, the port No., and the expiration date. Optional: Enable standard SIP and you can be compatible with SIP 1.0 indoor station...
... Figure 3-23 VOIP Account Settings Note Up to pop up the dialog box. 4. Tap Settings → → Configuration , and enter admin (activation) password. 2. Select HIK Protocol and you can access to the third party devices. 1) Slide to add the camera. - Optional: Enable Compatible with SIP 1.0 ...SIP. 2) Tap VOIP Account Settings and configure the account information, including the user name, the phone number, the registered user name, the password, the domain, the port No., and the expiration date. Optional: Enable standard SIP and you can be compatible with SIP 1.0 indoor station...

Configuration Guide
Page 32
.... Figure 3-24 Zone Settings 23 Edit port No. Exit the page to save the settings. - Enter the device name, IP address, user name and the password of the camera. Tap Settings → → Zone Settings to add the camera. and channel No. You should enable alarm function first. 1. Exit the page..., alarm type and delay time and other parameters of 8 zones. Network Indoor Station Configuration Guide Enter the device name, IP address, user name and the password of the camera.
.... Figure 3-24 Zone Settings 23 Edit port No. Exit the page to save the settings. - Enter the device name, IP address, user name and the password of the camera. Tap Settings → → Zone Settings to add the camera. and channel No. You should enable alarm function first. 1. Exit the page..., alarm type and delay time and other parameters of 8 zones. Network Indoor Station Configuration Guide Enter the device name, IP address, user name and the password of the camera.