

Warranty Card
Page 2
... purposes. (h) Any installation, consumer instruction, delivery, setup, adjustment, and/or programming charges. (i) A Product that is possible that certain on behalf of Hisense. It is not installed in accordance with installation instructions included with the Product. (j) Any signal reception problems (including antenna related problems), images "burnt" into the screen, signal noise or echo, interference or other than Hisense, a Hisense authorized service provider or a Hisense authorized service center or dealer. (c) Any replacement of accessories...
... purposes. (h) Any installation, consumer instruction, delivery, setup, adjustment, and/or programming charges. (i) A Product that is possible that certain on behalf of Hisense. It is not installed in accordance with installation instructions included with the Product. (j) Any signal reception problems (including antenna related problems), images "burnt" into the screen, signal noise or echo, interference or other than Hisense, a Hisense authorized service provider or a Hisense authorized service center or dealer. (c) Any replacement of accessories...

Warranty Card
Page 4
...Purchase Store/Dealer Model No Serial No Date of original purchase. therefore, the limitations or exclusions stated above may have other rights which vary from State to Purchaser, solely within those specific States. You do not need to send us this warranty card to the... maximum extent not prohibited by law. This warranty gives you specific legal rights, and you also may not apply to State. of incidental or consequential damages or allow limitations on warranties; This warranty applies to receive warranty service...
...Purchase Store/Dealer Model No Serial No Date of original purchase. therefore, the limitations or exclusions stated above may have other rights which vary from State to Purchaser, solely within those specific States. You do not need to send us this warranty card to the... maximum extent not prohibited by law. This warranty gives you specific legal rights, and you also may not apply to State. of incidental or consequential damages or allow limitations on warranties; This warranty applies to receive warranty service...
Quick Start Guide
Page 4
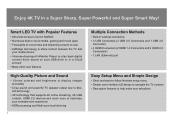
... TV in wireless connection • 3 USB Connectors (2 USB 2.0 Connectors and 1 USB 3.0 Connector) • 4 HDMI Connectors (2 HDMI 1.4 Connectors and 2 HDMI 2.0 Connectors) • 1 LAN (Ethernet) port Easy Setup Menu and Simple Design • Short and easy-to-follow first-time setup menu • Simple user interface (UI) design to navigate the TV screens • Descriptive features to help make your selections Smart LED TV with Popular Features • Ultra-fast access to...
... TV in wireless connection • 3 USB Connectors (2 USB 2.0 Connectors and 1 USB 3.0 Connector) • 4 HDMI Connectors (2 HDMI 1.4 Connectors and 2 HDMI 2.0 Connectors) • 1 LAN (Ethernet) port Easy Setup Menu and Simple Design • Short and easy-to-follow first-time setup menu • Simple user interface (UI) design to navigate the TV screens • Descriptive features to help make your selections Smart LED TV with Popular Features • Ultra-fast access to...

Quick Start Guide
Page 6
Required tools and devices Wireless router (not included) for Internet connectivity Phillips screwdriver (not included) to secure the TV stand HDMI and other types of the foam in which you prefer to mount the TV to check ALL of cables (not included) to connect external devices to the TV Wall mount bracket (not included) if... la espuma, asegúrese de retirar todos los accesorios. Packaged contents Your package in the carton box. · Please check foam for 55" Remote Control Power Cord IMPORTANT: To prevent accidentally discarding items that came with your TV, be sure to the...
Required tools and devices Wireless router (not included) for Internet connectivity Phillips screwdriver (not included) to secure the TV stand HDMI and other types of the foam in which you prefer to mount the TV to check ALL of cables (not included) to connect external devices to the TV Wall mount bracket (not included) if... la espuma, asegúrese de retirar todos los accesorios. Packaged contents Your package in the carton box. · Please check foam for 55" Remote Control Power Cord IMPORTANT: To prevent accidentally discarding items that came with your TV, be sure to the...

Quick Start Guide
Page 9
... the mounting hook. 9.5 - 11.5 mm Wall mount bracket Screw (not provided) Rear cover of the TV Screw Spacer Wall mount hole pattern VESA (mm) Wall mount screw size (mm) 200 × 200 (50",55") M6 Spacer Bracket (not provided) (not provided) CAUTION: • When you attach the mount, be sure to use the spacers (provided by the third-party manufacturer) between the TV and the bracket. Remove the TV stand if...
... the mounting hook. 9.5 - 11.5 mm Wall mount bracket Screw (not provided) Rear cover of the TV Screw Spacer Wall mount hole pattern VESA (mm) Wall mount screw size (mm) 200 × 200 (50",55") M6 Spacer Bracket (not provided) (not provided) CAUTION: • When you attach the mount, be sure to use the spacers (provided by the third-party manufacturer) between the TV and the bracket. Remove the TV stand if...

Quick Start Guide
Page 10
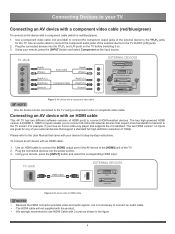
... are connected securely. Y PB COMPONENT IN PR L R VIDEO AV IN L R Green Blue Red White Red Yellow White Red DVD Player/Recorder Video Camera Set-top Box Satellite antenna cable Satellite Receiver Connect a component video cable and left -right audio cables from an external AV device. STEP 2. This 4K TV has two different software versions of the picture image and color. The two high-powered HDMI version 2.0(HDMI 3, HDMI 4) inputs enable you have selected the right cables for the ports and that supports the...
... are connected securely. Y PB COMPONENT IN PR L R VIDEO AV IN L R Green Blue Red White Red Yellow White Red DVD Player/Recorder Video Camera Set-top Box Satellite antenna cable Satellite Receiver Connect a component video cable and left -right audio cables from an external AV device. STEP 2. This 4K TV has two different software versions of the picture image and color. The two high-powered HDMI version 2.0(HDMI 3, HDMI 4) inputs enable you have selected the right cables for the ports and that supports the...

Quick Start Guide
Page 17
PRODUCT SPECIFICATIONS Model Name Dimension Without Stand (W × H × D) With Stand Weight Without Stand With Stand Active Screen Size (Diagonal) Screen Resolution Audio Power Power consumption Power Supply Picture Quality Component Input HDMI Input Receiving systems Key Apps Ports Analog Digital Other features 50H8C+ 55H8C+ 44.1 × 25.6 × 3.3 inches (1120 × 651 × 85 mm) 48.6 × 28.2 × 3.3 inches (1235 × 717 × 84 mm) 44.1 × 27.7 × 9.7 inches (1120 × 703 × 246 mm) 48.6 × 30...
PRODUCT SPECIFICATIONS Model Name Dimension Without Stand (W × H × D) With Stand Weight Without Stand With Stand Active Screen Size (Diagonal) Screen Resolution Audio Power Power consumption Power Supply Picture Quality Component Input HDMI Input Receiving systems Key Apps Ports Analog Digital Other features 50H8C+ 55H8C+ 44.1 × 25.6 × 3.3 inches (1120 × 651 × 85 mm) 48.6 × 28.2 × 3.3 inches (1235 × 717 × 84 mm) 44.1 × 27.7 × 9.7 inches (1120 × 703 × 246 mm) 48.6 × 30...

Quick Start Guide
Page 18
..." type of sound The remote control does not work POSSIBLE SOLUTIONS • Check if the power cord is plugged into a powered AC outlet. • Press the Power button on the remote control to activate the unit from the TV. • Insert the power plug of the TV set into another power outlet. • If using an external antenna, check the direction, position and connection of the antenna. • Adjust the direction of your TV, turn on...
..." type of sound The remote control does not work POSSIBLE SOLUTIONS • Check if the power cord is plugged into a powered AC outlet. • Press the Power button on the remote control to activate the unit from the TV. • Insert the power plug of the TV set into another power outlet. • If using an external antenna, check the direction, position and connection of the antenna. • Adjust the direction of your TV, turn on...

User Manual
Page 5
..., DVD player 3 Connecting an AV device with a component video cable 4 Connecting an AV device with an HDMI cable 4 Connecting headphones ...5 Connecting speakers (or other audio receivers 5 Connecting a digital sound bar to use Audio Return Channel (ARC 6 Connecting your TV to a Wired or Wireless Network 7 Connecting to a Wireless network...7 Connecting to a Wired (Ethernet) network...7 Using Your TV Remote Control...9 Shortcuts Instructions...11 Completing the First-Time Setup Menu 12 Basic and Advanced TV Settings 14 Accessing the Quick Setup Menu...14 Picture Menu...14 Sound Menu...
..., DVD player 3 Connecting an AV device with a component video cable 4 Connecting an AV device with an HDMI cable 4 Connecting headphones ...5 Connecting speakers (or other audio receivers 5 Connecting a digital sound bar to use Audio Return Channel (ARC 6 Connecting your TV to a Wired or Wireless Network 7 Connecting to a Wireless network...7 Connecting to a Wired (Ethernet) network...7 Using Your TV Remote Control...9 Shortcuts Instructions...11 Completing the First-Time Setup Menu 12 Basic and Advanced TV Settings 14 Accessing the Quick Setup Menu...14 Picture Menu...14 Sound Menu...
User Manual
Page 8
Use an audio cable to connect the component audio jacks of 1080p. AV device with your device for step-by-step instructions. TV JACK EXTERNAL DEVICES HDMI HDMI HDMI Cable DVD Set-top Box Figure 4. Using your remote, press the [INPUT] button and select Component as shown in the figure. 4 The two HDMI version 1.4 inputs are great for the TV. Use an HDMI cable to connect the [HDMI] output port of the AV device to the [HDMI] jack of the external device to the YPBPR jacks for...
Use an audio cable to connect the component audio jacks of 1080p. AV device with your device for step-by-step instructions. TV JACK EXTERNAL DEVICES HDMI HDMI HDMI Cable DVD Set-top Box Figure 4. Using your remote, press the [INPUT] button and select Component as shown in the figure. 4 The two HDMI version 1.4 inputs are great for the TV. Use an HDMI cable to connect the [HDMI] output port of the AV device to the [HDMI] jack of the external device to the YPBPR jacks for...

User Manual
Page 10
... device to the HDMI / ARC port 6 Press the Quick Setup menu button on your remote and press the right arrow on the [D-pad] of the TV and select RAW to receive the 5.1 channel audio. NOTE: If the device has an Input Selector feature then make sure to change it is set to 5.1 Channel output. NOTE Only digital sound bars that reads TV Speaker & ARC and select ARC First. To connect a digital sound bar with the...
... device to the HDMI / ARC port 6 Press the Quick Setup menu button on your remote and press the right arrow on the [D-pad] of the TV and select RAW to receive the 5.1 channel audio. NOTE: If the device has an Input Selector feature then make sure to change it is set to 5.1 Channel output. NOTE Only digital sound bars that reads TV Speaker & ARC and select ARC First. To connect a digital sound bar with the...

User Manual
Page 12
... network is connected to an external modem. Most home networks are Dynamic Networks. ADSL modems that support DHCP if your Internet Service Provider (ISP). The Modem Port on the back of your TV's Cable Setup Screen when you don't have a Dynamic Network, you use an ADSL modem or router that support DHCP automatically provide the IP address, subnet mask, gateway, and DNS, so you set up the network connection...
... network is connected to an external modem. Most home networks are Dynamic Networks. ADSL modems that support DHCP if your Internet Service Provider (ISP). The Modem Port on the back of your TV's Cable Setup Screen when you don't have a Dynamic Network, you use an ADSL modem or router that support DHCP automatically provide the IP address, subnet mask, gateway, and DNS, so you set up the network connection...

User Manual
Page 15
... remove the plug from the AC outlet. • If your remote. Using the Live TV To view broadcast programs, press the [Live TV] button on the remote, the list of the TV, then plug the power cord into standby mode Selecting the Input Source Select the Input Source depending on : 1. Channel search guide When you select TV as input, if no TV channels were saved before, you must specify the tune mode, Antenna or Cable...
... remove the plug from the AC outlet. • If your remote. Using the Live TV To view broadcast programs, press the [Live TV] button on the remote, the list of the TV, then plug the power cord into standby mode Selecting the Input Source Select the Input Source depending on : 1. Channel search guide When you select TV as input, if no TV channels were saved before, you must specify the tune mode, Antenna or Cable...

User Manual
Page 18
.... Settings Picture Sound Channel Network System About TV Picture Mode Standard Brightness 50 Contrast 50 Color 50 Aspect Ratio Auto Backlight Advanced Picture Settings Restore Defaults 14 Basic and Advanced TV Settings Your Hisense TV comes with many TV setting features to allow you to customize the picture based on the D-pad to view the full menu settings. You can press the [Quick Setup] menu button [ ] and press the right arrow on your viewing preference. • Display: Adjust advanced picture settings...
.... Settings Picture Sound Channel Network System About TV Picture Mode Standard Brightness 50 Contrast 50 Color 50 Aspect Ratio Auto Backlight Advanced Picture Settings Restore Defaults 14 Basic and Advanced TV Settings Your Hisense TV comes with many TV setting features to allow you to customize the picture based on the D-pad to view the full menu settings. You can press the [Quick Setup] menu button [ ] and press the right arrow on your viewing preference. • Display: Adjust advanced picture settings...

User Manual
Page 19
...; Digital Audio Delay: Adjust the digital audio output delay time to sync sound from an external speaker with the images on the following settings: TM Audio Enhancements: dbx-tv's Total Technology delivers the best possible TV sound for your TV. • Total Sonics: Optimizes overall sound quality by creating a Favorites list. Auto Channel Scan: Automatically scan for channels to view programming from wide dynamic range programs, too-loud commercials, and channel or input changes. For best results use with psycho- Network Menu Network...
...; Digital Audio Delay: Adjust the digital audio output delay time to sync sound from an external speaker with the images on the following settings: TM Audio Enhancements: dbx-tv's Total Technology delivers the best possible TV sound for your TV. • Total Sonics: Optimizes overall sound quality by creating a Favorites list. Auto Channel Scan: Automatically scan for channels to view programming from wide dynamic range programs, too-loud commercials, and channel or input changes. For best results use with psycho- Network Menu Network...

User Manual
Page 20
... you Settings Picture Sound Channel Network System About TV Location USA Time Language Parental Controls Application Settings Closed Caption HDMI Function Advanced Settings 16 Please contact VUDU if you want to change your time zone. • Time Format: Set the time to display in a 12 or 24-hour format. • Daylight Savings: Select whether to apply Daylight Savings Time to the TV. • Date/Time: Set the Date and Time. • Power On Timer: Enable the Power On Timer to...
... you Settings Picture Sound Channel Network System About TV Location USA Time Language Parental Controls Application Settings Closed Caption HDMI Function Advanced Settings 16 Please contact VUDU if you want to change your time zone. • Time Format: Set the time to display in a 12 or 24-hour format. • Daylight Savings: Select whether to apply Daylight Savings Time to the TV. • Date/Time: Set the Date and Time. • Power On Timer: Enable the Power On Timer to...

User Manual
Page 21
... can adjust the Style, Size, Font, Text Color, Text Opacity, Background Color etc. Off: To turn On with CEC-enabled devices. • Device Connect: Allow CEC-enabled devices to communicate with 4K Video. • Input Labels: Edit the input labels. • Default LiveTV Source: Select the default input selected by the remote control Live TV button. • Setup Wizard: Use the Setup Wizard for you service. NOTE HDMI cables must be used to connect HDMI CEC-compatible...
... can adjust the Style, Size, Font, Text Color, Text Opacity, Background Color etc. Off: To turn On with CEC-enabled devices. • Device Connect: Allow CEC-enabled devices to communicate with 4K Video. • Input Labels: Edit the input labels. • Default LiveTV Source: Select the default input selected by the remote control Live TV button. • Setup Wizard: Use the Setup Wizard for you service. NOTE HDMI cables must be used to connect HDMI CEC-compatible...

User Manual
Page 27
... your TV. Panels that you wish to Full menu settings > Network >TV Name. 3. Press the [ ] button on the type that appear on the right side of the screen. 23 File formats that will see a number of icons appear at the bottom of the screen. You can stream movies, pictures and photos that are stored on your personal device and play or view the content...
... your TV. Panels that you wish to Full menu settings > Network >TV Name. 3. Press the [ ] button on the type that appear on the right side of the screen. 23 File formats that will see a number of icons appear at the bottom of the screen. You can stream movies, pictures and photos that are stored on your personal device and play or view the content...
User Manual
Page 29
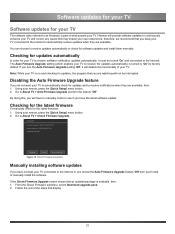
... Firmware Upgrade. The Auto Firmware Upgrade setting (which enables your TV to receive the updates automatically) is part of the steps that may impact your user experience; Disabling the Auto Firmware Upgrade feature If you are available. Go to 'On' by factory default. Hisense will not be turned 'On' and connected to manually install the software. Note: While your TV is available, then: 1. Using your remote, press the [Quick Setup] menu button. 2.  Software updates for your TV Software updates...
... Firmware Upgrade. The Auto Firmware Upgrade setting (which enables your TV to receive the updates automatically) is part of the steps that may impact your user experience; Disabling the Auto Firmware Upgrade feature If you are available. Go to 'On' by factory default. Hisense will not be turned 'On' and connected to manually install the software. Note: While your TV is available, then: 1. Using your remote, press the [Quick Setup] menu button. 2.  Software updates for your TV Software updates...

User Manual
Page 30
... previous setting information. Turn off and on again. The remote control does not work • Change the batteries in Mexico , operation of interference, including that this device doesn't cause any sound • Make sure you experience an issue with your antenna or reset or fine tune the channel. Quick Problem-Solving Tips When you have connected an external • Check for the correct output connection on the external...
... previous setting information. Turn off and on again. The remote control does not work • Change the batteries in Mexico , operation of interference, including that this device doesn't cause any sound • Make sure you experience an issue with your antenna or reset or fine tune the channel. Quick Problem-Solving Tips When you have connected an external • Check for the correct output connection on the external...

