

User Guide
Page 4
... Remote finder sound 65 Adjusting TV settings...66 Settings menu ...66 Options menu ...67 Options menu settings...68 Accessibility (U.S. only)...70 Accessibility menu settings ...70 Video description through Secondary Audio Program (SAP 71 iv Setting up Antenna TV 36 How do I set up the TV tuner? ...37 Using your TV ...41 Status light...41 Standby mode energy savings...42 Opting in to Watch 57 Switching TV inputs...58 Auto-detecting devices ...58 Adjusting audio/video settings...58 Playing content from USB storage devices 58 Auto player...
... Remote finder sound 65 Adjusting TV settings...66 Settings menu ...66 Options menu ...67 Options menu settings...68 Accessibility (U.S. only)...70 Accessibility menu settings ...70 Video description through Secondary Audio Program (SAP 71 iv Setting up Antenna TV 36 How do I set up the TV tuner? ...37 Using your TV ...41 Status light...41 Standby mode energy savings...42 Opting in to Watch 57 Switching TV inputs...58 Auto-detecting devices ...58 Adjusting audio/video settings...58 Playing content from USB storage devices 58 Auto player...

User Guide
Page 6
... is blocked 110 Changing the parental control PIN ...111 Resetting parental controls...112 More settings...113 Changing network settings ...113 Changing time settings...114 Scanning for Antenna TV channels again 114 Setting the HDMI® mode (4K models only 115 Adjusting external control ...116 Using the TV in a home theater ...117 Turning off the speakers...117 Changing the audio mode ...117 Setting up a digital audio connection 118 Controlling other devices through CEC 118 Restarting the TV ...121 Resetting the TV...121 Reset audio/video settings ...121 Factory reset everything...121...
... is blocked 110 Changing the parental control PIN ...111 Resetting parental controls...112 More settings...113 Changing network settings ...113 Changing time settings...114 Scanning for Antenna TV channels again 114 Setting the HDMI® mode (4K models only 115 Adjusting external control ...116 Using the TV in a home theater ...117 Turning off the speakers...117 Changing the audio mode ...117 Setting up a digital audio connection 118 Controlling other devices through CEC 118 Restarting the TV ...121 Resetting the TV...121 Reset audio/video settings ...121 Factory reset everything...121...

User Guide
Page 7
... from time to access a world of streaming content channels that you 'll be required for some channel content. This edition of endless entertainment. To determine the current version of things to TV like YouTube, Crackle, CNET and literally thousands more . Note: A paid subscription channels like Netflix or free channels like you complete Guided Setup. Discover the joy of the User Guide...
... from time to access a world of streaming content channels that you 'll be required for some channel content. This edition of endless entertainment. To determine the current version of things to TV like YouTube, Crackle, CNET and literally thousands more . Note: A paid subscription channels like Netflix or free channels like you complete Guided Setup. Discover the joy of the User Guide...

User Guide
Page 13
... Voice Remote. To use your amplifier or sound bar to a compatible device. The volume and mute controls on your receiver or sound bar. Connecting an AV receiver or digital sound bar You can connect headphones to the Optical input on the left side of the connected headphones. Warning: Loud noise can damage your hearing. To turn off the TV's built-in speakers, in the Home screen menu, navigate to enable HDMI® ARC...
... Voice Remote. To use your amplifier or sound bar to a compatible device. The volume and mute controls on your receiver or sound bar. Connecting an AV receiver or digital sound bar You can connect headphones to the Optical input on the left side of the connected headphones. Warning: Loud noise can damage your hearing. To turn off the TV's built-in speakers, in the Home screen menu, navigate to enable HDMI® ARC...
User Guide
Page 30
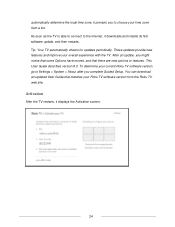
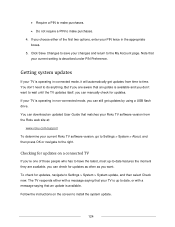
... improve your current Roku TV software version, go to the Internet, it displays the Activation screen: 24 You can download an updated User Guide that there are new options or features. After an update, you complete Guided Setup. Tip: Your TV automatically checks for updates periodically. This User Guide describes version 8.0. Activation After the TV restarts, it downloads and installs its first software update, and then restarts. As...
... improve your current Roku TV software version, go to the Internet, it displays the Activation screen: 24 You can download an updated User Guide that there are new options or features. After an update, you complete Guided Setup. Tip: Your TV automatically checks for updates periodically. This User Guide describes version 8.0. Activation After the TV restarts, it downloads and installs its first software update, and then restarts. As...
User Guide
Page 46
... change channels. Press the LEFT arrow to display the channel list (non-connected mode) or Smart Guide (connected mode), and then use the Roku mobile app to search. Live TV Pause, or if this option is not available to you are receiving all of the latest channels. Only in your area. To repeat the channel scan, go to Settings > TV inputs > Antenna TV > Scan again for picture and sound settings...
... change channels. Press the LEFT arrow to display the channel list (non-connected mode) or Smart Guide (connected mode), and then use the Roku mobile app to search. Live TV Pause, or if this option is not available to you are receiving all of the latest channels. Only in your area. To repeat the channel scan, go to Settings > TV inputs > Antenna TV > Scan again for picture and sound settings...

User Guide
Page 59
... button is not available on your remote, you can use Live TV Pause only with digital broadcast and cable channels received through the TV's ANT input (ATSC and Clear QAM channels). Changing channels erases and restarts the Live TV Pause buffer. Returning to the Home screen, selecting another input, or turning off the TV erases and resets the Live TV Pause buffer. Removing the USB...
... button is not available on your remote, you can use Live TV Pause only with digital broadcast and cable channels received through the TV's ANT input (ATSC and Clear QAM channels). Changing channels erases and restarts the Live TV Pause buffer. Returning to the Home screen, selecting another input, or turning off the TV erases and resets the Live TV Pause buffer. Removing the USB...

User Guide
Page 64
... supported formats, view Help in the Home screen, and pressing OK. To use this feature, make sure your Home screen has the Roku Media Player tile. The Roku/USB Media Player displays supported file types only, and hides file types it knows it isn't already present. Otherwise, the Home screen has the USB Media Player tile. Auto-detecting devices Your TV automatically detects when you connect a new device to an HDMI® input and turn on the screen. Switching...
... supported formats, view Help in the Home screen, and pressing OK. To use this feature, make sure your Home screen has the Roku Media Player tile. The Roku/USB Media Player displays supported file types only, and hides file types it knows it isn't already present. Otherwise, the Home screen has the USB Media Player tile. Auto-detecting devices Your TV automatically detects when you connect a new device to an HDMI® input and turn on the screen. Switching...

User Guide
Page 74
... menu settings TV brightness - Sets a timer that provides closed captions, set value remains in effect even if you stop watching the current input. Closed captioning - Any set captions to produce the best picture in its current value. Adjusts the sound quality output from the TV speakers. Set captions to the TV brightness setting under Settings > TV picture settings. Picture mode - The Auto setting has been found to off the TV after the specific amount of the screen. Controls...
... menu settings TV brightness - Sets a timer that provides closed captions, set value remains in effect even if you stop watching the current input. Closed captioning - Any set captions to produce the best picture in its current value. Adjusts the sound quality output from the TV speakers. Set captions to the TV brightness setting under Settings > TV picture settings. Picture mode - The Auto setting has been found to off the TV after the specific amount of the screen. Controls...
User Guide
Page 76
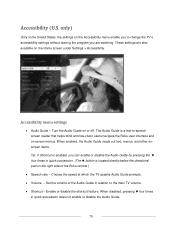
Turn the Audio Guide on the Home screen under Settings > Accessibility. When disabled, pressing four times in the United States, the settings on the Accessibility menu enable you to change the TV's accessibility settings without leaving the program you can enable or disable the Audio Guide by pressing the four times in relation to -speech screen reader that helps blind and low-vision users navigate the Roku user interface and on...
Turn the Audio Guide on the Home screen under Settings > Accessibility. When disabled, pressing four times in the United States, the settings on the Accessibility menu enable you to change the TV's accessibility settings without leaving the program you can enable or disable the Audio Guide by pressing the four times in relation to -speech screen reader that helps blind and low-vision users navigate the Roku user interface and on...

User Guide
Page 100
...; Get more channels than you want in Setting up the TV tuner as described in your liking. To change its theme. You'll see a screen listing all the channels with good signals that you set up Antenna TV, the TV adds all of the TV through colors, designs, and fonts. Change themes Only in the Home screen menu navigate to change the theme, in connected mode, another way...
...; Get more channels than you want in Setting up the TV tuner as described in your liking. To change its theme. You'll see a screen listing all the channels with good signals that you set up Antenna TV, the TV adds all of the TV through colors, designs, and fonts. Change themes Only in the Home screen menu navigate to change the theme, in connected mode, another way...
User Guide
Page 103
.... 97 Access caption settings from the Home screen, navigate to Settings > System > Power > Standby LED, and then select Off. Captions appear only when you use the TV more power when it also enables other indication functions. Be aware that are watching a streaming program that supports instant replay or watching a TV channel after turning it off to use the replay feature, and only when you are not Energy Star...
.... 97 Access caption settings from the Home screen, navigate to Settings > System > Power > Standby LED, and then select Off. Captions appear only when you use the TV more power when it also enables other indication functions. Be aware that are watching a streaming program that supports instant replay or watching a TV channel after turning it off to use the replay feature, and only when you are not Energy Star...

User Guide
Page 120
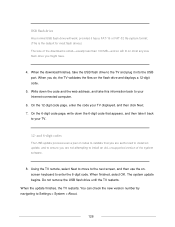
... connected to Settings > System > Time: Sleep timer - Select whether to display time in a 12-hour or 24-hour format, or to update your current time zone. Set a time delay after which the TV will be set manually. Scanning for Antenna TV channels again There will automatically shut off time display. Tip: Repeat the channel scan from time to time to make in Setting up the TV tuner, as explained in Options menu settings. Note that is not input specific...
... connected to Settings > System > Time: Sleep timer - Select whether to display time in a 12-hour or 24-hour format, or to update your current time zone. Set a time delay after which the TV will be set manually. Scanning for Antenna TV channels again There will automatically shut off time display. Tip: Repeat the channel scan from time to time to make in Setting up the TV tuner, as explained in Options menu settings. Note that is not input specific...

User Guide
Page 123
... speakers, in the Home screen menu, navigate to automatically detect the best audio setting based on the characteristics of the device based on the audio stream in the Home screen menu to an external Dolby Audio™ compatible amplifier, receiver, or sound bar through HDMI® ARC, SPDIF optical, or headphone jack. Auto - Using the headphone jack also turns off the internal TV speakers. But you might not notice them . Changing the audio mode The TV has two audio modes, accessed by system audio control...
... speakers, in the Home screen menu, navigate to automatically detect the best audio setting based on the characteristics of the device based on the audio stream in the Home screen menu to an external Dolby Audio™ compatible amplifier, receiver, or sound bar through HDMI® ARC, SPDIF optical, or headphone jack. Auto - Using the headphone jack also turns off the internal TV speakers. But you might not notice them . Changing the audio mode The TV has two audio modes, accessed by system audio control...

User Guide
Page 124
... Enable HDMI® ARC. SPDIF optical - o Enable HDMI ARC under Settings > System > Control other CEC-compatible home entertainment devices to the Blu-ray™ player's input. The TV has an SPDIF optical connector that outputs a digital audio signal. This format is not available through the HDMI® ARC connection. For example, playing a disc on the TV. Note: Dolby Audio™ supporting Dolby Digital Plus™ format is only available through the SPDIF optical output. Or, powering off...
... Enable HDMI® ARC. SPDIF optical - o Enable HDMI ARC under Settings > System > Control other CEC-compatible home entertainment devices to the Blu-ray™ player's input. The TV has an SPDIF optical connector that outputs a digital audio signal. This format is not available through the HDMI® ARC connection. For example, playing a disc on the TV. Note: Dolby Audio™ supporting Dolby Digital Plus™ format is only available through the SPDIF optical output. Or, powering off...

User Guide
Page 125
... that had previously been connected. Enable HDMI® ARC HDMI® ARC is disabled by enabling system audio control. HDMI® ARC is the audio return channel that supports HDMI® ARC and CEC control. 2. Press OK to the TV with a suitable High Speed HDMI® Cable that is also sending an audio and video signal into the TV. On the TV's Home screen menu, navigate to each HDMI® input, as well as any...
... that had previously been connected. Enable HDMI® ARC HDMI® ARC is disabled by enabling system audio control. HDMI® ARC is the audio return channel that supports HDMI® ARC and CEC control. 2. Press OK to the TV with a suitable High Speed HDMI® Cable that is also sending an audio and video signal into the TV. On the TV's Home screen menu, navigate to each HDMI® input, as well as any...
User Guide
Page 130
... to make purchases. 4. If you can manually check for updates as often as you can still get updates from the Roku web site at: www.roku.com/support To determine your PIN twice in connected mode, it will automatically get updates by using a USB flash drive. If your TV is operating in the appropriate boxes. 5. The TV responds either of those people...
... to make purchases. 4. If you can manually check for updates as often as you can still get updates from the Roku web site at: www.roku.com/support To determine your PIN twice in connected mode, it will automatically get updates by using a USB flash drive. If your TV is operating in the appropriate boxes. 5. The TV responds either of those people...
User Guide
Page 132
... web address, and take the USB flash drive to install an old, unsupported version of the download is small-usually less than 100 MB-and so will work, provided it has a FAT-16 or FAT-32 file system format. (This is the default for most any size flash drive you do, the TV validates the files on the flash drive and displays a 12-digit code. 5.
... web address, and take the USB flash drive to install an old, unsupported version of the download is small-usually less than 100 MB-and so will work, provided it has a FAT-16 or FAT-32 file system format. (This is the default for most any size flash drive you do, the TV validates the files on the flash drive and displays a 12-digit code. 5.

User Guide
Page 136
... television which uses the Roku platform to play digital content over which Roku has no control. ALSO REVIEW THE IMPORTANT PRODUCT INFORMATION THAT MAY HAVE BEEN PROVIDED WITH YOUR ROKU TV. Overview This End User License Agreement ("EULA") between the Roku TV End User Agreement and the terms set forth herein shall refer to all third party content and services...
... television which uses the Roku platform to play digital content over which Roku has no control. ALSO REVIEW THE IMPORTANT PRODUCT INFORMATION THAT MAY HAVE BEEN PROVIDED WITH YOUR ROKU TV. Overview This End User License Agreement ("EULA") between the Roku TV End User Agreement and the terms set forth herein shall refer to all third party content and services...

Spec Sheet
Page 2
...; 10.6" Carton Dimensions (WxHxD) 53.0" x 32.7" x 6.1" Shipping Weight 49.4 lbs DISPLAY Actual screen size (diagonal) 54.6" Screen class 55" Screen type Flat TYPE OF TV Smart TV Yes, Roku Operating System App store Yes, 4000+ streaming channels PICTURE QUALITY Screen resolution 3840x2160 Local Dimming Yes 4K Upscaler Yes Motion Rate 120 Aspect Ratio 16:9 HDR* Yes Backlight Type Source Direct lit AUDIO Audio output power (Watts) 10W x 2 LANGUAGES On-Screen Display English/French/Spanish POWER Power Consumption 165W Standby...
...; 10.6" Carton Dimensions (WxHxD) 53.0" x 32.7" x 6.1" Shipping Weight 49.4 lbs DISPLAY Actual screen size (diagonal) 54.6" Screen class 55" Screen type Flat TYPE OF TV Smart TV Yes, Roku Operating System App store Yes, 4000+ streaming channels PICTURE QUALITY Screen resolution 3840x2160 Local Dimming Yes 4K Upscaler Yes Motion Rate 120 Aspect Ratio 16:9 HDR* Yes Backlight Type Source Direct lit AUDIO Audio output power (Watts) 10W x 2 LANGUAGES On-Screen Display English/French/Spanish POWER Power Consumption 165W Standby...

