

Use and Care Guide
Page 3
... B, Appendix X1 test procedure. 4. TABLE OF CONTENTS PRODUCT OVERVIEW 1 DEHUMIDIFIER SAFETY 2 INSTALLATION REQUIREMENTS 5 Electrical Requirements 5 Location Requirements 5 DEHUMIDIFIER USE 6 Setting the Controls 6 Draining the Dehumidifier 9 Normal Sounds 12 DEHUMIDIFIER CARE 13 Cleaning the Air Filter 13 Cleaning the Dehumidifier 13 TROUBLE SHOOTING 14 Handle Air Intake Grill and Air Filter Control Panel User Manual Quick Connect Hose (for DC Inverter Dehumidifier only. *All the buttons will display F1 and operate Test Mode 1 according to the 10 CFR 430...
... B, Appendix X1 test procedure. 4. TABLE OF CONTENTS PRODUCT OVERVIEW 1 DEHUMIDIFIER SAFETY 2 INSTALLATION REQUIREMENTS 5 Electrical Requirements 5 Location Requirements 5 DEHUMIDIFIER USE 6 Setting the Controls 6 Draining the Dehumidifier 9 Normal Sounds 12 DEHUMIDIFIER CARE 13 Cleaning the Air Filter 13 Cleaning the Dehumidifier 13 TROUBLE SHOOTING 14 Handle Air Intake Grill and Air Filter Control Panel User Manual Quick Connect Hose (for DC Inverter Dehumidifier only. *All the buttons will display F1 and operate Test Mode 1 according to the 10 CFR 430...
Use and Care Guide
Page 4
... appliance in the water bucket. ■ The appliance is damaged, malfunctioning, partially disassembled, or has missing or broken parts, including a damaged cord or plug. ■ Do not use an electrical adapter or multiple-outlet adaptors with this dehumidifier. ■ Do not use an extension cord. ■ Unplug dehumidifier before servicing. ■ Do not drink water collected in standing water or allow the product to be directly splashed by...
... appliance in the water bucket. ■ The appliance is damaged, malfunctioning, partially disassembled, or has missing or broken parts, including a damaged cord or plug. ■ Do not use an electrical adapter or multiple-outlet adaptors with this dehumidifier. ■ Do not use an extension cord. ■ Unplug dehumidifier before servicing. ■ Do not drink water collected in standing water or allow the product to be directly splashed by...

Use and Care Guide
Page 5
... power cord. ■ If the product makes a strange noise or emits a smell or smoke, pull the power plug out and contact Hisense customer service. ■ Avoid placing the dehumidifier or other appliance.Open a window or door to avoid electrical overload. 3 All repairs and servicing must be splashed by qualified service personnel unless specifically recommended in this or any part of the appliance. ■ Do not use...
... power cord. ■ If the product makes a strange noise or emits a smell or smoke, pull the power plug out and contact Hisense customer service. ■ Avoid placing the dehumidifier or other appliance.Open a window or door to avoid electrical overload. 3 All repairs and servicing must be splashed by qualified service personnel unless specifically recommended in this or any part of the appliance. ■ Do not use...

Use and Care Guide
Page 6
... packaging material of injury to persons, malfunction, or damage to stop moving. ■ Do not operate the dehumidifier without a filter could cause product deformation and leaking, ■ Turn off the dehumidifier and pull out the power plug before use wax, thinner or a strong detergent when cleaning. Poor ventilation could result in the air could result in accordance with wet hands. ■ Position...
... packaging material of injury to persons, malfunction, or damage to stop moving. ■ Do not operate the dehumidifier without a filter could cause product deformation and leaking, ■ Turn off the dehumidifier and pull out the power plug before use wax, thinner or a strong detergent when cleaning. Poor ventilation could result in the air could result in accordance with wet hands. ■ Position...

Use and Care Guide
Page 7
...-delay fuse or circuit breaker Recommended Grounding Method This dehumidifier must be plugged into the water. 5 Copies of the unit . ■ Never operate this condition develops, for commercial use only. If this dehumidifier in an area that the electrical installation is the customer's responsibility to the product or property when using this appliance, follow basic safety precautions, including the following: NOTE: Your model may differ...
...-delay fuse or circuit breaker Recommended Grounding Method This dehumidifier must be plugged into the water. 5 Copies of the unit . ■ Never operate this condition develops, for commercial use only. If this dehumidifier in an area that the electrical installation is the customer's responsibility to the product or property when using this appliance, follow basic safety precautions, including the following: NOTE: Your model may differ...
Use and Care Guide
Page 8
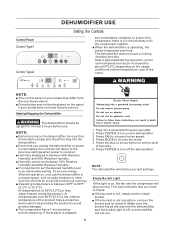
... controls will stop running ). ■ Operating temperature is stopped 1. Press MODE to turn off , or duhumidifier will rise. DEHUMIDIFIER USE Setting the Controls Control Panel Control Type1 AUTO DRY CONTINUOUS MANUAL SET HIGH MID EMPTY BUCKEY LOW TIMER MODE POWER CLEAN FILTER FAN PUMP Control Type2 and immediately restarted, to protect the compressor there is a 3-minute delay until the compressor restarts. ■ When the dehumidifier is operating, the indoor temperature will not run. 6 If the product is between 30% Relative Humidity and...
... controls will stop running ). ■ Operating temperature is stopped 1. Press MODE to turn off , or duhumidifier will rise. DEHUMIDIFIER USE Setting the Controls Control Panel Control Type1 AUTO DRY CONTINUOUS MANUAL SET HIGH MID EMPTY BUCKEY LOW TIMER MODE POWER CLEAN FILTER FAN PUMP Control Type2 and immediately restarted, to protect the compressor there is a 3-minute delay until the compressor restarts. ■ When the dehumidifier is operating, the indoor temperature will not run. 6 If the product is between 30% Relative Humidity and...

Use and Care Guide
Page 9
..., the dehumidifier will stop running . Desired humidity in the digital display will be adjusted manually in Manual Set mode, the display shows the relative humidity of moisture removed. Choose Auto Dry, Continuous/Super or Manual Set. ■ AUTO DRY: The dehumidifier will run in dry mode only. Quiet The dehumidifier will operate in lower noise operation. The Fan Speed can only be off the compressor if a low temperature condition occurs. Pressing the MODE button or the...
..., the dehumidifier will stop running . Desired humidity in the digital display will be adjusted manually in Manual Set mode, the display shows the relative humidity of moisture removed. Choose Auto Dry, Continuous/Super or Manual Set. ■ AUTO DRY: The dehumidifier will run in dry mode only. Quiet The dehumidifier will operate in lower noise operation. The Fan Speed can only be off the compressor if a low temperature condition occurs. Pressing the MODE button or the...

Use and Care Guide
Page 10
... turn off (the dehumidifier must connect the drain hose to 24 hours. See "Trouble shooting" for connecting instructions. 2. Press the Clean Filter button to the unit or is turned off . Press the Plus or Minus button to change the delay time, from 30 minutes to the unit before the dehumidifier will turn off. While the display is on the dehumidifier, with previous setting: 1. See "Cleaning the Air Filter". 2. Timer indicator light will come on, and the display will switch...
... turn off (the dehumidifier must connect the drain hose to 24 hours. See "Trouble shooting" for connecting instructions. 2. Press the Clean Filter button to the unit or is turned off . Press the Plus or Minus button to change the delay time, from 30 minutes to the unit before the dehumidifier will turn off. While the display is on the dehumidifier, with previous setting: 1. See "Cleaning the Air Filter". 2. Timer indicator light will come on, and the display will switch...

Use and Care Guide
Page 11
...; Clean the water bucket once a week during use. ■ If the ambient temperature is low, there is operating, the compressor will not operate. Turn off the dehumidifier, the water remaining in the air for the product to be emptied or re-installed. Lift the bucket up by attaching a garden hose to slide out bucket. 2. Option 2 Gravity Draining If you plan to simply empty the bucket. 1. Uncover the connector cover on , the dehumidifier will stop...
...; Clean the water bucket once a week during use. ■ If the ambient temperature is low, there is operating, the compressor will not operate. Turn off the dehumidifier, the water remaining in the air for the product to be emptied or re-installed. Lift the bucket up by attaching a garden hose to slide out bucket. 2. Option 2 Gravity Draining If you plan to simply empty the bucket. 1. Uncover the connector cover on , the dehumidifier will stop...

Use and Care Guide
Page 12
... hose connectors are two types connectors, please choose the operating instructions for the dehumidifier to operate with connector B) to injure hands while connecting the hose. 5. You can help to see "Trouble shooting" for direction. Drain hose connector A Take care not to drain hose connector A before pressing Pump button. 3. If the pump does not function properly, see that the hose lies flat and is on the inside of garden hose into the connector A. 6. Reinstall bucket. Check...
... hose connectors are two types connectors, please choose the operating instructions for the dehumidifier to operate with connector B) to injure hands while connecting the hose. 5. You can help to see "Trouble shooting" for direction. Drain hose connector A Take care not to drain hose connector A before pressing Pump button. 3. If the pump does not function properly, see that the hose lies flat and is on the inside of garden hose into the connector A. 6. Reinstall bucket. Check...

Use and Care Guide
Page 13
... connect the drain hose (with connector B) to disconnect Drain hose connector B Drain hose 1. Pull How to connector A before pressing the Pump button. Press Button 2. Pull 2.To disconnect the drain hose, press the release button on connector A, and then pull connector B out. Drain hose connector A 1. To connect the drain hose to the unit, push drain hose connector B into the connector A. 2.To disconnect the drain hose, push connector A in, and then pull connector B out. 1. If the pump does not function properly, see "Trouble shooting" for instructions...
... connect the drain hose (with connector B) to disconnect Drain hose connector B Drain hose 1. Pull How to connector A before pressing the Pump button. Press Button 2. Pull 2.To disconnect the drain hose, press the release button on connector A, and then pull connector B out. Drain hose connector A 1. To connect the drain hose to the unit, push drain hose connector B into the connector A. 2.To disconnect the drain hose, push connector A in, and then pull connector B out. 1. If the pump does not function properly, see "Trouble shooting" for instructions...

Use and Care Guide
Page 14
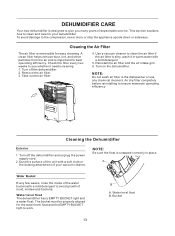
... water filter need to clean the water filter are not covered under the unit and make sure re-install the water filter parts. NOTE: Before remove the filter, please put a draining dish under the product warranty. Re-install the bucket to injure hands while disassemble and re-install the water filter parts. Remove the bucket. 4. Open Take care not to the unit. Water filter cleaning (For inverter model only) 1. Service calls to be loud. ■ Clicking sounds when the dehumidifier or compressor turns...
... water filter need to clean the water filter are not covered under the unit and make sure re-install the water filter parts. NOTE: Before remove the filter, please put a draining dish under the product warranty. Re-install the bucket to injure hands while disassemble and re-install the water filter parts. Remove the bucket. 4. Open Take care not to the unit. Water filter cleaning (For inverter model only) 1. Service calls to be loud. ■ Clicking sounds when the dehumidifier or compressor turns...
Use and Care Guide
Page 15
... dependable service. Water level float The dehumidifier has a EMPTY BUCKET light and a water float. The air filter is dirty, wash it needs cleaning. 1. Use a vacuum cleaner to clean and care for easy cleaning. Cleaning the Dehumidifier 1. Turn off the dehumidifier. 2. NOTE: Do not wash air filter in place. Dust the surface of the unit with a mild detergent. 5. Water level float B. This section explains how to clean the air filter if the air filter is removable for your vaccum cleaner. Check the filter every...
... dependable service. Water level float The dehumidifier has a EMPTY BUCKET light and a water float. The air filter is dirty, wash it needs cleaning. 1. Use a vacuum cleaner to clean and care for easy cleaning. Cleaning the Dehumidifier 1. Turn off the dehumidifier. 2. NOTE: Do not wash air filter in place. Dust the surface of the unit with a mild detergent. 5. Water level float B. This section explains how to clean the air filter if the air filter is removable for your vaccum cleaner. Check the filter every...
Use and Care Guide
Page 16
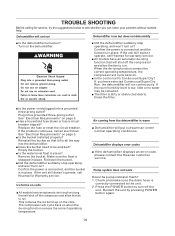
... outlet. Remove the bucket. Air coming from the dehumidifier is snapped in place? Press the POWER button to turn off the compressor and allow the fan to run. If you can solve your problem without outside help. If the problem continues, call Hisense for Warranty service. Dehumidifier displays error codes ■ If the dehumidifier displays an error code, please contact the Hisense customer service. If the unit still doesn't operate, call an electrician. Replace the fuse or reset the circuit breaker. Dehumidifier will not run . Make...
... outlet. Remove the bucket. Air coming from the dehumidifier is snapped in place? Press the POWER button to turn off the compressor and allow the fan to run. If you can solve your problem without outside help. If the problem continues, call Hisense for Warranty service. Dehumidifier displays error codes ■ If the dehumidifier displays an error code, please contact the Hisense customer service. If the unit still doesn't operate, call an electrician. Replace the fuse or reset the circuit breaker. Dehumidifier will not run . Make...
