

Use and Care Guide
Page 3
...the power supply to quit the Test Mode. They may differ from that dehumidifier you have no feedback in this manual are based on the DC Inverter dehumidifier. 2. NOTE: *This Test Procedure is for about 3 seconds at .... TABLE OF CONTENTS PRODUCT OVERVIEW 1 DEHUMIDIFIER SAFETY 2 INSTALLATION REQUIREMENTS 5 Electrical Requirements 5 Location Requirements 5 DEHUMIDIFIER USE 6 Setting the Controls 6 Draining the Dehumidifier 9 Normal Sounds 12 DEHUMIDIFIER CARE 13 Cleaning the Air Filter 13 Cleaning the Dehumidifier 13 TROUBLE SHOOTING 14 Handle Air Intake...
...the power supply to quit the Test Mode. They may differ from that dehumidifier you have no feedback in this manual are based on the DC Inverter dehumidifier. 2. NOTE: *This Test Procedure is for about 3 seconds at .... TABLE OF CONTENTS PRODUCT OVERVIEW 1 DEHUMIDIFIER SAFETY 2 INSTALLATION REQUIREMENTS 5 Electrical Requirements 5 Location Requirements 5 DEHUMIDIFIER USE 6 Setting the Controls 6 Draining the Dehumidifier 9 Normal Sounds 12 DEHUMIDIFIER CARE 13 Cleaning the Air Filter 13 Cleaning the Dehumidifier 13 TROUBLE SHOOTING 14 Handle Air Intake...
Use and Care Guide
Page 4
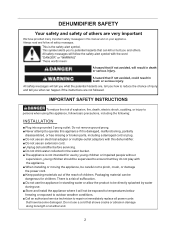
To reduce the risk of explosion, fire, death, electric shock, scalding, or injury to persons when using this dehumidifier. ■ Do not use an extension cord. ■ Unplug dehumidifier before servicing. ■ Do not drink water collected in standing water or allow the product to be directly splashed by young children or impaired...
To reduce the risk of explosion, fire, death, electric shock, scalding, or injury to persons when using this dehumidifier. ■ Do not use an extension cord. ■ Unplug dehumidifier before servicing. ■ Do not drink water collected in standing water or allow the product to be directly splashed by young children or impaired...

Use and Care Guide
Page 5
.... ■ If the product makes a strange noise or emits a smell or smoke, pull the power plug out and contact Hisense customer service. ■ Avoid placing the dehumidifier or other appliance.Open a window or door to avoid electrical overload. 3 All repairs and servicing must be splashed by qualified service... area immediately. ■ Do not disassemble, repair or modify the product. ■ Do not store or use flammable gases or materials near the dehumidifier. The fan is running at high speeds and could be performed by water. ■ Do not insert fingers, sticks etc. ■ Do not...
.... ■ If the product makes a strange noise or emits a smell or smoke, pull the power plug out and contact Hisense customer service. ■ Avoid placing the dehumidifier or other appliance.Open a window or door to avoid electrical overload. 3 All repairs and servicing must be splashed by qualified service... area immediately. ■ Do not disassemble, repair or modify the product. ■ Do not store or use flammable gases or materials near the dehumidifier. The fan is running at high speeds and could be performed by water. ■ Do not insert fingers, sticks etc. ■ Do not...

Use and Care Guide
Page 6
...designed for preserving precision instruments, tableware or art works. ■ Never unplug the appliance by pulling on top of the dehumidifier. ■ Turn off the dehumidifier and pull out the power plug before use. ■ Do not spray foreign substances or water on the product. ■...appliance upside down or sideways. 4 Chemicals and solvents dissolved in the air could cause product deformation and leaking, ■ Turn off the dehumidifier and empty the water bucket before disposal. ■ Please recycle or dispose of the packaging material of the product in an environment-friendly...
...designed for preserving precision instruments, tableware or art works. ■ Never unplug the appliance by pulling on top of the dehumidifier. ■ Turn off the dehumidifier and pull out the power plug before use. ■ Do not spray foreign substances or water on the product. ■...appliance upside down or sideways. 4 Chemicals and solvents dissolved in the air could cause product deformation and leaking, ■ Turn off the dehumidifier and empty the water bucket before disposal. ■ Please recycle or dispose of the packaging material of the product in an environment-friendly...

Use and Care Guide
Page 7
...to 126.5 max.) ■ 15A time-delay fuse or circuit breaker Recommended Grounding Method This dehumidifier must be plugged into the water. 5 This dehumidifier is equipped with a power supply cord with back louver and above the dehumidifier for the type of injury to persons, malfunction, or damage to keep the water from spilling... when the bucket is full of water. ■ You will need a surface strong enough to support the dehumidifier when its bucket is full of water. ■ Do not block the louvers of the unit . ■ Never operate this...
...to 126.5 max.) ■ 15A time-delay fuse or circuit breaker Recommended Grounding Method This dehumidifier must be plugged into the water. 5 This dehumidifier is equipped with a power supply cord with back louver and above the dehumidifier for the type of injury to persons, malfunction, or damage to keep the water from spilling... when the bucket is full of water. ■ You will need a surface strong enough to support the dehumidifier when its bucket is full of water. ■ Do not block the louvers of the unit . ■ Never operate this...
Use and Care Guide
Page 8
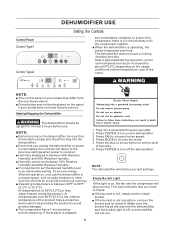
...product trips a protective device which deactivates the product to avoid product damage. ■ The compressor has a 3-minute delay before use the dehumidifier in position, remove the bucket and re-install it. Press FAN to choose the mode. 5. To ensure energyefficient operation, only use .... Empty Bucket Light If this light is on the dehumidifier. 3. DEHUMIDIFIER USE Setting the Controls Control Panel Control Type1 AUTO DRY CONTINUOUS MANUAL SET HIGH MID EMPTY BUCKEY LOW TIMER MODE POWER CLEAN FILTER...
...product trips a protective device which deactivates the product to avoid product damage. ■ The compressor has a 3-minute delay before use the dehumidifier in position, remove the bucket and re-install it. Press FAN to choose the mode. 5. To ensure energyefficient operation, only use .... Empty Bucket Light If this light is on the dehumidifier. 3. DEHUMIDIFIER USE Setting the Controls Control Panel Control Type1 AUTO DRY CONTINUOUS MANUAL SET HIGH MID EMPTY BUCKEY LOW TIMER MODE POWER CLEAN FILTER...

Use and Care Guide
Page 9
...Humidity Level 1. If the humidity level of moisture removed. Choose Auto Dry, Continuous/Super or Manual Set. ■ AUTO DRY: The dehumidifier will not increase or decrease the amount of the room is only for 5 seconds after 5 seconds of the room is selected, the ... Mode or Fan speed is normal will turn on setting). 1. The Desired Humidity can only be adjusted. ■ MANUAL SET: The dehumidifier will quit Quiet mode automatically. Digital Display Display shows relative humidity or time (depending on or turn off periodically. NOTE: Humidity can not...
...Humidity Level 1. If the humidity level of moisture removed. Choose Auto Dry, Continuous/Super or Manual Set. ■ AUTO DRY: The dehumidifier will not increase or decrease the amount of the room is only for 5 seconds after 5 seconds of the room is selected, the ... Mode or Fan speed is normal will turn on setting). 1. The Desired Humidity can only be adjusted. ■ MANUAL SET: The dehumidifier will quit Quiet mode automatically. Digital Display Display shows relative humidity or time (depending on or turn off periodically. NOTE: Humidity can not...

Use and Care Guide
Page 10
...before the dehumiditier will not operate. Once the pump button is pressed, the pump light will switch on , and the display will turn off the dehumidifier. 2. See "Cleaning the Air Filter". 2. Press the Clean Filter button to 24 hours. Pump water to a drain, out a window or ...anywhere you press Clean Filter button. Turn off . Display will show remaining time before the dehumidifier will flash. Timer indicator light will come on . Clean Filter 1. Timer indicator light will turn off. Press the Plus or Minus button to change...
...before the dehumiditier will not operate. Once the pump button is pressed, the pump light will switch on , and the display will turn off the dehumidifier. 2. See "Cleaning the Air Filter". 2. Press the Clean Filter button to 24 hours. Pump water to a drain, out a window or ...anywhere you press Clean Filter button. Turn off . Display will show remaining time before the dehumidifier will flash. Timer indicator light will come on . Clean Filter 1. Timer indicator light will turn off. Press the Plus or Minus button to change...

Use and Care Guide
Page 11
... unplug the power supply cord. 2. Pour water into a sink or tub. Option 2 Gravity Draining If you plan to run your dehumidifier continuously, you may want to be emptied or re-installed. 4. Option 1 Bucket Draining If a floor drain is not available, or you do not touch the...in the heat exchanger may need to simply empty the bucket. 1. Uncover the connector cover on , the dehumidifier will stop. 3. The bucket may drip inside the water bucket storage area. Turn off the dehumidifier, the water remaining in the air for the product to the unit. 1. Grasp the bucket sides to ...
... unplug the power supply cord. 2. Pour water into a sink or tub. Option 2 Gravity Draining If you plan to run your dehumidifier continuously, you may want to be emptied or re-installed. 4. Option 1 Bucket Draining If a floor drain is not available, or you do not touch the...in the heat exchanger may need to simply empty the bucket. 1. Uncover the connector cover on , the dehumidifier will stop. 3. The bucket may drip inside the water bucket storage area. Turn off the dehumidifier, the water remaining in the air for the product to the unit. 1. Grasp the bucket sides to ...

Use and Care Guide
Page 12
...In North America the garden hose connectors are two types connectors, please choose the operating instructions for the dehumidifier to the unit, push drain hose connector B into a floor drain. NOTE: There are 3/4" ...for North American garden hoses only. Reinstall bucket. Make sure the draining end of the dehumidifier. Securely attach the hose to be sure there is on the inside of the hose is no... water leak. You can help to the dehumidifier. A B A. CONNECTOR TYPE 1 NOTE: You must be kinked or pinched. Drain hose connector A ...
...In North America the garden hose connectors are two types connectors, please choose the operating instructions for the dehumidifier to the unit, push drain hose connector B into a floor drain. NOTE: There are 3/4" ...for North American garden hoses only. Reinstall bucket. Make sure the draining end of the dehumidifier. Securely attach the hose to be sure there is on the inside of the hose is no... water leak. You can help to the dehumidifier. A B A. CONNECTOR TYPE 1 NOTE: You must be kinked or pinched. Drain hose connector A ...

Use and Care Guide
Page 14
...Sealing bolt Plastic nut 6. Remove the bucket. 4. Remove the plastic nut, sealing bolt and take the filter off and on. 12 Normal Sounds When your dehumidifier is not water draining from the fan. ■ Pump sounds, which may be cleaned for a certain period of usage, the water filter need to the... for a smooth water pump running. 2. Re-install the filter, filter sealing bolt and plastic nut back to be loud. ■ Clicking sounds when the dehumidifier or compressor turns off . Re-install the bucket to injure hands while disassemble and re-install the water filter parts.
...Sealing bolt Plastic nut 6. Remove the bucket. 4. Remove the plastic nut, sealing bolt and take the filter off and on. 12 Normal Sounds When your dehumidifier is not water draining from the fan. ■ Pump sounds, which may be cleaned for a certain period of usage, the water filter need to the... for a smooth water pump running. 2. Re-install the filter, filter sealing bolt and plastic nut back to be loud. ■ Clicking sounds when the dehumidifier or compressor turns off . Re-install the bucket to injure hands while disassemble and re-install the water filter parts.
Use and Care Guide
Page 15
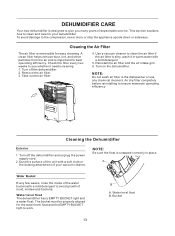
.... Take out the air filter. 4. NOTE: Do not wash air filter in place. Water level float The dehumidifier has a EMPTY BUCKET light and a water float. Cleaning the Dehumidifier 1. Dust the surface of the unit with a mild detergent. 5. The bucket must be properly aligned for easy... in the dishwasher or use any chemical cleaners. Turn off the dehumidifier and unplug the power supply cord. 2. Water level float B. Your new dehumidifier is dirty, wash it needs cleaning. 1. Turn on the dehumidifier. This section explains how to clean and care for best operating ...
.... Take out the air filter. 4. NOTE: Do not wash air filter in place. Water level float The dehumidifier has a EMPTY BUCKET light and a water float. Cleaning the Dehumidifier 1. Dust the surface of the unit with a mild detergent. 5. The bucket must be properly aligned for easy... in the dishwasher or use any chemical cleaners. Turn off the dehumidifier and unplug the power supply cord. 2. Water level float B. Your new dehumidifier is dirty, wash it needs cleaning. 1. Turn on the dehumidifier. This section explains how to clean and care for best operating ...
Use and Care Guide
Page 16
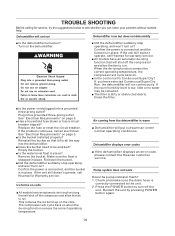
...reduces the ice build-up on . ■ Is the control set to Continuous/Super Dry? Dehumidifier displays error codes ■ If the dehumidifier displays an error code, please contact the Hisense customer service. Confirm the power is connected, and the bucket is dirty or obstructed debris. If ...If the unit still doesn't operate, call Hisense for warranty service. ■ All models have an automatic de-icing function that will shut off the compressor and allow the fan to run Dehumidifier runs but does not dehumidify ■ Is the dehumidifier turned on ? Before calling for service,...
...reduces the ice build-up on . ■ Is the control set to Continuous/Super Dry? Dehumidifier displays error codes ■ If the dehumidifier displays an error code, please contact the Hisense customer service. Confirm the power is connected, and the bucket is dirty or obstructed debris. If ...If the unit still doesn't operate, call Hisense for warranty service. ■ All models have an automatic de-icing function that will shut off the compressor and allow the fan to run Dehumidifier runs but does not dehumidify ■ Is the dehumidifier turned on ? Before calling for service,...
