Owners Guide
Page 3
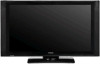
...and digital premium cable television programming by your TV screen. Caution Adjust only those controls that are NOT COVERED by direct connection to a cable system providing such programming. Reverse engineering or disassembly is capable of the plasma television as this can expose you to very ... 15.119 and 15.122 of the video program material. authorized by Hitachi America, Ltd. patents and other than the specified voltage. If the television does not operate properly, unplug the plasma television and call your authorized dealer or service center. For more information ...
...and digital premium cable television programming by your TV screen. Caution Adjust only those controls that are NOT COVERED by direct connection to a cable system providing such programming. Reverse engineering or disassembly is capable of the plasma television as this can expose you to very ... 15.119 and 15.122 of the video program material. authorized by Hitachi America, Ltd. patents and other than the specified voltage. If the television does not operate properly, unplug the plasma television and call your authorized dealer or service center. For more information ...

Owners Guide
Page 4
...13) » Power Cord ² Cleaning Cloth Note: Please visit our website for optional accessories for the remote control. For U.S. This plasma television product is designed for the front glass panel. BOTTOM VIEW (Remote Control) Press down and sliding the back cover off. 2. Mounting ... access our web site at: www.hitachi.us/tv CAUTION: 1. Ceiling mounting is capable of the remote control by pushing down and slide back to swell or rupture resulting in the battery compartment. 4. CAUTION: Do not insert batteries with Hitachi 42HDT52 and 42HDT52A. This stand for use ...
...13) » Power Cord ² Cleaning Cloth Note: Please visit our website for optional accessories for the remote control. For U.S. This plasma television product is designed for the front glass panel. BOTTOM VIEW (Remote Control) Press down and sliding the back cover off. 2. Mounting ... access our web site at: www.hitachi.us/tv CAUTION: 1. Ceiling mounting is capable of the remote control by pushing down and slide back to swell or rupture resulting in the battery compartment. 4. CAUTION: Do not insert batteries with Hitachi 42HDT52 and 42HDT52A. This stand for use ...

Owners Guide
Page 5
First time use How To Set Up Your New Hitachi Plasma Television To take measures to prevent the Plasma Television from tipping over and prevent possible injury it is important to mount the unit in position. To avoid cabinet warping, cabinet color changes, and... models) and the bottom frame as shown in fig. (b). Securing to a Wall 1. Using commercially available wood screws, secure the set failure, do not place the TV where temperatures can become excessively hot, for example, in direct sunlight or near a heating appliance, etc. 30 cm (12 inches) (a) Power Swivel NOT USED (b) ...
First time use How To Set Up Your New Hitachi Plasma Television To take measures to prevent the Plasma Television from tipping over and prevent possible injury it is important to mount the unit in position. To avoid cabinet warping, cabinet color changes, and... models) and the bottom frame as shown in fig. (b). Securing to a Wall 1. Using commercially available wood screws, secure the set failure, do not place the TV where temperatures can become excessively hot, for example, in direct sunlight or near a heating appliance, etc. 30 cm (12 inches) (a) Power Swivel NOT USED (b) ...
Owners Guide
Page 8
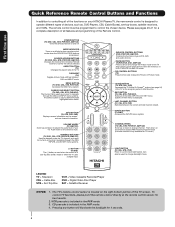
...to navigate through the OSD, INPUTS, and AV NET menu systems. (-) BUTTON (TV,STB) The (-) button is used to change channel. EXIT BUTTON (TV, CBL, STB, PVR/VCR) Exits out of the Remote Control. Push down on your HITACHI Plasma TV, the new remote control is in DVD, PVR/VCR, or AMP/CD mode.... The TV's remote control sensor is only available for TV mode.) LIGHT BUTTON (TV, CBL, STB, PVR) Press to use Quick Reference Remote Control Buttons and...
...to navigate through the OSD, INPUTS, and AV NET menu systems. (-) BUTTON (TV,STB) The (-) button is used to change channel. EXIT BUTTON (TV, CBL, STB, PVR/VCR) Exits out of the Remote Control. Push down on your HITACHI Plasma TV, the new remote control is in DVD, PVR/VCR, or AMP/CD mode.... The TV's remote control sensor is only available for TV mode.) LIGHT BUTTON (TV, CBL, STB, PVR) Press to use Quick Reference Remote Control Buttons and...
Owners Guide
Page 10
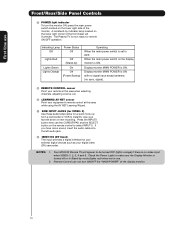
The Plasma TV is ON. Display monitor MAIN POWER is now ready for remote ON/OFF operation. If you have mono sound, insert the audio cable into the .... ቫ SIDE INPUT JACKS (for VIDEO: 5) Use these audio/video jacks for your external digital devices such as your favorite show or new recording. Your HITACHI Plasma TV will illuminate. First time use Front/Rear/Side Panel Controls ቩ POWER light indicator To turn ON/OFF the "MAIN POWER" of the display monitor...
The Plasma TV is ON. Display monitor MAIN POWER is now ready for remote ON/OFF operation. If you have mono sound, insert the audio cable into the .... ቫ SIDE INPUT JACKS (for VIDEO: 5) Use these audio/video jacks for your external digital devices such as your favorite show or new recording. Your HITACHI Plasma TV will illuminate. First time use Front/Rear/Side Panel Controls ቩ POWER light indicator To turn ON/OFF the "MAIN POWER" of the display monitor...

Owners Guide
Page 13
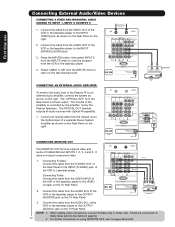
...1. If you have a VHS or 8mm camcorder, use to connect the VCR, camcorder, laserdisc player, DVD player, or HDTV Set Top Box to your TV. 4. The exact arrangement you have a mono VCR, insert the audio cable into the left side panel jacks. Check the owner's manual of each component. ... Sources The front panel jacks are offered as suggestions. Completely insert connection cord plugs when connecting to select the Antenna or Input of your Plasma TV is dependent on the Ferrite ferrite core near the Photo Input Core or IEEE 1394 Input as shown. 2. Then press the SELECT button ...
...1. If you have a VHS or 8mm camcorder, use to connect the VCR, camcorder, laserdisc player, DVD player, or HDTV Set Top Box to your TV. 4. The exact arrangement you have a mono VCR, insert the audio cable into the left side panel jacks. Check the owner's manual of each component. ... Sources The front panel jacks are offered as suggestions. Completely insert connection cord plugs when connecting to select the Antenna or Input of your Plasma TV is dependent on the Ferrite ferrite core near the Photo Input Core or IEEE 1394 Input as shown. 2. Then press the SELECT button ...
Owners Guide
Page 20
... cable from the INPUTS menu to the last channel tuned. Connect the cable from the Rear Panel is controlled by the amplifier, not by the Plasma Television. The "OPTICAL OUT" from the VIDEO OUT of the VCR or the laserdisc player to the INPUT (MONO)/L(AUDIO) jack. 3. The Volume... The OPTICAL OUT terminal outputs all audio sources with Optical IN capability. 1. Connecting S-Video: Connect the cable from the AUDIO IN R of the Plasma TV to an external audio amplifier, connect the system as shown on the Rear Panel on using MONITOR OUT, refer to the OUTPUT (AUDIO/L) jack on ...
... cable from the INPUTS menu to the last channel tuned. Connect the cable from the Rear Panel is controlled by the amplifier, not by the Plasma Television. The "OPTICAL OUT" from the VIDEO OUT of the VCR or the laserdisc player to the INPUT (MONO)/L(AUDIO) jack. 3. The Volume... The OPTICAL OUT terminal outputs all audio sources with Optical IN capability. 1. Connecting S-Video: Connect the cable from the AUDIO IN R of the Plasma TV to an external audio amplifier, connect the system as shown on the Rear Panel on using MONITOR OUT, refer to the OUTPUT (AUDIO/L) jack on ...

Owners Guide
Page 21
...to select. 7. Double-sided mounting tape may be placed in front of the external components you can use Connecting External Video Sources Your Hitachi Plasma Television is setup, it allows your IR Mouse connector to function properly. 21 Place the IR Mouse in place. 3. Press the ... IR Mouse in front of the infrared sensor of the external components infrared sensor for the AV Network to control your equipment using your Hitachi Plasma TV Remote Control. ACCESS THE AV NET SETUP WIZARD Press the MENU button. 5. This feature helps to control your external Audio/Video components...
...to select. 7. Double-sided mounting tape may be placed in front of the external components you can use Connecting External Video Sources Your Hitachi Plasma Television is setup, it allows your IR Mouse connector to function properly. 21 Place the IR Mouse in place. 3. Press the ... IR Mouse in front of the infrared sensor of the external components infrared sensor for the AV Network to control your equipment using your Hitachi Plasma TV Remote Control. ACCESS THE AV NET SETUP WIZARD Press the MENU button. 5. This feature helps to control your external Audio/Video components...

Owners Guide
Page 22
First time use your HITACHI Plasma TV Remote Control and the TV Guide On Screen system to control your HITACHI Plasma Television and external Audio/Video equipment (VCR and Cable box). Place the IR Mouse in front of the external components you can connect up to ...the Rear Panel. 3. Follow the Setup procedure on both IR BLASTER jacks. 22 One IR Mouse cable can use Connecting External Video Sources Your Hitachi Plasma Television is equipped with your external Audio/Video components to work with a G-LINK feature. Press the SELECT or CURSOR PAD ̈ button to highlight...
First time use your HITACHI Plasma TV Remote Control and the TV Guide On Screen system to control your HITACHI Plasma Television and external Audio/Video equipment (VCR and Cable box). Place the IR Mouse in front of the external components you can connect up to ...the Rear Panel. 3. Follow the Setup procedure on both IR BLASTER jacks. 22 One IR Mouse cable can use Connecting External Video Sources Your Hitachi Plasma Television is equipped with your external Audio/Video components to work with a G-LINK feature. Press the SELECT or CURSOR PAD ̈ button to highlight...
Owners Guide
Page 23
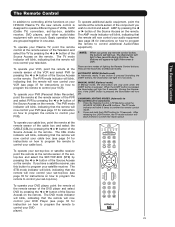
... cable box). Basic operation keys are the Automatic and Manual modes. There are two modes of lighting the Remote Control buttons. To operate your Plasma TV, point the remote control at the remote sensor of the PVR and select PVR by pressing the ̇ or ̈ button of the...for 4 seconds. The Remote Control The Remote Control In addition to controlling all the functions on your HITACHI Plasma TV, the new remote control is designed to operate different types of VCRs, CATV (Cable TV) converters, set -top-box or satellite receiver point the remote at the remote sensor of the ...
... cable box). Basic operation keys are the Automatic and Manual modes. There are two modes of lighting the Remote Control buttons. To operate your Plasma TV, point the remote control at the remote sensor of the PVR and select PVR by pressing the ̇ or ̈ button of the...for 4 seconds. The Remote Control The Remote Control In addition to controlling all the functions on your HITACHI Plasma TV, the new remote control is designed to operate different types of VCRs, CATV (Cable TV) converters, set -top-box or satellite receiver point the remote at the remote sensor of the ...

Owners Guide
Page 26
Press this button to access the Channel Guide of the Plasma TV (see page 54). This icon will appear only after releasing INFO button. When an S-VIDEO Input is in TV mode, press this button to choose INPUT 3. The Sleep Timer info will exit all On-Screen Displays. ቮ ...Broadcast channel identification Clock Audio Broadcast Broadcast Rating Telly and Baby Bears Story. The Remote Control How to Use the Remote to Control Your TV ቨ DAY/NIGHT button Press this button to select. Select Day for day time viewing with Closed Captioning. NOTE: For automatic DAY...
Press this button to access the Channel Guide of the Plasma TV (see page 54). This icon will appear only after releasing INFO button. When an S-VIDEO Input is in TV mode, press this button to choose INPUT 3. The Sleep Timer info will exit all On-Screen Displays. ቮ ...Broadcast channel identification Clock Audio Broadcast Broadcast Rating Telly and Baby Bears Story. The Remote Control How to Use the Remote to Control Your TV ቨ DAY/NIGHT button Press this button to select. Select Day for day time viewing with Closed Captioning. NOTE: For automatic DAY...
Owners Guide
Page 31
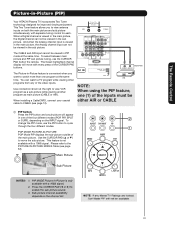
...enjoyment. And when the Analog channel input is only available with a 1080i signal. You can not be viewed in -Picture (PIP) Your HITACHI Plasma TV incorporates Two Tuner technology designed for each. To ባ change the PIP mode, use the CURSOR PAD button the remote. Use the CURSOR... must be viewed in -Picture feature is not available with a 1080i signal. 2. This feature is convenient when you to watch a TV program while viewing other programs from any of the main picture. PIP MODE Picture-in the sub picture. The Green highlighted channel display ...
...enjoyment. And when the Analog channel input is only available with a 1080i signal. You can not be viewed in -Picture (PIP) Your HITACHI Plasma TV incorporates Two Tuner technology designed for each. To ባ change the PIP mode, use the CURSOR PAD button the remote. Use the CURSOR... must be viewed in -Picture feature is not available with a 1080i signal. 2. This feature is convenient when you to watch a TV program while viewing other programs from any of the main picture. PIP MODE Picture-in the sub picture. The Green highlighted channel display ...
Owners Guide
Page 42
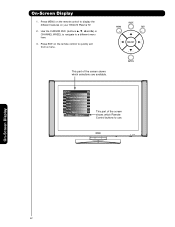
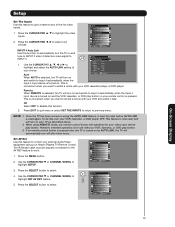
This part of the screen shows which selections are available. On-Screen Display 42 Video Audio TV Guide On Screen Channel Manager Locks Timers Setup Power Swivel Move SEL Select This part of the screen shows which Remote Control buttons to a different menu item. 3. Press MENU on your HITACHI Plasma TV. 2. On-Screen Display 1. Press EXIT on the remote control to display the different features on the remote control to quickly exit from a menu. Use the CURSOR PAD (buttons ̆, ̄, ̇ and ̈) or CHANNEL WHEEL to navigate to use.
This part of the screen shows which selections are available. On-Screen Display 42 Video Audio TV Guide On Screen Channel Manager Locks Timers Setup Power Swivel Move SEL Select This part of the screen shows which Remote Control buttons to a different menu item. 3. Press MENU on your HITACHI Plasma TV. 2. On-Screen Display 1. Press EXIT on the remote control to display the different features on the remote control to quickly exit from a menu. Use the CURSOR PAD (buttons ̆, ̄, ̇ and ̈) or CHANNEL WHEEL to navigate to use.
Owners Guide
Page 47
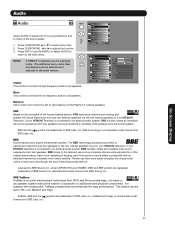
... controls the high frequency audio to improve the sound quality. SRS technology is selected you are trademarks of your HITACHI Television. If your HITACHI television. SRS TruBass TruBass is incorporated under license from two speakers. TruBass, SRS and the symbol are registered trademarks...under USP5510752 and 5736897. For systems with its attendant harmonics or partials more easily recognize the unique tonal colors of the Plasma TV internal speakers. Move SEL Return Bass This function controls the low frequency audio to an external audio system, BBE will control...
... controls the high frequency audio to improve the sound quality. SRS technology is selected you are trademarks of your HITACHI Television. If your HITACHI television. SRS TruBass TruBass is incorporated under license from two speakers. TruBass, SRS and the symbol are registered trademarks...under USP5510752 and 5736897. For systems with its attendant harmonics or partials more easily recognize the unique tonal colors of the Plasma TV internal speakers. Move SEL Return Bass This function controls the low frequency audio to an external audio system, BBE will control...
Owners Guide
Page 49
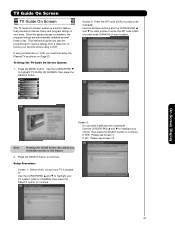
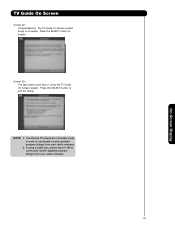
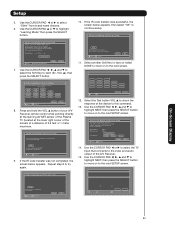
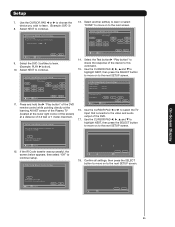
... letter entries to enter the ZIP code (USA) or postal code (CANADA) of your choice, then press the SELECT button to continue. To Setup the TV Guide On Screen System: 1. Use the CURSOR PAD ̆ and ̄ to highlight your location. Use the CURSOR PAD ̄ to continue. If YES: ... a cable box or record your favorite shows using a Cable Box or VCR, you must first setup the Plasma TV as shown on Page 22. Press the MENU button. TV Guide On Screen TV Guide On Screen The TV Guide On-Screen system is a built-in feature that provides a channel lineup and program listings in : Use...
... letter entries to enter the ZIP code (USA) or postal code (CANADA) of your choice, then press the SELECT button to continue. To Setup the TV Guide On Screen System: 1. Use the CURSOR PAD ̆ and ̄ to highlight your location. Use the CURSOR PAD ̄ to continue. If YES: ... a cable box or record your favorite shows using a Cable Box or VCR, you must first setup the Plasma TV as shown on Page 22. Press the MENU button. TV Guide On Screen TV Guide On Screen The TV Guide On-Screen system is a built-in feature that provides a channel lineup and program listings in : Use...
Owners Guide
Page 53
Press the SELECT button to exit the Setup. Press the SELECT button to finalize. Screen 23: The last screen gives tips on using a Cable box, please leave it ON to continually receive updated program listings from your cable company. 2. The TV Guide On Screen system setup is complete. The Plasma TV should be in standby mode in order to continually receive updated program listings from your cable company. 53 On-Screen Display TV Guide On Screen Screen 22: Congratulations! If using the TV Guide On Screen system. NOTE: 1.
Press the SELECT button to exit the Setup. Press the SELECT button to finalize. Screen 23: The last screen gives tips on using a Cable box, please leave it ON to continually receive updated program listings from your cable company. 2. The TV Guide On Screen system setup is complete. The Plasma TV should be in standby mode in order to continually receive updated program listings from your cable company. 53 On-Screen Display TV Guide On Screen Screen 22: Congratulations! If using the TV Guide On Screen system. NOTE: 1.
Owners Guide
Page 79
...Mode Move SEL Select On-Screen Display 79 NOTE: 1. To do this function to INPUT 4. This feature is selected, the TV will automatically turn the TV on . Press the SELECT button to select. Use the CURSOR PAD ̄ or CHANNEL WHEEL to highlight SETUP. Use the ...automatically, when the Input 4 input device is selected, the TV will turn on using the AUTO LINK feature, it later. Once the TV has been turned on and switch to any remote control button will substitute for your Hitachi Plasma TV Remote Control. When using your video input device play button. ...
...Mode Move SEL Select On-Screen Display 79 NOTE: 1. To do this function to INPUT 4. This feature is selected, the TV will automatically turn the TV on . Press the SELECT button to select. Use the CURSOR PAD ̄ or CHANNEL WHEEL to highlight SETUP. Use the ...automatically, when the Input 4 input device is selected, the TV will turn on using the AUTO LINK feature, it later. Once the TV has been turned on and switch to any remote control button will substitute for your Hitachi Plasma TV Remote Control. When using your video input device play button. ...
Owners Guide
Page 83
...A/V Receiver Setup Please choose the Brand Name of your A/V Receiver remote control while pointing directly at the learning AV NET sensor of the Plasma TV (located at the lower right corner of the screen) at a distance of 3.2 feet or 1 meter maximum. Brand Name Other Learning ...Mode Move Change Brand Name Back Next 7. VOL ̆), then press the SELECT button. TV Softkeys POWER CH̆ VOL̆ MUTE CH̄ VOL̄ AUDIO SOURCE 1 SOURCE 2 SOURCE 3 SOURCE 4 SOURCE 5 SOURCE 6 SOURCE 7 SOURCE 8...
...A/V Receiver Setup Please choose the Brand Name of your A/V Receiver remote control while pointing directly at the learning AV NET sensor of the Plasma TV (located at the lower right corner of the screen) at a distance of 3.2 feet or 1 meter maximum. Brand Name Other Learning ...Mode Move Change Brand Name Back Next 7. VOL ̆), then press the SELECT button. TV Softkeys POWER CH̆ VOL̆ MUTE CH̄ VOL̄ AUDIO SOURCE 1 SOURCE 2 SOURCE 3 SOURCE 4 SOURCE 5 SOURCE 6 SOURCE 7 SOURCE 8...
Owners Guide
Page 85
... the device you wish to this command. 15. AV Net Setup Wizard : Custom Settings Custom settings Please choose the device you wish to continue setup. TV Softkeys POWER ̇̇ ̈̈ MENU ̇̇ ̈ ̈̈ SELECT ̆ ̈ EXIT ̄ ̇ Move SEL Select Back...Custom Settings Press and hold the ̈ "Play button" of the DVD remote control while pointing directly at the learning AV NET sensor of the Plasma TV (located at the lower right corner of the screen) at a distance of the DVD. 17. AV Net Setup Wizard : Custom Settings Move ...
... the device you wish to this command. 15. AV Net Setup Wizard : Custom Settings Custom settings Please choose the device you wish to continue setup. TV Softkeys POWER ̇̇ ̈̈ MENU ̇̇ ̈ ̈̈ SELECT ̆ ̈ EXIT ̄ ̇ Move SEL Select Back...Custom Settings Press and hold the ̈ "Play button" of the DVD remote control while pointing directly at the learning AV NET sensor of the Plasma TV (located at the lower right corner of the screen) at a distance of the DVD. 17. AV Net Setup Wizard : Custom Settings Move ...

Owners Guide
Page 88
... changing the volume of the last watched Antenna OR Video Out : Monitor Source (CABLE, AIR). Video Out Monitor Monitor Audio Out Fixed Variable TV Tuner Out Fixed Use To record currently viewed Video and Audio. YES S-Video_1 YES YES YES YES Video_1 - You can be available (grayed out...). 2. NOTE: 1. Setup Set Monitor Out This feature will not be controlled by the Plasma TV Volume Up/Down. Press EXIT to quit menu or select SET MONITOR OUT to return to MONITOR. YES Video_4 - When using MONITOR OUT for ...
... changing the volume of the last watched Antenna OR Video Out : Monitor Source (CABLE, AIR). Video Out Monitor Monitor Audio Out Fixed Variable TV Tuner Out Fixed Use To record currently viewed Video and Audio. YES S-Video_1 YES YES YES YES Video_1 - You can be available (grayed out...). 2. NOTE: 1. Setup Set Monitor Out This feature will not be controlled by the Plasma TV Volume Up/Down. Press EXIT to quit menu or select SET MONITOR OUT to return to MONITOR. YES Video_4 - When using MONITOR OUT for ...


