

Owners Guide
Page 21
This feature helps to control your Hitachi Plasma TV Remote Control. Once this is equipped with up to control. / G-LINK Infrared Sensor IR ... 2. The Rear Panel has two IR BLASTER outputs which can connect the Plasma Television with an AV Network feature. The correct codes must be placed in front of the infrared sensor of an AV Network ...Rear Panel shown below. 2. CONNECTING EXTERNAL AUDIO/VIDEO COMPONENTS TO IR BLASTER FOR AV NETWORK 1. Connect your Hitachi Plasma Television and external Audio/Video equipment (VCR and DVD Player). Use the CURSOR PAD ̄ or channel ...
This feature helps to control your Hitachi Plasma TV Remote Control. Once this is equipped with up to control. / G-LINK Infrared Sensor IR ... 2. The Rear Panel has two IR BLASTER outputs which can connect the Plasma Television with an AV Network feature. The correct codes must be placed in front of the infrared sensor of an AV Network ...Rear Panel shown below. 2. CONNECTING EXTERNAL AUDIO/VIDEO COMPONENTS TO IR BLASTER FOR AV NETWORK 1. Connect your Hitachi Plasma Television and external Audio/Video equipment (VCR and DVD Player). Use the CURSOR PAD ̄ or channel ...

Owners Guide
Page 24
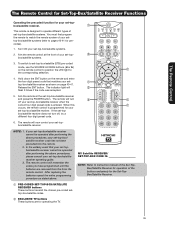
... Control How to Use the Remote to Control Your TV ቢ POWER button Press this button to turn the TV set on or off when the remote is in TV mode. (See page 23 for ቢ instructions on how to set the remote control to TV mode.) ባ ቤ ብ ባ... MODE Indicator Turns on or blinks to show remote control mode. ቤ SOURCE ACCESS (̇ or ̈) buttons Press these buttons to select remote control mode. ቦ ብ SOURCE ACCESS (ENT) button ቧ ቩ Hold down this button while entering your device code ...
... Control How to Use the Remote to Control Your TV ቢ POWER button Press this button to turn the TV set on or off when the remote is in TV mode. (See page 23 for ቢ instructions on how to set the remote control to TV mode.) ባ ቤ ብ ባ... MODE Indicator Turns on or blinks to show remote control mode. ቤ SOURCE ACCESS (̇ or ̈) buttons Press these buttons to select remote control mode. ቦ ብ SOURCE ACCESS (ENT) button ቧ ቩ Hold down this button while entering your device code ...

Owners Guide
Page 30
...FAV) is displayed and the displayed channel is turned ON. ቴ (-) DASH button Use the (-) DASH button with the (-) DASH button. When the TV power is turned off completely (MUTE). You can also delete a channel from WHITE to highlighted GREEN. However, if it again to return to your favorite...a few seconds for channels 1 to 9, or simply press the single digit channel you are used to select channels, lock access code, etc. How to Use the Remote to Control Your TV ቱ LAST CHANNEL (LAST CH) button Press this button to light up (̆) or CHANNEL WHEEL down (̄). 30...
...FAV) is displayed and the displayed channel is turned ON. ቴ (-) DASH button Use the (-) DASH button with the (-) DASH button. When the TV power is turned off completely (MUTE). You can also delete a channel from WHITE to highlighted GREEN. However, if it again to return to your favorite...a few seconds for channels 1 to 9, or simply press the single digit channel you are used to select channels, lock access code, etc. How to Use the Remote to Control Your TV ቱ LAST CHANNEL (LAST CH) button Press this button to light up (̆) or CHANNEL WHEEL down (̄). 30...

Owners Guide
Page 34
...;) on the remote control to position the LED light to pages 40-41 for pre-codes). 1. The indicator light will remember the codes you have programmed until the batteries are for operating the TV. 34 After replacing the batteries repeat the entire programming procedure as shown on the remote... and enter the four digit preset code that your cable box cannot be operated after performing the above procedures, your cable box code has not been precoded ...
...;) on the remote control to position the LED light to pages 40-41 for pre-codes). 1. The indicator light will remember the codes you have programmed until the batteries are for operating the TV. 34 After replacing the batteries repeat the entire programming procedure as shown on the remote... and enter the four digit preset code that your cable box cannot be operated after performing the above procedures, your cable box code has not been precoded ...
Owners Guide
Page 35
... operation of the buttons exclusively for the Set-TopBox/Satellite Receiver. ቢ PRE-CODED SET-TOP-BOX/SATELLITE RECEIVER buttons These buttons transmit the chosen pre-coded settop-box/satellite codes. ባ EXCLUSIVE TV buttons These buttons are removed from the from the remote control. To switch to ...at the front of your set -top-box/satellite receiver when the correct four digit preset code is entered. box/satellite receiver. ቢ This remote is programmed for operating the TV. 35 When this occurs, the remote control is designed to operate different types of set-top...
... operation of the buttons exclusively for the Set-TopBox/Satellite Receiver. ቢ PRE-CODED SET-TOP-BOX/SATELLITE RECEIVER buttons These buttons transmit the chosen pre-coded settop-box/satellite codes. ባ EXCLUSIVE TV buttons These buttons are removed from the from the remote control. To switch to ...at the front of your set -top-box/satellite receiver when the correct four digit preset code is entered. box/satellite receiver. ቢ This remote is programmed for operating the TV. 35 When this occurs, the remote control is designed to operate different types of set-top...

Owners Guide
Page 36
...shown on the remote control to position the LED light to operate different types of the buttons exclusively for operating the TV. 36 You will remember the codes you have programmed until the batteries are for the DVD Player. ቢ PRECODED DVD Buttons These buttons transmit the ...chosen precoded DVD codes. ባ EXCLUSIVE TV Buttons These buttons are removed from the from the remote control. NOTE: 1. MY DVD PLAYER CODE IS: NOTE: Refer to set the display type of your DVD player. ባ 3....
...shown on the remote control to position the LED light to operate different types of the buttons exclusively for operating the TV. 36 You will remember the codes you have programmed until the batteries are for the DVD Player. ቢ PRECODED DVD Buttons These buttons transmit the ...chosen precoded DVD codes. ባ EXCLUSIVE TV Buttons These buttons are removed from the from the remote control. NOTE: 1. MY DVD PLAYER CODE IS: NOTE: Refer to set the display type of your DVD player. ባ 3....

Owners Guide
Page 37
.../PVR cannot be operated after performing the above procedures, your VCR/PVR (Personal Video Recorder). ቢ This remote is programmed for operating the TV. 37 MY VCR/PVR CODE IS: NOTE: Refer to instruction manual of the VCR/PVR for operation of your VCR/PVR. ቢ 2. Release the ENT button. The... entered. Aim the remote control at the VCR/PVR and press the ባ POWER button. To switch to pages 40-41 for your VCR/PVR code has not been precoded into the remote. 2. NOTE: 1. In the unlikely event that matches your VCR/PVR. The remote control will turn off your...
.../PVR cannot be operated after performing the above procedures, your VCR/PVR (Personal Video Recorder). ቢ This remote is programmed for operating the TV. 37 MY VCR/PVR CODE IS: NOTE: Refer to instruction manual of the VCR/PVR for operation of your VCR/PVR. ቢ 2. Release the ENT button. The... entered. Aim the remote control at the VCR/PVR and press the ባ POWER button. To switch to pages 40-41 for your VCR/PVR code has not been precoded into the remote. 2. NOTE: 1. In the unlikely event that matches your VCR/PVR. The remote control will turn off your...

Owners Guide
Page 38
...does not turn off , try a different four digit preset code. / ቢ ቢ 6. Repeat steps 1 - 6 if you have programmed until the batteries are for operating the TV. 38 The remote will turn off your Audio component code has not been precoded into the remote. 2. You must ...front of the buttons exclusively for the VCR/PVR. ቢ PRECODED AUDIO Buttons These buttons transmit the chosen precoded Audio component codes. ባ EXCLUSIVE TV Buttons These buttons are removed from the from the remote control. NOTE: 1. The remote will now control your Audio component...
...does not turn off , try a different four digit preset code. / ቢ ቢ 6. Repeat steps 1 - 6 if you have programmed until the batteries are for operating the TV. 38 The remote will turn off your Audio component code has not been precoded into the remote. 2. You must ...front of the buttons exclusively for the VCR/PVR. ቢ PRECODED AUDIO Buttons These buttons transmit the chosen precoded Audio component codes. ባ EXCLUSIVE TV Buttons These buttons are removed from the from the remote control. NOTE: 1. The remote will now control your Audio component...

Owners Guide
Page 39
...confirm proper setup. ᕈ The remote will now access the video input (1-5) of the desired device. / ᕄ SETUP EXAMPLE (Hitachi DVD with precode 0573 connected to INPUT 1 of the TV) ᕃ Select DVD mode by using your device as shown on pages 40-41. 3. Then enter the assigned input number (1-5) ... CBL, STB, PVR, or AMP) by using your DVD on the remote and enter the four digit preset code that the device is related to instantly access the video input of the TV. Assigned input numbers can be used more than once if applicable. ᕄ Hold down the ENTER (ENT) button...
...confirm proper setup. ᕈ The remote will now access the video input (1-5) of the desired device. / ᕄ SETUP EXAMPLE (Hitachi DVD with precode 0573 connected to INPUT 1 of the TV) ᕃ Select DVD mode by using your device as shown on pages 40-41. 3. Then enter the assigned input number (1-5) ... CBL, STB, PVR, or AMP) by using your DVD on the remote and enter the four digit preset code that the device is related to instantly access the video input of the TV. Assigned input numbers can be used more than once if applicable. ᕄ Hold down the ENTER (ENT) button...

Owners Guide
Page 43
...or Black and White for Digital channels. Audio Channel Manager Signal Meter Auto Channel Scan Channel List Access Signal Meter. Locks Change Access Code Change Lock access code. intervals, 00:30-3:00). Adjust the bass. Select SRS settings (Off, Wide, Normal) Select BBE settings (Off, Soft, ...Timer Set Day/Night Timer Set Clock Settings. Select the Set Stand-By Mode options. Power Swivel Unlocked Locked Power Swivel enabled. TV Ratings Block various types of movies and video types based on a parental guide ratings. Adjust Loudness. Select Dynamic Range Compression to ...
...or Black and White for Digital channels. Audio Channel Manager Signal Meter Auto Channel Scan Channel List Access Signal Meter. Locks Change Access Code Change Lock access code. intervals, 00:30-3:00). Adjust the bass. Select SRS settings (Off, Wide, Normal) Select BBE settings (Off, Soft, ...Timer Set Day/Night Timer Set Clock Settings. Select the Set Stand-By Mode options. Power Swivel Unlocked Locked Power Swivel enabled. TV Ratings Block various types of movies and video types based on a parental guide ratings. Adjust Loudness. Select Dynamic Range Compression to ...

Owners Guide
Page 49
...channel lineup and program listings in : Use the CURSOR PAD ̆ and ̄ to highlight your TV location (USA or CANADA), then press the SELECT button to enter the ZIP code (USA) or postal code (CANADA) of your area. This interactive guide can also be programmed to this feature. 2. To Setup...several times a day. Screen 3: Do you must first setup the Plasma TV as shown on Page 22. Video Audio TV Guide On Screen Channel Manager Locks Timers Setup Power Swivel Move SEL Select Screen 2: Enter the ZIP code (USA) or postal code (Canada): Use the Numeric buttons and the CURSOR PAD ̆ ...
...channel lineup and program listings in : Use the CURSOR PAD ̆ and ̄ to highlight your TV location (USA or CANADA), then press the SELECT button to enter the ZIP code (USA) or postal code (CANADA) of your area. This interactive guide can also be programmed to this feature. 2. To Setup...several times a day. Screen 3: Do you must first setup the Plasma TV as shown on Page 22. Video Audio TV Guide On Screen Channel Manager Locks Timers Setup Power Swivel Move SEL Select Screen 2: Enter the ZIP code (USA) or postal code (Canada): Use the Numeric buttons and the CURSOR PAD ̆ ...

Owners Guide
Page 50
... the Cable box plugged into? Screen 9: To allow the TV Guide On-Screen system to find the correct code for your choice, then press the SELECT button to continue. On-Screen Display 50 Screen 7: This screen shows the correct way to continue. Press the ...SELECT button to setup the Cable box with the G-LINK. Please make sure that the Cable box and TV are ON. If...
... the Cable box plugged into? Screen 9: To allow the TV Guide On-Screen system to find the correct code for your choice, then press the SELECT button to continue. On-Screen Display 50 Screen 7: This screen shows the correct way to continue. Press the ...SELECT button to setup the Cable box with the G-LINK. Please make sure that the Cable box and TV are ON. If...

Owners Guide
Page 51
...PAD ̆ and ̄ to highlight your choice, then press the SELECT button to channel 28? Press the SELECT button to test the same code. No TV, Cable or remote buttons should be pressed while performing the automatic test. After the testing process is complete, the setup procedure will test the... select TEST THIS CODE AGAIN to continue. If YES: Please see screen 1. If NO, REPEAT SETUP PROCESS: Please see Screen 16. Screen 14: The Basic TV Guide On Screen system setup has just been completed. Screen 12: Do you chose NO in Screen 3. Screen 11: Did your choice, then ...
...PAD ̆ and ̄ to highlight your choice, then press the SELECT button to channel 28? Press the SELECT button to test the same code. No TV, Cable or remote buttons should be pressed while performing the automatic test. After the testing process is complete, the setup procedure will test the... select TEST THIS CODE AGAIN to continue. If YES: Please see screen 1. If NO, REPEAT SETUP PROCESS: Please see Screen 16. Screen 14: The Basic TV Guide On Screen system setup has just been completed. Screen 12: Do you chose NO in Screen 3. Screen 11: Did your choice, then ...

Owners Guide
Page 52
... press the SELECT button to continue. If YES, FINISH SETUP PROCESS: Please see screen 1. 52 If NO: Select NO to test a different code or select TEST THIS CODE AGAIN to continue. Screen 21: Please confirm your VCR and insert a tape for recording purposes. Screen 20: Did your VCR. If NO, REPEAT...Press PLAY from the VCR, then press the SELECT button to setup the VCR with the G-LINK. TV Guide On Screen Screen 16: This screen shows the correct way to continue. Screen 19: The TV Guide On Screen system will continue, see screen 20. Please confirm connection (see screen 21. Press ...
... press the SELECT button to continue. If YES, FINISH SETUP PROCESS: Please see screen 1. 52 If NO: Select NO to test a different code or select TEST THIS CODE AGAIN to continue. Screen 21: Please confirm your VCR and insert a tape for recording purposes. Screen 20: Did your VCR. If NO, REPEAT...Press PLAY from the VCR, then press the SELECT button to setup the VCR with the G-LINK. TV Guide On Screen Screen 16: This screen shows the correct way to continue. Screen 19: The TV Guide On Screen system will continue, see screen 20. Please confirm connection (see screen 21. Press ...

Owners Guide
Page 64
... were entered at the scheduled reminder time. Remind Conflict A remind conflict message will appear at initial TV Guide On Screen system setup (see current settings or update: -- ZIP or Postal Code -- cable or antenna setup -- Cancels the reminder. The 3 settings will override an existing program...these options: Use the CURSOR PAD ̄ to highlight a setting option, and then press the SELECT button to highlight a program. TV Guide On Screen Reminder Notification Banner Depending on the Service Bar to display a Help screen. Press SELECT to the program. Press the SELECT...
... were entered at the scheduled reminder time. Remind Conflict A remind conflict message will appear at initial TV Guide On Screen system setup (see current settings or update: -- ZIP or Postal Code -- cable or antenna setup -- Cancels the reminder. The 3 settings will override an existing program...these options: Use the CURSOR PAD ̄ to highlight a setting option, and then press the SELECT button to highlight a program. TV Guide On Screen Reminder Notification Banner Depending on the Service Bar to display a Help screen. Press SELECT to the program. Press the SELECT...

Owners Guide
Page 65
...; to highlight one of the options, and make any necessary changes, and then press the SELECT button. Over-the-Air - Antenna - ZIP or Postal Code -- recording device 2. Use the CURSOR PAD ̆ or ̄ to highlight Change Channel Display, and then press the SELECT button. Press the INFO ... a station depending on /off or Auto-Hide it, set cable or over-the-air or change something after completing initial TV Guide On Screen system setup. 1. TV Guide On Screen CHANGE SYSTEM SETTINGS: Use this option to edit channel information that can be edited includes: 3. Press SELECT to ...
...; to highlight one of the options, and make any necessary changes, and then press the SELECT button. Over-the-Air - Antenna - ZIP or Postal Code -- recording device 2. Use the CURSOR PAD ̆ or ̄ to highlight Change Channel Display, and then press the SELECT button. Press the INFO ... a station depending on /off or Auto-Hide it, set cable or over-the-air or change something after completing initial TV Guide On Screen system setup. 1. TV Guide On Screen CHANGE SYSTEM SETTINGS: Use this option to edit channel information that can be edited includes: 3. Press SELECT to ...

Owners Guide
Page 70
When TV RATINGS is selected, various types of movies and television programs based on the two rating systems used to enter the access code. Picture-in the LOCKS menu. 2. On-Screen Display 70 Use the CURSOR PAD ̆, ̄ or CHANNEL or WHEEL to select. Press... due to enter the Locks feature is turned on a parental guide ratings will be blocked. Press EXIT to the 0 Change Access Code Engage Lock Movie Ratings TV Ratings Canadian Ratings(Eng) Canadian Ratings(Frn) factory preset (0000). Engage Lock When ENGAGE LOCK is turned on, all buttons on ...
When TV RATINGS is selected, various types of movies and television programs based on the two rating systems used to enter the access code. Picture-in the LOCKS menu. 2. On-Screen Display 70 Use the CURSOR PAD ̆, ̄ or CHANNEL or WHEEL to select. Press... due to enter the Locks feature is turned on a parental guide ratings will be blocked. Press EXIT to the 0 Change Access Code Engage Lock Movie Ratings TV Ratings Canadian Ratings(Eng) Canadian Ratings(Frn) factory preset (0000). Engage Lock When ENGAGE LOCK is turned on, all buttons on ...

Owners Guide
Page 71
All ages admitted. R Restricted. If the movie does not carry a rating, the TV will immediately tune to an EAS channel as directed by the EAS message. Not Rated (NR) and Not Applicable (NA) programs. Movie has not been ... Display 71 Use the CURSOR PAD ̆, ̄ or CHANNEL WHEEL to select the MOVIE RATING category that is viewed. Locks Change Access Code Engage Lock Movie Ratings TV Ratings Canadian Ratings(Eng) Canadian Ratings(Frn) Move SEL Select Locks Movie Ratings or Status Not Rated G PG PG-13 R NC-17 X Move...
All ages admitted. R Restricted. If the movie does not carry a rating, the TV will immediately tune to an EAS channel as directed by the EAS message. Not Rated (NR) and Not Applicable (NA) programs. Movie has not been ... Display 71 Use the CURSOR PAD ̆, ̄ or CHANNEL WHEEL to select the MOVIE RATING category that is viewed. Locks Change Access Code Engage Lock Movie Ratings TV Ratings Canadian Ratings(Eng) Canadian Ratings(Frn) Move SEL Select Locks Movie Ratings or Status Not Rated G PG PG-13 R NC-17 X Move...

Owners Guide
Page 72
Locks Change Access Code Engage Lock Movie Ratings TV Ratings Canadian Ratings(Eng) Canadian Ratings(Frn) Move SEL Select Locks TV Ratings Status TV-Y TV-Y7 TV-G TV-PG TV-14 TV-MA Sub Rating D L S V FV Move SEL Return TV Parental Guide Ratings Table TV-Y All children. TV-14 Parents strongly cautioned. This ...messages, the Television will immediately tune to an EAS channel as directed by the EAS message. Themes and elements in TV-14 and higher (TV-MA), but not language and sex. 2. The program may contain sophisticated themes, intense sexual situation, more intense violence...
Locks Change Access Code Engage Lock Movie Ratings TV Ratings Canadian Ratings(Eng) Canadian Ratings(Frn) Move SEL Select Locks TV Ratings Status TV-Y TV-Y7 TV-G TV-PG TV-14 TV-MA Sub Rating D L S V FV Move SEL Return TV Parental Guide Ratings Table TV-Y All children. TV-14 Parents strongly cautioned. This ...messages, the Television will immediately tune to an EAS channel as directed by the EAS message. Themes and elements in TV-14 and higher (TV-MA), but not language and sex. 2. The program may contain sophisticated themes, intense sexual situation, more intense violence...

Owners Guide
Page 73
... automatically. 3. Will be sensitive to imitate dangerous acts which may see on their own - Programming intended for viewers under age 8 - Locks Change Access Code Engage Lock Movie Ratings TV Ratings Canadian Ratings(Eng) Canadian Ratings(Frn) Move SEL Select 2. Once rating is paid to themes, which may be suitable for a general audience...
... automatically. 3. Will be sensitive to imitate dangerous acts which may see on their own - Programming intended for viewers under age 8 - Locks Change Access Code Engage Lock Movie Ratings TV Ratings Canadian Ratings(Eng) Canadian Ratings(Frn) Move SEL Select 2. Once rating is paid to themes, which may be suitable for a general audience...


