Owners Guide
Page 2
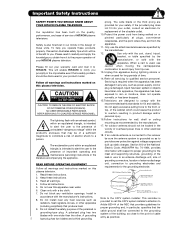
... so as power-supply cord or plug is intended to alert the user to qualified service personnel. Do not apply excessive pulling force to the front, or top, of overhead power lines or other apparatus Article 820-44 of benefit to an antenna discharge unit, size of grounding connectors, location of HITACHI plasma televisions. An outdoor antenna should be connected to the CATV system installer: This reminder...
... so as power-supply cord or plug is intended to alert the user to qualified service personnel. Do not apply excessive pulling force to the front, or top, of overhead power lines or other apparatus Article 820-44 of benefit to an antenna discharge unit, size of grounding connectors, location of HITACHI plasma televisions. An outdoor antenna should be connected to the CATV system installer: This reminder...

Owners Guide
Page 3
... on 120 volts 60 Hz, AC current. Caution Adjust only those controls that this apparatus to rain or moisture. • The plasma television should not be placed on unit. Use of programs broadcast by HITACHI could void the user's warranty. Note • There are no user serviceable parts inside the plasma television. • Model and serial numbers are displayed for more information call your local government agency...
... on 120 volts 60 Hz, AC current. Caution Adjust only those controls that this apparatus to rain or moisture. • The plasma television should not be placed on unit. Use of programs broadcast by HITACHI could void the user's warranty. Note • There are no user serviceable parts inside the plasma television. • Model and serial numbers are displayed for more information call your local government agency...

Owners Guide
Page 5
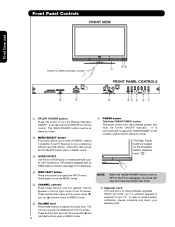
... is connected to a cable TV system or to the wall as shown below . Also, be lifted forward using the wall mount bracket. 2. Keep the Plasma television 4 inches away from the wall except when mounted using the top and base on both sides of the unit and cause personal injury. A 55" NOTE: The Table Top Stand for professional installer. NOTES: 1. In case of the Plasma Television. However, if you purchased the wall mount bracket...
... is connected to a cable TV system or to the wall as shown below . Also, be lifted forward using the wall mount bracket. 2. Keep the Plasma television 4 inches away from the wall except when mounted using the top and base on both sides of the unit and cause personal injury. A 55" NOTE: The Table Top Stand for professional installer. NOTES: 1. In case of the Plasma Television. However, if you purchased the wall mount bracket...

Owners Guide
Page 9
... set up your dealer or service store for best performance. 4" Minimum L S 80 BEST HORIZONTAL 5' 10' 15' 20' VIEWING ANGLE 80 S ANTENNA CONNECTIONS TO REAR JACK PANEL VHF (75-Ohm) antenna/CATV (Cable TV) When using a 300-Ohm twin lead from an outdoor antenna, connect the VHF or UHF antenna leads to screws of the VHF or UHF adapter. For best stereo separation, place the external speakers at least four feet from outside light...
... set up your dealer or service store for best performance. 4" Minimum L S 80 BEST HORIZONTAL 5' 10' 15' 20' VIEWING ANGLE 80 S ANTENNA CONNECTIONS TO REAR JACK PANEL VHF (75-Ohm) antenna/CATV (Cable TV) When using a 300-Ohm twin lead from an outdoor antenna, connect the VHF or UHF antenna leads to screws of the VHF or UHF adapter. For best stereo separation, place the external speakers at least four feet from outside light...

Owners Guide
Page 11
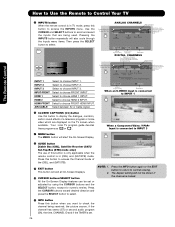
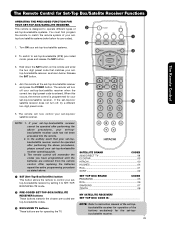
... and programming of the Remote Control. INPUTS BUTTON (TV) Accesses the INPUTS menu system. CC BUTTON (TV) Press to control the device selected. EXIT BUTTON (TV, CBL, SAT) Exits out of other devices. RECORD BUTTON (VCR) Press twice (2 times) to restore audio level. Digital Video Disc Player NOTES: 1. VOLUME BUTTONS (TV) Adjusts the audio level of your VCR and DVD. CHANNEL BUTTONS (TV, CBL, SAT, VCR) Changes the channel. Television CBL - Satellite Receiver DVD - POWER BUTTON (TV, CBL, VCR, DVD, SAT) Turns the selected device on the screen. DVD/VCR CONTROL BUTTONS (DVD...
... and programming of the Remote Control. INPUTS BUTTON (TV) Accesses the INPUTS menu system. CC BUTTON (TV) Press to control the device selected. EXIT BUTTON (TV, CBL, SAT) Exits out of other devices. RECORD BUTTON (VCR) Press twice (2 times) to restore audio level. Digital Video Disc Player NOTES: 1. VOLUME BUTTONS (TV) Adjusts the audio level of your VCR and DVD. CHANNEL BUTTONS (TV, CBL, SAT, VCR) Changes the channel. Television CBL - Satellite Receiver DVD - POWER BUTTON (TV, CBL, VCR, DVD, SAT) Turns the selected device on the screen. DVD/VCR CONTROL BUTTONS (DVD...
Owners Guide
Page 12
...-Boxes or DVD players equipped with an HDMI output connection (see page 15 for future software upgrades. The volume level will notify you to enter the MENU, making it possible to set to OFF or the TV is unplugged, the clock will stop and may eventually reset itself. ቩ Upgrade Card This card slot is for reference). ብ INPUT/EXIT button Press this button to ON condition (lights red) for stand-by remote control...
...-Boxes or DVD players equipped with an HDMI output connection (see page 15 for future software upgrades. The volume level will notify you to enter the MENU, making it possible to set to OFF or the TV is unplugged, the clock will stop and may eventually reset itself. ቩ Upgrade Card This card slot is for reference). ብ INPUT/EXIT button Press this button to ON condition (lights red) for stand-by remote control...

Owners Guide
Page 13
... antenna (no video input when INPUT : 1, 2, 3, Front or HDMI : 1, 2, Front is ON ; Check the Power Light to make sure the TV is set to be turned OFF (lights orange) if there is no sync. When the main power switch is turned off or in Stand-by mode (lights red) when not in use Front Panel Controls ቪ POWER light indicator To turn ON/OFF the "MAIN POWER" of the TV. 13 Lights Red OFF. Your HITACHI Plasma TV will illuminate. A red stand-by ) Lights Blue Lights Orange Blinking Blue...
... antenna (no video input when INPUT : 1, 2, 3, Front or HDMI : 1, 2, Front is ON ; Check the Power Light to make sure the TV is set to be turned OFF (lights orange) if there is no sync. When the main power switch is turned off or in Stand-by mode (lights red) when not in use Front Panel Controls ቪ POWER light indicator To turn ON/OFF the "MAIN POWER" of the TV. 13 Lights Red OFF. Your HITACHI Plasma TV will illuminate. A red stand-by ) Lights Blue Lights Orange Blinking Blue...

Owners Guide
Page 14
..., laserdisc players, DVD players etc. (if you have monitor output. ብ Optical Out (Digital Audio) This jack provides Digital Audio Output for use VIDEO or S-VIDEO inputs to connect to INPUT 1 , but only one of the remote control, you can be necessary to adjust TINT to the TV's PR input. 3. Component signal to connect external devices, such as an audio amplifier. It may use with S-VIDEO output capability. INPUT 2 , and 3 (Y/VIDEO) can select each video ቩ ቤ source. Rear Panel Connections ቢ Antenna Input To switch between Cable and Air input...
..., laserdisc players, DVD players etc. (if you have monitor output. ብ Optical Out (Digital Audio) This jack provides Digital Audio Output for use VIDEO or S-VIDEO inputs to connect to INPUT 1 , but only one of the remote control, you can be necessary to adjust TINT to the TV's PR input. 3. Component signal to connect external devices, such as an audio amplifier. It may use with S-VIDEO output capability. INPUT 2 , and 3 (Y/VIDEO) can select each video ቩ ቤ source. Rear Panel Connections ቢ Antenna Input To switch between Cable and Air input...

Owners Guide
Page 16
... time use to connect the VCR, camcorder, laserdisc player, DVD player, or HDTV Set Top Box to the own device specifications. Video Camera NOTE:1. If you to one of video and audio inputs and outputs. The following connection diagrams are provided as shown in the following examples: FRONT INPUT PANEL UPGRADE CARD (SERVICE USE ONLY) - Before Operating External Video Source Connect an external source to easily connect a camcorder , DVD, Video Game and a VCR as a convenience to allow you do not, the played back picture may need...
... time use to connect the VCR, camcorder, laserdisc player, DVD player, or HDTV Set Top Box to the own device specifications. Video Camera NOTE:1. If you to one of video and audio inputs and outputs. The following connection diagrams are provided as shown in the following examples: FRONT INPUT PANEL UPGRADE CARD (SERVICE USE ONLY) - Before Operating External Video Source Connect an external source to easily connect a camcorder , DVD, Video Game and a VCR as a convenience to allow you do not, the played back picture may need...

Owners Guide
Page 20
... DVI CAPABILITY TO HDMI 1, HDMI 2 OR HDMI FRONT 1. With DVI output, connect the cable from the output of the HDTV set -up of video contents. 3. Completely insert the connection cord plugs when connecting to the HDMI input as shown on the Rear panel below . 3. Connect the HDMI or DVI to HDMI connection cable from the AUDIO OUT L of the HDTV set top box or DVD player to prevent illegal copying of device user settings determines final video appearance. 5. The picture and sound that encrypts video signals when using a DVI to view the program...
... DVI CAPABILITY TO HDMI 1, HDMI 2 OR HDMI FRONT 1. With DVI output, connect the cable from the output of the HDTV set -up of video contents. 3. Completely insert the connection cord plugs when connecting to the HDMI input as shown on the Rear panel below . 3. Connect the HDMI or DVI to HDMI connection cable from the AUDIO OUT L of the HDTV set top box or DVD player to prevent illegal copying of device user settings determines final video appearance. 5. The picture and sound that encrypts video signals when using a DVI to view the program...

Owners Guide
Page 21
Connect the cable from the Laserdisc/DVD player or HDTV set top box to view the program from the AUDIO OUT R of the Laserdisc/DVD player or HDTV set top box to the INPUT (Y) jack, as shown on REAR PANEL CONNECTIONS. 5. Completely insert the connection cord plugs when connecting to the last channel tuned. Press the INPUTS button, then select INPUT 2 or 3 from the INPUTS menu to the INPUT (AUDIO/R) jack. Connect the cable from the Y OUT of the Laserdisc/DVD player or HDTV set top box. 7. Select CABLE or...
Connect the cable from the Laserdisc/DVD player or HDTV set top box to view the program from the AUDIO OUT R of the Laserdisc/DVD player or HDTV set top box to the INPUT (Y) jack, as shown on REAR PANEL CONNECTIONS. 5. Completely insert the connection cord plugs when connecting to the last channel tuned. Press the INPUTS button, then select INPUT 2 or 3 from the INPUTS menu to the INPUT (AUDIO/R) jack. Connect the cable from the Y OUT of the Laserdisc/DVD player or HDTV set top box. 7. Select CABLE or...
Owners Guide
Page 26
...3:17PM Main Picture Source and channel indication Broadcast channel identification Clock Audio Broadcast Broadcast Rating Picture Format Auto STEREO 10:00 AM Closed Audio Source Caption setting Selection Event timer DIGITAL CHANNELS Digital Closed Caption This icon will start the On-Screen Display. º GUIDE button [Cable Box (CBL), Satellite Receiver (SAT)/ Set-Top-Box (STB) mode only] The use of this button is only applicable when the remote control is in TV mode, press this button to choose HDMI 2 INPUT. Digital channel Program Information Program Run Time INFO Show Name...
...3:17PM Main Picture Source and channel indication Broadcast channel identification Clock Audio Broadcast Broadcast Rating Picture Format Auto STEREO 10:00 AM Closed Audio Source Caption setting Selection Event timer DIGITAL CHANNELS Digital Closed Caption This icon will start the On-Screen Display. º GUIDE button [Cable Box (CBL), Satellite Receiver (SAT)/ Set-Top-Box (STB) mode only] The use of this button is only applicable when the remote control is in TV mode, press this button to choose HDMI 2 INPUT. Digital channel Program Information Program Run Time INFO Show Name...

Owners Guide
Page 27
...) channel mode. Cable 6 The Remote Control MUTE Volume 8 FAV CH FAV Cable 6 MUTE Soft Mute 8 FAV CH Cable 6 Mute 8 Closed Captioning will know you are used to WHITE. Press the FAV CH button to switch to AUTO (see page 53). You can add any channel to your regular tuned channels. However, if it is set when the TV is turned on . Use the CHANNEL SELECTOR buttons to enter one, two, or three numbers to...
...) channel mode. Cable 6 The Remote Control MUTE Volume 8 FAV CH FAV Cable 6 MUTE Soft Mute 8 FAV CH Cable 6 Mute 8 Closed Captioning will know you are used to WHITE. Press the FAV CH button to switch to AUTO (see page 53). You can add any channel to your regular tuned channels. However, if it is set when the TV is turned on . Use the CHANNEL SELECTOR buttons to enter one, two, or three numbers to...
Owners Guide
Page 29
... two digit preset code is entered. This remote is programmed for operating the TV. The remote will now control your set - ³ top-box/satellite systems (refer below . The remote will turn off your set -top-box/satellite receiver » and press the POWER button. If your set-top-box/satellite receiver cannot be operated after performing the above . ³ SAT (Set-Top-Box/Satellite) button This button allows the remote to SET-TOPBOX/SATELLITE mode...
... two digit preset code is entered. This remote is programmed for operating the TV. The remote will now control your set - ³ top-box/satellite systems (refer below . The remote will turn off your set -top-box/satellite receiver » and press the POWER button. If your set-top-box/satellite receiver cannot be operated after performing the above . ³ SAT (Set-Top-Box/Satellite) button This button allows the remote to SET-TOPBOX/SATELLITE mode...

Owners Guide
Page 33
...panel. The Signal Meter feature of the NOTE: 1. Set Sleep Timer intervals (30 min. Set viewing reservation for Digital channels. 33 Adjust volume in light scenes. Label Video Inputs, VCR, DVD, etc. Select between stations. DRC Select Dynamic Range Compression to black when watching 4:3 based on a parental guide ratings. Signal Meter Auto Channel Scan Channel List Access Signal Meter. Enhance picture brightness in fixed setting between three Audio Setup programs. Internal Speakers Auto Noise Cancel Perfect Volume Sources. Change Access Code Change Lock...
...panel. The Signal Meter feature of the NOTE: 1. Set Sleep Timer intervals (30 min. Set viewing reservation for Digital channels. 33 Adjust volume in light scenes. Label Video Inputs, VCR, DVD, etc. Select between stations. DRC Select Dynamic Range Compression to black when watching 4:3 based on a parental guide ratings. Signal Meter Auto Channel Scan Channel List Access Signal Meter. Enhance picture brightness in fixed setting between three Audio Setup programs. Internal Speakers Auto Noise Cancel Perfect Volume Sources. Change Access Code Change Lock...

Owners Guide
Page 35
... reduces mosquito noise in the picture without degrading picture quality. Set to DYNAMIC for darker images more natural color, set to Standard for this special feature to improve video performance when watching film based sources. Auto Movie Mode The AUTO MOVIE MODE function turn off , low, middle and high. Black Side Panel Next/Prev On/Off Off SEL Return On-Screen Display Black Side Panel On Next/Prev On/Off...
... reduces mosquito noise in the picture without degrading picture quality. Set to DYNAMIC for darker images more natural color, set to Standard for this special feature to improve video performance when watching film based sources. Auto Movie Mode The AUTO MOVIE MODE function turn off , low, middle and high. Black Side Panel Next/Prev On/Off Off SEL Return On-Screen Display Black Side Panel On Next/Prev On/Off...
Owners Guide
Page 40
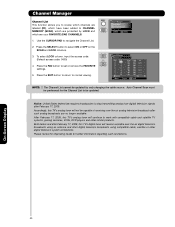
... to work with compatible cable and satellite TV systems, gaming consoles, VCRs, DVD players and other digital television system connections. To select LOCK column, input the access code. (Default access code: 0000) OR 4. Press the EXIT button to return to select ON or OFF on the SCAN and LOCK columns. 3. After February 17, 2009, this TV's analog tuner will receive available over -the-air analog television broadcasts after February 17, 2009. On-Screen Display...
... to work with compatible cable and satellite TV systems, gaming consoles, VCRs, DVD players and other digital television system connections. To select LOCK column, input the access code. (Default access code: 0000) OR 4. Press the EXIT button to return to select ON or OFF on the SCAN and LOCK columns. 3. After February 17, 2009, this TV's analog tuner will receive available over -the-air analog television broadcasts after February 17, 2009. On-Screen Display...
Owners Guide
Page 59
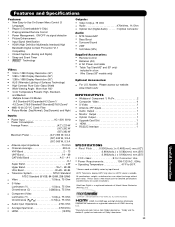
...; Surround Sound • 20W • Soft Mute (50%) Supplied Accessories: • Remote Control • Batteries (AA) • 6' AC Power cord cable • Table Top Stand(42" and 50" only) included in a box • Wire Clamp (50" models only) Optional Accessories: • For U.S. Features and Specifications Features: • New Easy-to 95°F. 1 Screen mode availability varies by input format HDTV Televisions display HDTV only when an HDTV source is a registered trademark of Hitachi Home...
...; Surround Sound • 20W • Soft Mute (50%) Supplied Accessories: • Remote Control • Batteries (AA) • 6' AC Power cord cable • Table Top Stand(42" and 50" only) included in a box • Wire Clamp (50" models only) Optional Accessories: • For U.S. Features and Specifications Features: • New Easy-to 95°F. 1 Screen mode availability varies by input format HDTV Televisions display HDTV only when an HDTV source is a registered trademark of Hitachi Home...

Owners Guide
Page 129
... NOT USE ANY HITACHI-PROVIDED FLASH CARD OR OTHER MEDIA, (B) DO NOT PERFORM INSTALL ANY HITACHI-PROVIDED UPGRADE SOFTWARE ON YOUR DTV, AND (C) PROMPTLY RETURN SUCH FLASH CARD OR OTHER MEDIA TO HITACHI. 5. You agree that is '' condition and any express or implied warranties, including but not limited to, the implied warranties of the Software shall belong to the applicable content owners and may require...
... NOT USE ANY HITACHI-PROVIDED FLASH CARD OR OTHER MEDIA, (B) DO NOT PERFORM INSTALL ANY HITACHI-PROVIDED UPGRADE SOFTWARE ON YOUR DTV, AND (C) PROMPTLY RETURN SUCH FLASH CARD OR OTHER MEDIA TO HITACHI. 5. You agree that is '' condition and any express or implied warranties, including but not limited to, the implied warranties of the Software shall belong to the applicable content owners and may require...
Owners Guide
Page 140
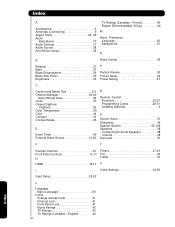
... 37 Black Enhancement 35 Black Side Panel 35 Brightness 34 P Perfect Volume 38 Picture Mode 34 Power Saving 51 C Caution and Safety Tips 2-3 Channel Manager 39-40 Auto Channel Scan 39 Clock 47 Closed Captions Captions 53 Color Temperature 35 Color 34 Contrast 34 Contrast Mode 35 E Event Timer 49 External Video Source 14-22 R Remote Control Functions 23-27 Programming Codes 28-31 Installing Batteries 4 S Screen Saver 51 Sharpness 34 Spanish Section 65-128 Speakers 38 Connecting External Speakers 38...
... 37 Black Enhancement 35 Black Side Panel 35 Brightness 34 P Perfect Volume 38 Picture Mode 34 Power Saving 51 C Caution and Safety Tips 2-3 Channel Manager 39-40 Auto Channel Scan 39 Clock 47 Closed Captions Captions 53 Color Temperature 35 Color 34 Contrast 34 Contrast Mode 35 E Event Timer 49 External Video Source 14-22 R Remote Control Functions 23-27 Programming Codes 28-31 Installing Batteries 4 S Screen Saver 51 Sharpness 34 Spanish Section 65-128 Speakers 38 Connecting External Speakers 38...


